
Check Best Thermostat Pricing in Amazon
** As an Amazon Associate, I earn from qualifying purchases.
Is your electric water heater not warming up the way it used to? You might be dealing with a faulty thermostat.
Knowing how to check your water heater thermostat can save you time, money, and the hassle of calling a professional. This simple skill puts you in control, helping you spot problems early and keep your hot water flowing smoothly. Keep reading, and you’ll learn easy steps to test your thermostat safely and effectively—no special tools or experience needed.
Your comfort depends on it!
Tools Needed
Checking an electric water heater thermostat requires some basic tools. These tools help you test the thermostat safely and accurately. Having the right equipment makes the job easier and faster.
Below are the key tools you need to check the thermostat.
Multimeter
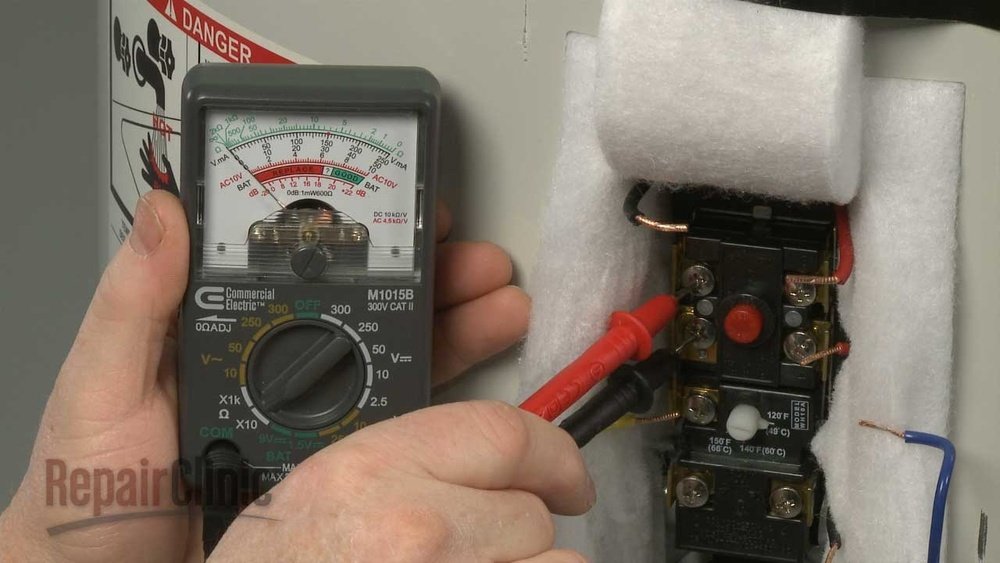
A multimeter measures electrical voltage, current, and resistance. It shows if the thermostat works properly. Set it to the ohms setting to check continuity. This tool helps find any faults in the thermostat.
Screwdriver
You need a screwdriver to open the water heater panel. It allows access to the thermostat and heating elements. A flathead or Phillips screwdriver usually works. Choose one that fits the screws well to avoid damage.
Insulated Gloves
Insulated gloves protect your hands from electric shock. They keep you safe while handling electrical parts. Always wear gloves before touching the thermostat or wires. Safety should be your top priority.

Credit: www.youtube.com
Safety Precautions
Checking an electric water heater thermostat requires care. Safety is the top priority. Electric parts can cause serious injury. Following safety steps lowers risks and keeps you safe.
Power Shutdown
Always turn off the power before starting. Find the circuit breaker for the water heater. Switch it off to cut electricity. Test the water heater to confirm no power flows. This step prevents shocks and accidents.
Avoiding Electrical Shock
Wear insulated gloves to protect your hands. Use tools with insulated handles only. Keep your hands dry at all times. Never touch wires or terminals without protection. Stay alert to avoid contact with live parts.
Proper Work Area Setup
Clear the area around the water heater. Remove any water or wet items nearby. Make sure the floor is dry and stable. Use a bright light for good visibility. Keep tools and parts organized and within reach.
Locating The Thermostat
Finding the thermostat on an electric water heater is the first step to checking it. The thermostat controls the water temperature. Knowing its exact location helps in troubleshooting any heating problems. This guide shows how to find the thermostat safely and easily.
Access Panel Removal
Start by turning off the power supply to the water heater. Safety first. Locate the access panels on the side of the heater. Most units have two panels, one on top of the other. Use a screwdriver to remove the screws. Gently pull the panel away. Be careful not to damage the insulation behind it. Set the panel and screws aside for reinstallation later.
Thermostat Position In Heater
The thermostat sits behind the access panel. Usually, it is near the heating elements. Most water heaters have two thermostats—one at the top and one at the bottom. Each controls its heating element. The thermostat looks like a small metal box with wires attached. You can now see it clearly for testing or adjustment.
Testing Thermostat Continuity
Testing the thermostat continuity is a key step to find out if the thermostat works well. This test shows if electricity flows through the thermostat properly. A multimeter helps check this flow. This method saves time and money by avoiding unnecessary replacements.
Follow simple steps to set the multimeter, check the terminals, and understand the results. These steps ensure accurate testing of your electric water heater thermostat.
Setting Multimeter
Turn off power to the water heater before testing. Set the multimeter to the lowest ohms setting. This setting measures resistance and shows continuity. If unsure, look for the symbol that looks like a sound wave or diode. Prepare the multimeter probes for the test.
Checking Terminals
Remove the thermostat cover carefully. Locate the thermostat terminals, usually marked as T1 and T2. Place one probe on each terminal. Hold the probes steady to get a clear reading. Avoid touching both probes together during the test.
Interpreting Results
A continuous circuit shows a low resistance number or near zero. This means the thermostat is good. If the multimeter shows no change or “OL,” the circuit is open. An open circuit means the thermostat is faulty and needs replacement. Use these results to decide the next steps.
Check Best Thermostat Pricing in Amazon
** As an Amazon Associate, I earn from qualifying purchases.
Adjusting Thermostat Temperature
Adjusting the thermostat temperature on an electric water heater is simple. It helps control how hot the water gets. Setting it right saves energy and avoids scalding. This section shows you where the dial is, the best settings to use, and how to adjust it safely.
Temperature Dial Location
The temperature dial is usually behind a small panel on the water heater. You may need a screwdriver to open this panel. Sometimes, the dial is under an insulation cover. Look near the middle of the water heater tank. The dial often has numbers or temperature marks.
Recommended Settings
The safe and energy-saving temperature is 120 degrees Fahrenheit. This temperature is hot enough for daily use. It also reduces the risk of burns. Setting it higher wastes energy and can cause scalds. Lower settings may not kill germs in the water.
Adjusting Steps
First, turn off the power to the water heater at the circuit breaker. Open the panel to see the thermostat dial. Use a flathead screwdriver to turn the dial. Turn it clockwise to increase temperature or counterclockwise to decrease. Close the panel and turn the power back on. Wait a few hours, then check the water temperature to confirm.
Common Thermostat Issues
Electric water heater thermostats can face several common problems. These issues affect water temperature and safety. Knowing these problems helps you check and fix your heater quickly. Below are the most frequent thermostat issues you may find.
No Heat
No heat means the water stays cold or lukewarm. The thermostat might be broken or stuck. Sometimes, wiring problems cause no power to reach the heating element. Testing the thermostat with a multimeter can show if it works. A faulty thermostat needs replacement to restore heat.
Overheating
Overheating happens when water gets too hot. A thermostat stuck in the “on” position causes this. It fails to shut off the power to the heating element. Overheated water can damage pipes and cause burns. Checking the thermostat setting and function can prevent this risk.
Tripping Breaker
The circuit breaker trips if the thermostat or heating element shorts. Electrical faults create a surge, cutting power to avoid danger. Loose wires or corrosion can cause these shorts. Inspecting the thermostat and wiring is important. Repair or replace any damaged parts to stop breaker trips.
When To Replace The Thermostat
Knowing when to replace your electric water heater thermostat is important. The thermostat controls water temperature. A faulty one can cause water to be too hot or cold. It can also increase your electric bill. Replacing it at the right time saves money and prevents damage.
Signs Of Failure
Water temperature changes suddenly or feels inconsistent. The water never gets hot enough or becomes scalding hot. The heater runs constantly without shutting off. You hear strange noises from the water heater. These signs often point to a bad thermostat.
Cost Considerations
Thermostat replacement costs depend on model and labor charges. Parts usually cost between $20 and $60. Hiring a professional may add $100 to $200. Replacing early can avoid bigger repair bills. Compare costs before deciding on replacement.
Professional Help
Working with electricity can be risky. A licensed technician ensures safety and proper installation. Professionals can also test the thermostat accurately. They offer warranties on their work. Choosing expert help reduces mistakes and future problems.

Credit: www.reddit.com

Credit: johnowensservices.com
Frequently Asked Questions
How Do I Test My Electric Water Heater Thermostat?
To test the thermostat, turn off power and remove access panel. Use a multimeter to check for continuity. No continuity means a faulty thermostat that needs replacement.
What Tools Are Needed To Check The Thermostat?
You need a screwdriver, multimeter, and voltage tester. These tools help safely access and test the thermostat’s electrical function.
Can A Faulty Thermostat Cause No Hot Water?
Yes, a broken thermostat can prevent heating. It disrupts power flow to the heating elements, resulting in cold water.
How Often Should I Check The Water Heater Thermostat?
Check your thermostat annually to ensure proper function. Regular checks prevent unexpected failures and improve energy efficiency.
Conclusion
Checking your electric water heater thermostat helps keep your hot water steady. A simple test can show if it works right or needs fixing. Always turn off power before starting to stay safe. Regular checks can save money and avoid cold showers.
Understanding your thermostat is easier than it seems. Take time to learn these steps and keep your heater running well. Small efforts prevent big problems later. You can handle this task with care and patience.
Check Best Thermostat Pricing in Amazon
** As an Amazon Associate, I earn from qualifying purchases.