
Check Best Thermostat Pricing in Amazon
** As an Amazon Associate, I earn from qualifying purchases.
Wiring a thermostat to your furnace might sound tricky, but it doesn’t have to be. If you want to control your home’s heat more efficiently, understanding how to connect your thermostat to a heat-only furnace is key.
In this guide, you’ll discover simple, step-by-step instructions that anyone can follow. By the end, you’ll have the confidence to set up your thermostat correctly and enjoy a warmer, more comfortable home without spending extra on professional help. Ready to take control of your heating system?
Let’s get started!

Credit: www.youtube.com
Tools And Materials Needed
Before wiring a thermostat to a furnace that only provides heat, gather the right tools and materials. This step helps make the job easier and safer. Having everything ready prevents delays and mistakes.
Use tools that are in good condition. Check each item for damage or wear. Using the right materials ensures a proper connection and long-lasting results.
Basic Tools
- Phillips and flathead screwdrivers
- Wire strippers
- Needle-nose pliers
- Voltage tester or multimeter
- Drill with drill bits (if mounting is needed)
Materials Required
- Heat-only thermostat compatible with your furnace
- Thermostat wire (usually 18/2 gauge)
- Wire connectors or electrical tape
- Mounting screws and anchors
Safety Equipment
- Insulated gloves
- Safety glasses
- Flashlight or headlamp
Safety Precautions
Turn off power before starting any wiring work to avoid electric shock. Use a voltage tester to ensure wires are not live. Always follow the furnace and thermostat manuals for safe connections.
Turn Off The Power
Start by switching off the power to the furnace at the circuit breaker. This step prevents electric shocks. Never work on wiring while power is on. Use a voltage tester to confirm no power flows.
Use Proper Tools
Choose insulated tools to avoid electrical hazards. Screwdrivers, wire strippers, and pliers must be in good condition. Proper tools make wiring safer and easier.
Follow Manufacturer Instructions
Read the thermostat and furnace manuals carefully. Each model may have unique wiring requirements. Following instructions avoids mistakes and damage.
Wear Safety Gear
Wear gloves to protect your hands from sharp wires. Safety glasses shield your eyes from debris. Dress in non-conductive clothing to reduce shock risk.
Check Wiring Labels
Identify and label each wire before disconnecting. Correct labeling prevents confusion during installation. Match wires to thermostat terminals precisely.
Identify Furnace And Thermostat Wires
Before wiring a thermostat to a furnace, identifying the wires is key. Each wire has a specific role in the heating system. Knowing which wire does what helps avoid mistakes and keeps the system safe.
Thermostat wires are usually color-coded. Furnace wires connect to different parts inside the furnace. Understanding these wires ensures a smooth and correct connection.
Check The Thermostat Wire Colors
Thermostat wires often come in a bundle with several colors. The most common colors include red, white, green, and yellow. For a heat-only furnace, focus on red and white wires. Red usually carries power. White controls the heating system.
Other wires like green or yellow may not be used for heat-only setups. Note which wires are connected to the thermostat terminals before disconnecting anything.
Locate Furnace Terminal Block
Open the furnace panel carefully to find the terminal block. This block holds the wires coming from the thermostat. Terminals are marked with letters like R, W, and C. For heat-only systems, R and W are the main terminals.
The R terminal connects to the power wire. The W terminal connects to the heating control wire. Identifying these helps match wires from the thermostat to the furnace correctly.
Use A Multimeter For Wire Testing
A multimeter helps test wires if colors are unclear. Set it to measure voltage. Test between the R and W terminals. A reading around 24 volts means you found the power and heating wires.
Testing wires confirms their function. It reduces errors during wiring. Always turn off the power before handling wires to stay safe.
Turn Off Power To The Furnace
Turning off power to the furnace is the first and most important step. It keeps you safe from electric shock. It also protects the furnace from damage during wiring.
Never skip this step. Even if the furnace looks off, it can still have live wires. Safety must come first in any electrical work.
Locate The Furnace Power Switch
Find the power switch near the furnace. It often looks like a regular light switch. Sometimes, it is a red or black switch on the furnace cabinet.
Check the area around the furnace carefully. The switch might be on the wall or attached to the furnace itself.
Turn Off The Circuit Breaker
Go to the main electrical panel. Look for the breaker labeled “Furnace” or “Heating.”
Flip the breaker to the OFF position. This cuts power to the furnace completely.
Use a tester to confirm the power is off before starting work.
Verify Power Is Off Safely
Use a voltage tester or multimeter on furnace wires. It confirms no electricity is flowing.
Test more than one wire. Always double-check safety before touching wires.
No sparks, no shocks. Only start wiring after full power off is confirmed.
Remove Old Thermostat
Removing the old thermostat is the first step in wiring a new thermostat to a furnace heat only system. It helps to ensure a safe and clean start. Take your time and work carefully to avoid damage or confusion later.
Turn off the power to the furnace. This prevents electric shock and protects the system.
Locate the furnace’s power switch or circuit breaker. Switch it off to cut the electricity supply. Double-check that the furnace is off by testing the thermostat display or system lights.
Check Best Thermostat Pricing in Amazon
** As an Amazon Associate, I earn from qualifying purchases.
Remove Thermostat Cover
Gently pull or unscrew the thermostat cover. This exposes the wiring and mounting plate behind it. Keep the cover safe for later use or reference.
Label The Wires
Look at the wires connected to the thermostat. Use small pieces of tape or labels to mark each wire’s terminal letter. This helps connect the wires correctly to the new thermostat.
Disconnect The Wires
Loosen the screws or clips holding the wires. Carefully remove each wire from the terminals. Avoid letting the wires slip back into the wall.
Unscrew The Mounting Plate
Remove the screws holding the thermostat base to the wall. Take off the mounting plate and keep it aside. The wires should now be free and ready for the next step.
Connect Thermostat Wires
Connecting thermostat wires to your furnace is a key step in setting up your heating system. It controls when your furnace turns on and off. Proper wiring ensures your home stays warm and energy-efficient. Follow clear steps to connect wires correctly without confusion.
Focus on the main wires: R and W. These wires send signals between your thermostat and furnace. Knowing their location and how to attach them is essential for a heat-only system. Let’s break down the process into simple parts.
Locate The R And W Terminals
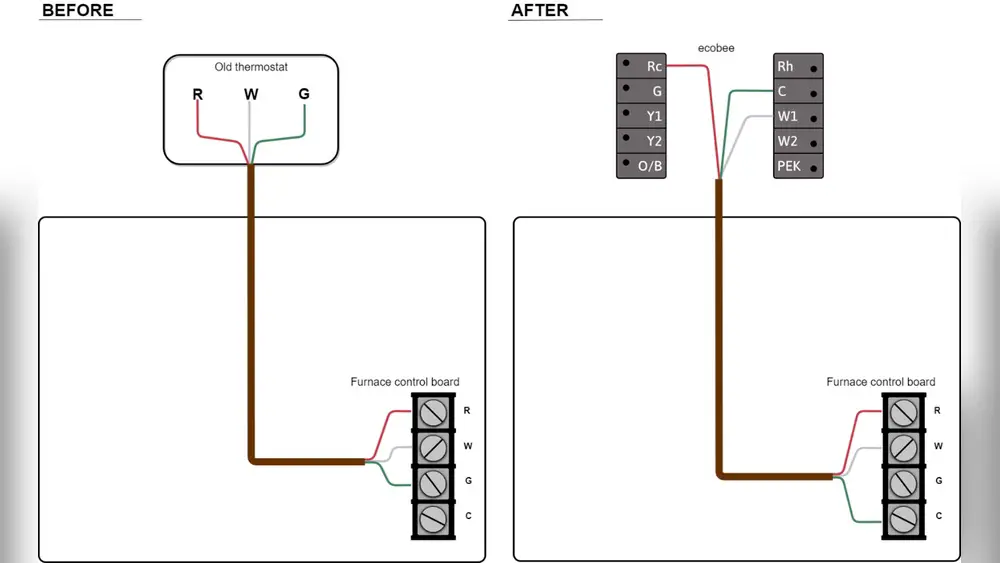
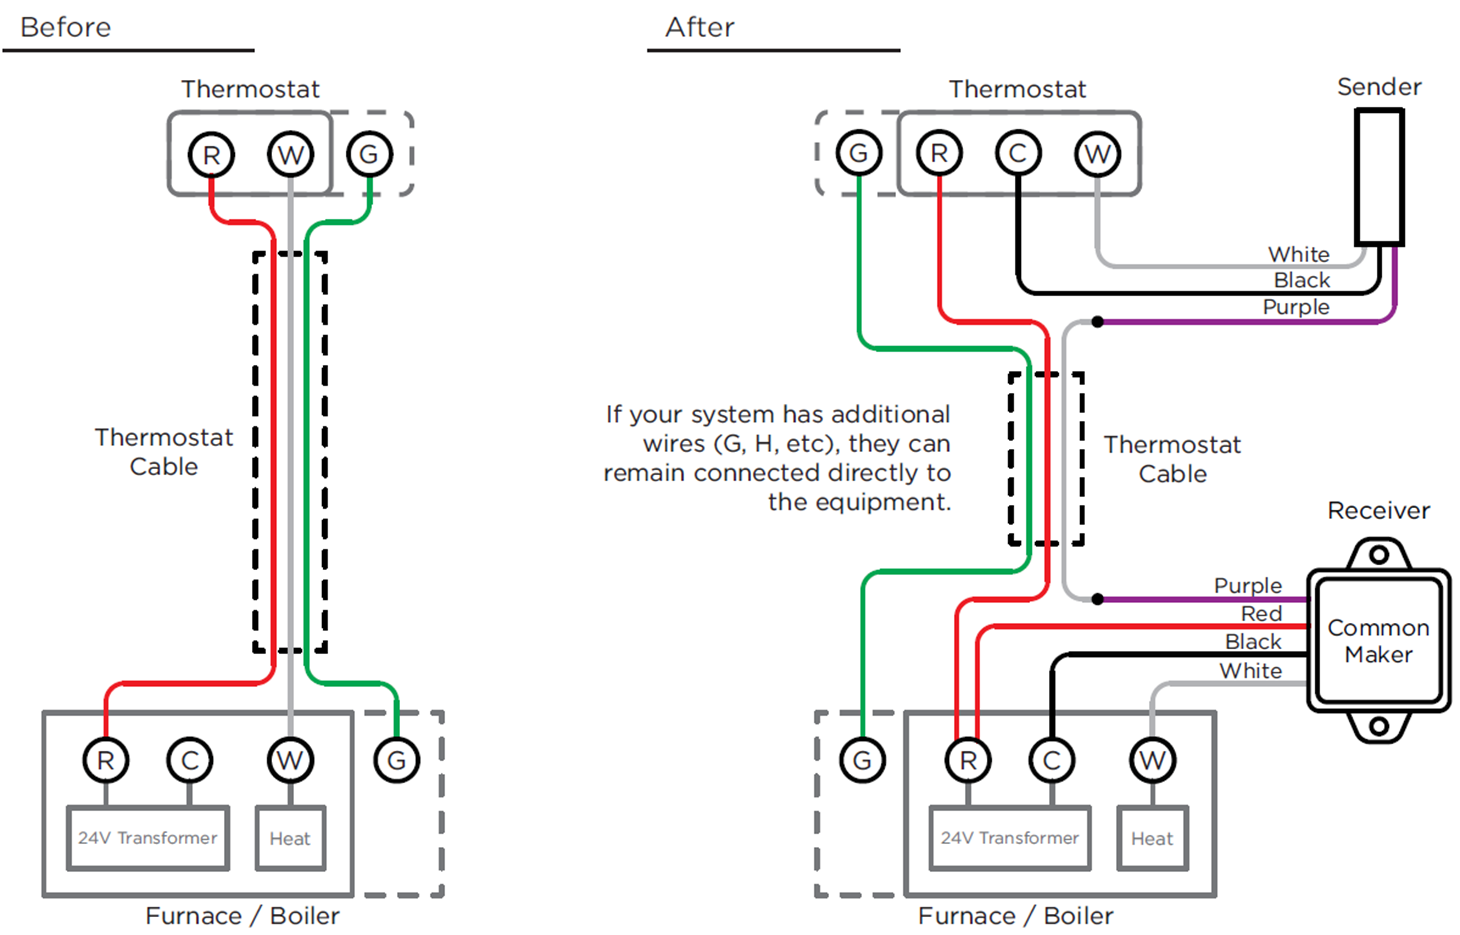
First, find the R and W terminals on your thermostat base. The R terminal usually powers the thermostat. The W terminal controls the furnace heat. Check your furnace control board for matching R and W terminals. Identifying these points helps avoid wiring mistakes.
Attach The R Wire
Next, connect the R wire to the R terminal. This wire usually has a red color. Strip a small section of the wire’s insulation. Insert the wire into the R terminal and tighten the screw firmly. A secure connection prevents power loss to the thermostat.
Attach The W Wire
Finally, connect the W wire to the W terminal. This wire often has a white color. Strip a bit of insulation from the wire end. Insert it into the W terminal and tighten the screw. This wire signals your furnace to start heating. Double-check both connections for tightness.
Mount The New Thermostat
Mounting the new thermostat is an important step in wiring your furnace heat-only system. Proper placement ensures accurate temperature reading and easy access. A well-mounted thermostat helps your heating system work efficiently and keeps your home comfortable.
Choose a spot on an interior wall, away from direct sunlight, drafts, or heat sources. Avoid walls with heavy furniture or curtains that block airflow. The thermostat should be at eye level, about 5 feet above the floor.
Prepare The Wall For Mounting
Start by removing the old thermostat from the wall. Unscrew the mounting plate carefully. Check the wall for any damage or holes. Patch and smooth the wall surface if needed to ensure a clean installation.
Attach The Mounting Plate
Hold the new thermostat’s mounting plate against the wall. Use a level to keep it straight. Mark the screw holes with a pencil. Drill small pilot holes if needed. Screw the plate securely to the wall.
Connect The Thermostat Wires
Pull the furnace wires through the mounting plate opening. Match each wire to the correct terminal on the thermostat. Typically, the red wire connects to the R terminal. The white wire connects to the W terminal. Tighten the screws to hold the wires firmly.
Install The Thermostat Body
Once the wires are connected, snap the thermostat body onto the mounting plate. Press gently until it clicks in place. Check that the thermostat sits flush against the wall. Ensure no wires are pinched or loose.

Credit: www.jujaipur.ac.in
Restore Power And Test
After wiring your thermostat to a furnace for heat only, it is time to restore power and test the system. This step is crucial to ensure everything works correctly and safely. Follow these simple instructions to bring your heating system back online and confirm the thermostat controls the furnace properly.
Turn Power Back On
Locate the circuit breaker or switch that powers your furnace. Flip it back to the ON position. This action restores electricity to your heating system. Wait a few seconds to allow the furnace to prepare for operation.
Set Thermostat To Heat Mode
On your thermostat, select the HEAT mode. Adjust the temperature setting higher than the current room temperature. This triggers the furnace to start heating your home. Ensure the thermostat is properly connected and responsive to your commands.
Check Furnace Operation
Listen for the furnace to turn on. Feel the warm air coming from vents or registers. Check the thermostat display for any error messages. Confirm the system runs smoothly without unusual noises. This test confirms your wiring is correct and the furnace heats as expected.
Troubleshooting Common Issues
Troubleshooting common problems with your thermostat and furnace saves time and money. Knowing what to check helps fix issues quickly. This section covers frequent problems and simple fixes. Follow these tips to keep your heating system working well.
No Heat From Furnace
Check the thermostat settings first. Make sure it is set to “Heat” mode. Verify the temperature is higher than the room temperature. Next, inspect the furnace power switch. It should be turned on. Look at the circuit breaker to see if it tripped. Reset it if needed. Also, check the furnace filter. A dirty filter can block airflow and stop heat. Replace it if dirty. Finally, listen for the furnace blower. If it does not run, the problem might be inside the furnace itself.
Thermostat Not Responding
Start by checking the thermostat batteries. Weak or dead batteries cause no response. Replace batteries with fresh ones. Ensure thermostat wires are properly connected. Loose wires stop signals from reaching the furnace. Turn off power before inspecting wires. Look for any signs of damage or corrosion. Clean the contacts if dirty. Test the thermostat by setting the temperature higher. If it still does not work, the thermostat might need replacement.
Furnace Running Continuously
Continuous running wastes energy and can damage parts. Check if the thermostat is set too high. Lower the temperature setting to a comfortable level. Inspect the thermostat placement. Avoid spots near heat sources or drafts. These cause false temperature readings. Clean or replace the furnace filter. A clogged filter forces the furnace to run longer. Finally, check the furnace limit switch. A faulty switch may prevent the furnace from turning off. Call a professional if you suspect this issue.
Credit: www.tunet.cult.cu
Frequently Asked Questions
How Do I Connect Thermostat Wires To A Heat-only Furnace?
Identify the R and W wires from the thermostat. Connect R to the furnace’s R terminal and W to the W terminal. Ensure power is off before wiring. This setup controls the furnace heat only, without cooling functions.
What Tools Are Needed To Wire A Thermostat To Furnace?
You need a screwdriver, wire stripper, and voltage tester. A small flashlight helps in dark furnace areas. These tools ensure safe, precise wire connections during thermostat installation.
Can I Use Any Thermostat For A Heat-only Furnace?
No, use a thermostat compatible with single-stage heating. Heat-only furnaces need simple thermostats without cooling or fan controls. Verify compatibility to avoid wiring errors and ensure proper heating function.
How To Troubleshoot Thermostat Wiring Issues With Furnace?
Check for loose or incorrect wire connections first. Use a voltage tester to verify power at terminals. Replace damaged wires or faulty thermostats if heating doesn’t activate after wiring.
Conclusion
Wiring a thermostat to a furnace for heat only is simple. Follow the steps carefully for safety and success. Double-check all connections before turning power back on. Your furnace will work smoothly with correct wiring. Enjoy a warm home without extra hassle.
Stay safe and take your time. This small project saves money and boosts comfort. Keep this guide handy for future reference.
Check Best Thermostat Pricing in Amazon
** As an Amazon Associate, I earn from qualifying purchases.