
Check Best Thermostat Pricing in Amazon
** As an Amazon Associate, I earn from qualifying purchases.
Are you ready to take control of your home’s comfort and save on energy bills? Installing a Honeywell Home thermostat is easier than you might think, and you don’t need to be a tech expert to do it.
In this guide, you’ll find simple, step-by-step instructions that will help you set up your thermostat quickly and correctly. By the end, you’ll enjoy precise temperature control right at your fingertips. Keep reading to discover how you can upgrade your home’s heating and cooling system with confidence.
- Tools And Materials Needed
- Preparing Your Thermostat
- Turning Off Power To Hvac System
- Removing The Old Thermostat
- Labeling And Disconnecting Wires
- Mounting The Honeywell Thermostat Base
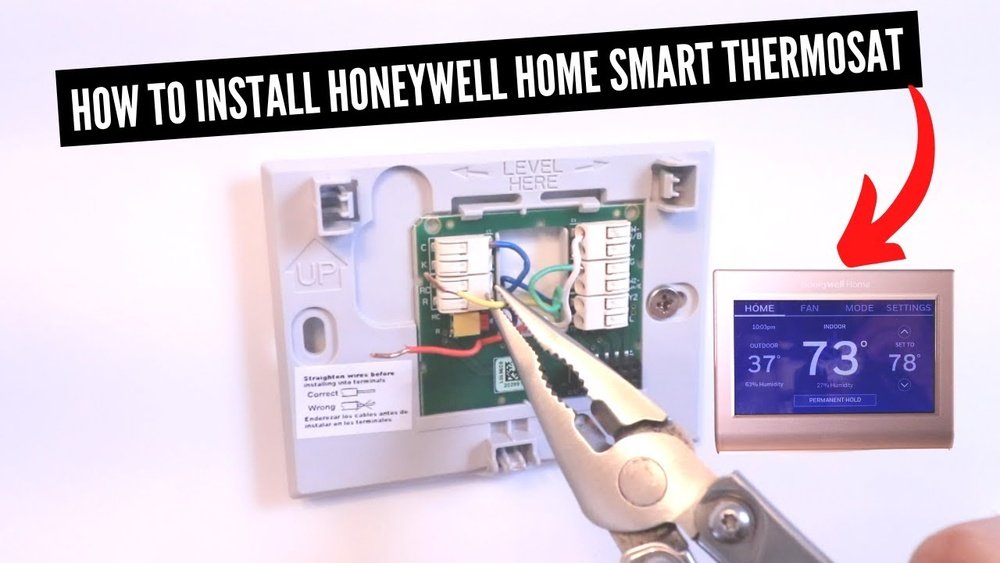
- Connecting The Wires
- Attaching The Thermostat Display
- Restoring Power And Initial Setup
- Configuring Settings For Your Home
- Troubleshooting Common Issues
- Tips For Optimal Thermostat Performance
- Frequently Asked Questions
- Conclusion
Tools And Materials Needed
Before installing a Honeywell Home Thermostat, gather all the necessary tools and materials. This preparation helps the installation process go smoothly and saves time. Having everything ready avoids interruptions and mistakes.
Basic Tools
You need a screwdriver, usually a Phillips head. A flathead screwdriver might also be helpful. A drill can be useful for mounting the thermostat on the wall. A level tool ensures the thermostat sits straight.
Materials Included With Thermostat
The Honeywell Home Thermostat package contains the device itself. It also includes mounting screws and wall anchors. Instruction manuals and wiring labels are part of the package too.
Additional Supplies
Having electrical tape is important for securing wire connections. Wire strippers help prepare the wires for connection. A small flashlight can assist in working with wires in dim spaces.
Safety Gear
Wear safety glasses to protect your eyes. Use gloves to avoid cuts or shocks. Turn off the power at the circuit breaker before starting any work.
Preparing Your Thermostat
Preparing your Honeywell Home thermostat is the first step to a smooth installation. Taking time to get ready ensures the process goes fast and without problems.
Gathering the right tools and understanding your current system helps avoid mistakes. This preparation also keeps your home safe during installation.
Check Your Existing Thermostat And Wiring
Turn off power to your heating and cooling system. Remove the old thermostat cover carefully. Take a clear photo of the wiring for reference. Label each wire with tape and a marker. Compare the wires to Honeywell’s guide to confirm compatibility.
Gather Necessary Tools And Materials
Prepare a screwdriver, drill, and level. Have wire strippers and electrical tape nearby. Keep your Honeywell thermostat and mounting screws ready. A smartphone can help with digital instructions and photos.
Read The Installation Guide Thoroughly
Open the Honeywell thermostat manual. Read each step slowly and carefully. Understand safety warnings and important notes. Follow the guide exactly to avoid damage or errors.
Turning Off Power To Hvac System
Turning off power to your HVAC system is a critical first step before installing a Honeywell Home thermostat. It ensures your safety and protects the equipment from damage. Without cutting the power, you risk electric shock or short circuits.
Take your time with this step. Confirm that the system is completely off before you begin any work. This simple action makes the installation process smoother and safer.
Locate The Hvac Circuit Breaker
Find the main electrical panel in your home. It is usually in the basement, garage, or utility room. Look for a breaker labeled “HVAC,” “Air Conditioner,” or “Furnace.”
Flip the breaker to the OFF position. This stops electricity from flowing to the system.
Verify Power Is Off
Check that the HVAC system is not running. Listen for any sounds or vibrations. The thermostat screen should go blank.
Use a voltage tester if you have one. Test the wires at the thermostat. No voltage means power is off.
Turn Off The System Switch
Some HVAC systems have a dedicated power switch near the indoor unit. It looks like a light switch. Turn it off to cut power.
Switching off this helps avoid accidental power flow during installation.

Credit: www.youtube.com
Removing The Old Thermostat
Removing the old thermostat is the first step in installing your new Honeywell Home thermostat. This step is important to prepare the wall and wiring for the new device. Careful removal helps avoid damage to wires and the wall. Follow these simple steps to remove the old thermostat safely and easily.
Turn Off The Power
Start by turning off the power to your heating and cooling system. Find the circuit breaker labeled for your HVAC system and switch it off. This prevents electric shock and protects your equipment during removal.
Remove The Thermostat Cover
Gently pull or unscrew the cover of the old thermostat. Most covers snap off or have small screws. Set the cover aside carefully to avoid losing any parts.
Label The Wires
Look at the wires connected to the thermostat base. Use small pieces of tape to label each wire by its terminal letter. This helps during installation of the new thermostat.
Disconnect The Wires
Loosen the screws holding the wires to the thermostat base. Carefully pull the wires free. Do not let the wires fall back into the wall.
Remove The Thermostat Base
Unscrew the base from the wall. Keep the screws for use with your new thermostat. Remove the base and clean the wall surface if needed.
Labeling And Disconnecting Wires
Labeling and disconnecting wires is a key step in installing a Honeywell Home Thermostat. It helps avoid confusion during installation. Proper labeling ensures you connect each wire correctly later. This step saves time and prevents errors that could affect your heating and cooling system.
Before disconnecting, take a close look at the wires. Each one controls a different function of the thermostat. Labeling them clearly makes the process smoother and safer. Always work with the power turned off to prevent shocks.
Identify Each Wire
Look at the wires connected to your old thermostat. Most wires have letters on them like R, W, Y, and G. These letters match the terminals on your new Honeywell thermostat. Use small pieces of tape or labels to mark each wire with its letter. Write clearly to avoid mistakes.
Take A Photo For Reference
Take a clear photo of the wires and their labels before disconnecting. This image acts as a backup guide. It helps if you forget which wire goes where. You can refer to the photo during installation to connect wires correctly.
Turn Off The Power
Switch off the power to your HVAC system at the breaker box. This step is important for safety. It stops electricity from flowing to the thermostat wires. Use a voltage tester to check that power is off before touching wires.
Disconnect The Wires Carefully
Loosen the screws holding the wires in place one by one. Pull each wire gently out of its terminal. Do not force or tug hard to avoid damage. Keep the labeled wires separated and organized for easy handling.

Credit: www.reddit.com
Mounting The Honeywell Thermostat Base
Mounting the Honeywell thermostat base is the first step to setting up your new device. It holds the thermostat securely and connects it to your home’s wiring. A proper mount ensures the thermostat works well and looks neat.
Take your time during this step. A good base installation makes the rest easier and keeps your system safe.
Choosing The Right Location For The Thermostat Base
Pick a spot on an interior wall. Avoid places near windows, doors, or vents. These areas can give false temperature readings. The base should be about 5 feet above the floor for best results.
Marking And Drilling Holes For The Mount
Hold the base against the wall. Use a pencil to mark screw holes clearly. Double-check the level with a small tool. Drill holes carefully to avoid damage. Use wall anchors if needed for stability.
Connecting The Wires To The Thermostat Base
Match each wire to its labeled terminal. Strip the wire ends if needed. Secure each wire under the correct screw. Tighten screws to prevent loose connections. Keep wires neat to avoid interference.
Securing The Thermostat Base To The Wall
Place the base over the drilled holes. Insert screws and tighten firmly but gently. Check if the base sits flush against the wall. Loose or tilted bases can cause issues later. Ensure all wires remain connected and tidy.
Connecting The Wires
Connecting the wires is a key step in installing your Honeywell Home Thermostat. It ensures the thermostat controls your heating and cooling systems properly. Take your time to follow each step carefully.
Check Best Thermostat Pricing in Amazon
** As an Amazon Associate, I earn from qualifying purchases.
Before starting, turn off the power to your HVAC system. This prevents any risk of electric shock or damage to your equipment.
Identify The Wires
Begin by looking at the wires coming from your wall. Most systems have color-coded wires. Match these colors to the labels on your Honeywell thermostat base. Common colors include red for power, white for heat, and green for the fan.
Remove Old Thermostat Wires
Carefully disconnect wires from your old thermostat. Do not let the wires fall back inside the wall. Use tape to label each wire with its letter. This makes connecting easier later.
Connect Wires To The New Thermostat
Attach each wire to the matching terminal on the Honeywell thermostat. Push the wire into the slot and tighten the screw. Make sure each wire is secure and no bare wire shows.
Double Check Your Connections
Review each wire connection. Loose or wrong wires cause the thermostat to fail. Confirm that wires match the letters on the thermostat base. Tighten any loose screws.
Restore Power And Test
Turn the power back on to your HVAC system. Use the thermostat controls to test heating and cooling. The system should respond to your settings without issues.
Attaching The Thermostat Display
Attaching the thermostat display is a key step in installing your Honeywell Home Thermostat. This part connects the control panel to the base, allowing you to manage your home’s temperature easily.
Handle the display gently to avoid damage. Align it carefully with the base unit for a secure fit.
Aligning The Display With The Base
Place the display close to the base. Make sure the connectors line up properly. Hold the display steady before attaching it.
Securing The Display
Press the display gently against the base. You should hear a soft click. This sound means the display is locked in place.
Checking The Connection
Turn on the thermostat to test the display. The screen should light up immediately. If it stays blank, detach and try again carefully.
Restoring Power And Initial Setup
Restoring power and completing the initial setup are key steps after installing your Honeywell Home Thermostat. These steps ensure the device works correctly and responds to your settings. Follow each step carefully to get your thermostat ready for use.
Restoring Power To The Thermostat
After connecting the wires, turn the power back on at the breaker. This action powers up your thermostat. Watch the screen light up, which means the device is receiving power. If the screen stays dark, check the wiring and power source again.
Starting The Initial Setup Process
The thermostat will guide you through the setup. Follow the on-screen prompts to select language and time. Set your home’s heating and cooling preferences. This step customizes the thermostat for your comfort.
Connecting To Wi-fi
Connecting your thermostat to Wi-Fi allows remote control. Choose your home network from the list shown. Enter the Wi-Fi password carefully. A strong connection helps your thermostat update automatically.
Configuring Temperature Settings
Set the desired temperature for heating and cooling modes. Use simple buttons to increase or decrease the temperature. Create a schedule to save energy and stay comfortable. The thermostat learns your routine over time.
Configuring Settings For Your Home
Configuring your Honeywell Home thermostat settings helps keep your home comfortable. Adjusting the settings properly saves energy and cuts costs. This section explains how to set your thermostat for daily use.
Setting The Temperature Schedule
Start by creating a daily temperature schedule. Choose different temperatures for morning, day, evening, and night. Set lower temperatures when you are away or asleep. This helps reduce energy use without losing comfort.
Adjusting Fan Settings
Control the fan to improve air circulation. Select “Auto” for the fan to run only when heating or cooling. Use “On” to run the fan continuously. Continuous fan use can spread air evenly but may use more power.
Using The Smart Features
Explore the smart options on your thermostat. Use geofencing to adjust temperature when you leave or return. Enable alerts to remind you about filter changes or maintenance. These features help keep your system efficient.
Setting Temperature Limits
Set minimum and maximum temperature limits for safety and comfort. This stops the thermostat from going too high or low. Limits protect your home and avoid wasting energy.
Troubleshooting Common Issues
Troubleshooting common issues with your Honeywell Home Thermostat helps keep your home comfortable. Small problems can stop the thermostat from working right. Fixing these quickly saves time and money. Below are common problems and easy steps to solve them.
Check The Thermostat Power Supply
First, make sure the thermostat has power. Check the batteries if it uses any. Replace old batteries with new ones. If the thermostat is wired, ensure the circuit breaker is not off. Power issues often cause the thermostat to stop working.
Reset The Thermostat
Resetting the thermostat can fix many errors. Find the reset button or option in settings. Press and hold it for a few seconds. This clears temporary glitches. After reset, set the time and temperature again.
Verify Thermostat Wiring
Incorrect wiring can cause problems. Turn off power before checking wires. Compare wires to the installation guide. Make sure each wire is in the right terminal. Loose or wrong wires can stop the system from running.
Calibrate The Temperature Sensor
Sometimes the thermostat shows wrong temperature. This happens if the sensor is off. Calibrate the sensor using instructions in the manual. Place the thermostat away from heat or cold sources. This helps the sensor read the correct room temperature.
Update Thermostat Software
Software bugs cause some issues. Check if there is an update for your model. Updating software can improve performance. Use the app or website to download updates. Keep your thermostat software current for best results.
Tips For Optimal Thermostat Performance
Proper use of your Honeywell Home Thermostat helps save energy and money. Small actions improve its performance and keep your home comfortable. These tips make sure your thermostat works well every day.
Place The Thermostat Correctly
Install the thermostat away from direct sunlight and drafts. Avoid placing it near windows, doors, or vents. This stops false temperature readings and keeps settings accurate.
Keep The Thermostat Clean
Dust and dirt can block sensors and buttons. Gently clean the thermostat with a soft cloth once a month. This helps it respond better to temperature changes.
Use The Scheduling Feature
Set your thermostat to match your daily routine. Lower the temperature when you sleep or leave home. This saves energy without losing comfort.
Check Batteries Regularly
Replace batteries every year or when the low battery alert appears. Fresh batteries ensure the thermostat runs smoothly and keeps your settings.
Update Thermostat Software
Check for firmware updates often. Updates improve performance and fix bugs. Connect your thermostat to Wi-Fi for easy updates.

Credit: uflacweb.velarium.com
Frequently Asked Questions
How Do I Install A Honeywell Home Thermostat?
Turn off power to your HVAC system first. Remove the old thermostat, label wires, and connect them to the new Honeywell thermostat terminals. Mount the thermostat on the wall and restore power. Follow the setup instructions to configure your settings for optimal performance.
What Tools Are Needed For Honeywell Thermostat Installation?
You will need a screwdriver, drill, drill bits, level, wire stripper, and a voltage tester. These tools help safely remove the old thermostat and install the new Honeywell model accurately and securely on the wall.
Can I Install Honeywell Thermostat Myself?
Yes, most Honeywell thermostats are designed for DIY installation. Basic electrical knowledge and careful following of instructions are essential. Always turn off power before starting and consult the manual to avoid damaging your HVAC system.
How Do I Reset My Honeywell Thermostat?
To reset, press and hold the reset button or follow the manual’s reset procedure. This clears settings and restores factory defaults, useful if your thermostat malfunctions or requires reprogramming.
Conclusion
Installing your Honeywell Home Thermostat is simple and quick. Follow each step carefully for the best results. Double-check your wiring before turning the power back on. Test the thermostat to ensure it controls your heating and cooling properly. Enjoy better comfort and energy savings in your home.
This small upgrade can make a big difference. Now, you have the tools to keep your home cozy year-round. Trust the process and feel confident with your new thermostat.
Check Best Thermostat Pricing in Amazon
** As an Amazon Associate, I earn from qualifying purchases.