
Check Best Thermostat Pricing in Amazon
** As an Amazon Associate, I earn from qualifying purchases.
A thermostat controls the temperature in your home. It is important to install it correctly.
Knowing the right way to place a thermostat ensures your heating and cooling systems work efficiently. You might wonder if there’s a specific direction it should face or a particular position it should be in. Installing a thermostat correctly can make a big difference in your home’s comfort and energy bills.
We will explain how to position your thermostat properly. We will also discuss common mistakes to avoid. Understanding these basics can save you time and money in the long run. Let’s get started on finding the perfect spot for your thermostat.
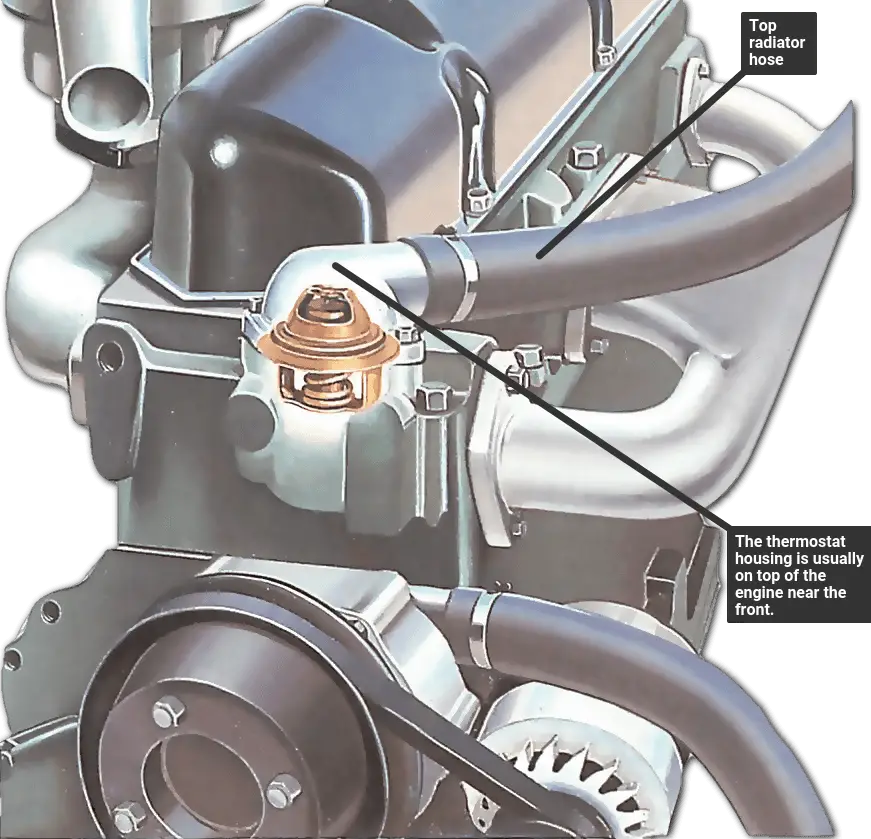
Credit: www.samarins.com
Types Of Thermostats
Understanding the types of thermostats can help you make the right choice. Each type offers different features and benefits. Let’s explore the main types of thermostats available.
Manual Thermostats
Manual thermostats are the simplest type. You adjust them by hand. These thermostats are easy to use and often the least expensive. They are reliable and durable. However, they do not offer advanced features.
Programmable Thermostats
Programmable thermostats provide more control over your home’s temperature. You can set different temperatures for different times of the day. This feature helps save energy and money. You won’t need to adjust the thermostat manually. Just set your schedule and let it work.
Smart Thermostats
Smart thermostats are the most advanced option. They connect to your Wi-Fi network. This allows you to control them using your smartphone or computer. Smart thermostats learn your habits and adjust settings automatically. They also offer energy reports and can integrate with other smart home devices.
Tools And Materials Needed
Before you start replacing your thermostat, gather the necessary tools and materials. Having everything ready will make the process smoother and quicker. This section will guide you through the essential tools and additional materials needed for the task.
Essential Tools
You will need a few basic tools. A socket set is crucial. It helps remove the bolts securing the thermostat housing. A flathead screwdriver is also necessary. You will use it to pry off the old gasket. A pair of pliers can come in handy too. They assist in handling small parts and clamps.
Additional Materials
Besides tools, gather some materials. A new thermostat is the main item. Ensure it fits your vehicle model. You will also need a new gasket. It prevents leaks after installation. Some coolant will be required too. Topping up ensures your engine stays cool. A bucket or drain pan is useful for catching old coolant.
Preparation Steps
Install the thermostat with the spring side facing the engine. This ensures proper coolant flow and prevents overheating. Carefully follow the manufacturer’s instructions for best results.
Preparing to install a new thermostat can seem daunting, but with a few simple steps, you can make it a smooth process. From my own experience, taking the time to prepare properly can save you from any headaches later on. Let’s dive into the essential preparation steps to ensure a successful thermostat installation.Turning Off Power
Before you begin, it’s crucial to turn off the power to your HVAC system. This step is vital for your safety and the safety of your home. Locate the circuit breaker panel in your home. Find the switch that controls your HVAC system and turn it off. Check to see if the power is off by adjusting your current thermostat. If the system does not respond, you’re ready to proceed.Removing The Old Thermostat
With the power off, you can now remove the old thermostat. Start by taking off the cover to expose the wiring. Take a picture of the wiring configuration. This will be a helpful reference when you connect the new thermostat. Carefully disconnect the wires from the terminals. Use labels or tape to mark each wire, so you know where they go. Unscrew the thermostat from the wall. Gently pull it away and set it aside. By following these preparation steps, you’ll be well on your way to installing your new thermostat with confidence. What other tasks do you think might be important to consider before starting a home improvement project?
Credit: www.reddit.com
Wiring The Thermostat
Wiring the thermostat is a crucial step in setting up your heating and cooling system. Proper wiring ensures your thermostat communicates effectively with your HVAC system. This guide will help you identify and connect the necessary wires.
Identifying Wires
First, turn off the power to your HVAC system. This will prevent any risk of electric shock. Remove the cover of your old thermostat. You will see several wires, each with a specific color and function. The most common wire colors are:
- Red (R) – Power
- Green (G) – Fan
- Yellow (Y) – Cooling
- White (W) – Heating
- Blue or Black (C) – Common
Take a picture of the wiring before disconnecting. This will help you remember the connections.
Connecting Wires
Once you have identified the wires, you can start connecting them to your new thermostat. The terminals on the new thermostat will be labeled with letters. Match each wire to the corresponding terminal. For example, connect the red wire to the R terminal. Secure the wires by tightening the screws. Double-check the connections to ensure they are tight and secure.
After connecting the wires, attach the new thermostat to the wall. Turn the power back on and test the system. Your new thermostat should now be wired and ready to control your HVAC system.
Mounting The Thermostat
Mounting the thermostat correctly ensures efficient temperature control in your home. Proper installation not only enhances comfort but also boosts energy efficiency. Let’s explore the steps involved in mounting your thermostat.
Positioning The Thermostat
First, choose a central location for the thermostat. Avoid placing it near windows or doors. These areas can cause inaccurate temperature readings. Place it on an interior wall. Make sure it is away from direct sunlight or any heat sources. The ideal height is about five feet from the ground. This helps in getting the most accurate temperature reading.
Securing The Thermostat
After positioning, it’s time to secure the thermostat. Turn off the power to avoid any electrical hazards. Remove the cover plate of the thermostat. Mark the mounting holes on the wall using a pencil. Drill the holes where you marked. Insert wall anchors if needed. Align the thermostat base with the drilled holes. Use screws to secure the base to the wall. Make sure it is level. Finally, connect the wires to their respective terminals. Replace the cover plate and turn the power back on.

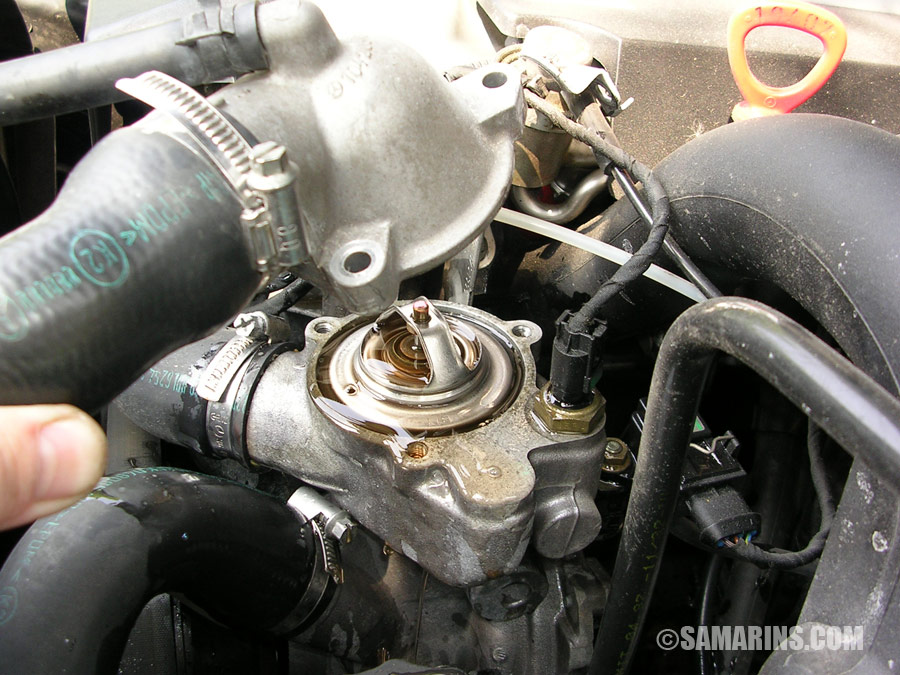
Credit: www.aa1car.com
Configuring The Thermostat
Configuring your thermostat properly is crucial for maintaining a comfortable home and saving on energy bills. A well-configured thermostat can make a world of difference in your daily comfort. Let’s break down the essential steps to get your thermostat set up correctly.
Setting The Temperature
First, decide on a comfortable temperature for your home. Consider the needs of everyone in your household. For instance, if you have kids, you may want to keep it a bit warmer during the winter months.
Most thermostats have a simple up and down button to set the temperature. Aim for around 68°F in the winter and 78°F in the summer. This balance helps save energy while keeping everyone comfortable.
Check Best Thermostat Pricing in Amazon
** As an Amazon Associate, I earn from qualifying purchases.
Does your thermostat have a digital display? If so, take advantage of the precision it offers. Setting an exact temperature can make a noticeable difference in how your home feels.
Programming The Schedule
A programmable thermostat can save you a lot of hassle and money. Set a schedule that matches your daily routine. For example, lower the temperature when you’re at work and raise it when you’re home.
Most modern thermostats allow you to set different temperatures for different times of the day. This feature is particularly useful if your schedule varies. Make sure to review your settings periodically to ensure they still fit your lifestyle.
Remember to adjust the settings for weekends. You might spend more time at home, so ensure the thermostat keeps you comfortable without wasting energy.
Have you thought about syncing your thermostat with your smartphone? Many models now offer this feature, allowing you to control the temperature remotely. It’s a great way to ensure you always come back to a cozy home.
Testing And Troubleshooting
Testing and troubleshooting your thermostat installation is essential. It ensures your heating and cooling systems work correctly. Proper testing can save you from future issues and discomfort. In this section, we will explore how to test your thermostat installation and common problems you might face.
Testing The Installation
First, turn off your HVAC system. This prevents any damage during testing. Next, check if the thermostat is securely mounted. Loose connections can cause malfunctions. Then, set your thermostat to a temperature higher than room temperature. Listen for a click sound and check if the heater turns on.
After that, set the thermostat to a temperature lower than room temperature. Listen for another click and check if the air conditioner starts. If both tests are successful, your installation is likely correct. Finally, use a thermometer to compare the room temperature with the thermostat setting. They should be close to each other.
Common Issues And Fixes
Sometimes, thermostats can have problems even after correct installation. One common issue is incorrect temperature readings. This can be caused by placing the thermostat in direct sunlight or near heat sources. To fix this, move the thermostat to a different location.
Another issue is the HVAC system not responding to thermostat settings. This can happen due to loose wires or poor connections. Check all wiring and ensure they are tightly connected. Additionally, replace old batteries in battery-powered thermostats. Low battery can cause unresponsive systems.
Lastly, if your thermostat screen is blank, it could mean power issues. Check if the circuit breaker is on. If the breaker is fine, inspect the wiring for any damage. Sometimes, resetting the thermostat can solve the problem. Consult your thermostat manual for reset instructions.
Maintenance Tips
Keeping your thermostat in tip-top shape is essential for maintaining a comfortable home environment. Regular maintenance ensures your thermostat runs efficiently, saving you both energy and money. Let’s dive into some practical maintenance tips that you can easily follow.
Regular Cleaning
Dust and dirt can accumulate on your thermostat, affecting its performance. Use a soft brush or a can of compressed air to gently clean around the buttons and screen. Make sure to turn off the thermostat before you start cleaning to avoid any accidental changes to your settings.
Cleaning the thermostat regularly can prevent malfunctions and ensure it reads the temperature accurately. A clean thermostat is not just about aesthetics; it’s about functionality, too. Have you checked your thermostat’s cleanliness lately?
Battery Replacement
Thermostats often rely on batteries to function correctly. If your thermostat isn’t working, a dead battery might be the culprit. Checking the batteries every six months can prevent sudden failures.
To replace the batteries, simply remove the thermostat from its base and open the battery compartment. Insert the new batteries, making sure they are positioned correctly. Do you remember when you last changed your thermostat’s batteries?
Regular maintenance of your thermostat can make a significant difference in your home’s comfort and energy efficiency. A few simple steps can go a long way in ensuring your system runs smoothly. Try these tips and notice the improvement in your thermostat’s performance.
Frequently Asked Questions
Which Direction Do Thermostats Go?
Turn thermostats clockwise to increase the temperature. Turn them counterclockwise to decrease the temperature.
Is There A Wrong Way To Put A Thermostat In?
Yes, you can install a thermostat incorrectly. Incorrect wiring or placement can cause malfunction and inefficient temperature control. Always follow the manufacturer’s instructions.
What Is The Correct Way To Install A Thermostat?
To install a thermostat, first turn off power. Remove old thermostat, label wires, mount new base, connect wires, and attach cover.
Which Side Of The Thermostat Goes Down?
The left side of the thermostat usually goes down. This adjusts the temperature lower. Always check your specific model for accuracy.
Conclusion
Understanding thermostat placement is crucial for efficient heating and cooling. Correct installation prevents issues and ensures your system runs smoothly. Always check your vehicle’s manual for guidance. It helps avoid mistakes and keeps your engine healthy. Remember, placing the thermostat in the right direction is vital.
Regular maintenance and proper installation can save time and money. Keep your thermostat working well, and you’ll enjoy a comfortable environment. Follow these tips to ensure optimal performance and longevity.
Check Best Thermostat Pricing in Amazon
** As an Amazon Associate, I earn from qualifying purchases.