
Check Best Thermostat Pricing in Amazon
** As an Amazon Associate, I earn from qualifying purchases.
Testing a water heater thermostat ensures it’s working correctly. This can save you from cold showers and high energy bills.
A faulty thermostat can cause a lot of inconvenience. You might end up with no hot water or an overworked heater. Understanding how to test your water heater thermostat can help you troubleshoot these issues. It’s a simple process that you can do yourself with some basic tools.
In this guide, we’ll walk you through the steps to check your thermostat. You don’t need to be a tech expert to follow along. By the end, you’ll know if your thermostat is the problem and what to do next. Let’s get started!
Safety Precautions
Ensure the power is off before testing a water heater thermostat. Use a multimeter to check for continuity. Wear insulated gloves for safety.
Testing a water heater thermostat can be a straightforward task if approached with the right safety precautions. Ensuring your safety should be the first priority before you dive into the project. Let’s break down some essential safety steps to follow.Turning Off Power
Before you start, make sure to turn off the power supply to the water heater. This is crucial to avoid any electrical hazards. Locate the circuit breaker panel in your home and switch off the breaker corresponding to your water heater. Double-check that the power is off by using a voltage tester. Place the tester on the thermostat terminals to confirm there’s no electrical current. Skipping this step could lead to serious injuries.Protective Gear
Always wear protective gear to safeguard yourself. Use insulated gloves to prevent electric shocks while handling the thermostat. Eye protection is also essential to shield your eyes from any accidental splashes of hot water or debris. Consider wearing long sleeves and pants to protect your skin from burns. Even though the power is off, the water inside the heater can still be hot. These precautions will help you avoid potential injuries. In your experience, have you ever faced an unexpected situation while doing a DIY project? Taking these safety measures can help you stay prepared. By prioritizing safety, you can handle the task with confidence and ease. What other safety tips have you found useful in similar home projects? Your insights could help others navigate their own DIY challenges safely. Stay cautious and prioritize your well-being while testing your water heater thermostat.
Credit: diy.repairclinic.com
Accessing The Thermostat
Accessing the thermostat in your water heater is a critical step when you’re trying to diagnose and fix heating issues. It’s not as daunting as it might sound. With a few simple tools and a bit of patience, you can easily access and test your water heater thermostat.
Removing Covers
Before you begin, make sure the power to your water heater is turned off. Safety first! Once you’ve ensured the power is off, locate the access panels on your water heater. These are usually found on the side of the tank.
You’ll need a screwdriver to remove the screws holding the panels in place. Keep the screws in a safe place so you don’t lose them. Once the screws are out, gently pull the covers away to expose the insulation and the thermostat.
Locating The Thermostat
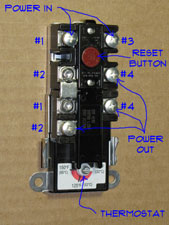
With the cover removed, you’ll see a layer of insulation. Carefully pull this back to reveal the thermostat and heating elements. The thermostat is a small, rectangular device with a dial or buttons for temperature adjustment.
Most water heaters have two thermostats – one at the top and one at the bottom. Make sure you check both, as a problem with either can affect your water heater’s performance. Have you ever wondered why your shower suddenly runs cold? It might just be a thermostat issue!
Once you’ve located the thermostats, you’re ready to test them. Do you feel comfortable proceeding? If not, consulting a professional is always a good option. For those ready to go ahead, grab a multimeter and let’s get testing.
Testing your water heater thermostat doesn’t have to be a daunting task. By following these steps and taking your time, you’ll be well on your way to ensuring your water heater runs efficiently and effectively. Have you had any unexpected discoveries while testing your thermostat? Share your experiences and tips in the comments below!
Testing The Upper Thermostat
Testing the upper thermostat of your water heater ensures it functions correctly. A malfunctioning thermostat can lead to inconsistent water temperatures. This guide helps you test the upper thermostat easily.
Setting Multimeter
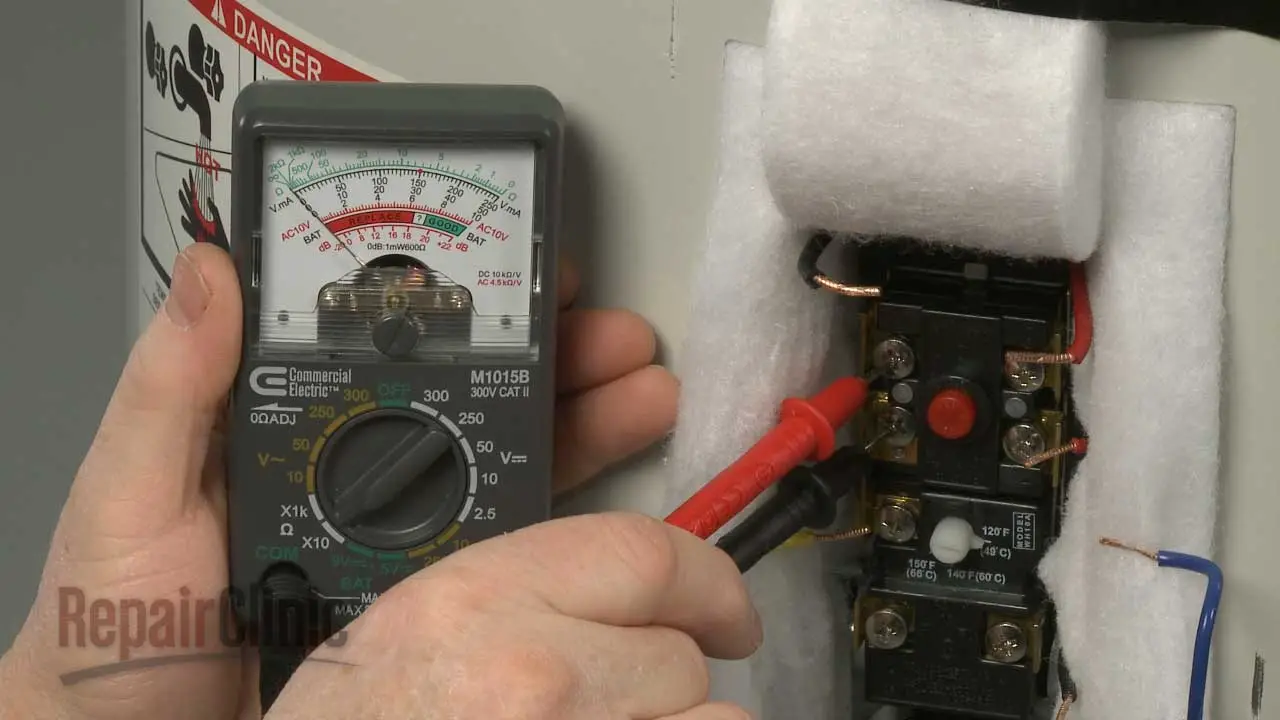
First, turn off the power to the water heater. Safety is important. Remove the access panel to expose the thermostat. Use a flathead screwdriver to remove the panel. Set your multimeter to the lowest ohm setting. This is often labeled as 200 or X1. Place one probe on the thermostat’s left terminal. Place the other probe on the right terminal. Be sure probes make solid contact.
Reading Results
If the thermostat works, the multimeter reads zero or close to zero. This means there’s continuity. A reading of infinity or no change means the thermostat is faulty. Replace the thermostat if needed. Reassemble the access panel once done. Turn the power back on. Test your water heater for consistent temperatures.
Testing The Lower Thermostat
Testing the lower thermostat of your water heater ensures that it functions properly. If the water is not heating as expected, the thermostat may be the issue. Follow these steps to test the lower thermostat efficiently.
Adjusting Multimeter
First, set your multimeter to the lowest ohms setting. This will allow you to measure resistance accurately. Ensure the device is calibrated. Attach the black probe to the common terminal. Attach the red probe to the terminal labeled “ohms” or “resistance.”
Interpreting Readings
Touch the probes to the lower thermostat terminals. A reading of zero or near zero means the thermostat is working. A high or infinite reading indicates a faulty thermostat. Replace it if the reading is not as expected. This simple test can prevent further issues with your water heater.
Analyzing Results
Once you’ve tested your water heater thermostat, it’s time to analyze the results. This step involves understanding the readings to determine if your thermostat is functioning properly. Correct interpretation can help you decide if you need a replacement.
Check Best Thermostat Pricing in Amazon
** As an Amazon Associate, I earn from qualifying purchases.
Normal Readings
Normal readings indicate your thermostat is working well. For an upper thermostat, you should see a resistance of zero. The lower thermostat should also show zero resistance. These readings show that the electrical current flows correctly through the thermostat.
Faulty Readings
Faulty readings suggest your thermostat has issues. If the resistance is infinite, the circuit is broken. This means the thermostat cannot regulate the water heater temperature. It’s a sign to replace your thermostat. If you get a reading other than zero or infinite, your thermostat might be unreliable.
Replacing A Faulty Thermostat
Replacing a faulty thermostat in your water heater can restore its efficiency. It’s crucial to choose the right thermostat and install it correctly. This guide will help you through the process.
Choosing The Right Thermostat
First, identify the type of water heater you have. There are different thermostats for electric and gas heaters. Check your heater’s manual for specifications. Note the voltage and temperature range. These details will help you pick the right part.
Visit a hardware store or search online for the correct thermostat. Ensure it matches your heater’s model. Buying the wrong one can cause more issues.
Installation Process
Before starting, turn off the power supply. Safety first. Use a screwdriver to remove the access panel on the heater. Locate the faulty thermostat. Disconnect the wires carefully. Take a photo if needed for reference.
Remove the old thermostat. Place the new one in the same position. Reconnect the wires as they were. Double-check your connections. Secure the thermostat and replace the panel.
Finally, restore power to the heater. Test the new thermostat by adjusting the temperature. Ensure the heater responds correctly. If it does, you’ve successfully replaced the thermostat.
Final Checks
Ensure your water heater thermostat works by following these steps. Begin by turning off power, then test with a multimeter. Replace if faulty.
As you approach the final checks in testing your water heater thermostat, it’s crucial to ensure everything is working perfectly. This stage is where you confirm that your hard work has paid off and your water heater is safe and functional. By following these steps, you can avoid potential issues and ensure your water heater runs smoothly.Restoring Power
First, you need to restore power to the water heater. Head over to your circuit breaker panel and flip the switch back to the “on” position. Take a moment to listen to any sounds from the water heater. You might hear a slight hum, indicating the heater is receiving power.Testing Functionality
Now, it’s time to test the functionality. Set your thermostat to the desired temperature. Wait for a few minutes and check if the water is heating up properly. Place your hand under the tap and feel the temperature change. If the water heats up to the expected temperature, your thermostat is working correctly. Have you ever found yourself in the shower with unexpectedly cold water? By performing these checks, you can avoid such unpleasant surprises. Is your water heater taking too long to heat up? Consider checking the thermostat settings once more. Testing the functionality ensures that your water heater is reliable and efficient. You can trust that your next shower will be warm and comfortable. Perform these final checks diligently, and you’ll enjoy a hassle-free water heater experience.
Credit: www.reddit.com
Credit: www.home-repair-central.com
Frequently Asked Questions
How Do I Know If My Water Heater Thermostat Is Bad?
Check for inconsistent water temperatures. Listen for unusual noises. Inspect for a tripped reset button. Test with a multimeter for continuity. Cold water despite power indicates a faulty thermostat.
How To Test A Water Heater Thermostat With A Multimeter?
Turn off the power. Remove the thermostat cover. Set the multimeter to the lowest ohms setting. Test the thermostat terminals. A reading of zero indicates a faulty thermostat.
Which Element Turns On First In An Electric Water Heater?
The upper heating element turns on first in an electric water heater. It heats the water at the top.
How To Test Heater Thermostat?
Turn off the power. Remove the thermostat. Test with a multimeter. Check for continuity. Replace if faulty.
Conclusion
Testing your water heater thermostat is essential. It ensures your heater works efficiently. Follow the steps carefully. Use basic tools like a multimeter. Check for faults in the thermostat. Regular checks prevent bigger issues. They save money on repairs. A properly working thermostat means consistent hot water.
Keep your water heater in top shape. Regular maintenance is key to longevity. Now you know how to test your thermostat easily. Enjoy uninterrupted hot showers.
Check Best Thermostat Pricing in Amazon
** As an Amazon Associate, I earn from qualifying purchases.