
Check Best Thermostat Pricing in Amazon
** As an Amazon Associate, I earn from qualifying purchases.
Is your car’s engine overheating or running too cold? The problem might be your thermostat housing.
Replacing it may sound tricky, but with the right steps, you can do it yourself and save time and money. In this guide, you’ll learn exactly how to replace thermostat housing quickly and safely. By the end, you’ll feel confident tackling this common car repair with your own hands.
Keep reading to discover the simple process that can keep your engine running smoothly.
- Tools And Materials Needed
- Safety Precautions
- Locating The Thermostat Housing
- Draining The Coolant
- Removing The Old Thermostat Housing
- Cleaning The Mounting Surface
- Installing The New Thermostat Housing
- Refilling The Coolant
- Checking For Leaks
- Testing The Thermostat Function
- Frequently Asked Questions
- Conclusion
Tools And Materials Needed
Replacing a thermostat housing requires the right tools and materials. Having everything ready makes the job easier and faster. It also helps avoid mistakes and extra trips to the store.
Gathering the correct tools and parts before starting the work is important. This section lists the essentials for this task. Each item plays a key role in the replacement process.
Basic Hand Tools
Start with simple hand tools. A ratchet wrench and socket set help remove bolts. Screwdrivers are needed to loosen clamps and screws. Pliers assist in handling hoses and clips.
New Thermostat Housing
Buy the exact replacement for your vehicle model. A proper fit ensures no leaks or engine issues. Check the part number or consult your car manual.
Gasket Or Sealant
Use a new gasket or high-temperature sealant. It seals the thermostat housing to prevent coolant leaks. Never reuse old gaskets as they may leak.
Coolant
Drain some coolant before removing the housing. Keep extra coolant ready for refilling after the job. Use the recommended type for your vehicle.
Drain Pan
A drain pan collects coolant safely. It prevents spills and protects the workspace. Choose a pan large enough for your vehicle’s coolant volume.
Cleaning Supplies
Clean the mating surfaces before installing the new housing. Use a wire brush, rags, and a scraper. Clean surfaces help gaskets seal better.
Safety Precautions
Replacing a thermostat housing needs careful attention to safety. Working on your vehicle’s cooling system involves risks. Taking the right steps protects you and your car. Always prepare well before starting the task.
Turn Off The Engine And Let It Cool
Never work on the thermostat housing with a hot engine. Hot coolant can cause serious burns. Wait at least an hour after turning off the engine. Make sure the engine is completely cool before touching any parts.
Wear Protective Gear
Use gloves to protect your hands from sharp edges and hot surfaces. Safety glasses shield your eyes from coolant splashes. Wear old clothes that can get dirty. This gear keeps you safe during the repair.
Work In A Well-ventilated Area
Coolant fumes can be harmful. Open doors and windows if you work indoors. Fresh air helps reduce inhaling dangerous chemicals. Proper ventilation keeps your workspace safe.
Handle Coolant Carefully
Coolant is toxic and should not touch your skin or eyes. Use a drain pan to catch all the fluid. Dispose of old coolant at a recycling center. Avoid spills on the ground or driveway to protect the environment.
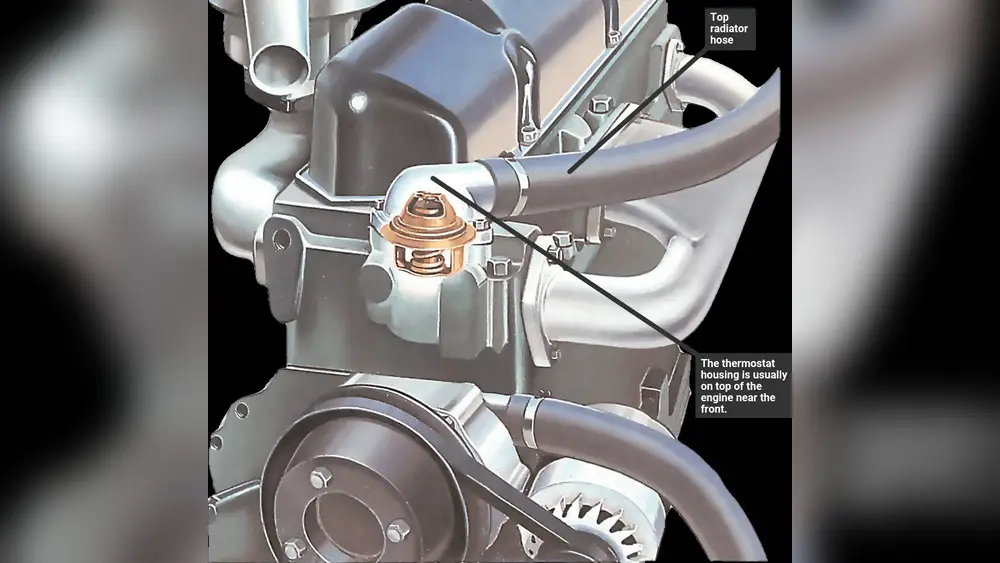
Locating The Thermostat Housing
Locating the thermostat housing is the first step in replacing it. The thermostat housing holds the thermostat that controls engine temperature. Finding it correctly saves time and avoids confusion.
The thermostat housing usually sits at the engine end of the upper radiator hose. It connects the engine to the cooling system. Knowing this helps narrow down the search area quickly.
Identify The Upper Radiator Hose
Locate the radiator at the front of the engine bay. The upper radiator hose runs from the top of the radiator to the engine. Follow this hose carefully as it leads to the thermostat housing.
Look Near The Engine Block
The thermostat housing mounts directly on the engine block. It is often near the cylinder head. Check for a metal or plastic cover attached with bolts. This cover is the thermostat housing.
Check For Hose Connection
The housing connects the engine to the radiator hose. Look for a clamp securing the hose to the housing. This connection spot is an easy way to spot the thermostat housing.
Use The Vehicle Manual
Refer to the vehicle’s manual for exact location. Manuals provide diagrams and pictures. This makes finding the thermostat housing easier and faster.
Draining The Coolant
Start by placing a drain pan under the radiator. Open the drain valve to let the coolant flow out. This step prevents spills and makes the thermostat housing replacement easier.
Preparing Your Vehicle For Coolant Drain
Start by parking your car on a flat surface. Turn off the engine and let it cool down. Hot coolant can burn you. Open the hood and locate the radiator cap. Remove it slowly to release any pressure.
Locating The Drain Plug
Find the radiator drain plug under your vehicle. It looks like a small valve or screw. Place a drain pan below it to catch the coolant. Be ready for the liquid to flow out quickly.
Draining The Coolant Safely
Open the drain plug carefully. Let all the coolant flow into the pan. Avoid spilling coolant on the ground. Coolant is toxic and harmful to animals and plants.
Disposing Of Old Coolant Properly
Collect the drained coolant in a sealed container. Take it to a recycling center or auto shop. Do not pour coolant into drains or soil. Protect the environment and follow local rules.
Removing The Old Thermostat Housing
Removing the old thermostat housing is the first step in replacing it. This part connects to the engine and controls coolant flow. Taking it off carefully avoids damage to other parts. Follow these steps to remove the housing safely and quickly.
Disconnecting Hoses
Start by loosening the clamps on the hoses attached to the housing. Slide the clamps back along the hoses. Gently twist the hoses to break their seal. Pull the hoses away from the housing carefully. Set the hoses aside without bending or damaging them.
Unbolting The Housing
Find the bolts that hold the thermostat housing to the engine. Use a wrench or socket to loosen each bolt. Turn the bolts counterclockwise until they come out. Keep the bolts in a safe place for reinstallation. Remove the housing gently to avoid breaking the gasket.
Removing The Thermostat
Look inside the housing to find the thermostat. Lift the thermostat out carefully. Note how it sits in the engine for the new one. Check the old thermostat for damage or wear. Clean the surface before fitting the new thermostat.
Cleaning The Mounting Surface
Cleaning the mounting surface is a crucial step before installing a new thermostat housing. Dirt, old gasket material, and corrosion can stop the new housing from sealing properly. This can cause leaks or engine overheating. A clean surface ensures a tight fit and long-lasting repair.
Take your time to remove all residues from the mounting area. Use the right tools and materials to avoid damaging the engine block or housing. A clean mounting surface helps the thermostat work efficiently and prevents future problems.
Check Best Thermostat Pricing in Amazon
** As an Amazon Associate, I earn from qualifying purchases.
Gathering Cleaning Tools
Start by collecting necessary cleaning tools. You need a plastic scraper, wire brush, cleaning solvent, and a lint-free cloth. Avoid metal tools that can scratch the surface. These tools help remove old gasket and dirt safely.
Removing Old Gasket Material
Use the plastic scraper to gently lift off the old gasket. Be careful not to gouge the surface. Apply solvent to soften stuck-on material. Repeat scraping until the surface looks smooth and clean.
Cleaning Rust And Corrosion
Light rust or corrosion must be brushed away. Use a small wire brush gently to avoid damage. Wipe the area with a solvent-soaked cloth to remove loosened rust. This step prevents leaks and helps the new gasket seal better.
Final Surface Wipe
After scraping and brushing, clean the surface again with a solvent. Use a lint-free cloth to dry the area completely. Make sure no debris or oil remains. A dry, clean surface ensures the best seal for the new thermostat housing.
Installing The New Thermostat Housing
Installing the new thermostat housing is a key step in this repair. It ensures your engine keeps the right temperature. The process requires care to avoid leaks and ensure proper fit. Follow these steps closely for best results.
Placing The Thermostat
Start by putting the thermostat in its spot. Make sure the spring side faces the engine. The thermostat must sit flat and secure. Check if it moves freely without falling out.
Sealing The Housing
Apply a thin layer of gasket sealant around the housing edge. This prevents coolant from leaking out. Use a new gasket to create a tight seal. Press the gasket firmly to avoid gaps.
Bolting The Housing Back
Align the housing with the bolt holes on the engine. Insert the bolts by hand to avoid cross-threading. Tighten the bolts in a crisscross pattern. Use a torque wrench to reach the correct tightness.

Credit: www.amazon.com
Refilling The Coolant
Refilling the coolant is a key step after replacing the thermostat housing. Coolant helps keep the engine at the right temperature. Without enough coolant, the engine can overheat and get damaged. This part of the process needs care and attention to avoid leaks and air pockets.
Preparing The Coolant Mixture
Use the correct coolant type for your vehicle. Check the owner’s manual for the right kind. Mix coolant with water if needed, usually in a 50/50 ratio. Use distilled water to avoid mineral buildup. Stir the mixture well before pouring it into the system.
Filling The Radiator And Reservoir
Open the radiator cap carefully. Pour the coolant mixture slowly into the radiator. Fill until the coolant reaches the top. Next, fill the coolant reservoir to the marked level. Do not overfill either tank to avoid spills.
Removing Air Pockets
Air pockets can cause engine overheating. To remove air, start the engine and let it run. Turn the heater on high to help air escape. Watch for bubbles in the radiator. Add coolant if the level drops during this process.
Checking For Leaks
Checking for leaks is a crucial step after replacing the thermostat housing. Leaks can cause engine overheating and damage. Spotting leaks early saves time and money on repairs. This step ensures your cooling system works properly and keeps the engine safe.
Visual Inspection For Coolant Leaks
Start by looking closely around the thermostat housing. Check for wet spots or coolant residue. Look under the car for puddles or drips. Use a flashlight to see tight areas. A clean, dry surface helps spot leaks faster.
Pressure Testing The Cooling System
Use a pressure tester to check for leaks. Attach it to the radiator or coolant reservoir. Pump air slowly and watch the pressure gauge. If pressure drops, there is a leak. Listen for hissing sounds that show escaping air.
Checking Hose Connections
Inspect hoses connected to the thermostat housing. Ensure clamps are tight and secure. Look for cracks or worn spots on hoses. Replace damaged hoses to prevent leaks. Proper hose connection stops coolant from escaping.
Running The Engine And Monitoring
Start the engine and let it reach normal temperature. Watch the thermostat housing for any leaks. Check coolant level in the reservoir. Look for steam or drips around the housing. Stop the engine if leaks appear and fix them immediately.

Credit: www.youtube.com
Testing The Thermostat Function
Testing the thermostat function is a key step after replacing the thermostat housing. It ensures the new thermostat works properly. A faulty thermostat can cause engine overheating or poor heating inside the car.
This process checks if the thermostat opens and closes at the right temperature. It helps avoid costly repairs and keeps the engine running smoothly. Follow these steps carefully to test your thermostat function.
Preparing The Engine For The Test
Start with a cold engine. Remove the radiator cap carefully. Attach a thermometer to the radiator hose. This helps monitor the coolant temperature during the test.
Running The Engine And Watching The Thermostat
Turn on the engine and let it warm up. Watch the temperature on the thermometer. The thermostat should open around the temperature listed in the vehicle manual.
Observing Coolant Flow
Look at the radiator hose. When the thermostat opens, the hose becomes hot. Coolant flows freely through the engine. This confirms the thermostat is working correctly.
Checking For Temperature Stability
Maintain the engine temperature for a few minutes. The temperature should stay steady. Fluctuations may indicate thermostat problems. Replace it again if needed.

Credit: www.reddit.com
Frequently Asked Questions
What Tools Are Needed To Replace Thermostat Housing?
You need a wrench set, screwdriver, gasket scraper, and new gasket. A drain pan and coolant are also necessary for safe removal and replacement.
How Long Does It Take To Replace Thermostat Housing?
Replacing the thermostat housing usually takes 30 to 60 minutes. Time may vary depending on vehicle model and your mechanical experience.
Can I Replace Thermostat Housing Myself Safely?
Yes, with basic mechanical skills and proper tools, you can replace it safely. Always disconnect the battery and drain coolant before starting.
What Causes Thermostat Housing To Fail?
Thermostat housing can fail due to corrosion, cracks, or gasket leaks. Overheating and coolant contamination also contribute to damage over time.
Conclusion
Replacing the thermostat housing can save you time and money. Follow each step carefully to avoid damage. Use the right tools for a smooth job. Check for leaks after installation to ensure proper fit. Taking your time helps prevent mistakes.
This simple repair keeps your engine running cool. Now you can handle this task with more confidence. Keep your vehicle in good shape with regular checks. A small fix today avoids bigger problems tomorrow.
Check Best Thermostat Pricing in Amazon
** As an Amazon Associate, I earn from qualifying purchases.