
Check Best Thermostat Pricing in Amazon
** As an Amazon Associate, I earn from qualifying purchases.
Connecting to a Nest Thermostat is easy. It takes just a few simple steps.
Nest Thermostats are smart devices that help you control your home’s temperature. They save energy and keep your home comfortable. Many people worry about setting them up, but it’s simple. This guide will walk you through each step clearly. You’ll learn how to connect your Nest Thermostat to your Wi-Fi and your phone.
By the end, your Nest will be up and running. You’ll enjoy a smarter, more efficient home. Let’s get started!
Preparation
Proper preparation is key to a seamless connection to your Nest Thermostat. Starting with a clear plan will save you time and avoid frustration. This section will guide you through the necessary steps to get ready.
Gather Tools And Materials
First, gather all the tools and materials. You will need a screwdriver, a drill, and a level. Have your Wi-Fi network name and password handy. Get the installation manual that came with your Nest Thermostat. A pencil for marking holes can be useful too.
Check Compatibility
Next, check the compatibility of your heating and cooling system. Visit the Nest website and use the compatibility checker. Enter your system’s details to see if it works with the Nest Thermostat. You can also look for the compatibility guide in the installation manual.
If your system is not compatible, do not proceed. An incompatible system can damage the thermostat or your HVAC system. If you are unsure, seek professional help.
Installation
Connecting your Nest Thermostat can seem daunting. Follow these steps to ensure a smooth installation. This guide will help you set up your new device quickly and efficiently.
Turn Off Power
Before you begin, turn off the power to your heating and cooling system. This step is crucial for your safety. Locate your home’s circuit breaker panel. Flip the switch that controls power to your HVAC system. Verify the power is off by trying to turn on your old thermostat.
Remove Old Thermostat
Now, it’s time to remove the old thermostat. Start by taking off the thermostat cover. You may need to use a screwdriver. Carefully unscrew the mounting screws and remove the base. Label the wires before disconnecting them. This will help you later. Use the provided stickers or write down the wire labels. Finally, pull the wires through the backplate and remove it from the wall.
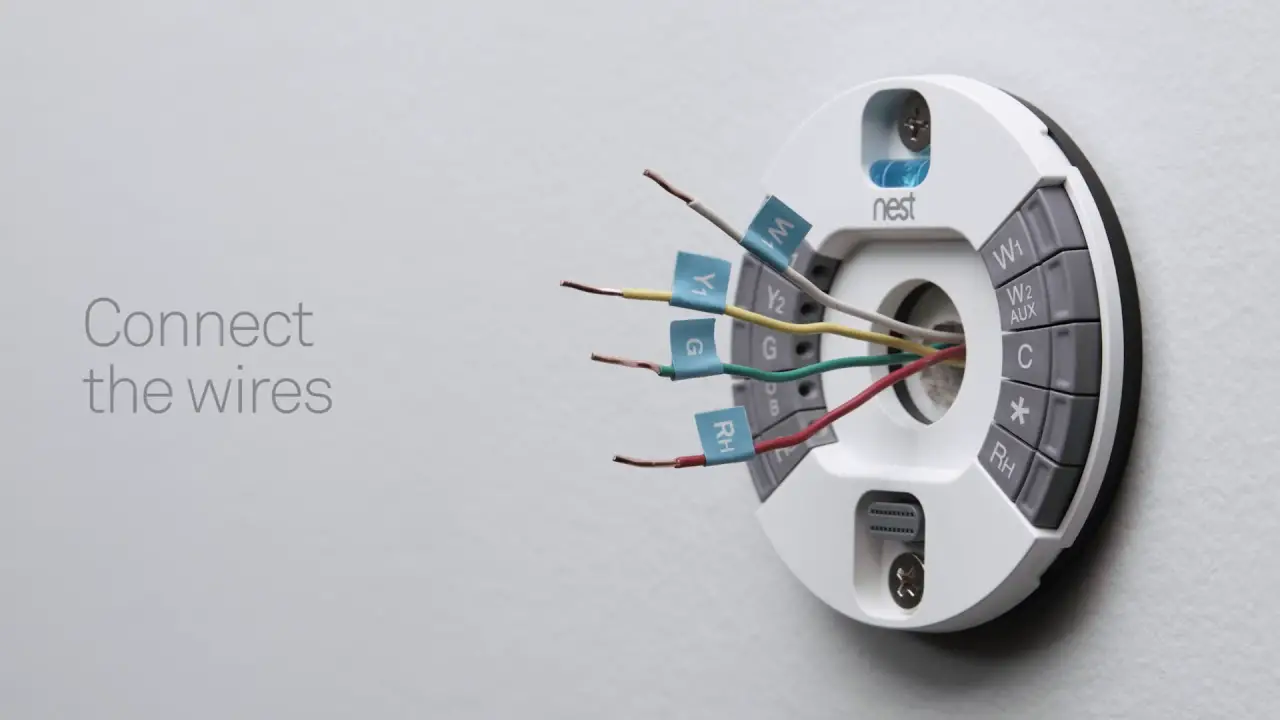
Wiring
Wiring your Nest Thermostat might seem complex, but it’s simpler than you think. This guide will help you understand each step. Follow along to get your system up and running. Let’s dive into the crucial part: wiring.
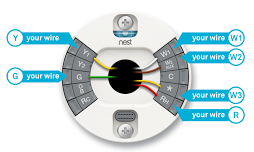
Identify Wires
First, turn off the power to your heating and cooling system. This step ensures your safety. Now, remove the cover of your old thermostat. You’ll see several wires. Each wire controls a different function. Check the labels on these wires. Common labels include R, Y, G, and W.
Use the Nest compatibility checker if you are unsure. It helps identify which wires work with the Nest Thermostat. Write down the wire labels and their colors. This information will be helpful later. Take a clear photo of the wire setup for reference.
Connect Nest Base
Next, grab the Nest base. Hold it against the wall where the old thermostat was. Pull the wires through the center of the Nest base. Use the included screws to secure the base to the wall. Make sure it is level. This ensures accurate temperature readings.
Now, insert each wire into its corresponding connector. Push the wire in until you hear a click. This confirms the wire is securely connected. Double-check that each wire is in the right connector. A wrong connection can cause issues.
Finally, attach the Nest display. Align it with the base. Press it in until it clicks. Turn the power back on. Your Nest Thermostat will light up. Follow the on-screen setup instructions. Your wiring task is complete!
Credit: www.reddit.com
Mounting
Secure the Nest Thermostat to the wall using the included screws. Ensure it is firmly in place for accurate readings.
Mounting your Nest Thermostat is a crucial step to ensure it works properly and efficiently. Correct mounting not only helps with functionality but also adds to the aesthetic appeal of your space. Let’s dive into the two primary steps involved in the mounting process: attaching the Nest display and securing it on the wall.Attach Nest Display
First things first, you need to attach the Nest display to the base plate. This is where your Nest Thermostat really starts to come together. Ensure that the base plate is properly aligned with the connectors on the back of the Nest display. You’ll want to hear a satisfying click as the display snaps into place. This step is pretty straightforward, but double-check that the display is securely attached. I remember when I first mounted mine, I was overly cautious. I kept rechecking to ensure the display was clicked in properly. It saved me from potential issues later on. Have you ever had a gadget that seemed secure but wasn’t?Secure On Wall
Securing the Nest Thermostat on the wall is equally important. You’ll need to make sure it’s level and firmly attached. Use the screws provided in the box to secure the base plate to the wall. If your wall is not perfectly flat, you might want to use the trim plate included in the package. This ensures the thermostat sits flush against the wall, giving it a polished look. During my first installation, I found that using a level made a huge difference. It’s a small step that can save you from a crooked thermostat. Do you have a level handy, or will you eyeball it? By paying attention to these details, you can ensure that your Nest Thermostat is mounted correctly and ready to go. Happy mounting!Setup
Easily connect to your Nest Thermostat by downloading the Nest app. Follow the app’s step-by-step instructions. Ensure your Wi-Fi is stable.
Setting up your Nest Thermostat can seem like a daunting task, but it’s actually quite straightforward. The process is designed to be user-friendly and intuitive. Let’s walk through the setup together, ensuring you get the most out of your smart thermostat.Power On Thermostat
To begin, ensure your Nest Thermostat is powered on. Connect it to the wall base, which should already be installed and wired. Once connected, the thermostat will light up, indicating it’s ready to go. Press the display to wake it up if needed. You’ll be prompted to select your preferred language. Simply turn the outer ring to navigate and press to select.Configure Wi-fi Settings
Next, you’ll need to connect your thermostat to your home Wi-Fi. This is crucial for remote access and software updates. Navigate to the Wi-Fi settings on the thermostat. Select your home network from the list of available networks. Enter your Wi-Fi password using the on-screen keyboard. Once connected, you’ll see a confirmation. Connecting your Nest Thermostat to the internet allows you to control it from your smartphone. Have you ever forgotten to adjust the temperature before leaving home? With the Nest app, you can make adjustments anytime, anywhere. Taking these steps ensures your Nest Thermostat is properly set up. Have you considered how much energy you could save? Start exploring the features and optimize your home’s comfort and efficiency.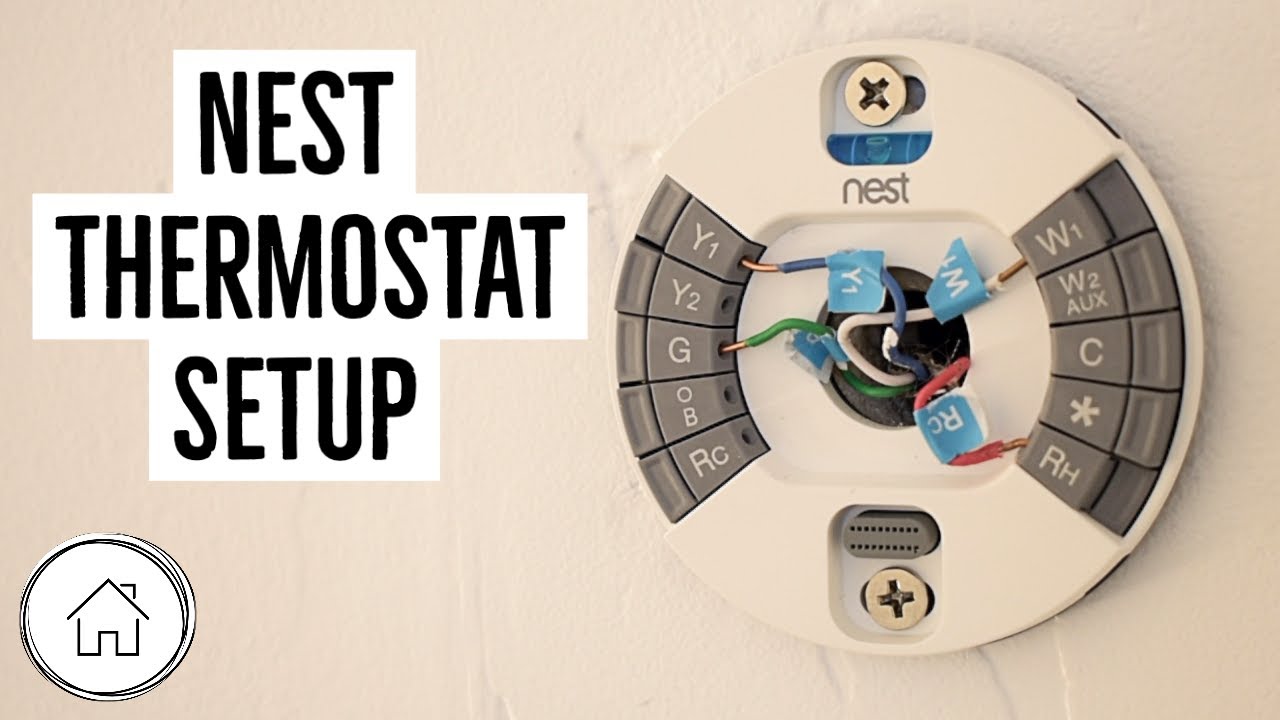
Credit: www.youtube.com
Account Linking
Connecting your Nest Thermostat to your account is crucial for maximizing its features. Account linking ensures that you can control your thermostat remotely and take advantage of smart home integrations. Let’s break down the steps to make this process seamless.
Create Nest Account
First things first, you need a Nest account. If you don’t already have one, head over to the Nest website to sign up. It’s quick and straightforward.
Check Best Thermostat Pricing in Amazon
** As an Amazon Associate, I earn from qualifying purchases.
During sign-up, you’ll be asked to provide your email and create a password. Make sure to use a strong password for security. Once done, you’ll receive a verification email. Click on the verification link to activate your account.
Now that your account is ready, you can move on to the next step.
Sync With Mobile App
Download the Nest app from the Google Play Store or Apple App Store. Open the app and log in with your newly created Nest account.
Once logged in, tap the ‘+’ icon to add your thermostat. Follow the on-screen instructions to connect your thermostat to the app. You’ll need to enter the entry key displayed on your thermostat screen.
After entering the key, your thermostat should sync with the app. You can now control your Nest Thermostat from your phone, whether you’re at home or away.
Isn’t it amazing how technology simplifies our lives? With just a few taps, you can ensure your home is always at the perfect temperature. Why not give it a try today and experience the convenience for yourself?
Troubleshooting
Having trouble connecting your Nest Thermostat? You’re not alone. Many users face challenges during the setup process. This guide will help you troubleshoot common issues and know when to contact customer support.
Common Issues
Several factors can prevent a successful connection. First, check your Wi-Fi network. Ensure it’s working properly. Sometimes, a weak signal can cause problems. Move the router closer if needed.
Another common issue is incorrect settings. Double-check your thermostat settings. Make sure you’ve entered the correct Wi-Fi password. Also, verify that your mobile device is on the same network.
Outdated software can also be a problem. Ensure your Nest Thermostat is running the latest firmware. Update your mobile app too. These updates often fix bugs and improve connectivity.
Customer Support
If you’re still having trouble, don’t worry. Nest offers excellent customer support. You can reach them through their website. They offer live chat, email, and phone support.
Before contacting support, gather some information. Know your thermostat model and software version. This information will help the support team assist you better.
Sometimes, the community can help too. Check out the Nest user forums. Many users share their experiences and solutions there. You might find an answer to your problem.
Credit: support.google.com
Frequently Asked Questions
How Do You Connect Your Phone To A Nest Thermostat?
To connect your phone to a Nest thermostat, download the Nest app. Follow the in-app instructions to add your device.
How Do I Connect To An Already Installed Nest Thermostat?
To connect to an installed Nest thermostat, download the Nest app. Follow the on-screen instructions to add your device. Ensure your Wi-Fi network is active.
How Do You Pair A Nest Thermostat?
To pair a Nest thermostat, download the Google Home app. Follow on-screen instructions to add and connect your device. Ensure your Wi-Fi is on.
How Do I Reset My Nest Thermostat For A New Owner?
To reset your Nest thermostat, go to Settings > Reset > All Settings. Confirm the reset. The device will restart, and all personal settings will be erased. The new owner can then set it up as their own.
Conclusion
Connecting to your Nest thermostat is simple. Follow the steps carefully. Ensure your Wi-Fi is stable. Use the Nest app for guidance. Adjust settings as needed. Your home comfort is now in your control. Troubleshoot if issues arise. Enjoy energy savings and convenience.
Stay updated with Nest features. Make the most of your smart thermostat. Thank you for reading. Happy connecting!
Check Best Thermostat Pricing in Amazon
** As an Amazon Associate, I earn from qualifying purchases.