
Check Best Thermostat Pricing in Amazon
** As an Amazon Associate, I earn from qualifying purchases.
Connecting a heat pump thermostat can be straightforward. You’ll need basic tools and a bit of patience.
In this guide, we’ll walk you through the steps. Heat pumps are essential for maintaining comfortable indoor temperatures. They work efficiently in both heating and cooling modes. Installing a thermostat for your heat pump can enhance its performance. A properly connected thermostat allows precise control over indoor climate.
With the right setup, your heat pump will run more smoothly and efficiently. This guide will help you understand the process clearly. Follow our steps, and you’ll have your heat pump thermostat connected in no time. Let’s dive into the details and make this task simple for you.

Credit: forums.wyze.com
Tools And Materials
Connecting a heat pump thermostat requires specific tools and materials. Having the right tools and materials ensures a smooth installation process. This guide will help you gather everything you need before starting.
Essential Tools
First, gather all essential tools. A screwdriver is crucial for loosening and tightening screws. Use a wire stripper to remove insulation from wires. A drill may be needed for mounting the thermostat. Have a voltage tester to check for live wires. A level ensures that your thermostat is mounted straight.
Required Materials
Next, collect the required materials. You will need the heat pump thermostat itself. Make sure it is compatible with your heat pump system. Have mounting screws to secure the thermostat. Ensure you have wire nuts to connect wires securely. Keep a user manual handy for reference during installation. Lastly, have some electrical tape to insulate wire connections.
Safety Precautions
Before connecting a heat pump thermostat, always follow safety precautions. These steps help prevent accidents and ensure a smooth installation process. Ignoring safety measures can lead to electrical hazards or damage to your system.
Power Off
First, turn off the power to your HVAC system. Locate the circuit breaker and switch off the corresponding breaker. This step prevents any electric shock while working on the thermostat wiring.
Double-check that the power is off. Use a voltage tester to ensure no electricity flows to the thermostat. This extra step guarantees your safety during installation.
Handling Wiring Safely
Handle wiring with care. Use insulated tools to avoid electric shocks. Before touching wires, confirm that the power is off again with a voltage tester.
Keep wires organized. Label each wire according to its terminal. This way, you’ll know where each wire goes when reconnecting. Never let exposed wires touch each other. It can cause short circuits or damage to the thermostat.
If any wire appears damaged, replace it. Damaged wires can be unsafe and affect system performance. Always work in a well-lit area to clearly see what you are doing. Good lighting helps avoid mistakes and ensures a safe installation.
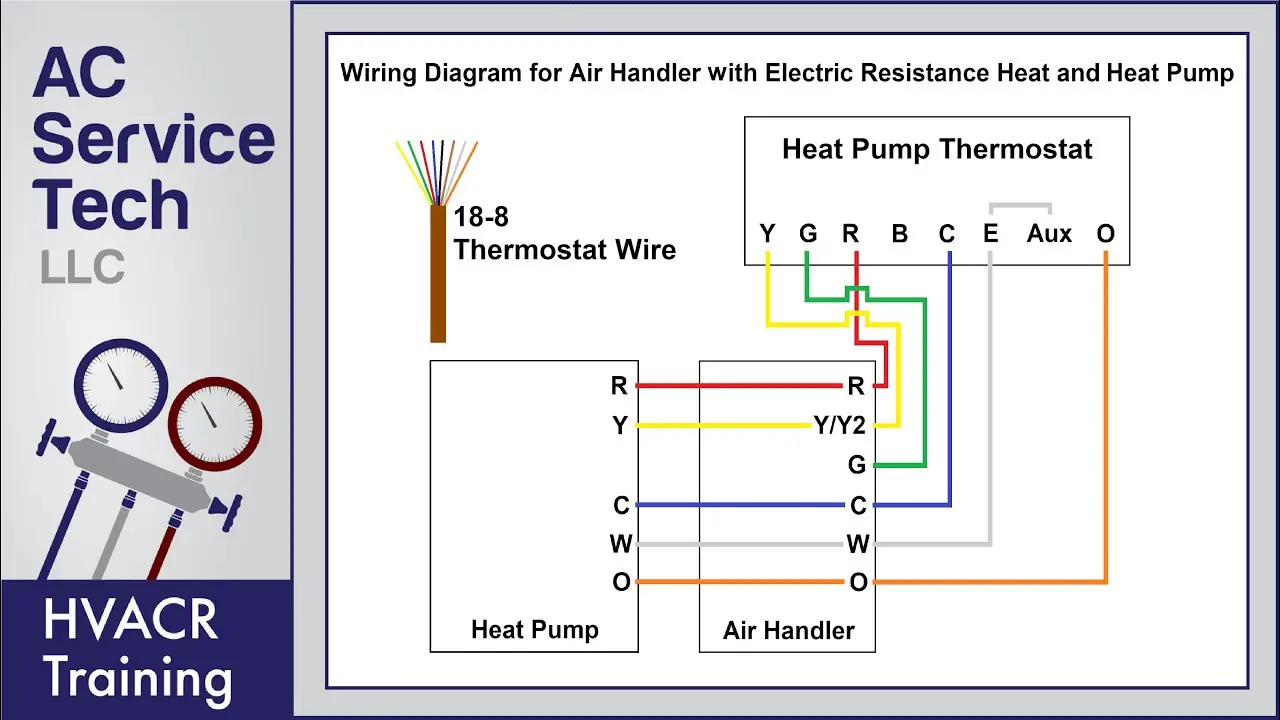
Identifying Wiring
Identifying wiring is crucial for connecting a heat pump thermostat. Ensure each wire matches the terminal labels for proper setup. This step avoids potential issues and ensures the system runs efficiently.
Connecting a heat pump thermostat can seem daunting, but understanding the wiring is key. Let’s demystify the process, starting with identifying the wiring. Knowing the different wires and their functions is crucial. This will help you avoid mistakes and ensure your system works efficiently.Color Codes
Wiring color codes are like a map for your thermostat. Typically, you’ll find wires in standard colors, each representing a specific function. For instance, the red wire usually stands for power (24V), while the white wire generally controls the heating. Knowing these color codes can save you a lot of headaches. Imagine trying to solve a puzzle without seeing the pieces. It’s just as confusing as wiring without understanding what each color means.Labeling Wires
Labeling wires is a simple yet effective trick. Before disconnecting any wires, label them with masking tape. Write down the function or the terminal it connects to. This practice will help you when it’s time to reconnect everything. It’s like leaving yourself a trail of breadcrumbs to follow back. It might seem tedious, but it ensures you won’t mix up connections. Have you ever tried putting together a piece of furniture with missing parts or unclear instructions? That’s how it feels if you don’t label your wires. Taking a few minutes to do this can save you from a lot of frustration later. Can you think of any other situations where labeling or organizing has saved you time? Share your thoughts in the comments below!
Credit: www.youtube.com
Removing Old Thermostat
Switching out an old thermostat for a new heat pump thermostat is a straightforward process if you follow the right steps. One of the first tasks is removing the old thermostat. This step ensures you have a clean slate to work with, and it can be simpler than you think. Let’s dive into the details of how you can do this effectively.
Disconnecting Wires
Before you begin, make sure to turn off the power to your heating and cooling system. This is crucial for your safety.
Once the power is off, remove the cover of your old thermostat. You might need a screwdriver for this. Inside, you will see several wires connected to different terminals.
Take a photo of the wire connections or label each wire with masking tape. This will help you remember where each wire goes when you install the new thermostat.
Carefully disconnect the wires from the terminals. Ensure none of the wires fall back into the wall, as this can make your job harder.
Removing Mounting
With the wires safely disconnected, it’s time to remove the thermostat from the wall.
Use a screwdriver to unscrew the mounting screws. Place these screws in a safe spot; you might need them for the new thermostat.
Gently pull the thermostat away from the wall. Be cautious of any remaining wires or attachments that might still be connected.
Check Best Thermostat Pricing in Amazon
** As an Amazon Associate, I earn from qualifying purchases.
Once the old thermostat is removed, you should see the mounting plate or wall anchors. Remove these as well to ensure a clean surface for the new thermostat.
Now, you have successfully removed your old thermostat. You are ready to start the installation process for your new heat pump thermostat.
Installing New Thermostat
Connect your heat pump thermostat with ease by following simple steps. Ensure wires are correctly labeled to avoid confusion. Securely attach the thermostat to the wall and test the system.
Installing a new thermostat for your heat pump can seem daunting, but with the right guidance, it becomes a manageable task. Whether you’re upgrading to a smart thermostat or simply replacing an outdated model, the process is straightforward. This guide will help you step by step, ensuring you get it done correctly and efficiently. ### Mounting the Thermostat First, turn off the power to your heat pump system. This is crucial for your safety. Remove the old thermostat. Keep track of the wires and their connections by taking a picture or labeling them. Next, place the new thermostat’s mounting plate on the wall. Use a level to make sure it’s straight. Mark the screw holes with a pencil. Drill pilot holes where you marked, then use the provided screws to attach the mounting plate to the wall. If your new thermostat requires a wall anchor, insert it before screwing in the plate. ### Connecting Wires Now, it’s time to connect the wires. Refer to the picture or labels you made earlier. Match each wire to its corresponding terminal on the new thermostat. Typically, wires are color-coded, but double-check the manual to be sure. For example, the red wire usually goes to the “R” terminal, while the white wire connects to the “W” terminal. Tighten the screws to secure the wires in place. Double-check all connections to ensure they are tight and secure. Loose wires can cause the thermostat to malfunction. Once the wires are connected, attach the thermostat to the mounting plate. It should snap or screw into place easily. Turn the power back on and test your new thermostat. Set it to heat or cool and make sure the system responds appropriately. Remember, taking your time and following each step carefully will help you avoid mistakes. Have you ever installed a thermostat before? How did it go? Let us know in the comments! By following these steps, you can successfully install your new heat pump thermostat and enjoy a more comfortable home.Configuring Settings
Configuring the settings on your heat pump thermostat can seem daunting at first, but it’s essential for optimizing energy efficiency and comfort. Understanding how to set the temperature and program the schedule will make your home more comfortable and save on energy bills. Let’s dive into these settings and how you can easily manage them.
Setting Temperature
Setting the right temperature is crucial. Start by deciding your preferred temperature range. Most people find that 68-72°F (20-22°C) is comfortable for living spaces.
Use the thermostat’s up and down buttons to adjust the temperature. Check the display to ensure the correct setting. You can always tweak it based on your comfort level.
Remember, every degree you lower the heat during winter can save up to 3% on heating costs. Experiment with small adjustments to find a balance between comfort and savings.
Programming Schedule
Programming the schedule on your thermostat allows you to set different temperatures for various times of the day. This feature is a game-changer for energy efficiency. Think about your daily routine and when you need the most heating or cooling.
For weekdays, you might want the heat to kick in just before you wake up and turn down when you leave for work. Set another increase before you return home in the evening. Weekends might have a different schedule based on your activities.
Most thermostats allow settings for four periods: wake, leave, return, and sleep. Utilize these periods to maximize comfort and efficiency. Don’t forget to review and adjust these settings seasonally.
What settings work best for your routine? Take a few minutes to explore these options and see how much you can save while staying comfortable.
Testing And Troubleshooting
Connecting a heat pump thermostat involves careful wiring and setup. Start by turning off power to the HVAC system. Follow the thermostat’s instructions, matching wires correctly to ensure proper operation.
Connecting your heat pump thermostat correctly is crucial for a comfortable home environment. Once you’ve installed it, the next step is to ensure it functions properly. This involves testing and troubleshooting. In this section, we’ll walk you through running a test cycle and identifying common issues you might face.Running A Test Cycle
After installation, run a test cycle to make sure your thermostat is working correctly. First, set your thermostat to a temperature higher than the current room temperature. This will trigger the heat pump to start heating. Listen for the system to turn on and check if warm air is coming from the vents. Next, lower the thermostat to a temperature below the current room temperature. This should turn off the heating and possibly start the cooling process, depending on your system. Again, listen for the system to turn off and verify if the air flow stops. If everything seems to be working fine, leave the thermostat at your desired setting and monitor it for a day to ensure it maintains the temperature accurately.Common Issues
Sometimes, things don’t go as planned. Here are common issues and how you can fix them: The heat pump doesn’t turn on: Check if the thermostat wires are connected correctly. Sometimes a loose wire can cause this issue. Also, ensure that the power supply to the heat pump is not interrupted. The system runs continuously: This might indicate a problem with the thermostat settings. Double-check the temperature settings and ensure the thermostat is not set to “hold” or “manual” mode. Inaccurate temperature reading: If your room feels warmer or cooler than the thermostat’s reading, the thermostat might be in a location that doesn’t reflect the room’s actual temperature. Try moving it to a more central location. No airflow: Ensure that the air filters are clean and not clogged. Dirty filters can restrict airflow and reduce the system’s efficiency. Have you encountered any of these issues? What steps did you take to resolve them? Sharing your experiences can help others troubleshoot more effectively. Remember, a well-functioning heat pump thermostat ensures your home remains comfortable throughout the year. Happy troubleshooting!Maintenance Tips
Maintaining your heat pump thermostat is crucial. It ensures the system runs efficiently and prolongs its lifespan. Regular care can prevent unexpected breakdowns and save on energy bills.
Regular Checks
Inspect the thermostat monthly. Look for any dirt or dust buildup. Clean the surface gently with a soft, dry cloth. Check the wiring connections. Ensure they are tight and secure. Loose wires can cause malfunctions. If you notice any damage, contact a professional for repair.
Seasonal Adjustments
Adjust your thermostat settings with each season. Set the thermostat to “cool” in the summer. In the winter, switch it to “heat.” This helps maintain a comfortable home environment. Also, consider lowering the temperature at night or when away. This can reduce energy consumption and lower utility bills.

Credit: cyncsupport.gelighting.com
Frequently Asked Questions
Can You Connect A Heat Pump To A Thermostat?
Yes, you can connect a heat pump to a thermostat. Ensure compatibility between the thermostat and heat pump for efficient operation.
How Many Wires For Heat Pump Thermostat?
A heat pump thermostat typically requires 8 wires. These wires include power, heating, cooling, fan, reversing valve, and emergency heat. Always check the manufacturer’s instructions for specifics.
What Wire Color Goes To What Terminal In A Thermostat?
Red wire goes to the R terminal. White wire goes to the W terminal. Yellow wire connects to the Y terminal. Green wire goes to the G terminal. Blue wire connects to the C terminal.
Why Is My Thermostat Not Sending Signal To My Heat Pump?
Your thermostat might not be sending a signal to your heat pump due to wiring issues, dead batteries, or a faulty thermostat. Check connections, replace batteries, or consult a technician.
Conclusion
Connecting a heat pump thermostat is simple with the right steps. Follow the instructions carefully. Always turn off the power first for safety. Match the wires correctly to avoid any issues. Check the manual if unsure. Testing the system ensures everything works well.
Enjoy a cozy home with your new thermostat. Happy heating!
Check Best Thermostat Pricing in Amazon
** As an Amazon Associate, I earn from qualifying purchases.