
Check Best Thermostat Pricing in Amazon
** As an Amazon Associate, I earn from qualifying purchases.
Calibrating your Nest Thermostat ensures it works efficiently. It keeps your home at the right temperature.
Nest Thermostats are smart devices that learn your habits. They help save energy and keep your home comfortable. But sometimes, they need calibration to ensure accuracy. You might notice your home feels warmer or cooler than expected. Calibrating the Nest Thermostat can fix this.
It is a simple process that anyone can do. In this guide, you’ll learn how to calibrate your Nest Thermostat step-by-step. Proper calibration means better energy savings and comfort. Let’s dive into the process and make your Nest Thermostat work perfectly.

Credit: www.youtube.com
Preparation
Before calibrating your Nest Thermostat, a few steps are necessary to prepare. Proper preparation ensures a smooth process and accurate results. Gather all needed tools and follow safety measures to avoid any issues.
Tools Needed
Having the right tools is crucial for calibration. Here’s a list of what you need:
- Phillips screwdriver
- Level
- Thermometer
- Smartphone or tablet
These tools help ensure the thermostat is installed correctly and level. A thermometer verifies temperature accuracy. Use a smartphone or tablet to access the Nest app for settings adjustments.
Safety Precautions
Safety is important during the calibration process. Follow these precautions:
- Turn off the power to your HVAC system.
- Wear insulated gloves to prevent electrical shock.
- Ensure your workspace is dry and well-lit.
By following these steps, you ensure safety and accuracy. Always double-check connections and follow the manual for specific instructions.

Credit: www.reddit.com
Accessing Settings
Accessing Settings on your Nest Thermostat can seem like a daunting task. However, with a little guidance, you can easily navigate through the menu and find what you need. This section will walk you through the steps to access and calibrate your Nest Thermostat settings efficiently.
Navigating The Menu
First, approach your thermostat and press the display. This action will wake up the device and bring up the main menu. You will see several icons, each representing different functionalities.
Using the outer ring of the Nest thermostat, rotate it to scroll through the menu options. The highlighted icon will change as you turn the ring, making it easy to navigate.
Press the display again once you have highlighted the gear icon, which represents the settings menu. This will allow you to access various settings, including the calibration options.
Finding Calibration Options
In the settings menu, continue to rotate the outer ring to scroll through the options. Look for an option labeled “Technical Info” or “Equipment.”
Once you have found the correct section, press the display to enter. Inside, you will find detailed information about your device, including the calibration settings.
Scroll down to find the “Calibrate” option. Select it by pressing the display. Follow the on-screen instructions to complete the calibration process.
Have you ever felt overwhelmed by the number of settings on your smart devices? Taking the time to explore and understand them can save you a lot of trouble in the long run.
Remember, calibrating your Nest Thermostat ensures that it accurately reads the temperature, making your home more comfortable and energy-efficient. Take a moment to familiarize yourself with these steps and enjoy a more efficient heating and cooling system.
Starting Calibration
Starting calibration for your Nest Thermostat ensures it operates efficiently. Proper calibration helps maintain your home’s comfort. It also optimizes energy use. Follow these steps to get the best results.
Initial Steps
First, power on your Nest Thermostat. Make sure it’s connected to Wi-Fi. This allows the device to access the latest software updates. Updates often include important calibration features.
Next, navigate to the settings menu. Select “Equipment” to review the current setup. Confirm that all connected devices are properly listed. Check that the thermostat is accurately sensing room temperature.
Setting Temperature Preferences
Set your preferred temperature range. Start by selecting “Temperature Preferences” in the settings menu. Adjust the comfort, eco, and away temperatures to suit your needs.
Ensure that your selections match your daily schedule. This fine-tunes the thermostat’s operation. Accurate settings help maintain a consistent and comfortable environment.
Lastly, monitor the thermostat’s performance over a few days. Make small adjustments if needed. This helps the device learn your habits and preferences.
Adjusting Settings
Calibrating your Nest Thermostat ensures it provides accurate readings and optimal performance. Adjusting settings is a crucial part of this process. These settings help the thermostat understand your preferences and home environment better, leading to a more comfortable living space. Let’s dive into two key areas: temperature adjustment and sensor calibration.
Temperature Adjustment
One of the first steps in adjusting your Nest Thermostat settings is to set the desired temperature. This can be done easily through the Nest app or directly on the thermostat. Start by selecting the mode you want – heating, cooling, or eco mode.
If you feel the current settings are not quite right, tweak them. For example, if you prefer a cooler environment, lower the temperature by a few degrees. A friend of mine found that even a 2-degree adjustment made a significant difference in their comfort level during summer.
Don’t forget to adjust the schedule as well. Nest Thermostat can learn your routine, but it’s good to review and refine it periodically. Have you noticed changes in your daily routine? Reflect these in your thermostat settings for optimal comfort and energy savings.
Sensor Calibration
Sensor calibration is another vital aspect of adjusting your Nest Thermostat settings. The built-in sensors detect temperature, humidity, and even if someone is home. Accurate sensor readings are crucial for the thermostat to function correctly.
To calibrate the sensors, go to the settings menu and select the ‘Equipment’ option. Follow the prompts to recalibrate. Make sure the thermostat is installed in a location free from drafts, direct sunlight, or obstructions. These factors can skew sensor readings.
Once, my thermostat was near a window that received a lot of afternoon sun. The temperature read higher than the actual room temperature. Relocating it solved the issue. Consider the placement in your home and make adjustments if needed.
Check Best Thermostat Pricing in Amazon
** As an Amazon Associate, I earn from qualifying purchases.
Have you ever felt your thermostat’s readings were off? Checking and calibrating the sensors might just be the solution. It’s a simple step that can significantly enhance your comfort and the efficiency of your heating and cooling system.
Adjusting settings on your Nest Thermostat may seem minor, but it has a big impact. Experiment with temperature adjustments and ensure your sensors are well-calibrated for the best experience. Have you tried these steps? How did they work for you?
Testing Calibration
Testing calibration of your Nest Thermostat is essential. It ensures your home’s temperature stays accurate. Begin by following these steps to test the calibration effectively.
Monitoring Performance
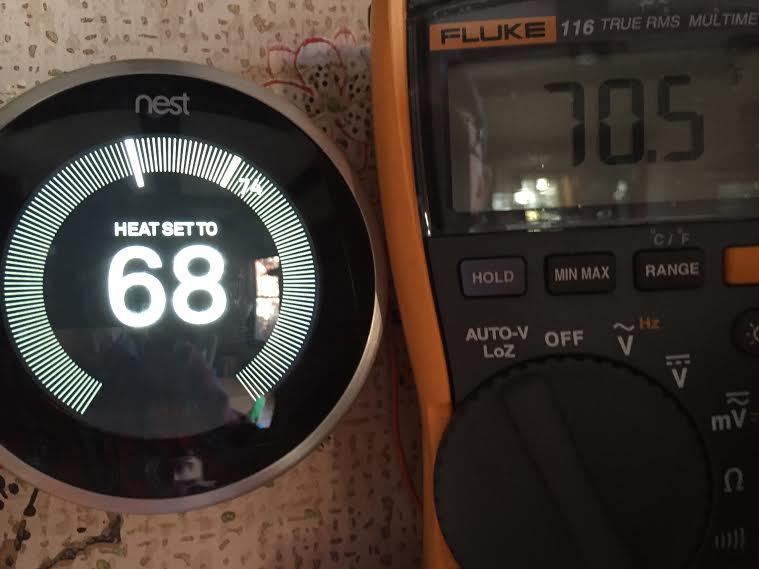
First, monitor your thermostat’s performance for a day. Check if the displayed temperature matches the actual room temperature. Use a reliable thermometer for this comparison.
Place the thermometer near your thermostat. Record readings every few hours. Compare these readings with the thermostat’s display. This helps identify any discrepancies.
Making Further Adjustments
If you notice a difference, adjust the Nest Thermostat settings. Use the Nest app or thermostat interface. Navigate to settings, then to temperature calibration.
Follow the on-screen instructions. Make small adjustments and save the changes. Continue monitoring the performance for another day.
If the problem persists, repeat the process. Small adjustments ensure precise calibration. This maintains comfort in your home.
Troubleshooting
Calibrating your Nest Thermostat can sometimes present challenges. These issues can affect the efficiency of your heating and cooling system. Understanding common problems and their solutions can save you time and frustration. Here are some common issues and how to resolve them.
Common Issues
Several common issues can arise during Nest Thermostat calibration. One frequent problem is inaccurate temperature readings. This can result in your home being too warm or too cold. Another issue is the thermostat not turning on or off the HVAC system as expected. This can lead to energy inefficiency and discomfort.
Additionally, some users report connectivity issues with the Nest Thermostat. This can prevent remote control through the app. Finally, a less common but still notable issue is the thermostat not holding a charge. This can cause the device to power off unexpectedly.
Solutions
For inaccurate temperature readings, first check the thermostat’s placement. Ensure it is not near heat sources or in direct sunlight. If the problem persists, recalibrate the thermostat through the settings menu.
If the thermostat is not controlling the HVAC system properly, check the wiring connections. Loose or incorrect wiring can cause this issue. Refer to the installation guide for proper wiring instructions.
For connectivity issues, restart your Wi-Fi router and the thermostat. Make sure your Wi-Fi signal is strong. If the problem continues, reset the network settings on your thermostat.
If your thermostat is not holding a charge, ensure it is connected to a constant power source. Check the power connector and the battery health in the settings menu.
Addressing these common issues can help ensure your Nest Thermostat works efficiently. Keep these solutions in mind for a smooth calibration process.
Final Steps
The final steps in calibrating your Nest Thermostat are crucial to ensure it functions accurately. Following these steps will save you from future headaches and ensure your home stays at the perfect temperature. Let’s dive into the last few tasks to wrap up the calibration process.
Saving Settings
Once you’ve adjusted the settings, it’s vital to save them. Press the Nest Thermostat ring to bring up the main menu. Navigate to the settings icon and select it.
Scroll down to find the “Save” option. Confirm your settings by pressing the ring again. This ensures all your hard work doesn’t go to waste.
Have you ever forgotten to save a document and lost hours of work? The same frustration applies here. Don’t skip this step!
Regular Maintenance
Calibrating your Nest Thermostat isn’t a one-time task. Regular checks ensure it continues to operate efficiently. Set a reminder to recalibrate your thermostat every few months.
Dust and debris can affect its performance. Clean the device gently with a dry cloth to keep it functioning optimally.
Imagine your thermostat as a car. Regular maintenance keeps it running smoothly. Can you recall the last time you cleaned your thermostat?
These final steps might seem tedious, but they are essential. They ensure your Nest Thermostat remains reliable and accurate. Take these steps seriously to enjoy a comfortable home environment.

Credit: www.reddit.com
Frequently Asked Questions
How Do I Recalibrate My Nest Thermostat?
To recalibrate your Nest thermostat, go to “Settings,” select “Technical Info,” and then choose “Network. ” Follow the instructions to restart.
Why Is My Nest Thermostat Not Reading Correct Temperature?
Your Nest thermostat might not read the correct temperature due to incorrect placement, dirty sensors, or software issues. Make sure it’s not near heat sources or drafts. Clean the device and check for software updates.
Why Does My Nest Thermostat Setting Not Match My Home’s Temperature?
Your Nest thermostat may not match your home’s temperature due to incorrect placement, thermostat calibration issues, or blocked airflow. Ensure proper installation and check for software updates.
How Do I Recalibrate My Thermostat?
To recalibrate your thermostat, refer to the user manual for specific instructions. Usually, access settings, select calibration, and adjust temperature.
Conclusion
Calibrating your Nest Thermostat can improve comfort and efficiency. Follow the steps carefully for accurate settings. Take your time with each step. A well-calibrated thermostat helps maintain a consistent temperature. Enjoy a more comfortable home environment. Proper calibration can also save on energy bills.
It’s worth the effort. Keep your manual handy for reference. Make adjustments as needed over time. A little attention now leads to long-term benefits. Your home will thank you. Happy calibrating!
Check Best Thermostat Pricing in Amazon
** As an Amazon Associate, I earn from qualifying purchases.