
Check Best Thermostat Pricing in Amazon
** As an Amazon Associate, I earn from qualifying purchases.
You charge the Nest thermostat by connecting it to your home’s electrical system. The thermostat uses power from the heating and cooling system’s wires.
Many homeowners wonder about charging their Nest thermostat. If you’re new to smart home devices, it can be confusing. The Nest thermostat is designed to be user-friendly and efficient. It connects to your HVAC system’s wires to draw power. This setup eliminates the need for external chargers.
Understanding how this works can save you time and ensure your device functions correctly. In this blog post, we’ll explain the steps to charge your Nest thermostat. We’ll also provide tips to keep it running smoothly. Stay tuned to learn more about maintaining your smart home’s energy efficiency.
Charging Basics
Understanding how to charge your Nest Thermostat is essential for its optimal performance. This guide will explain the charging basics and provide key insights. Learn how the Nest Thermostat charges and its battery lifespan. This knowledge ensures your device remains efficient.
How Nest Thermostat Charges
The Nest Thermostat charges via the HVAC system wiring. When your HVAC system operates, it sends power to the thermostat. The thermostat uses this power to charge its internal battery. This process ensures the device stays powered without needing frequent manual charging.
If your HVAC system isn’t running often, the thermostat might not charge efficiently. In such cases, a C-wire or a compatible power adapter can help. These tools provide a continuous power source, ensuring the thermostat charges properly.
Battery Lifespan
The battery lifespan of a Nest Thermostat typically ranges between 2-5 years. This depends on usage and environmental factors. Frequent use of the HVAC system can shorten the battery life. However, regular charging through the C-wire or power adapter can help maintain battery health.
Keep an eye on the battery status through the Nest app. It provides alerts if the battery level drops too low. Replacing the battery might be necessary after a few years. This ensures the thermostat continues to function efficiently.

Credit: www.onehoursmarthome.com
Checking Battery Status
Checking the battery status of your Nest Thermostat is crucial. It ensures your device runs smoothly without interruptions. Knowing the status helps you decide when to charge the thermostat. Here are two easy ways to check the battery status.
Using The Device
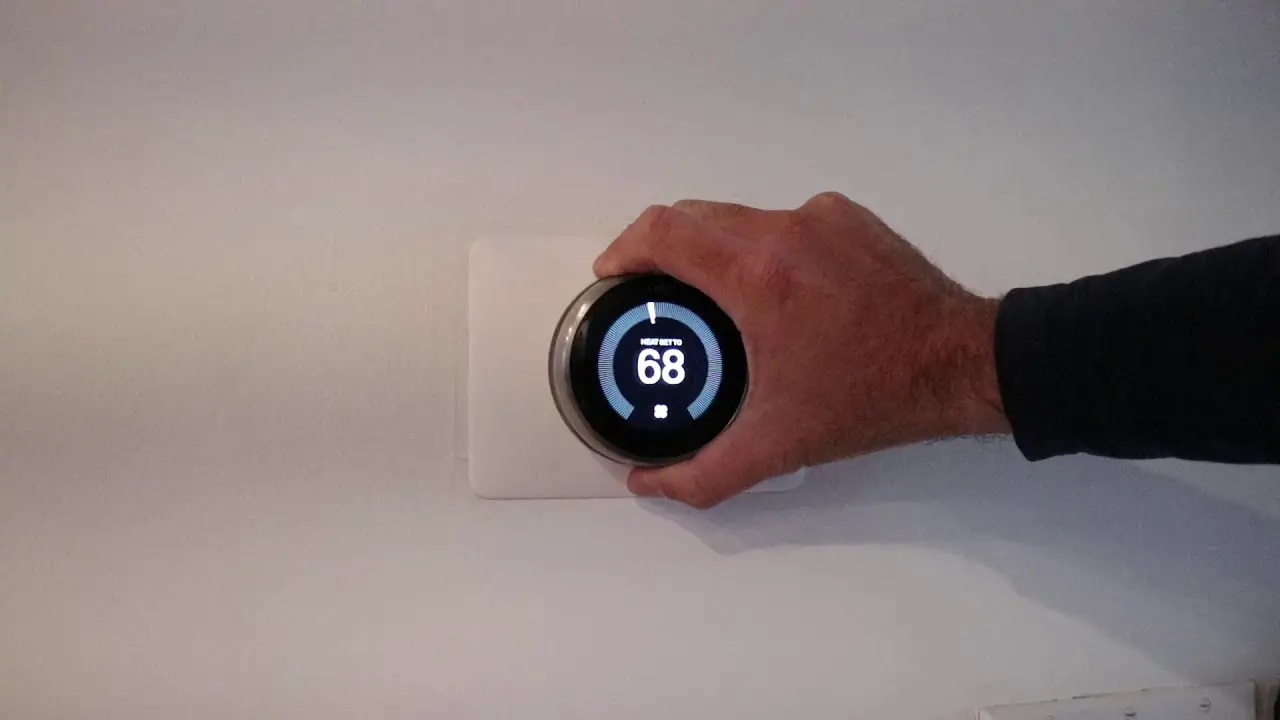
You can check the battery status directly on the thermostat. Start by waking up the Nest Thermostat. Press the ring on the thermostat to bring up the menu. Select ‘Settings’ and then ‘Technical Info.’ Scroll down to the ‘Power’ section. Here, you will see the battery level displayed. If the battery level is low, it will show a message to charge the device.
Using The App
Another way to check the battery status is through the Nest app. Open the app on your smartphone. Tap on the Nest Thermostat icon. Go to ‘Settings’ and then ‘Technical Info.’ In this section, you will find the battery level. The app will notify you if the battery is low. This method allows you to check the battery without touching the device.
Manual Charging
Manual charging of your Nest Thermostat is a straightforward process. This method can be handy if your thermostat’s battery is low. Here, we will guide you through the steps needed to manually charge it.
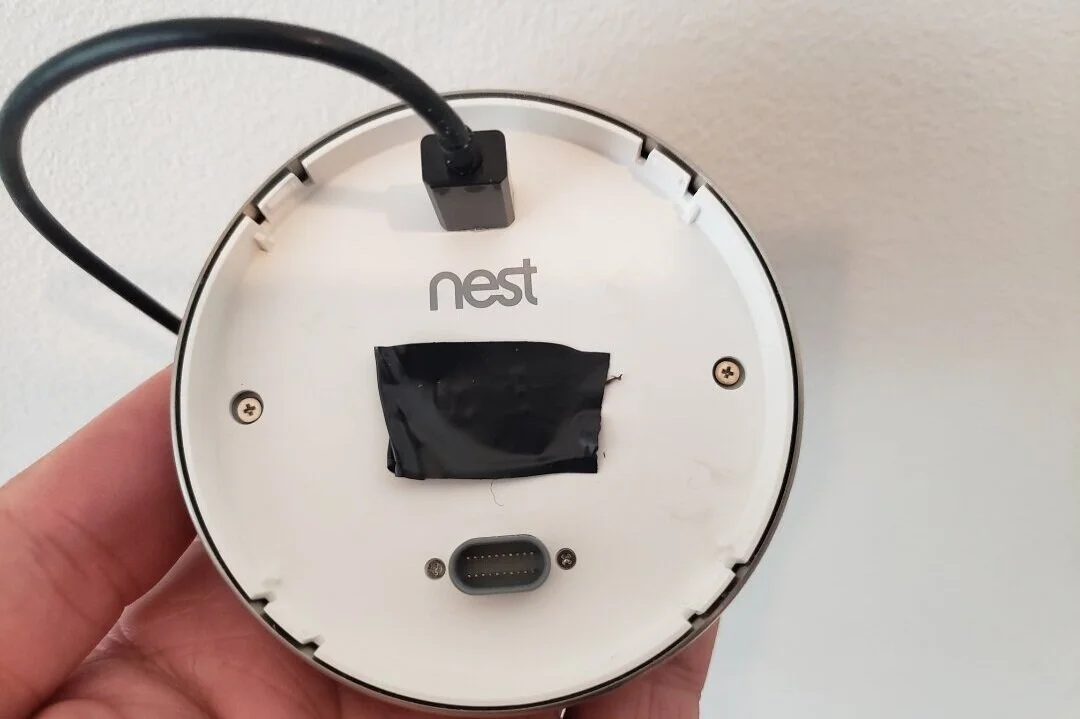
Removing The Thermostat
First, gently pull the thermostat display off the base. Hold the display and pull it straight towards you. Be careful not to twist or turn it. This action will expose the charging port on the back of the display.
Using A Usb Cable
Next, locate a compatible USB cable. Insert one end of the cable into the charging port on the back of the thermostat display. Plug the other end into a USB power adapter or a computer. Allow the thermostat to charge for a few hours. Once charged, reattach the display to the base. Make sure it snaps securely back into place.
Credit: www.onehoursmarthome.com
Troubleshooting
Encountering issues while charging your Nest Thermostat can be frustrating. Whether it’s not powering on or not holding a charge, troubleshooting these problems is essential. Let’s delve into common issues and their solutions to get your Nest Thermostat up and running smoothly.
Common Issues
One common issue is the Nest Thermostat not holding a charge. This can often be due to a low battery or a power outage.
Another issue is the display not turning on, which might indicate a problem with the thermostat’s connection to the base or the power source.
You might also experience unexpected reboots or the thermostat not responding to inputs. This can be due to software glitches or hardware problems.
Solutions And Tips
To address a low battery, connect your thermostat to a USB charger. Use the provided charging port and let it charge for at least an hour. This can often resolve the issue.
If the display isn’t turning on, ensure that the thermostat is securely connected to the base. Sometimes, simply removing and reattaching it can restore the connection.
For unexpected reboots, try a software reset. Hold down the thermostat ring until the screen turns off and then back on. This simple step can clear minor software issues.
Additionally, check your home’s wiring. Loose or disconnected wires can prevent the thermostat from receiving power. Ensure all wires are properly connected and secured.
Lastly, consider updating the firmware. Outdated software can cause compatibility issues and glitches. Connect your thermostat to Wi-Fi and check for updates in the settings menu.
Have you encountered any other peculiar issues with your Nest Thermostat? Sharing your experiences might help others troubleshoot their devices more effectively.
Remember, patience and a systematic approach are key. By following these practical tips, you can resolve most charging issues and enjoy a comfortable home environment.
Maintaining Battery Health
Keeping your Nest Thermostat’s battery in good health is essential for ensuring it functions effectively over time. A well-maintained battery can mean the difference between a smoothly operating device and one that frequently dies or malfunctions. Here are some practical tips on how to maintain your Nest Thermostat’s battery health.
Regular Maintenance
Regular maintenance is key to extending the life of your Nest Thermostat’s battery. Dust and dirt can accumulate over time, affecting the device’s performance and battery life. Make it a habit to clean your thermostat at least once a month. Use a soft cloth to wipe away any dust or debris.
Check Best Thermostat Pricing in Amazon
** As an Amazon Associate, I earn from qualifying purchases.
Check the wiring connections to ensure they are secure. Loose connections can cause the thermostat to draw more power, reducing battery life. Tighten any loose wires to prevent this issue.
Optimizing Settings
Optimizing your thermostat’s settings can significantly impact battery health. Set your thermostat to energy-saving modes when you’re not home. This reduces the load on the battery and extends its life.
Adjust the brightness of the display. A dimmer display uses less power, helping your battery last longer. Navigate to the settings menu and reduce the brightness level to a comfortable yet power-saving level.
Pay attention to software updates. Nest frequently releases updates that can improve efficiency and battery usage. Ensure your device is set to update automatically or check for updates regularly.
Have you ever noticed your thermostat running low on battery more often than usual? It might be time to review these maintenance tips and settings. Taking a few moments to optimize and clean your device can save you from future battery woes.

Credit: www.reddit.com
When To Replace The Battery
Replace the Nest Thermostat battery when the device shows a low battery warning. A blinking red light also indicates it’s time for a new battery.
When to Replace the Battery Your Nest Thermostat is a marvel of modern technology, but like any device, it requires a bit of maintenance. One key component is the battery. Knowing when to replace it can save you from unexpected breakdowns and keep your home comfortable all year round. ###Signs Of Battery Failure
The first sign of a failing battery is often a low battery warning on the thermostat screen. You might also notice that your thermostat is not staying connected to Wi-Fi. Another sign is if the thermostat suddenly becomes unresponsive or slow to respond to your inputs. One time, I noticed my Nest Thermostat was disconnecting from Wi-Fi every other day. It turned out the battery was almost drained. Replacing it fixed the issue instantly. So, if you see any of these signs, it’s time to consider a battery replacement. ###Replacement Process
Replacing the battery in your Nest Thermostat is straightforward. First, you need to remove the thermostat from the wall. Gently pull it off to avoid damaging the connectors. Locate the battery compartment at the back. Use a small screwdriver if necessary to open it. Remove the old battery and insert a new one, making sure it’s aligned correctly. After replacing the battery, snap the thermostat back onto the wall mount. Ensure it clicks into place securely. Reconnect it to Wi-Fi and check if it’s functioning properly. Have you experienced any signs of battery failure in your Nest Thermostat? Replacing the battery is a simple task that can save you a lot of hassle. Don’t wait until it’s too late—keep an eye on your thermostat’s performance and take action when needed.Faqs
When dealing with technology, especially something as crucial as your Nest Thermostat, questions are bound to arise. Charging your Nest Thermostat can seem complicated, but it doesn’t have to be. To make things easier, we’ve gathered some of the most common questions and provided expert answers to help you understand the process better.
Common Questions
1. How do I know if my Nest Thermostat needs charging?
Your Nest Thermostat will display a low battery warning on the screen. Additionally, if the device becomes unresponsive or the display turns off, it may indicate a low battery.
2. Can I charge my Nest Thermostat with a USB cable?
Yes, you can. Simply remove the thermostat from the wall and plug it into a USB port using a compatible cable. Charging takes about 30 minutes to an hour.
3. Do I need to turn off my HVAC system while charging the Nest Thermostat?
It’s not necessary. However, if you feel more comfortable doing so, you can turn off your HVAC system while charging the thermostat to ensure safety.
Expert Answers
1. Why does my Nest Thermostat battery drain quickly?
Several factors can cause this. Common reasons include Wi-Fi connectivity issues, outdated software, or problems with the HVAC system. Regular maintenance and updates can help mitigate these issues.
2. What should I do if the Nest Thermostat does not charge?
First, check the USB cable and port for any damages. If everything seems fine, try a different USB cable or port. If the problem persists, contact Nest support for further assistance.
3. How can I maintain the battery life of my Nest Thermostat?
Keep your device software updated and ensure a stable Wi-Fi connection. Regularly check your HVAC system to ensure it’s functioning correctly. These steps help maintain optimal battery life.
Have you ever faced a unique challenge while charging your Nest Thermostat? Share your experience or questions below. Let’s help each other make the most out of our smart home devices!
Frequently Asked Questions
Does The Nest Thermostat Need To Be Charged?
The Nest thermostat typically draws power from your HVAC system. It does not usually need manual charging.
How Do I Know My Nest Thermostat Is Charging?
Check the Nest thermostat display. A blinking light or battery icon indicates it is charging.
What Happens When The Nest Thermostat Battery Dies?
The Nest thermostat stops working when the battery dies. It will not control your HVAC system. Charge or replace the battery to restore functionality.
How Do You Change The Battery In A Nest Thermostat?
To change the battery in a Nest thermostat, remove the thermostat from the base. Replace the old batteries with new AAA ones. Reattach the thermostat to the base.
Conclusion
Charging your Nest Thermostat is simple. Follow the steps we’ve discussed. Ensure it connects properly to the power source. Regularly check the battery level on the display. Proper maintenance helps extend its lifespan. Keep your thermostat clean and free of dust.
This ensures accurate temperature readings. With these tips, your Nest Thermostat will work efficiently. Enjoy a comfortable and energy-saving home environment. Thank you for reading and happy saving!
Check Best Thermostat Pricing in Amazon
** As an Amazon Associate, I earn from qualifying purchases.