
Check Best Thermostat Pricing in Amazon
** As an Amazon Associate, I earn from qualifying purchases.
Replace thermostat housing when it leaks or shows visible cracks. Also, replace if the engine overheats frequently.
Thermostat housing plays a crucial role in your car’s cooling system. It houses the thermostat and manages coolant flow. A damaged housing can lead to coolant leaks and engine overheating. Regular checks can help identify early signs of wear and tear.
Ignoring these signs can cause severe engine damage and costly repairs. Replacing the thermostat housing ensures your engine runs efficiently. Always consult your vehicle’s manual for specific guidelines. Using quality parts can enhance performance and longevity. Regular maintenance keeps your vehicle in top condition. Stay proactive to avoid unexpected breakdowns.
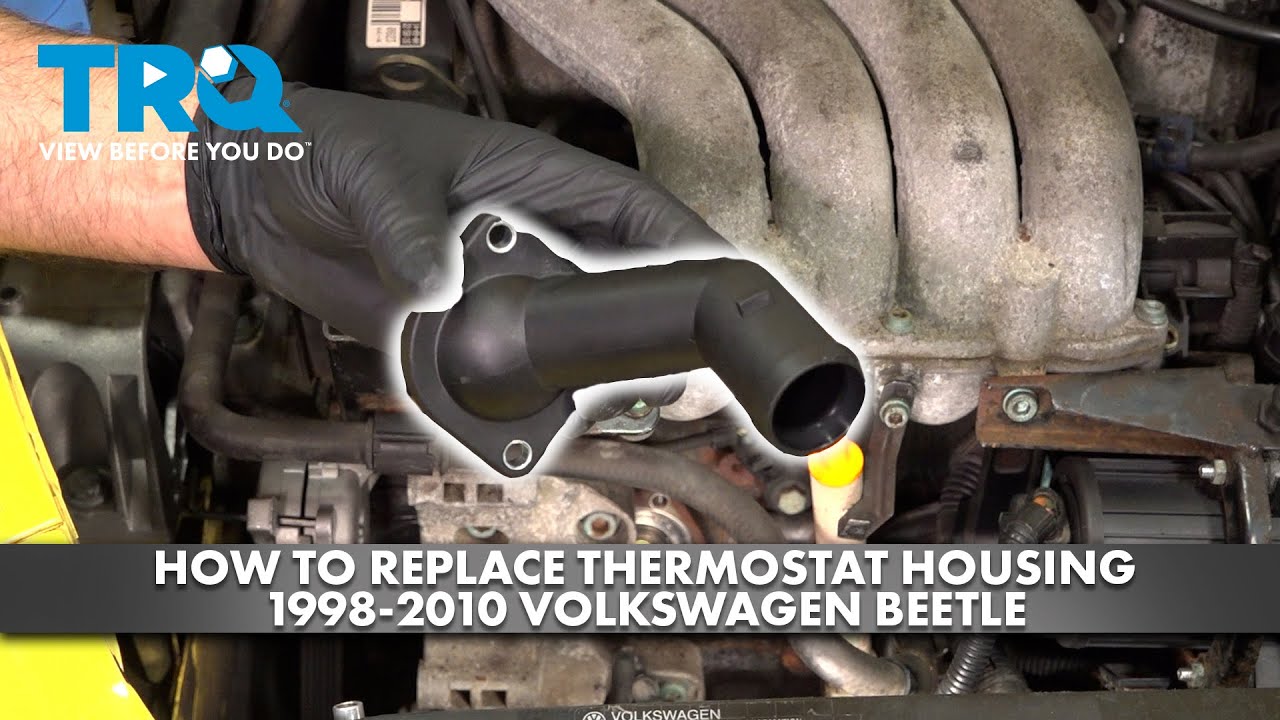
Credit: m.youtube.com
- Signs Of Thermostat Housing Failure
- Impact On Vehicle Performance
- Diagnosing Thermostat Housing Issues
- Optimal Replacement Intervals
- Choosing The Right Replacement
- The Replacement Process
- Common Mistakes To Avoid
- Maintaining Thermostat Housing Post-replacement
- Cost Considerations For Replacement
- When To Consult A Professional
- Frequently Asked Questions
- Conclusion
Signs Of Thermostat Housing Failure
The thermostat housing is an important part of your car’s cooling system. It holds the thermostat, which regulates the flow of coolant. Knowing the signs of thermostat housing failure can help you avoid major engine problems. Keep an eye out for these key indicators.
Temperature Fluctuations
Temperature fluctuations can mean trouble. If your car’s temperature gauge goes up and down a lot, it might be a sign. The thermostat housing could be failing. This can lead to engine overheating or running too cold.
Coolant Leaks
Coolant leaks are another clear sign. Look for puddles under your car. If you see green or orange fluid, it might be coolant. A cracked thermostat housing can cause these leaks. Low coolant levels can lead to engine damage.
| Sign | Description |
|---|---|
| Temperature Fluctuations | Gauge goes up and down a lot |
| Coolant Leaks | Puddles of green or orange fluid |
Watch for these signs to keep your engine safe. Replacing a faulty thermostat housing can save you from costly repairs.

Credit: www.amazon.com
Impact On Vehicle Performance
Replacing the thermostat housing is crucial for your car’s health. A faulty thermostat housing can affect your vehicle’s performance. Let’s explore how it impacts engine overheating and fuel consumption.
Engine Overheating
Engine overheating is a serious issue. A malfunctioning thermostat housing can cause this. The thermostat regulates the engine’s temperature. If it fails, the engine may overheat.
Overheating can damage the engine. It can lead to costly repairs. You might notice steam from the hood. The temperature gauge might show a high reading. These are signs of overheating.
A damaged thermostat housing can also cause coolant leaks. Low coolant levels contribute to overheating. Ensure the thermostat housing is in good condition to avoid these problems.
Inefficient Fuel Consumption
Inefficient fuel consumption is another impact. A faulty thermostat housing affects engine efficiency. The engine may run too hot or too cold.
When the engine runs too cold, it burns more fuel. This happens because the engine stays in a warm-up phase. As a result, fuel consumption increases.
When the engine runs too hot, it can also affect fuel efficiency. The engine works harder to cool down. This extra effort uses more fuel.
Regularly check the thermostat housing. Replace it if necessary. This ensures optimal fuel consumption and engine performance.
| Impact | Cause |
|---|---|
| Engine Overheating | Faulty thermostat housing |
| Inefficient Fuel Consumption | Improper engine temperature regulation |
In summary, replacing a faulty thermostat housing is vital. It prevents engine overheating and ensures efficient fuel consumption.
Diagnosing Thermostat Housing Issues
Understanding when to replace your thermostat housing is crucial for maintaining engine health. Diagnosing issues early can save you from costly repairs. This section will guide you through the process of identifying problems with your thermostat housing.
Visual Inspection
A visual inspection is the first step in diagnosing thermostat housing issues. Start by checking for visible leaks. Look around the housing and adjacent areas for any signs of coolant leakage.
Inspect the housing for cracks or corrosion. Even small cracks can lead to major problems if left unchecked. Use a flashlight to get a better view of hard-to-see areas.
Take note of any discoloration or rust around the housing. These could be indicators of coolant leaks or internal damage.
Diagnostic Tools
Using diagnostic tools can provide a more accurate assessment of your thermostat housing condition. A pressure tester is an essential tool for this.
Connect the pressure tester to the radiator cap opening. Pump the tester to the recommended pressure level. Observe the gauge for any pressure drops. A drop in pressure indicates a possible leak in the thermostat housing.
Another useful tool is an infrared thermometer. Point the thermometer at the thermostat housing to measure its temperature. Compare the readings with the manufacturer’s specifications. Inconsistent readings may suggest a faulty thermostat or housing.
Lastly, a digital multimeter can help check the thermostat’s electrical connections. Ensure all connections are secure and functioning properly.
Optimal Replacement Intervals
Knowing the optimal replacement intervals for your thermostat housing can save you from unexpected breakdowns. Regular checks ensure your engine runs smoothly. Below are key aspects to consider.
Manufacturer Recommendations
Manufacturers provide specific guidelines for replacing thermostat housings. Always refer to your vehicle’s manual. Typically, the recommendations vary by model and make.
| Vehicle Type | Replacement Interval |
|---|---|
| Compact Cars | Every 50,000 miles |
| SUVs | Every 60,000 miles |
| Trucks | Every 70,000 miles |
Mileage Milestones
Monitoring your car’s mileage helps in timely replacements. Usually, thermostat housings last for a significant duration. Here are some milestones to consider:
- 0-30,000 miles: Rarely need replacement unless faulty.
- 30,000-60,000 miles: Start checking for signs of wear.
- 60,000+ miles: Highly recommended to replace.
Regular maintenance checks are crucial. Always watch for signs of a failing thermostat housing. Early detection can prevent more significant engine issues.
Choosing The Right Replacement
Replacing a thermostat housing is crucial for maintaining your vehicle’s performance. Selecting the right replacement ensures your engine runs smoothly and prevents overheating. There are several factors to consider when choosing a new thermostat housing.
Oem Vs. Aftermarket
When selecting a new thermostat housing, you have two main options: OEM (Original Equipment Manufacturer) and Aftermarket. Each has its own set of advantages and disadvantages.
| OEM | Aftermarket |
|---|---|
|
|
Choosing between OEM and Aftermarket depends on your budget and quality requirements. If you prefer guaranteed compatibility, OEM is the safer choice. For cost savings, Aftermarket options are worth considering.
Check Best Thermostat Pricing in Amazon
** As an Amazon Associate, I earn from qualifying purchases.
Material Considerations
The material of the thermostat housing affects its durability and performance. The two common materials are plastic and metal.
- Plastic:
- Lightweight
- Resistant to corrosion
- May crack under extreme heat
- Metal:
- More durable
- Handles high temperatures better
- Heavier and prone to rust
Choosing the right material depends on your driving conditions. For high-temperature environments, metal is the better choice. For everyday use, plastic may suffice.
The Replacement Process
Replacing a thermostat housing can seem daunting. With the right tools and steps, it’s manageable. Follow this guide to ensure a smooth replacement process.
Tools Required
- Socket Set – A comprehensive socket set is essential.
- Wrenches – Both adjustable and fixed sizes.
- Screwdrivers – Phillips and flathead.
- Gasket Scraper – To remove old gasket material.
- New Thermostat Housing – Ensure it fits your vehicle model.
- New Gasket – For a secure and leak-free fit.
- Coolant – To refill the system after replacement.
- Drain Pan – To catch any spilled coolant.
- Clean Rags – For wiping and cleaning surfaces.
Step-by-step Guide
- Cool the Engine – Let the engine cool completely. This prevents burns and injuries.
- Drain Coolant – Place a drain pan under the radiator. Open the drain valve to release coolant.
- Locate the Thermostat Housing – It’s typically near the top of the engine, connected to a hose.
- Remove Housing Bolts – Use your socket set to remove the bolts securing the housing.
- Detach the Housing – Gently pull the housing away from the engine. Be careful not to damage the hose.
- Remove the Old Gasket – Use the gasket scraper to clean the surface. Ensure no residue remains.
- Install the New Gasket – Place the new gasket onto the clean surface.
- Attach the New Housing – Position the new housing and secure it with the bolts. Tighten evenly.
- Reconnect the Hose – Ensure the hose is securely attached to the new housing.
- Refill Coolant – Fill the radiator with new coolant. Check for leaks around the new housing.
- Start the Engine – Let the engine run and monitor the temperature. Ensure it remains stable.
By following these steps, you can replace your thermostat housing efficiently. Always double-check your work for safety and reliability.
Common Mistakes To Avoid
Replacing the thermostat housing can seem simple. Yet, many make mistakes during this process. These mistakes can lead to bigger problems. This section covers common pitfalls and how to avoid them.
Incorrect Installation
One common mistake is incorrect installation. This happens when the housing is not placed properly. Make sure the housing fits snugly. If it’s loose, it can cause leaks.
Another issue is using the wrong tools. Always use the correct tools for the job. This ensures the housing is tight and secure. Check the alignment before tightening the bolts. Misalignment can lead to cracks.
| Common Error | Solution |
|---|---|
| Loose Housing | Ensure a snug fit |
| Wrong Tools | Use correct tools |
| Misalignment | Check alignment before tightening |
Neglecting Coolant System
Another mistake is neglecting the coolant system. The coolant system needs regular checks. Failing to do so can cause overheating. Always inspect the coolant level before replacing the housing.
Old or dirty coolant can also cause issues. Replace the coolant if it looks dirty. This helps the new housing function well. Pay attention to any signs of leaks in the system.
- Inspect coolant level regularly
- Replace dirty coolant
- Check for leaks
Keeping the coolant system in good shape is key. This ensures your new thermostat housing lasts longer.
Maintaining Thermostat Housing Post-replacement
Replacing your thermostat housing is only half the job. Proper maintenance ensures it lasts longer and functions efficiently. Follow these guidelines to keep your thermostat housing in top shape.
Routine Checks
Regular inspection of your thermostat housing is crucial. Look for any signs of wear, cracks, or leaks. Use a flashlight to check hard-to-see areas. Perform these checks monthly to catch problems early.
- Check for leaks: Look around the housing and nearby areas.
- Inspect seals: Ensure all gaskets and seals are intact.
- Temperature monitoring: Use a thermometer to check the engine temperature. It should be within the normal range.
Preventive Measures
Taking preventive steps can extend the life of your thermostat housing. Use high-quality coolant to prevent corrosion. Replace the coolant as recommended by the manufacturer.
- Use the right coolant: Always use the coolant specified for your vehicle.
- Flush the system: Flush the cooling system every two years to remove debris.
- Monitor coolant levels: Keep an eye on the coolant levels and top up as needed.
Follow these preventive measures to avoid unexpected failures. A well-maintained thermostat housing ensures a smoothly running engine.
Cost Considerations For Replacement
Understanding the cost implications of replacing your thermostat housing is crucial. This process involves several factors, including whether you opt for DIY or professional service and budgeting for parts and labor. Let’s delve into these aspects to help you make an informed decision.
Diy Vs. Professional Service
Choosing between DIY and professional service can significantly impact your expenses.
- DIY: Doing it yourself can save labor costs. But, you need the right tools and skills. Mistakes can lead to more expenses.
- Professional Service: Hiring a professional ensures the job is done correctly. It includes labor costs but offers peace of mind.
Budgeting For Parts And Labor
To budget effectively, consider the cost of parts and labor separately.
| Component | Estimated Cost |
|---|---|
| Thermostat Housing | $50 – $150 |
| Labor (Professional Service) | $100 – $200 |
For a DIY project, you may only spend on parts. For professional service, factor in labor costs.
Always get multiple quotes from mechanics. Compare the total cost to your budget.

Credit: www.howacarworks.com
When To Consult A Professional
Knowing when to replace your thermostat housing is crucial. Sometimes, the symptoms are straightforward. Other times, they are more complex. Consulting a professional ensures your vehicle’s health. Here are instances when you should seek expert help.
Complex Symptoms
Complex symptoms can be confusing. For example, you might see coolant leaks, engine overheating, or strange noises. These signs indicate deeper issues. A professional can diagnose the problem accurately.
| Symptom | Potential Issue |
|---|---|
| Coolant Leaks | Cracked housing or gasket failure |
| Engine Overheating | Thermostat stuck closed |
| Strange Noises | Loose or damaged parts |
Attempting to fix complex symptoms yourself can lead to further damage. Trust a professional to handle these issues.
Warranty Preservation
New cars often come with warranties. These warranties cover various parts and repairs. Replacing your thermostat housing yourself might void these warranties.
Here are some reasons to consult a professional:
- Warranty compliance: Professionals know the warranty terms.
- Proper documentation: Certified repairs come with documentation.
- Quality assurance: Professionals use approved parts and procedures.
Preserving your warranty saves money. Always check your warranty terms before attempting repairs.
Frequently Asked Questions
How Do You Know If You Need A New Thermostat Housing?
Check for coolant leaks, engine overheating, or temperature gauge fluctuations. Inspect for cracks or corrosion on the housing.
How Do I Know If My Thermostat Housing Is Bad?
Check for coolant leaks, overheating, or temperature fluctuations. Inspect for cracks or corrosion around the housing. Listen for unusual noises.
How Often Should Thermostat Housing Be Replaced?
Replace the thermostat housing every 50,000 to 100,000 miles. Check for leaks, cracks, or corrosion regularly.
How Long Does Thermostat Housing Last?
A thermostat housing typically lasts between 100,000 to 150,000 miles. Regular maintenance can extend its lifespan.
Conclusion
Replacing your thermostat housing is crucial for engine health. Monitor for leaks, overheating, and unusual noises. Timely replacement can prevent costly repairs and ensure optimal performance. Regular checks will help maintain your vehicle’s efficiency. Always consult a professional for accurate diagnosis and replacement.
Stay proactive to keep your car running smoothly.
Check Best Thermostat Pricing in Amazon
** As an Amazon Associate, I earn from qualifying purchases.