

Check Best Thermostat Pricing in Amazon
** As an Amazon Associate, I earn from qualifying purchases.
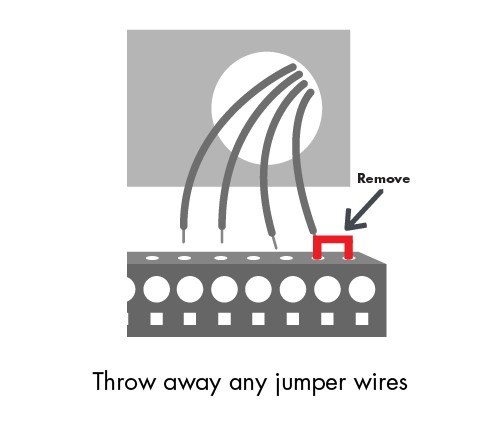
A jumper wire in a thermostat has a specific purpose. It connects different terminals to ensure proper function.
Without it, your thermostat might not work correctly. Thermostats control your home’s heating and cooling. They rely on a series of connections to operate smoothly. One crucial part is the jumper wire. This small wire may seem insignificant, but it plays a vital role.
It bridges gaps between terminals, ensuring signals pass through correctly. Understanding its purpose can help you troubleshoot issues. It also aids in understanding how your thermostat works. Let’s dive into why the jumper wire is essential and how it benefits your thermostat.
Introduction To Jumper Wire
Have you ever wondered why your thermostat has a small wire connecting two terminals? This tiny but crucial component is known as the jumper wire. Understanding its role can help you manage your heating and cooling systems more efficiently.
Definition
A jumper wire is a short piece of wire used to connect two points in an electrical circuit. In thermostats, it’s often used to bridge specific terminals.
This connection allows the thermostat to perform multiple functions without needing additional wiring. It’s a simple yet ingenious solution that simplifies installation and operation.
Importance
Why is the jumper wire so important? It ensures your thermostat can control both heating and cooling systems effectively. Without it, you might face issues like your heating system not turning on during winter.
Consider the time I had to troubleshoot my own thermostat. The heating wasn’t working, and after checking everything else, I found the jumper wire had come loose. Reconnecting it fixed the issue immediately.
Think about it: a small wire can make a big difference in your home’s comfort. Have you checked your thermostat’s jumper wire lately? It might be the key to solving any lingering issues you have.

Credit: diy.stackexchange.com
Function In Thermostat
The jumper wire in a thermostat connects two terminals. This helps the thermostat control heating and cooling systems. It ensures the HVAC system works correctly.
### Function in Thermostat Jumper wires in thermostats are like the unseen heroes of your home’s heating and cooling system. Their primary function is to ensure that your thermostat communicates effectively with your HVAC system. You might not think about them often, but without these small wires, your home’s temperature regulation could go haywire. ####Temperature Regulation
Jumper wires play a crucial role in temperature regulation. They help bridge the connections between different terminals in your thermostat. Imagine trying to talk to someone without a phone line; that’s what your thermostat faces without jumper wires. When you adjust the temperature, the jumper wire ensures the command is sent accurately to your HVAC system. This means your heater or air conditioner responds precisely, keeping your home comfortable. Have you ever experienced fluctuations in your room temperature despite setting a specific degree? It could be due to a faulty or missing jumper wire. Maintaining these wires ensures you get the exact temperature you desire. ####System Compatibility
Jumper wires also ensure system compatibility. Not all HVAC systems are the same, and neither are thermostats. These wires help make sure that different systems can work together seamlessly. For instance, some HVAC systems have separate terminals for heating and cooling. A jumper wire can connect these terminals, allowing a single thermostat to manage both functions. This means you don’t have to buy a new thermostat every time you upgrade your HVAC system. Have you ever upgraded your heating system, only to find your thermostat no longer works? Jumper wires can often solve this compatibility issue, saving you time and money. By understanding the importance of jumper wires, you can better manage your home’s comfort levels. Next time you experience any issues with your thermostat, consider checking those tiny but mighty jumper wires. They might just be the key to your problem.Types Of Jumper Wires
Understanding the types of jumper wires in thermostats can be quite helpful. Different types of jumper wires serve various purposes. Let’s explore the main categories of jumper wires used in thermostats.
Standard Jumper Wires
Standard jumper wires are the most common type used in thermostats. They are simple and easy to identify. These wires connect two terminals within the thermostat. This connection allows the thermostat to control multiple systems. For example, heating and cooling systems. Standard jumper wires are typically red or white. They are often made of copper. The simplicity of these wires makes them a popular choice. They are easy to install and replace if needed.
Specialized Jumper Wires
Specialized jumper wires are less common but very important. These wires are designed for specific thermostat models. They might have unique features or connectors. Specialized jumper wires often handle more complex tasks. For example, they might connect to advanced HVAC systems. These wires can be different colors. They are usually made of high-quality materials. The design ensures they work efficiently in complex systems. Specialized jumper wires require careful handling. Incorrect installation can lead to issues. Always refer to the thermostat’s manual for guidance.
Credit: support.ecobee.com
Installation Process
The installation process for a jumper wire in a thermostat can seem daunting at first. But with the right steps and safety measures, you can complete it smoothly. Let’s walk through the installation process together, step-by-step.
Safety Measures
Your safety is paramount. Always turn off the power to your HVAC system before you begin. This prevents any electrical accidents.
Use a voltage tester to ensure there is no power running to the thermostat. Wearing insulated gloves is also a good precaution. These simple steps can prevent potential hazards.
Step-by-step Guide
Here’s a detailed guide to help you install the jumper wire:
- Turn Off Power: Locate the circuit breaker that controls your HVAC system and switch it off. Double-check with a voltage tester.
- Remove Thermostat Cover: Gently remove the cover of your thermostat. Usually, it snaps off or requires a small screwdriver.
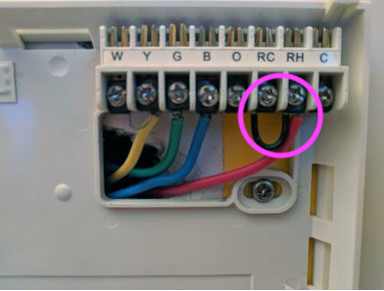
- Identify Terminals: Look at the terminal labels inside the thermostat. You will typically see labels like R, RC, RH, W, Y, and G.
- Add the Jumper Wire: Connect the jumper wire between the RC and RH terminals. These terminals may already have a small bridge or wire connecting them. If not, simply insert the jumper wire.
- Secure Connections: Ensure all wires are firmly connected to their respective terminals. Loose connections can cause malfunctioning.
- Replace Thermostat Cover: Snap or screw the cover back on the thermostat. Make sure it is secure.
- Turn On Power: Go back to the circuit breaker and switch the power back on. Check your thermostat to ensure it is functioning correctly.
Installing a jumper wire in your thermostat can seem technical, but it’s very doable with the right guidance. Have you installed a jumper wire before? What challenges did you face? Share your experience in the comments!
Common Issues
Understanding the purpose of jumper wires in thermostats is essential for troubleshooting. Jumper wires ensure proper communication between different thermostat terminals. However, issues can arise that affect their performance. Here are some common issues you may encounter.
Faulty Connections
One common issue is faulty connections. This occurs when the jumper wire is not properly attached. Loose connections can cause the thermostat to malfunction. It may lead to inaccurate temperature readings. To fix this, ensure the wire is securely connected. Check for corrosion or debris at the terminals. Clean and reattach the wire if needed.
Wire Damage
Another issue is wire damage. This can happen due to wear and tear. Damaged wires can interrupt the signal. This can cause the thermostat to stop working. Inspect the wire for cuts or frays. Replace any damaged wires immediately. Using a multimeter can help check the wire’s continuity.
Troubleshooting Tips
Encountering issues with your thermostat? Troubleshooting tips can help you solve problems quickly. Learn to identify and fix common issues with the jumper wire in your thermostat. This guide will walk you through simple steps to get your thermostat working again.
Check Best Thermostat Pricing in Amazon
** As an Amazon Associate, I earn from qualifying purchases.
Identifying Problems
First, check if your thermostat is not responding. Look for error messages or unusual behavior. Examine the display for any signs of trouble. If the screen is blank, it might indicate a power issue.
Next, inspect the jumper wire. Ensure it is correctly placed. A loose or misplaced jumper wire can cause problems. Make sure the connections are secure and in the right terminals.
Diy Solutions
Start by turning off the power to your thermostat. Safety first. Remove the thermostat cover. Locate the jumper wire. Check if it is damaged. Replace it if necessary.
Use a small screwdriver to tighten any loose connections. Reattach the cover and turn the power back on. Test the thermostat to see if it is working properly.
If the problem persists, consider resetting the thermostat. Refer to the user manual for specific instructions. Resetting can often resolve minor issues.
Maintenance
Maintaining your thermostat’s jumper wire is essential for ensuring optimal performance and longevity. A well-maintained jumper wire helps your thermostat function effectively and prevents unexpected breakdowns. Below, we cover some key maintenance practices, including regular inspections and cleaning techniques, to keep your thermostat in top shape.
Regular Inspections
Regular inspections are crucial for spotting any wear and tear on your jumper wire. Check the wire every few months to ensure it is securely connected and free from damage. Look for signs of fraying or corrosion, as these can lead to malfunctions.
During inspections, gently tug on the wire to confirm it is firmly attached. A loose connection can cause intermittent issues, leading to inconsistent temperature control. If you notice any problems, address them immediately to avoid further complications.
Don’t forget to examine the surrounding components. A damaged wire can impact other parts of your thermostat, leading to more extensive repairs. By catching issues early, you can save time and money in the long run.
Cleaning Techniques
Cleaning your jumper wire is an easy yet effective way to maintain your thermostat’s performance. Dust and debris can accumulate over time, affecting the wire’s connectivity. Use a soft, dry cloth to gently wipe the wire and its connections.
If you encounter stubborn dirt, a small amount of rubbing alcohol on a cotton swab can help. Avoid using water or harsh chemicals, as they can damage the wire and its connections. Be gentle to prevent any unintentional damage during cleaning.
Regular cleaning not only improves your thermostat’s functionality but also extends its lifespan. A clean jumper wire ensures a consistent connection, which is vital for accurate temperature control. Make this a part of your routine maintenance to keep your thermostat running smoothly.
Ever wondered if a clean jumper wire can really make a difference? Try it yourself and notice the improved performance. Share your experience with others, and let them know how simple maintenance can lead to better home comfort.
Professional Assistance
Jumper wires in thermostats can be tricky. Sometimes, professional help is needed. This ensures your system runs smoothly. A technician can pinpoint issues and fix them. They have the right tools and experience.
When To Call A Technician
Not sure how to handle the jumper wire? Call a technician. If your heating or cooling system stops working, seek help. Strange noises or smells are signs too. Technicians can diagnose and fix problems fast.
Cost Considerations
Hiring a technician costs money. The price varies by location and issue. Simple fixes are cheaper. Complex problems cost more. Always get a quote first. This helps avoid surprises. Some companies offer service plans. These can save money over time.
Credit: p1-auth.sensi.copeland.com
Frequently Asked Questions
Why Is There A Jumper Wire On My Thermostat?
A jumper wire on your thermostat connects two terminals to complete the circuit, ensuring proper function. It helps control your HVAC system efficiently.
What Is A Jumper Wire Used For?
A jumper wire connects electronic components or circuits. It is used for breadboarding, prototyping, and testing.
What Is The Jumper Between Y And W On A Thermostat?
The jumper between Y and W on a thermostat connects the cooling and heating systems. It signals both to activate.
What Is The Function Of Jumper Connector?
A jumper connector is used to configure or modify electronic circuits. It connects specific pins on a motherboard or circuit board, enabling or disabling hardware functions.
Conclusion
The jumper wire in thermostats plays a crucial role. It connects different terminals, enabling optimal function. Without it, thermostats might not perform effectively. Understanding its purpose helps in troubleshooting issues. Regular maintenance ensures a longer thermostat lifespan. Always consult the user manual for specific details.
This simple component can make a big difference in your home’s comfort. Keep your thermostat in top shape for efficient heating and cooling.
Check Best Thermostat Pricing in Amazon
** As an Amazon Associate, I earn from qualifying purchases.