
Check Best Thermostat Pricing in Amazon
** As an Amazon Associate, I earn from qualifying purchases.
Are you tired of sweating through the summer heat or shivering during the winter chill because your thermostat just won’t cooperate? Learning how to wire your thermostat can be the key to unlocking a perfectly comfortable home environment.
You don’t need to be an electrician or a tech wizard to master this skill. By taking control of your thermostat wiring, you can save money, improve energy efficiency, and enjoy the satisfaction of a job well done. This guide is designed to simplify the process, step-by-step, ensuring that you have all the knowledge you need to get it right the first time.
So, are you ready to transform your home into a cozy haven? Keep reading, and discover how easy it can be to wire your thermostat like a pro.

Credit: colemanhvacparts.com
- Tools And Materials Needed
- Safety Precautions
- Identifying Thermostat Wires
- Removing The Old Thermostat
- Mounting The New Thermostat
- Connecting The Wires
- Installing The Thermostat Base
- Attaching The Thermostat Cover
- Testing The Thermostat
- Troubleshooting Common Issues
- Maintenance Tips
- Frequently Asked Questions
- Conclusion
Tools And Materials Needed
Essential tools for wiring a thermostat include a screwdriver, wire stripper, and voltage tester. Necessary materials involve thermostat wires, mounting screws, and electrical tape. Ensure all tools and materials are ready before starting to install for a smooth process.
Wiring a thermostat can seem daunting, but with the right tools and materials, the task becomes much simpler. Knowing precisely what you need can save time and prevent frustration. When I first attempted to wire a thermostat, I realized the importance of having everything ready. It’s like prepping for a recipe—having all the ingredients laid out makes the process smoother and more enjoyable. Let’s dive into the essentials that will make your thermostat wiring project a success.Basic Tools
Before starting your wiring project, you need a few basic tools. A screwdriver is a must-have. Ensure you have both Phillips and flat-head types. Wire strippers are crucial for removing insulation without damaging the wire. A multimeter can be incredibly handy for checking electrical connections. Have a drill available if you need to make new holes for mounting the thermostat.Safety Equipment
Safety should always come first. Use insulated gloves to protect your hands from electrical currents. Safety goggles shield your eyes from dust and debris. Ensure your working area is well-lit to avoid mistakes. You wouldn’t want to miss a step because you couldn’t see clearly.Materials Needed
You’ll need a new thermostat compatible with your heating and cooling system. Check the manual to ensure compatibility. Gather electrical tape to secure and insulate wire connections. Wire nuts are essential for joining wires securely. If your wiring project involves new installations, having extra wire on hand is beneficial. You never know when you might need it.Installation Accessories
Consider purchasing mounting screws if your thermostat doesn’t come with them. A level is useful to ensure your thermostat is straight. A pencil or marker is great for marking positions on the wall. This small step can prevent misalignment and hassle later.Additional Tips
Organize your tools and materials before starting. It’s easier to work when everything is within reach. Think about the layout of your space. Will you need extension cords or extra lighting? Are there obstacles like furniture or fixtures that might get in the way? Planning ahead can save you time and energy. What other tips or tools have you found useful in wiring projects? Share your experiences and insights in the comments below.Safety Precautions
Wiring a thermostat requires careful attention to safety precautions. Electricity can be dangerous. Ensuring your safety is crucial before starting any electrical work. This guide will cover essential safety measures to follow. Learn how to protect yourself and complete the task safely.
1. Turn Off The Power
Always switch off the power before working with wires. Locate the circuit breaker panel. Turn off the power to the thermostat. This step prevents electric shock. Ensure the power is off by checking with a voltage tester.
2. Use The Right Tools
Gather the necessary tools. Use insulated tools to avoid electric contact. This includes screwdrivers and wire strippers. Check the tools for any damage. Damaged tools can pose safety risks.
3. Wear Safety Gear
Safety gear is essential. Wear insulated gloves to protect your hands. Safety goggles protect your eyes from debris. Proper gear minimizes the risk of injury.
4. Label Wires Properly
Label wires before disconnecting them. This helps in reconnecting them correctly. Use colored tape or markers. Incorrect wiring can damage the thermostat.
5. Follow Manufacturer Instructions
Read the thermostat’s manual carefully. Follow the manufacturer’s instructions closely. Each thermostat may have specific requirements. Ignoring these can cause malfunctions or hazards.
6. Keep Area Dry
Ensure the work area is dry. Water and electricity are a dangerous mix. Avoid working in wet or damp areas. This reduces the risk of electric shock.
7. Seek Professional Help If Unsure
Unsure about any step? Contact a professional electrician. It’s better to seek help than risk safety. Proper guidance ensures the job is done right.
Identifying Thermostat Wires
Identifying thermostat wires simplifies the wiring process. Each wire has a color code for easy recognition. These colors guide the connection, ensuring proper thermostat functionality.
Understanding how to identify thermostat wires is a crucial step in the wiring process. Whether you’re upgrading to a smart thermostat or replacing an old unit, knowing which wire goes where can be daunting. Let’s break it down into simple steps that even beginners can follow.Understanding Thermostat Wire Colors
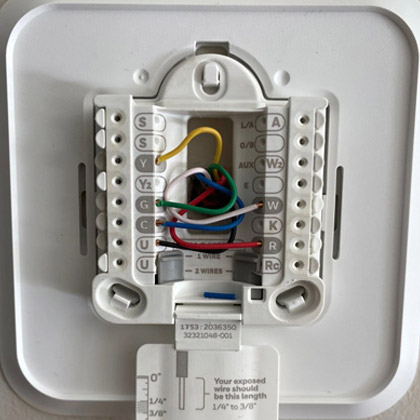
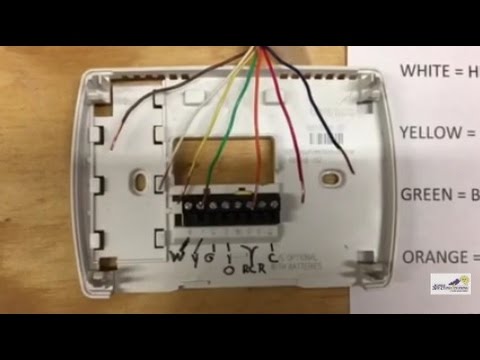
Thermostat wires usually come in a variety of colors, each with a specific function. Red is typically the power wire and connects to the R terminal. White often connects to the W terminal, controlling the heating system. The green wire usually connects to the G terminal for the fan, while yellow is for the Y terminal, which handles cooling. But don’t just rely on color. Always refer to the wiring diagram specific to your HVAC system. Have you ever found that the colors don’t match the expected terminals? That’s why checking the diagram is key.Using A Multimeter For Wire Identification
A multimeter is your best friend when identifying thermostat wires. Set it to measure voltage and test each wire. For example, when you connect the multimeter to the red wire and a ground, it should read around 24 volts, indicating it’s the power wire. If you’ve never used a multimeter, don’t worry. Many online tutorials can guide you through the process. Testing wires this way gives you peace of mind that you’re connecting them correctly.Labeling Your Thermostat Wires
Labeling wires before disconnecting them from the old thermostat can save you a lot of hassle. Use small pieces of tape and a pen to mark each wire according to its function. Once, I skipped this step and ended up spending extra time figuring out which wire went where. Trust me, this simple task can save you from a headache.Referencing The Hvac System Manual
Your HVAC system’s manual is a goldmine of information. It provides detailed wiring diagrams and explanations of each wire’s function. If you’ve lost the manual, many manufacturers offer PDFs online. Have you ever ignored a manual and later regretted it? In this case, taking a few minutes to look through it can make the process much smoother.Ensuring Compatibility With Your Thermostat
Before you start wiring, ensure your thermostat is compatible with your HVAC system. Some thermostats require a common wire (C wire) for power. If your system doesn’t have one, you might need to run a new wire or use an adapter. Checking compatibility beforehand avoids unnecessary trips to the hardware store. It’s a small step that can save you time and frustration.Engaging With Online Communities For Help
Don’t hesitate to reach out to online forums or communities if you’re unsure about wiring. Many experienced DIYers and professionals are willing to help. When was the last time you solved a problem with a quick online search? Engaging with others can provide new insights and solutions you might not have considered. It’s like having a virtual toolbox of knowledge at your fingertips. Identifying thermostat wires doesn’t have to be intimidating. With the right approach and tools, you can wire your thermostat confidently and enjoy a comfortable home environment.Removing The Old Thermostat
Start by turning off the power to ensure safety. Remove the old thermostat cover carefully. Take note of the wiring configuration for easy installation of the new thermostat.
Removing the old thermostat can be a straightforward task if approached methodically. Before you dive in, ensure safety by turning off the power to your HVAC system. This prevents any electrical mishaps and protects your system from possible damage. Once you’re ready, follow these steps to make the transition smooth and efficient.Step 1: Gather Your Tools
To start, you’ll need a few basic tools: a screwdriver, masking tape, and a pen. Having these at hand ensures you can work without interruptions. Masking tape and pen are particularly useful for labeling wires, a step that will save you time and confusion later.Step 2: Turn Off Power
Locate the circuit breaker that controls your HVAC system and switch it off. This step is crucial for safety. It may seem like a hassle, but it’s a necessary precaution to prevent shocks or damage.Step 3: Remove The Thermostat Cover
Gently pull or unscrew the cover of your thermostat to expose the wiring. Be careful not to use excessive force, as this can damage the unit. If you’re unsure, refer to the thermostat’s manual for specific instructions.Step 4: Take A Picture Of The Wiring
Before touching any wires, take a clear picture of the existing wiring setup. This serves as your reference when installing the new thermostat. A simple snapshot can save you from guesswork and ensure correct reconnections.Step 5: Label The Wires
Use masking tape to label each wire according to its terminal. Most thermostats have standard labels like R, W, Y, G, etc. This step is crucial for matching the wires to the correct terminals in your new thermostat.Step 6: Disconnect The Wires
With the wires labeled, use your screwdriver to loosen the terminal screws. Carefully disconnect each wire, ensuring they don’t slip back into the wall. This is where your labels and picture come in handy as a guide.Step 7: Remove The Old Thermostat Base
Once the wires are free, unscrew the old thermostat base from the wall. Keep the screws; you might need them for the new installation. Removing the base completes the process, and you’re now ready to install your new thermostat. Engaging in these steps not only prepares you for the new installation but also deepens your understanding of your home’s HVAC system. Have you ever thought about how a small device like a thermostat can influence your comfort and energy savings? By taking the time to install it yourself, you gain control and insight into an essential part of your home.Mounting The New Thermostat
Mounting the new thermostat is a crucial step in installation. Proper mounting ensures efficient operation and accurate temperature control. Follow these simple steps to mount your thermostat securely.
Preparing The Wall Surface
Start by cleaning the wall surface. Remove any dust or debris. This helps the thermostat mount securely. A clean surface ensures a tight fit.
Positioning The Thermostat
Choose a suitable location on the wall. Avoid direct sunlight or drafts. These can affect the thermostat’s accuracy. Place it at eye level for easy access.
Aligning The Thermostat Base
Align the thermostat base against the wall. Use a level to ensure it is straight. Proper alignment prevents installation issues. It also improves the aesthetic appeal.
Screwing The Base To The Wall
Use screws to attach the base to the wall. Make sure they are tight. Loose screws can cause the thermostat to fall. A secure base is essential for safe operation.
Attaching The Thermostat To The Base
Place the thermostat onto the mounted base. It should snap into place easily. Ensure all connections are secure. This allows the thermostat to function properly.
Connecting The Wires
Connecting the wires of your thermostat can seem daunting at first, but it’s easier than you might think. You’ll need to pay close attention to detail, and in no time, you’ll have your thermostat up and running. Whether you’re upgrading an old system or setting up a new one, understanding the basics of wire connections is crucial.
Matching Wire Colors
Wire colors are your guiding map. Typically, thermostats use standard color codes for easy identification. Red usually connects to the power source, while green might be for the fan. Have you ever been puzzled by the jumble of colors behind your thermostat? It’s like a colorful secret code waiting to be cracked.
Before disconnecting anything, take a picture of the current setup. This visual reference can be a lifesaver if things get confusing. Remember, matching the correct colors ensures your system functions properly. Make sure each wire matches its corresponding terminal.
Securing Wire Connections
Once you’ve matched your wires, securing them firmly is the next step. Loose connections can lead to erratic thermostat behavior or even system failure. Have you felt the frustration of a thermostat that seems to have a mind of its own? This is often due to poor wire connections.
Use wire nuts or terminal screws to ensure each connection is tight. Give each wire a gentle tug to test its security. If it slips out, tighten the connection further. This simple step can save you from endless troubleshooting later on.
Always ask yourself: Is there a chance any wire could come loose? Double-check your work to prevent future headaches. You’ll thank yourself later.
By focusing on these aspects, you’ll be well on your way to a smoothly functioning thermostat. As you handle these wires, think of the satisfaction of doing it yourself. Isn’t it empowering to master the details of your home systems?
Installing The Thermostat Base
Installing the thermostat base is a crucial step in thermostat wiring. This process ensures your thermostat functions accurately and reliably. The base acts as a connector, linking the thermostat to the system’s wiring.
Preparing The Area
Turn off the power to your heating and cooling system. Locate the ideal spot for your thermostat. Avoid areas near windows and doors. Use a level to mark the spot on the wall. This ensures the thermostat sits straight.
Check Best Thermostat Pricing in Amazon
** As an Amazon Associate, I earn from qualifying purchases.
Mounting The Base
Use a drill to make holes where marked. Insert wall anchors to secure the base. Align the thermostat base with the drilled holes. Screw the base into the wall firmly. Check for any loose screws and tighten them.
Connecting Wires
Identify the wire terminals on the base. Match each wire to its corresponding terminal. Common wire colors are red, white, green, and yellow. Use a screwdriver to secure each wire to its terminal. Double-check connections for accuracy.
Checking Stability
Ensure the base is secure against the wall. Test the stability by gently pushing the base. If it moves, tighten screws further. A stable base prevents future issues. This guarantees your thermostat works efficiently.
Attaching The Thermostat Cover
Attaching the thermostat cover is the final step in wiring your thermostat. This task not only completes the installation but also protects the wiring. A properly attached cover ensures safety and functionality. Let’s dive into how you can attach the thermostat cover with ease.
Aligning The Cover Properly
First, ensure the cover aligns with the base. Misalignment can cause issues. Carefully check the orientation of the cover. It should match the base perfectly. This step prevents damage and ensures a snug fit.
Securing The Cover In Place
Once aligned, it’s time to secure the cover. Use the screws provided with your thermostat. Insert them into the designated holes. Tighten them firmly, but don’t overdo it. Over-tightening can crack the cover.
With the cover attached, test the thermostat. Turn it on to check if it works. Ensure all settings respond correctly. A well-attached cover should not affect functionality. If there are issues, double-check the alignment and screws.
Ensuring Safety
Safety is paramount when dealing with electrical devices. Confirm the cover is securely attached. Loose covers can expose wires. This poses a safety risk. Always double-check the attachment for peace of mind.
Testing The Thermostat
Connecting a thermostat involves handling wires carefully. Begin by switching off the power supply for safety. Match each wire to its terminal, often marked with letters like R, W, Y, and G. Ensure connections are secure, then test the thermostat to verify proper functioning.
Testing your thermostat is a crucial step to ensure it functions properly, saving you from unexpected chilly nights or sweltering days. Before assuming your thermostat is ready to go, you’ll want to make sure it is correctly communicating with your HVAC system. You don’t need to be an expert electrician to do this; just follow a few simple steps and you’ll be set.Powering On
First, ensure your thermostat is properly connected to the power source. Flip the switch on your circuit breaker to the “on” position. If your thermostat is battery-powered, insert fresh batteries. You should see the display light up almost immediately. If nothing happens, double-check your wiring connections. I once spent an entire afternoon troubleshooting only to find a wire was slightly loose. A quick fix saved me a potential service call.Checking Temperature Settings
Once powered on, check the current room temperature displayed on the thermostat. Is it close to what you expect? Adjust the set temperature to see if the HVAC system kicks in. For instance, set the temperature a few degrees higher than the current room temperature to test the heating function. If the system doesn’t respond, you might need to revisit the wiring or consult the thermostat’s manual. But often, it’s just a matter of fine-tuning the settings. Are the temperature settings intuitive? If not, consider whether this thermostat is the right one for your needs. You want something user-friendly, especially if multiple people will be adjusting it. Testing your thermostat isn’t just a one-time task. Regular checks can prevent a lot of future headaches. What would you rather spend your time on—a quick test or an uncomfortable evening?
Credit: cyncsupport.gelighting.com
Troubleshooting Common Issues
Facing issues with thermostat wiring can be frustrating. Ensure wires are correctly connected to their terminals. Double-check labels and colors to avoid confusion. Proper installation keeps your heating and cooling systems running smoothly.
Wiring a thermostat might seem straightforward, but even the simplest tasks can run into snags. When the temperature in your home isn’t quite right or the thermostat doesn’t seem to work, it can be frustrating. Troubleshooting common issues can save you both time and money, ensuring your home stays comfortable without needing a professional’s help.No Power
If your thermostat display is blank, it might be due to a lack of power. First, check if the circuit breaker is tripped. If it is, simply reset it. In some cases, the issue might be with the batteries. Replace them and see if the display turns on. If the problem persists, ensure the wires are securely connected to the correct terminals. Double-checking these connections can often resolve the power issue.Incorrect Temperature
Does your room feel like a sauna, but the thermostat reads a chilly 65 degrees? This might be due to incorrect temperature readings. Start by ensuring the thermostat is installed in a proper location. It shouldn’t be near heat sources or direct sunlight, as these can throw off its readings. You can also recalibrate the thermostat. Most units have a manual or digital calibration option. Consult your thermostat’s manual for specific instructions. If you notice consistent discrepancies, there might be an issue with the sensor. Have you ever faced these issues? Sometimes, a simple fix is all it takes. But if problems persist, it might be time to consider professional help. The goal is to keep your space cozy and your mind at ease.Maintenance Tips
Keeping your thermostat in good shape is crucial for maintaining the efficiency of your heating and cooling system. Regular maintenance not only ensures that your home stays comfortable but also saves energy and money. Whether you’re a seasoned DIY enthusiast or a beginner, these maintenance tips will guide you in keeping your thermostat running smoothly.
Regular Cleaning
Dirt and dust can accumulate inside your thermostat, affecting its performance. Gently remove the cover and use a soft brush or a can of compressed air to clean the interior. Ensure the thermostat is off to avoid any electrical mishaps.
Check The Wiring
Loose or damaged wiring can lead to inaccurate temperature readings. Inspect the wires periodically to ensure they are securely connected. If you notice any fraying, it might be time to call a professional.
Calibrate Your Thermostat
An uncalibrated thermostat can cause your HVAC system to run inefficiently. Compare your thermostat’s reading with a reliable thermometer. Adjust accordingly if there’s a significant difference to maintain the desired room temperature.
Update The Software
If you have a smart thermostat, check for software updates. Manufacturers often release updates to improve functionality and efficiency. Make it a habit to check for updates every few months.
Replace Batteries
Low batteries can cause your thermostat to malfunction. Replace them at least once a year, or as soon as you notice any issues. A fresh set of batteries can prevent unexpected system failures.
Test It Regularly
Run your heating or cooling system to test if the thermostat is working properly. Listen for any unusual noises or delays in response. Regular testing helps catch issues before they become major problems.
Have you ever thought about how small steps can lead to big savings? By incorporating these simple maintenance tips, you can extend the life of your thermostat and keep your home comfortable. Isn’t it worth the effort for peace of mind and a more efficient household?
Credit: www.youtube.com
Frequently Asked Questions
What Wires Go Where On A Thermostat?
Thermostat wires typically connect as follows: Red to R (power), White to W (heat), Yellow to Y (cooling), Green to G (fan), and Common wire (blue or black) to C. Always consult the thermostat manual for specific wiring instructions, as configurations can vary based on system type.
Does The R Wire Go To The Rc Or Rh Thermostat?
The R wire usually connects to the RH terminal for heating systems. For combined heating and cooling systems, it connects to the RC terminal. Always refer to your thermostat’s manual for specific instructions.
How To Wire A 3 Wire Thermostat?
Turn off power to the HVAC system. Connect the red wire to the R terminal, white wire to the W terminal, and green wire to the G terminal. Secure connections and restore power. Ensure the thermostat is configured for your system.
Consult the manual for specific model instructions.
What Is The T1 And T2 On A Thermostat?
T1 and T2 on a thermostat refer to temperature sensors. T1 measures the ambient room temperature, while T2 monitors the setpoint temperature. These sensors ensure accurate climate control by comparing current and desired temperatures. Proper functioning of both sensors is vital for efficient heating or cooling.
Conclusion
Wiring a thermostat may seem tricky. But with guidance, it’s achievable. First, ensure safety by switching off power. Then, follow the wiring diagram carefully. Match the wires to the correct terminals. Use a screwdriver to secure connections. Double-check everything before turning the power back on.
A properly wired thermostat improves home comfort. It also saves energy. Always consult a professional if unsure. Safety and accuracy are crucial. Enjoy the comfort of a well-regulated home temperature. With patience and care, success is within reach. Remember, practice makes perfect.
Happy wiring!
Check Best Thermostat Pricing in Amazon
** As an Amazon Associate, I earn from qualifying purchases.