
Check Best Thermostat Pricing in Amazon
** As an Amazon Associate, I earn from qualifying purchases.
Are you ready to take control of your home’s comfort and energy efficiency? Wiring a thermostat with a heat pump may sound like a daunting task, but it doesn’t have to be.
Imagine never having to worry about fluctuating indoor temperatures or skyrocketing energy bills again. With the right guidance, you can confidently tackle this project and enjoy the benefits of a perfectly synced heating and cooling system. In this guide, you’ll discover simple, step-by-step instructions that will empower you to wire your thermostat with ease.
Your comfort is just a few connections away—let’s dive in and make your home the oasis you deserve.
- Tools And Materials Needed
- Safety Precautions
- Understanding Thermostat Wiring
- Identifying Wires And Terminals
- Removing The Old Thermostat
- Installing The New Thermostat
- Configuring Thermostat Settings
- Testing The System
- Troubleshooting Common Issues
- Maintenance Tips
- Frequently Asked Questions
- Conclusion
Tools And Materials Needed
Wiring a thermostat with a heat pump requires specific tools and materials. Proper preparation ensures a smooth installation process. Using the right tools prevents mistakes and saves time.
Tools Required
A screwdriver is essential for removing and installing screws. A wire stripper helps strip insulation from the wire ends. A voltage tester ensures safety by checking for live wires. Needle-nose pliers assist in bending and cutting wires. A drill is needed for mounting the thermostat on the wall.
Materials Needed
Thermostat wire is necessary for connecting the thermostat to the heat pump. Electrical tape secures connections and insulates wires. Screws are required for mounting the thermostat. Wire nuts connect wires securely and prevent short circuits. A mounting plate may be needed if the thermostat does not fit directly on the wall.
Safety Gear
Safety goggles protect your eyes from debris or accidental splashes. Gloves keep your hands safe from sharp edges and electrical shocks. Having a first-aid kit nearby is prudent in case of minor injuries.
Instruction Manual
Refer to the thermostat’s instruction manual for specific installation guidelines. The manual provides wiring diagrams and troubleshooting tips. It is crucial for understanding the thermostat’s features and settings.
Preparation Tips
Turn off the power at the circuit breaker before starting. Gather all tools and materials for a hassle-free installation. Double-check connections with the voltage tester for safety.
Safety Precautions
Ensure power is off before starting to wire a thermostat with a heat pump. Use insulated tools to prevent electric shock. Double-check connections to avoid malfunction or damage.
When wiring a thermostat with a heat pump, ensuring safety should be your top priority. Working with electrical systems can be risky, and a small mistake can lead to significant damage or injury. By taking the right precautions, you can protect yourself and ensure your installation is successful.Turn Off The Power
Before you begin any work, switch off the power to your heat pump and thermostat at the circuit breaker. This step is crucial to avoid electrical shock. Double-check by using a voltage tester to confirm that no power is running to the unit. It’s a simple step, but skipping it can have serious consequences.Read The Manual
Familiarize yourself with the manuals for both your thermostat and heat pump. Each device may have unique wiring requirements that you need to understand. If you’ve ever assembled furniture without reading the instructions, you know how much time and frustration this can save.Use The Right Tools
Having the proper tools on hand can make the wiring process smoother and safer. Essential tools include a screwdriver, wire stripper, and pliers. Imagine trying to cut a steak with a spoon—using the wrong tool can be just as ineffective and frustrating.Inspect Wires For Damage
Check all wires for any signs of wear or damage before connecting them. Frayed or broken wires can cause short circuits or fires. Would you trust a frayed rope to hold your weight? Similarly, damaged wires are not safe for electrical connections.Label Wires Clearly
Label each wire to correspond with its correct terminal on the thermostat. This simple act can prevent confusion and mistakes during installation. Consider this step like labeling spice jars in your kitchen—misplacing even one can ruin the entire dish.Consult A Professional If Unsure
If you’re ever in doubt about any step in the process, consult a professional electrician. Your safety and the proper functioning of your heat pump are worth the investment. Think of it as asking for directions when lost—sometimes, it’s the smartest move to make.Keep The Area Clear
Ensure your workspace is free of clutter and hazards. A tidy area minimizes the risk of accidents and helps you focus on the task. It’s like having a clean desk when working—less distraction, more productivity. How do you approach safety in DIY projects? Taking these precautions can make a big difference in the outcome of your wiring task. Remember, safety is not just a step but a mindset.Understanding Thermostat Wiring
Understanding thermostat wiring is essential for efficient heat pump operation. Proper wiring ensures your system runs smoothly, saving energy and money. Many people find thermostat wiring confusing. But once you understand the basics, it becomes manageable.
Types Of Thermostats
There are various thermostat types available. Each one serves different needs. Digital thermostats offer precise temperature control. Programmable models allow for automated settings. Smart thermostats connect to Wi-Fi for remote access. Choose the right thermostat to match your system and lifestyle.
Heat Pump Basics
Heat pumps move heat from one place to another. They work efficiently in both heating and cooling. A heat pump uses electricity to transfer heat. It’s a cost-effective solution for maintaining comfortable temperatures. Understanding how a heat pump works helps in wiring your thermostat correctly.
Credit: www.reddit.com
Identifying Wires And Terminals
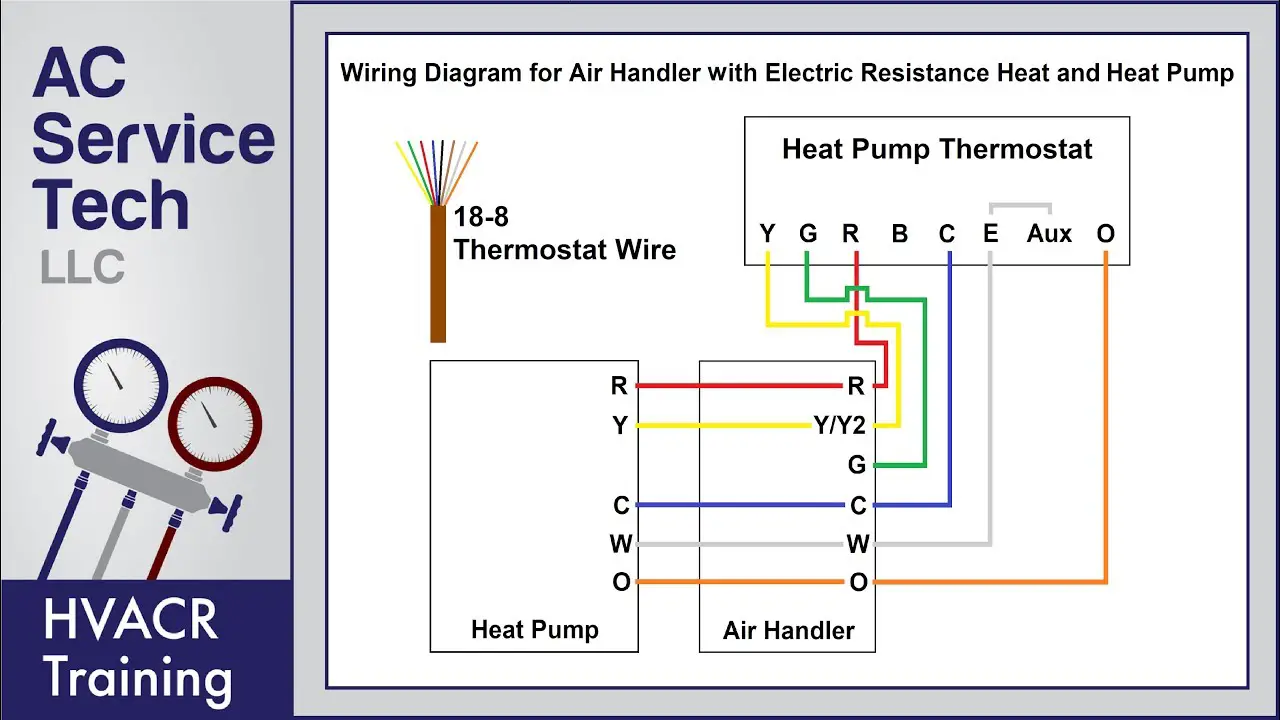
Wiring a thermostat with a heat pump can seem tricky at first. But knowing the wires and terminals makes it easier. Each wire and terminal has a specific role. It’s crucial to match them correctly. Doing so ensures your system works efficiently. Let’s explore the common wire colors and terminal labels.
Common Wire Colors
Most thermostat wires follow a color code. This simplifies the wiring process. The red wire often connects to the ‘R’ terminal. It powers the thermostat. The white wire usually connects to the ‘W’ terminal. This controls the heating function.
The yellow wire typically connects to the ‘Y’ terminal. It manages the cooling function. The green wire links to the ‘G’ terminal. It operates the fan. There might also be an orange wire. This connects to the ‘O’ terminal and controls the reversing valve.
Terminal Labels Explained
Each terminal label has a specific function. The ‘R’ terminal powers the thermostat. The ‘W’ terminal handles the heating system. The ‘Y’ terminal connects to the air conditioner. The ‘G’ terminal manages the fan operation. The ‘O’ terminal controls the reversing valve for heat pumps.
Some thermostats have more labels. The ‘C’ terminal is common. It provides continuous power to the thermostat. Understanding these labels is key. It ensures each wire connects to the right place. This makes your system run smoothly.
Removing The Old Thermostat
Removing the old thermostat is a crucial step in wiring a new one with a heat pump. Proper removal ensures safety and prevents errors during installation. Follow these clear instructions to avoid complications.
Powering Down The System
Before starting, turn off the power to your HVAC system. Locate the breaker panel and switch off the circuit that controls the thermostat. This prevents electrical shocks and damage to the system.
Labeling Existing Wires
Once powered down, remove the thermostat cover. Carefully observe the wires connected to it. Use labels or masking tape to mark each wire. This helps in identifying them later during the new installation.
Note each wire’s color and terminal. Write them on a paper or take a photo for reference. This step avoids confusion and ensures correct wiring for the new thermostat.

Credit: forums.wyze.com
Installing The New Thermostat
Replacing your thermostat with a heat pump model can be straightforward. Start by removing the old unit. Ensure power is off at the breaker. This prevents electrical shocks. Gather the necessary tools. You need a screwdriver and level. Keep wire labels handy for easy identification.
Mounting The Base Plate
Position the base plate on the wall. Use the level to make sure it’s straight. Mark the screw holes with a pencil. Drill holes for the screws. Insert wall anchors if needed. Secure the base plate with screws. Ensure it’s firmly attached.
Check Best Thermostat Pricing in Amazon
** As an Amazon Associate, I earn from qualifying purchases.
Connecting The Wires
Identify the wires using the labels. Match them to the terminals on the thermostat. Common wire connections include R, W, Y, and G. R connects to power. W controls heating. Y is for cooling. G operates the fan. Use a screwdriver to connect each wire. Make sure wires are snug. Avoid loose connections. Double-check each connection before powering up.
Configuring Thermostat Settings
Configuring your thermostat settings can make a world of difference in your home’s comfort and energy efficiency. If you’ve ever felt like you’re playing a guessing game with your thermostat, it’s time to take control. With a heat pump system, understanding the nuances of programming modes and temperature preferences is key.
Programming Modes
Programming your thermostat can be a game-changer. Most thermostats offer different modes to suit your lifestyle. Are you home during the day, or is your house empty until evening? Adjusting these modes can help save energy and reduce bills.
Consider setting a schedule that aligns with your routine. If mornings are bustling, set a warmer temperature to ease into the day. Conversely, if everyone is out by noon, a cooler setting can maintain efficiency while you’re away.
Setting Temperature Preferences
How do you like your home environment? Cozy and warm, or refreshingly cool? Your heat pump thermostat allows you to set specific temperature preferences. Be mindful of seasonal changes and how they affect your comfort.
Experiment with different settings over a few days. You might find that a slight adjustment makes a big difference in your comfort level. Don’t be afraid to tweak the settings until they feel just right for you.
Have you ever thought about how your preferences might change throughout the year? It’s fascinating how a few degrees can transform your living space from chilly to cozy.
Remember, your thermostat is a tool to enhance your living experience, not a one-size-fits-all device. Adjust the settings to suit your needs, and enjoy the comfort it brings to your home.
Testing The System
Once you’ve successfully wired your thermostat, it’s crucial to test the system. Testing ensures that your thermostat and heat pump work together efficiently. A smooth operation helps maintain comfortable indoor temperatures and optimal energy use.
Proper testing involves turning on the power and checking the heat pump operation. These steps confirm the connections are correct and the system functions as expected.
Turning On Power
Start by turning the power back on at the circuit breaker. Ensure all switches are in the correct position. This step is essential for initializing the thermostat and heat pump.
Once powered, check the thermostat display. It should be bright and responsive. If there’s no display, recheck the wiring connections. Ensure they are secure and correct.
Checking Heat Pump Operation
Set the thermostat to heating mode. Increase the temperature setting above current room temperature. Listen for the heat pump to activate. The fan should start smoothly.
Next, switch to cooling mode. Lower the temperature setting. The heat pump should respond accordingly. Observe the air flow and cooling effects.
If any issues arise, verify each connection. Double-check the wiring diagram for accuracy. Ensure the thermostat settings match your system type.
Troubleshooting Common Issues
Connecting a thermostat to a heat pump often poses challenges. Ensure correct wiring to avoid system malfunctions. Understand the wire colors and functions to help prevent common errors during installation.
Troubleshooting common issues when wiring a thermostat with a heat pump can save you time, money, and a lot of frustration. You’ve done the hard work of setting up your system, but sometimes things don’t go as planned. Whether it’s incorrect wiring or system performance issues, understanding how to identify and fix these problems can make a world of difference.Incorrect Wiring Problems
Incorrect wiring is a frequent issue that can lead to a host of problems with your thermostat and heat pump setup. One common mistake is mismatching wires. For example, connecting the ‘R’ wire to the ‘Y’ terminal can cause your system to malfunction. A simple way to avoid this is by referring to the heat pump’s wiring diagram. Keep the manual handy, and double-check each connection. Did you know that sometimes the problem isn’t the wiring but the wire itself? A damaged or broken wire can disrupt the entire system. Inspect each wire for visible wear and tear. A small investment in a wire stripper and multimeter can be invaluable for these checks.System Performance Issues
Once your wires are correctly connected, you might still face system performance issues. If your heat pump isn’t heating or cooling as expected, check the thermostat settings. Sometimes, a simple reset of the thermostat can resolve performance hiccups. Is your system cycling on and off too frequently? This could be due to incorrect thermostat placement. Ensure it’s installed in a location free from direct sunlight or drafts, which can affect its accuracy. Have you ever experienced a heat pump blowing cold air when it should be heating? This can be due to the reversing valve being stuck or malfunctioning. Make sure it’s set correctly and consult your heat pump’s manual for adjustments. By taking the time to troubleshoot these common issues, you’re not just fixing a problem—you’re gaining a deeper understanding of your system. What issues have you encountered with your heat pump and thermostat? Share your experiences and tips in the comments below!Maintenance Tips
Connecting a thermostat to a heat pump requires careful attention to wiring details. Ensure wires match the terminals on both devices. Refer to the manufacturer’s guide for accurate configuration, ensuring optimal performance and energy efficiency.
Maintaining your thermostat with a heat pump is crucial for ensuring its efficiency and longevity. Regular upkeep not only saves you money on energy bills but also keeps your home comfortable throughout the year. Here are some practical maintenance tips to keep your system running smoothly.Regular Check-ups
Scheduling regular check-ups is essential for your thermostat and heat pump system. Routine inspections help identify minor issues before they become costly repairs. You can think of it like a health check for your home’s comfort system. During these check-ups, it’s important to look at the wiring connections. Loose or corroded wires can lead to poor performance. If you’re comfortable doing it, check for any visible wear or discoloration. Regular check-ups also ensure your settings are optimal. Sometimes settings can be accidentally altered or reset. Double-check them to confirm everything is operating as intended.Seasonal Adjustments
Adjusting your thermostat settings with the changing seasons can optimize energy efficiency. During warmer months, slightly increase the temperature setting to reduce energy usage. In cooler months, a slight decrease can maintain comfort without overworking your heat pump. Consider using a programmable thermostat for automatic seasonal adjustments. This can be a game-changer for those who often forget to manually change settings. It helps ensure your system is only running when needed, reducing wear and tear. Think about the last time you adjusted your thermostat settings. Did you notice any difference in comfort or energy bills? These small tweaks can make a significant impact over time. Remember, your thermostat is a key player in your home’s ecosystem. Regular care and smart adjustments can make a big difference in performance and efficiency. Are you giving your thermostat the attention it deserves?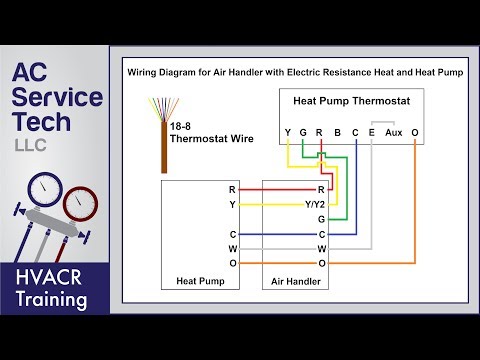
Credit: www.youtube.com
Frequently Asked Questions
How Many Wires For A Heat Pump Thermostat?
A heat pump thermostat typically requires 8 wires for full functionality. Common wires include R, C, Y, G, O/B, W, and sometimes E and L. These wires connect the thermostat to your heat pump system, ensuring efficient operation. Proper installation is crucial for optimal performance and energy efficiency.
Does A Heat Pump Need A Special Thermostat?
Heat pumps often require a special thermostat designed for their unique functions. These thermostats support auxiliary and emergency heating modes. Ensure compatibility with your heat pump model for optimal performance. A compatible thermostat enhances efficiency and maximizes energy savings.
What Thermostat Wire Controls A Heat Pump?
The “O” or “B” wire controls the reversing valve in a heat pump. It switches between heating and cooling modes. The “Y” wire activates the compressor, while the “G” wire operates the fan. Ensure the thermostat is compatible with heat pumps for proper functioning.
Where Does White Wire Go On A Thermostat With A Heat Pump?
Connect the white wire to the “W” terminal on the thermostat. This controls the auxiliary heat. Ensure compatibility with your specific heat pump system for proper functioning. Always consult the thermostat’s manual or a professional for guidance.
Conclusion
Wiring a thermostat with a heat pump can seem tricky. But with patience, it becomes manageable. Follow each step carefully to ensure safety and success. Always turn off power before starting any wiring. Use the right tools for an easy installation.
Double-check connections to prevent future issues. A properly wired thermostat helps maintain efficient heating. This can save money on energy bills. If unsure, consult a professional for assistance. Keep learning and exploring to better understand your home’s systems. With practice, you’ll gain confidence in handling such tasks.
Enjoy the benefits of a well-functioning thermostat and cozy home.
Check Best Thermostat Pricing in Amazon
** As an Amazon Associate, I earn from qualifying purchases.