
Check Best Thermostat Pricing in Amazon
** As an Amazon Associate, I earn from qualifying purchases.
Wiring your thermostat to your AC unit might sound tricky, but it doesn’t have to be. If you want to control your home’s temperature easily and save on energy bills, learning how to connect these two devices is key.
In this guide, you’ll discover simple, step-by-step instructions that anyone can follow—even if you’re not an expert. By the end, you’ll feel confident handling the wiring yourself, avoiding costly technician visits. Ready to take control of your comfort? Let’s get started.

Credit: highperformancehvac.com
Tools And Materials Needed
Wiring a thermostat to an AC unit needs the right tools and materials. These items help you do the job safely and correctly. Having everything ready makes the process easier and faster.
Using the proper tools also prevents damage to your equipment. This part of the project is very important. Here is what you need before starting.
Basic Tools For Wiring
A screwdriver set is necessary for removing and securing screws. Choose both flathead and Phillips types. Wire strippers help remove insulation without cutting wires. A voltage tester checks if wires carry current. This tool keeps you safe from electric shock. Needle-nose pliers help in bending and holding wires precisely.
Materials Required
Use thermostat wire designed for HVAC systems. It usually has several color-coded wires. Electrical tape secures wire connections and prevents shorts. Wire nuts join wires safely and firmly. A new thermostat unit comes with the terminals and instructions you need. Keep the old thermostat manual for reference if needed.
Safety Equipment
Wear insulated gloves to protect from electric shocks. Safety glasses shield your eyes from debris. Turn off power at the circuit breaker before starting any work. Double-check power is off with a voltage tester.
Safety Precautions
Always turn off power before starting to wire the thermostat. Avoid touching wires with wet hands to prevent shocks. Double-check connections to ensure safety and proper function.
Turn Off Power Before Starting
Always switch off the power at the circuit breaker. This stops electricity from flowing. It keeps you safe from shocks while working. Double-check by using a voltage tester on wires.
Use Proper Tools And Equipment
Use insulated tools designed for electrical work. Avoid metal tools without insulation. Wear rubber-soled shoes and safety glasses. These protect you from accidents and sparks.
Read Manufacturer Instructions
Follow the thermostat and AC unit manuals closely. Each model has unique wiring needs. Ignoring instructions can cause damage or injury. Keep manuals nearby during installation.
Label Wires Clearly
Mark wires before disconnecting them. Use colored tape or labels. This helps avoid confusion when wiring the thermostat. Correct connections ensure the system works well.
Work In A Dry Environment
Never work on electrical parts in wet or damp areas. Water increases the risk of electric shock. Keep the workspace dry and clean. Use a flashlight if lighting is poor.
Check Local Electrical Codes
Follow local rules for electrical work. Codes protect safety and ensure quality. Some places require permits or inspections. Check regulations before starting the project.
Identify Thermostat And Ac Unit Wires
Identifying the wires between your thermostat and AC unit is the first key step. Each wire has a role in controlling your air conditioning system. Knowing which wire does what helps you connect everything correctly. It also prevents damage to the unit or thermostat. This section explains common wire colors and their functions. It will guide you in recognizing each wire easily.
Common Wire Colors
Thermostat and AC wires usually come in standard colors. Red wires often carry power from the thermostat to the AC unit. White wires usually connect to the heating system. Green wires control the fan. Yellow wires typically manage the cooling function. Blue or black wires often serve as the common wire, completing the circuit. Colors may vary by manufacturer, so check your device manuals.
Wire Functions
Each wire controls a specific part of the AC system. The red wire supplies 24-volt power from the transformer. The white wire signals the heating system to turn on. The green wire activates the blower fan. The yellow wire turns on the compressor for cooling. The blue or black wire acts as the common return path for power. Correctly matching these functions is essential for proper operation.
Turn Off Power Supply
Before wiring your thermostat to the AC unit, turn off the power supply. This step keeps you safe from electric shock. It also protects your devices from damage.
Electricity can be dangerous. Even a small mistake can cause serious injury. Turning off the power stops electricity from flowing to the AC unit and thermostat. This makes the wiring process safe and easy.
Take time to find the right power source. Usually, the circuit breaker controls the power for your AC unit. Switch it off to cut the power supply completely. Double-check that the power is off before starting work.
Locate The Circuit Breaker
Find your home’s main electrical panel. Look for the breaker labeled for the AC unit. If labels are missing, turn off the main breaker to stop all power.
Switch Off The Breaker
Flip the breaker switch to the off position. This action cuts off electricity to the AC unit and thermostat. Do not skip this step.
Confirm Power Is Off
Use a voltage tester on the wires. The tester should show no power. This confirms it is safe to work on wiring.
Remove Old Thermostat
Removing the old thermostat is the first step to wiring your new AC unit. This task requires care to avoid damaging wires or your wall. Follow these steps to safely detach the old device.
Turn Off Power
Start by switching off the power to your HVAC system. Use the circuit breaker to cut electricity. This prevents shocks and damage during removal.
Remove Thermostat Cover
Gently pull or unscrew the thermostat cover. This exposes the wiring and mounting plate underneath. Handle the cover carefully to avoid breaking it.
Label The Wires
Use small pieces of tape to mark each wire. Write the letter or number matching the terminal. This step helps connect wires correctly later.
Disconnect The Wires
Loosen the screws holding wires in place. Carefully pull wires free from terminals. Keep the wires untangled and away from the wall.
Check Best Thermostat Pricing in Amazon
** As an Amazon Associate, I earn from qualifying purchases.
Unscrew The Mounting Plate
Remove screws securing the base plate to the wall. Take off the plate and set it aside. The wall is now ready for the new thermostat.

Credit: support.rfwel.com
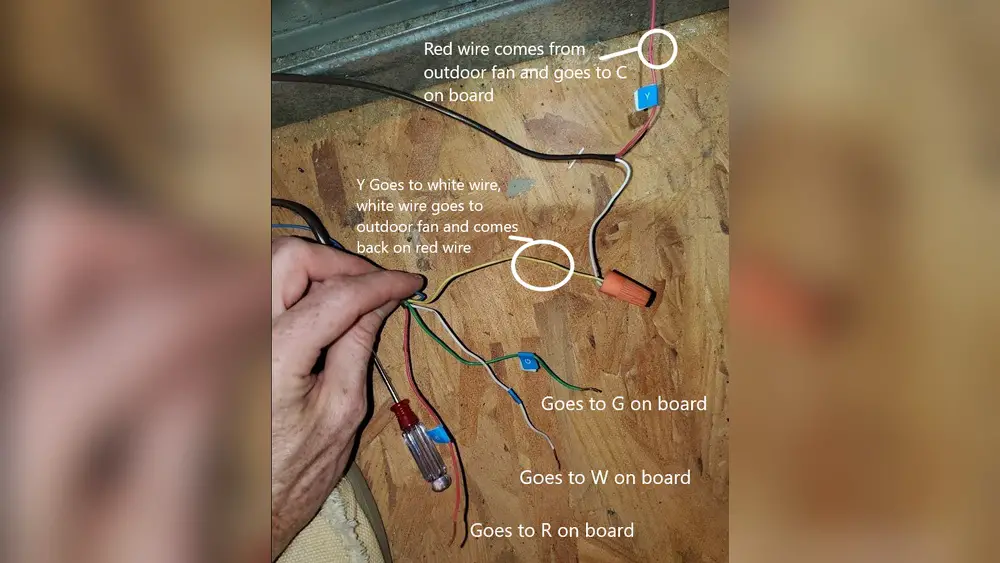
Connect Thermostat Wires To Ac Unit
Connecting thermostat wires to the AC unit is a key step in setting up your cooling system. Proper wiring ensures your thermostat controls the AC correctly. Take your time to make sure each wire is connected safely and accurately. This process involves matching wire terminals and securing the connections tightly. Follow these steps carefully for a smooth installation.
Match Wire Terminals
Start by identifying the wires from the thermostat and the AC unit. Each wire has a specific terminal to connect to. Look for labels like R, Y, G, and C on both the thermostat and the AC unit. Match each wire to the same letter terminal on the AC unit. This matching keeps the system working as it should.
For example, the red wire usually connects to the R terminal. The yellow wire goes to the Y terminal, which controls cooling. The green wire connects to the G terminal for the fan. The common wire, C, completes the circuit. Double-check each wire to avoid mistakes.
Secure Wire Connections
After matching the wires, connect them firmly to the AC unit terminals. Use a screwdriver to tighten the terminal screws. Loose wires can cause poor contact and system failure. Make sure each wire is wrapped around the screw tightly. Avoid leaving any bare wire exposed. This prevents shorts and electrical hazards.
Check each connection by gently tugging on the wires. If any wire moves, tighten the screw again. Keep the wires neat and organized inside the unit. This makes future maintenance easier and safer.
Mount New Thermostat
Mounting a new thermostat is a key step in wiring it to your AC unit. This process ensures the thermostat sits securely on the wall. It also keeps the wires safe and easy to connect.
Careful mounting helps the thermostat work correctly. It reads the room temperature well. This lets your AC cool your space efficiently.
Choose The Right Location
Pick a spot on an interior wall. Avoid places near windows or doors. Stay away from direct sunlight or heat sources. These can cause wrong temperature readings. The thermostat needs a calm area to sense air temperature well.
Mark And Drill Holes
Hold the thermostat base against the wall. Use a pencil to mark the screw holes. Check the level to keep it straight. Drill holes where you marked. Use wall anchors if needed for a firm hold.
Attach The Thermostat Base
Screw the base tightly to the wall. Ensure it does not wobble or move. A stable base helps in easy wiring and better sensor contact. Double-check the level again before final tightening.
Restore Power And Test System
Restoring power and testing the system is the final step in wiring your thermostat to the AC unit. This step confirms that all connections are correct and the system works properly. It ensures comfort and safety in your home.
After completing the wiring, you must turn the power back on carefully. This action powers the thermostat and the AC unit. Watch for any unusual sounds or smells. These could signal wiring issues or system faults.
Turn On The Circuit Breaker
Locate the circuit breaker that controls your AC unit. Flip it to the ON position. This restores electricity to the system. Avoid turning on other breakers to prevent overloads during testing.
Set The Thermostat To Cooling Mode
Press the mode button on your thermostat. Select the cooling setting. Adjust the temperature lower than the current room temperature. This triggers the AC unit to start running.
Check For Proper Operation
Listen for the AC unit’s fan and compressor starting. Feel for cool air coming from vents. If the system does not start, recheck all wiring connections. Ensure the thermostat has fresh batteries if applicable.
Monitor The System For A Few Minutes
Let the AC run for several minutes. Confirm it cycles on and off correctly. Watch for any error codes on the thermostat display. Error codes indicate wiring or system problems that need fixing.
Troubleshooting Common Issues
Troubleshooting common issues helps solve problems fast. Knowing what to check saves time and effort. Many thermostat and AC unit problems have easy fixes. Understanding these fixes keeps your system running smoothly.
Thermostat Not Turning On
Check the power source first. Ensure the thermostat has fresh batteries or is properly wired. Look for blown fuses or tripped circuit breakers. Sometimes, a loose wire causes power loss. Tighten any loose connections carefully. Reset the thermostat by turning it off and on again. Confirm the display lights up to show power.
Ac Unit Not Responding
Verify the thermostat settings are correct for cooling mode. Check if the thermostat is set to a temperature lower than room temperature. Inspect the wiring between the thermostat and AC unit. Look for damaged or disconnected wires. Examine the outdoor unit for power and proper function. Clean debris blocking the unit’s airflow. Reset the circuit breaker controlling the AC unit to restore power.
Credit: www.reddit.com
Frequently Asked Questions
How Do I Connect Thermostat Wires To Ac Unit?
First, turn off power to avoid shocks. Match thermostat wires to AC terminals by color. Connect each wire firmly and securely. Finally, restore power and test the system for proper operation.
What Tools Are Needed To Wire A Thermostat?
You need a screwdriver, wire stripper, and voltage tester. Also, have electrical tape and wire labels handy. These tools ensure safe, accurate, and clean thermostat wiring.
Can I Wire A Thermostat Without Professional Help?
Yes, if you follow instructions carefully and turn off power. Basic electrical knowledge is helpful. For complex systems or doubts, hire a professional for safety and accuracy.
Why Is Thermostat Wiring Important For Ac Performance?
Correct wiring ensures proper communication between thermostat and AC. It controls temperature accurately and avoids damage. Faulty wiring can cause system failure or inefficient cooling.
Conclusion
Wiring a thermostat to an AC unit is a simple task. Follow each step carefully and check your work twice. Use the right tools and safety gear for best results. A properly wired thermostat helps keep your home cool and saves energy.
Take your time, and don’t rush. Soon, you will enjoy a comfortable home with efficient cooling. Remember, a little patience goes a long way in DIY projects. Stay safe and enjoy the cool air!
Check Best Thermostat Pricing in Amazon
** As an Amazon Associate, I earn from qualifying purchases.