
Check Best Thermostat Pricing in Amazon
** As an Amazon Associate, I earn from qualifying purchases.
Wiring a thermostat might seem complicated at first. But with the right guidance, it becomes simple.
Understanding how to wire a thermostat is essential for maintaining your home’s heating and cooling systems. Whether you’re installing a new thermostat or replacing an old one, knowing the basics can save you time and trouble. This guide will break down the steps and provide easy-to-follow instructions.
With a clear approach, even those with little technical knowledge can handle this task. We’ll cover the tools you need, safety tips, and step-by-step directions to ensure your thermostat works perfectly. Let’s dive in and make sure your home stays comfortable all year round.
Tools And Materials Needed
Wiring a thermostat is a task most homeowners can handle. Having the right tools and materials is crucial for a smooth process. This section will guide you through the essential tools and materials needed for wiring a thermostat.
Essential Tools
Before starting, gather these essential tools:
- Screwdriver: A flat-head and a Phillips screwdriver.
- Wire Stripper: To strip wire ends easily.
- Drill: For making holes if needed.
- Level: Ensures the thermostat is straight.
- Multimeter: Checks voltage and continuity.
Required Materials
You will also need some materials to complete the task:
- Thermostat: Choose a model suitable for your system.
- Wall Anchors: Provides support for the thermostat.
- Mounting Plate: Helps attach the thermostat to the wall.
- Wires: Usually, a 18/5 thermostat wire is used.
- Wire Nuts: Connects wires securely.

Credit: cyncsupport.gelighting.com
Safety Precautions
Ensure the power is off before wiring the thermostat to avoid electric shock. Use insulated tools for safety. Double-check connections to prevent short circuits.
When wiring a thermostat, taking the right safety precautions is crucial. Ensuring your safety will prevent accidents and ensure a smooth installation. Let’s dive into some essential safety steps you need to follow. ###Turn Off Power
The first step is to turn off the power. Go to your breaker box and switch off the power to your HVAC system. This step is non-negotiable. You don’t want to risk getting an electric shock. Trust me, I’ve been there, and it’s not pleasant. Double-check by trying to turn on the heating or cooling system. It should not start. ###Use Proper Safety Gear
Always use proper safety gear. Wear insulated gloves to protect your hands from potential shocks. Safety goggles are also a smart choice. These simple items can make a huge difference. Imagine working without gloves and accidentally touching a live wire. Not worth the risk, right? Are you the type who rushes through tasks without thinking twice? Slow down. Safety should be your top priority.Removing The Old Thermostat
When it comes to upgrading your home’s heating and cooling system, installing a new thermostat is a great start. The first and most crucial step is removing the old thermostat. This process might seem daunting, but with a little patience and attention to detail, you can do it yourself. Let’s dive into the essential steps you need to follow to ensure a smooth transition.
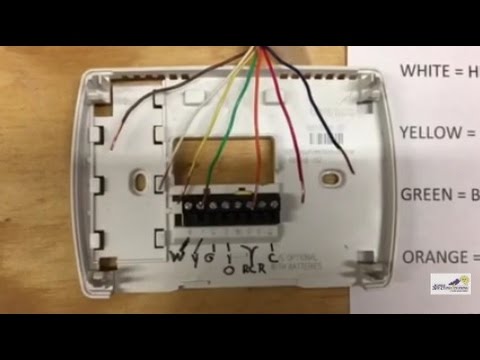
Labeling Wires
Before you detach any wires, label them. Trust me, this will save you a lot of headaches later. Use small pieces of masking tape and a pen to mark each wire according to the terminal it connects to. Most thermostats have labels like R, W, Y, and G. Note these down as you label each wire.
Why is this important? Each wire controls a different function of your HVAC system. Mixing them up can lead to a malfunction, or worse, damage your new thermostat. Take a photo of the wire setup before you start labeling. This acts as a backup reference.
Detaching The Thermostat
Once the wires are labeled, you can begin detaching the thermostat. Start by turning off the power to your HVAC system at the circuit breaker. This step is crucial for your safety. Next, remove the thermostat cover. Most covers snap off easily, while others might need a gentle nudge with a flathead screwdriver.
After the cover is off, unscrew the mounting screws holding the thermostat base to the wall. Carefully pull the base away, ensuring you don’t yank any wires out of the wall. Keep the screws; you might need them for the new thermostat.
What’s the trickiest part you’ve encountered while working with home appliances? Share your experiences in the comments below. Let’s help each other out!
Credit: www.youtube.com
Installing The New Thermostat Base
Installing the new thermostat base involves connecting the right wires to the correct terminals. Ensure power is off to avoid any electric shock. Follow the wiring diagram provided with the thermostat.
Installing the New Thermostat Base So, you’ve decided to upgrade your thermostat for better energy efficiency and comfort. The first step is installing the new thermostat base. This might sound tricky, but with a bit of patience and the right guidance, you’ll have it mounted in no time.Mounting The Base
Mounting the new thermostat base is crucial. It needs to be secure and level to function properly. First, turn off the power to your HVAC system. This prevents any electrical mishaps. Next, remove the old thermostat, revealing the wires and the wall. Use a small level to ensure the new base is straight. A crooked thermostat can affect its performance. Mark the screw holes with a pencil. This helps you drill accurately. Drill the holes and insert wall anchors if necessary. Wall anchors give extra support, especially if you’re attaching the base to drywall. Finally, screw the base onto the wall. Ensure it’s firmly attached, but don’t over-tighten the screws. You don’t want to crack the base or damage the wall.Connecting The Wires
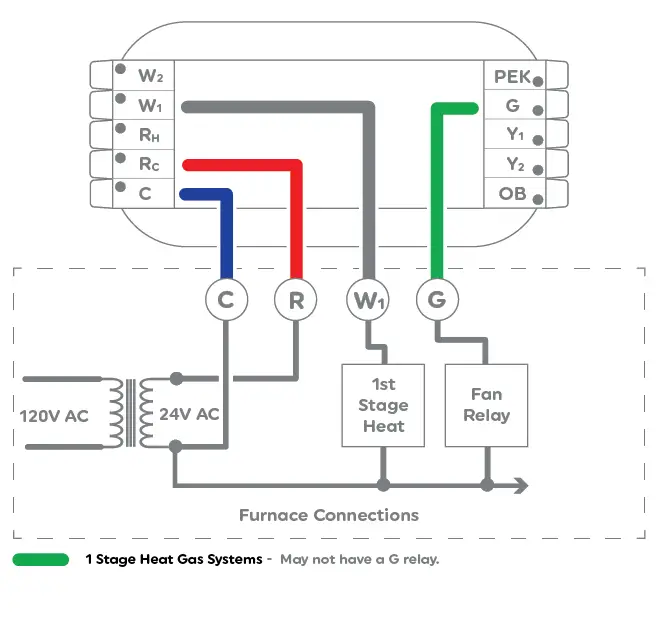
Connecting the wires is the heart of the operation. It can seem daunting, but it’s manageable with a bit of care. Start by identifying the wires from your HVAC system. They are usually color-coded. Common wire colors include red for power, white for heat, yellow for cooling, and green for the fan. Refer to the wiring guide in your new thermostat’s manual. Match each wire to the corresponding terminal on the new base. Loosen the terminal screws, insert the wires, and tighten the screws. Make sure each wire is securely connected. Double-check your connections. A loose wire can cause the thermostat to malfunction. Once all wires are connected, gently push them into the wall cavity. This keeps them out of the way when you attach the thermostat to the base. Have you ever installed a thermostat before? If so, what challenges did you face? Sharing your experiences can help others avoid common pitfalls. By following these steps, you can install the new thermostat base with confidence. It’s a straightforward process that enhances your home’s comfort and efficiency. Happy wiring!Connecting The Thermostat Wires
Connecting the thermostat wires involves matching each wire with the correct terminal. Ensure power is off before starting. Follow the color codes to avoid mistakes.
Connecting the thermostat wires is a crucial step in installing your new thermostat. This process ensures your heating and cooling systems communicate properly with the thermostat. Incorrect wiring can lead to malfunctioning systems or inefficiencies. Let’s break down the steps to make this task simple and clear.Matching Wire Colors
Start by identifying the wire colors. Each color represents a different function. Typically, red wires connect to the power source, while white wires connect to the heating system. Green wires usually connect to the fan, and yellow wires to the cooling system. Refer to the thermostat’s manual for specific color codes.Securing Wire Connections
Once you’ve identified the wires, it’s time to connect them. First, ensure the power is off to avoid any electrical hazards. Use a screwdriver to loosen the terminal screws on the thermostat. Insert the wires into their respective terminals. Tighten the screws to secure the wires in place. Double-check that each wire is firmly connected. Loose wires can cause the thermostat to malfunction. By following these steps, you can easily connect your thermostat wires. Enjoy a properly functioning heating and cooling system.
Credit: www.oliverheatcool.com
Attaching The New Thermostat
Attaching a new thermostat can seem difficult. But, with simple steps, you can do it easily. This guide will help you with the process. Follow along and you will have your thermostat installed in no time.
Placing The Thermostat
First, place the thermostat on the wall. Ensure it is straight. You can use a level for this. Make sure the wires are through the back of the thermostat. This will help in connecting them later.
Check Best Thermostat Pricing in Amazon
** As an Amazon Associate, I earn from qualifying purchases.
Next, check the placement height. It should be at eye level. This makes it easier to read and adjust the settings. Make sure it is not near any heat sources. This can affect the readings.
Tightening Screws
After placing the thermostat, it is time to secure it. Use the screws provided with the thermostat. Insert the screws into the holes on the thermostat. Tighten them using a screwdriver.
Do not over-tighten the screws. This can damage the thermostat. Ensure the thermostat is firmly attached to the wall. It should not wobble or move.
Once the screws are tight, double-check the placement. Make sure it is still straight. Now, you are ready to connect the wires.
Testing The New Thermostat
Testing your new thermostat is crucial to ensure it works properly. This step involves restoring power and checking its functionality. Follow these simple instructions to make sure everything runs smoothly.
Restoring Power
First, locate your circuit breaker panel. Turn the power back on to your HVAC system. Ensure the thermostat display is active. If not, double-check the wiring connections.
Checking Functionality
Set your thermostat to a desired temperature. Observe if your heating or cooling system responds. Listen for any unusual sounds. Ensure the air conditioner or heater activates.
Test both heating and cooling modes. Allow each mode to run for a few minutes. Confirm the system reaches the set temperature. Check for any error messages on the display.
If everything works as expected, your thermostat is correctly installed. Enjoy the comfort of your properly functioning thermostat.
Troubleshooting Common Issues
Experiencing issues with your thermostat can be frustrating. Sometimes, a simple wiring problem is the root cause. Understanding common issues can save you time and effort. Here, we will discuss troubleshooting steps for two common problems.
No Power To Thermostat
First, check the thermostat’s display. If the screen is blank, there may be no power. Ensure the breaker for your heating and cooling system is on. A tripped breaker can cut power to the thermostat. Next, inspect the wiring connections. Loose or disconnected wires can cause power loss. Tighten any loose wires and ensure all connections are secure. Check the batteries if your thermostat uses them. Dead batteries can also cause the thermostat to lose power. Replace with new ones if needed.
Incorrect Temperature Readings
Inaccurate temperature readings can lead to discomfort. Begin by verifying the thermostat’s location. It should be away from direct sunlight and drafts. These factors can affect the temperature sensor. Clean the thermostat gently with a soft brush. Dust can accumulate and interfere with the sensor. Check the wiring connections. Incorrect wiring can cause erroneous readings. Refer to your thermostat’s manual to ensure proper wiring. Finally, recalibrate the thermostat if necessary. Follow the instructions in your user manual for precise calibration.
Frequently Asked Questions
What Color Wire Goes Where On A Thermostat?
The red wire connects to the R terminal. The white wire goes to the W terminal. The yellow wire connects to the Y terminal. The green wire attaches to the G terminal. The common wire (C) connects to the C terminal.
Always check the thermostat manual for specific instructions.
How To Wire A Thermostat Correctly?
To wire a thermostat correctly, turn off power first. Follow the manufacturer’s instructions, match wire colors, connect to terminals. Ensure secure connections and restore power.
Does The R Wire Go To The Rc Or Rh Thermostat?
The R wire can connect to either RC or RH terminals. RC is for cooling, and RH is for heating. Check your thermostat’s manual for specifics.
Can A Thermostat Be Wired Wrong?
Yes, a thermostat can be wired wrong. Incorrect wiring may cause malfunction or damage to your HVAC system. Always follow the manufacturer’s instructions and seek professional help if needed.
Conclusion
Wiring a thermostat may seem tricky, but it’s manageable. Follow the steps carefully. Ensure you turn off the power before you start. Always use the correct tools. Double-check your connections. If unsure, consult a professional. Proper wiring ensures your thermostat works efficiently.
This saves energy and money. Stay safe and enjoy the comfort of your well-regulated home. Happy wiring!
Check Best Thermostat Pricing in Amazon
** As an Amazon Associate, I earn from qualifying purchases.