
Check Best Thermostat Pricing in Amazon
** As an Amazon Associate, I earn from qualifying purchases.
To wire a Honeywell Pro Series Thermostat, turn off the power and follow the wiring diagram provided. Connect the appropriate wires to the matching terminals.
Wiring a Honeywell Pro Series Thermostat can seem daunting, but it’s a straightforward process if done correctly. This thermostat is designed to offer precise control over your home’s heating and cooling system. Before starting, ensure that you have all necessary tools and have turned off the power supply to avoid any electrical hazards.
Carefully follow the wiring diagram included in the user manual to connect the wires to their corresponding terminals. Once wired, you can enjoy the advanced features and energy efficiency that this thermostat provides. Proper installation ensures optimal performance and longevity of your HVAC system.
- Introduction To Honeywell Pro Series Thermostat
- Pre-installation Checklist
- Understanding Your Current Wiring
- Removing The Old Thermostat
- Mounting The Honeywell Pro Series Plate
- Connecting The Wires
- Attaching The Thermostat To The Wall Plate
- Final Steps And Testing
- Troubleshooting Common Issues
- Maintenance Tips For Longevity
- Frequently Asked Questions
- Conclusion
Introduction To Honeywell Pro Series Thermostat
The Honeywell Pro Series Thermostat is a top choice for many homeowners. It offers advanced features and easy installation. This guide will help you wire your Honeywell Pro Series Thermostat correctly.
Benefits Of A Programmable Thermostat
A programmable thermostat can save you money. It allows you to set specific temperatures for different times of the day. This means your heating and cooling systems work less when you are not home.
- Energy Savings: Reduce your energy bills by up to 10% annually.
- Convenience: Set it and forget it. Your home will always be at the perfect temperature.
- Comfort: Maintain a consistent and comfortable environment.
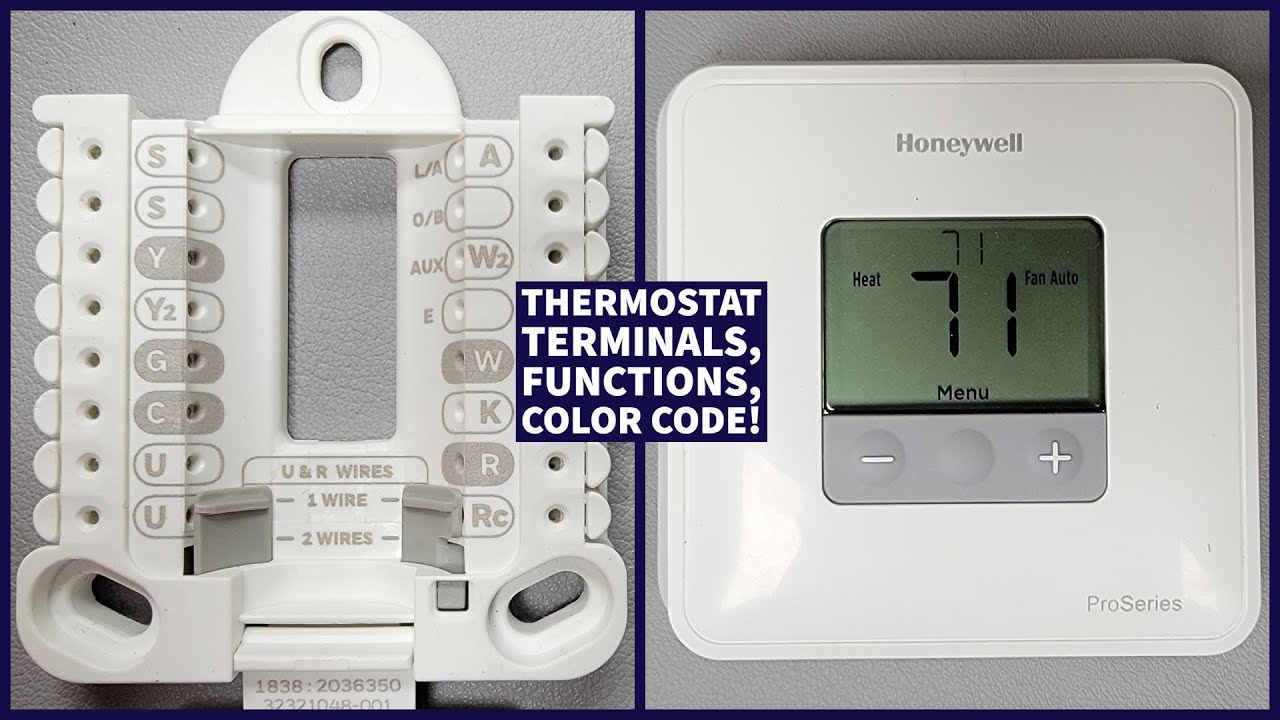
Key Features Of The Honeywell Pro Series
The Honeywell Pro Series Thermostat comes packed with features. These features make it a great addition to any home.
| Feature | Description |
|---|---|
| Smart Response Technology | The thermostat learns your schedule and preferences. |
| Wi-Fi Connectivity | Control your thermostat remotely using a smartphone or tablet. |
| Large Touchscreen Display | Easy to read and use, with a modern look. |
| Customizable Programs | Set different temperatures for various times and days. |
These features make the Honeywell Pro Series Thermostat user-friendly and efficient. It is designed to fit seamlessly into your lifestyle.

Credit: www.reddit.com
Pre-installation Checklist
Wiring a Honeywell Pro Series Thermostat can be simple if you follow a step-by-step guide. Before starting, ensure you have everything ready. This pre-installation checklist will help you prepare.
Safety First: Powering Off Your Hvac System
Safety is the top priority before you start wiring. Begin by turning off the power to your HVAC system. Locate the circuit breaker panel in your home. Flip the switch that controls your HVAC system to the “off” position.
Double-check to make sure the power is off. This step prevents any electrical shocks or damages. Use a voltage tester to ensure no electricity is flowing to the thermostat wires.
Gathering The Necessary Tools
Having the right tools makes the installation process easier. Here is a list of essential tools you will need:
- Screwdriver: To remove the old thermostat and mount the new one.
- Wire Stripper: To strip the insulation from the wires.
- Wire Labels: To label each wire for easy identification.
- Drill (if needed): For mounting the thermostat on the wall.
- Level: To ensure the thermostat is mounted straight.
Make sure you have these tools ready before starting the installation. Having everything prepared will save you time and effort.
Understanding Your Current Wiring
Before you start wiring your Honeywell Pro Series Thermostat, it’s crucial to understand your current wiring setup. This ensures that you connect everything correctly, avoiding any potential issues. Let’s dive into the steps to identify and document your existing thermostat wiring.
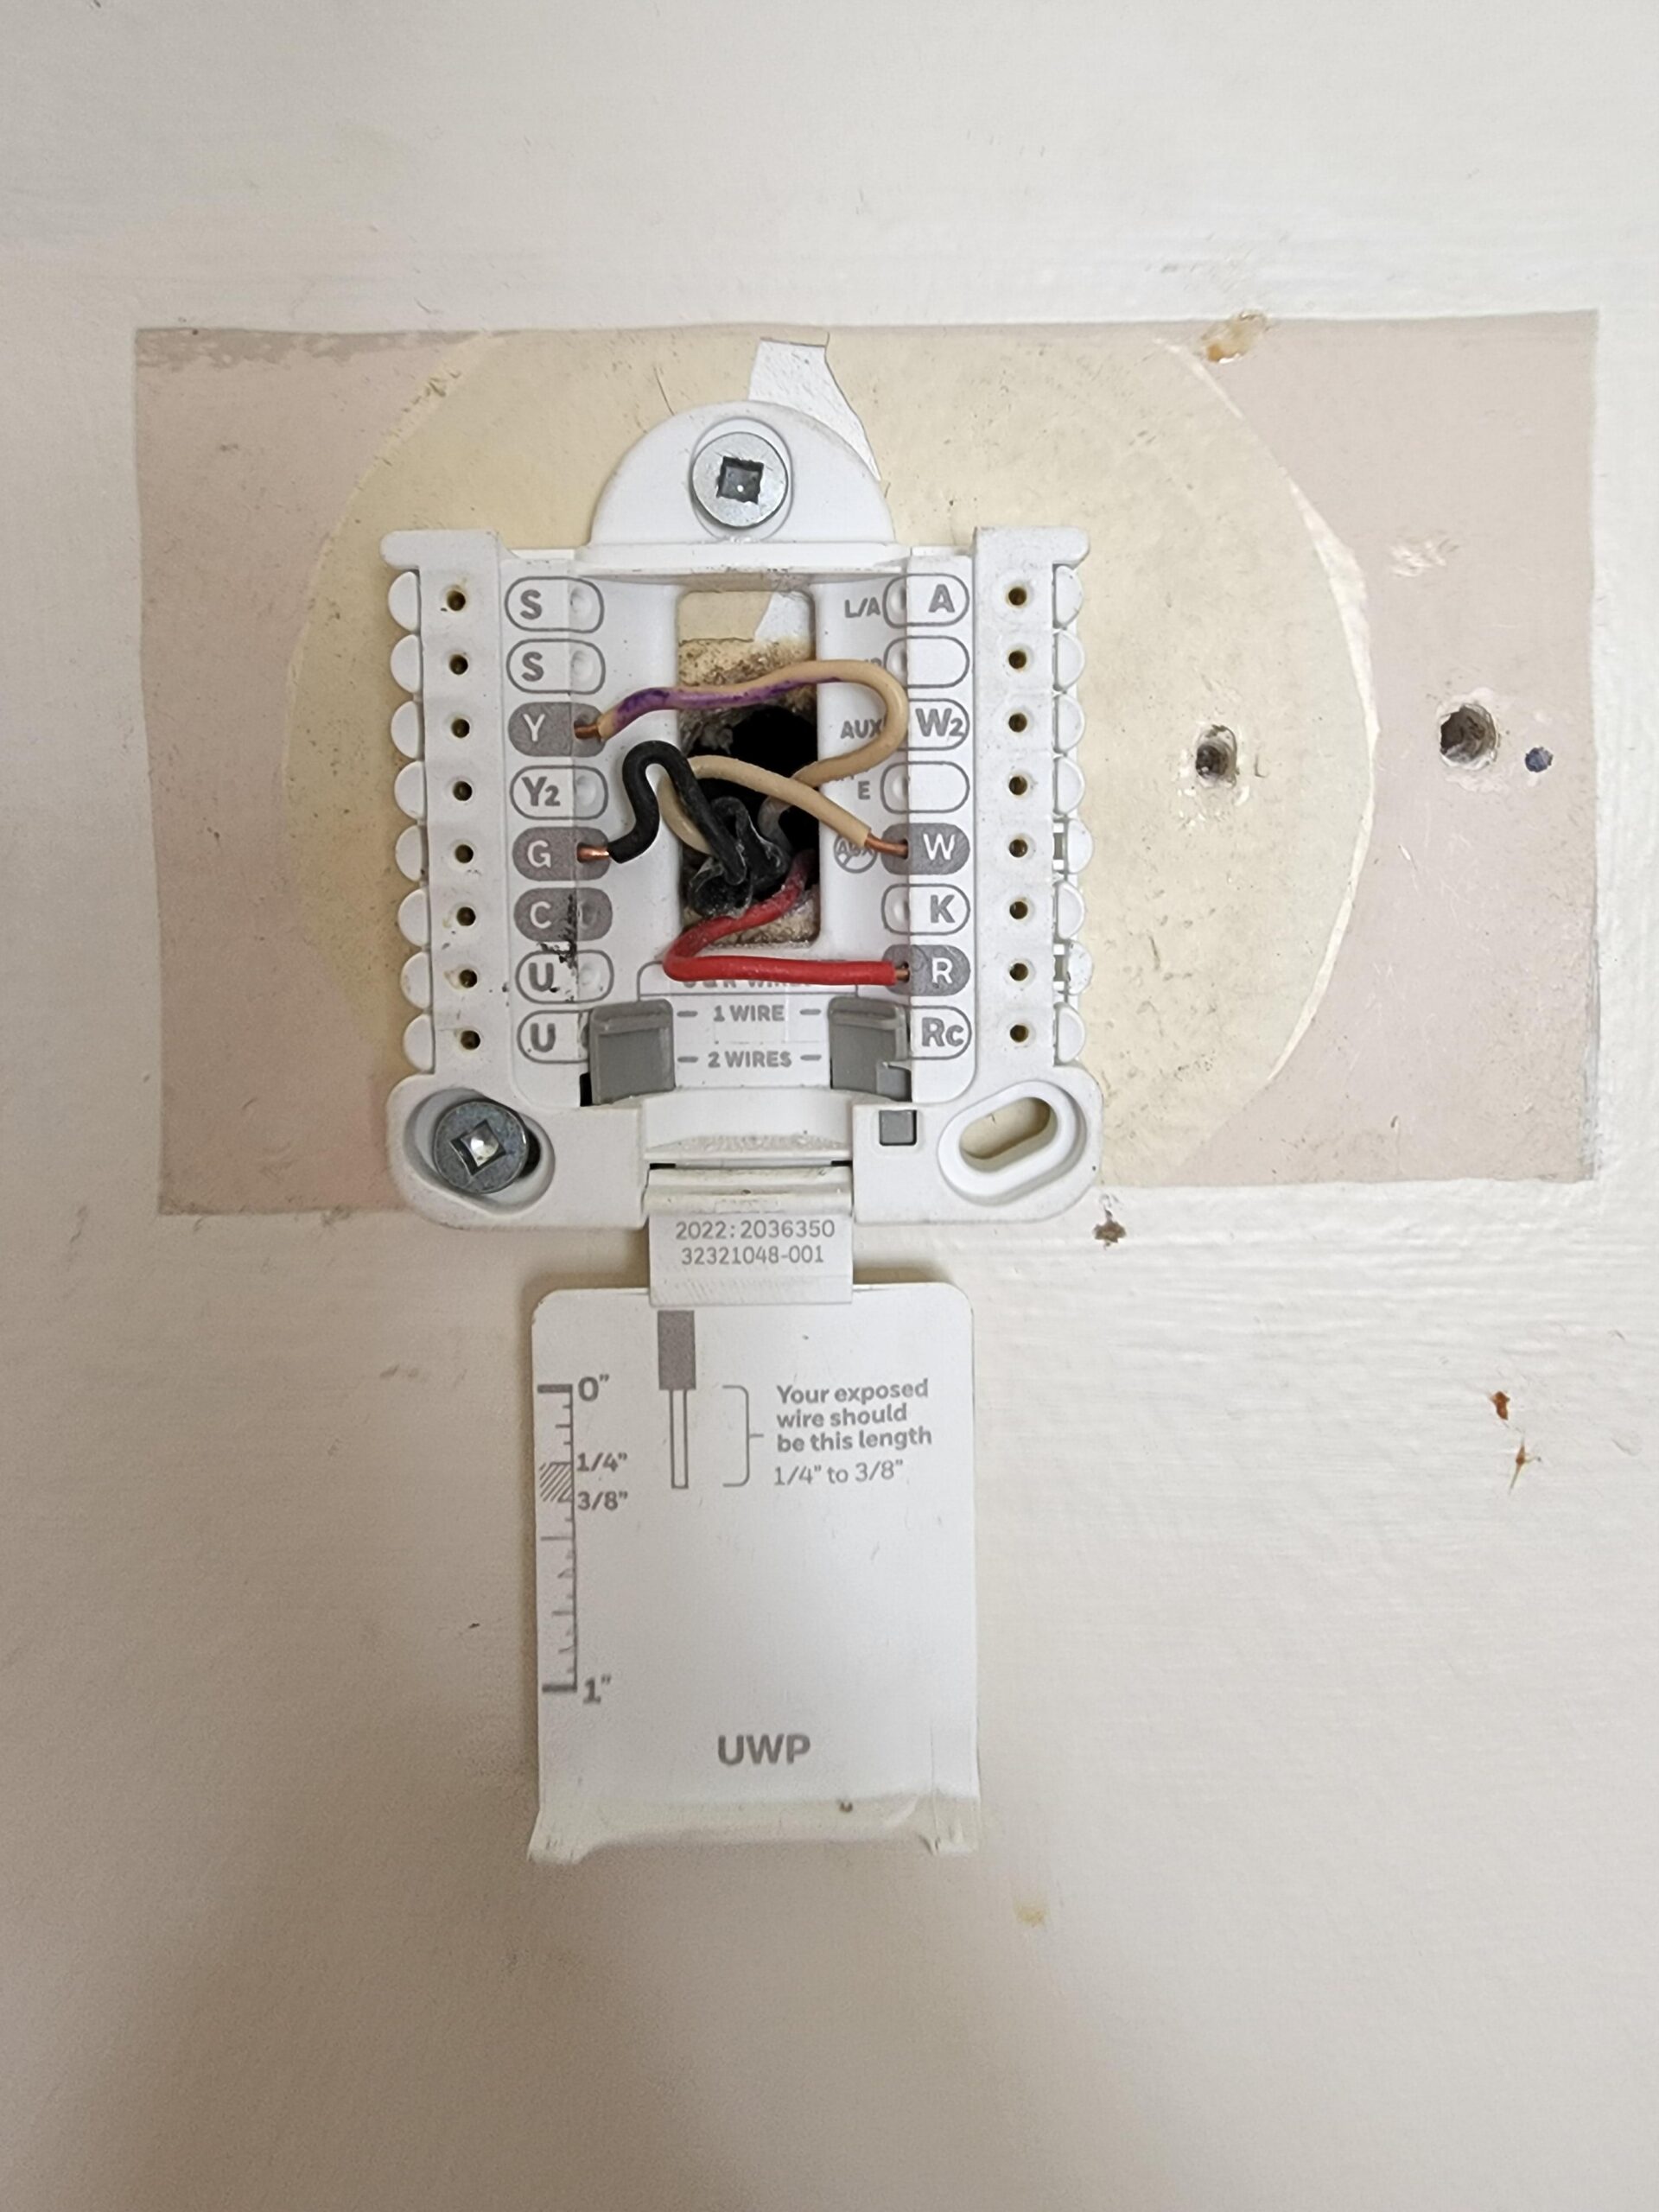
Identifying Existing Wires And Terminals
First, turn off the power to your thermostat. This is important for your safety. Next, remove the cover of your old thermostat to expose the wires and terminals.
You’ll see different colored wires connected to specific terminals. Each wire and terminal has a unique function. The most common wires you’ll encounter include:
- Red (R or Rh) – Power
- White (W) – Heat
- Yellow (Y) – Cool
- Green (G) – Fan
- Blue or Black (C) – Common
Label each wire with its corresponding terminal letter. This will make the installation process smoother.
Taking A Photo For Reference
It’s always a good idea to take a photo of your current wiring setup. This serves as a visual reference. If you forget which wire goes where, you can always refer back to your photo.
Make sure the photo is clear and captures all the wires and terminals. This will help you avoid any guesswork during installation.
Once you have labeled the wires and taken a photo, you are ready to proceed with wiring your new Honeywell Pro Series Thermostat.
Removing The Old Thermostat
Before installing your new Honeywell Pro Series Thermostat, you must remove the old one. This step requires attention to detail and care. Follow these simple steps to safely remove your old thermostat.
Unscrewing And Detaching The Faceplate
First, locate the screws holding the thermostat’s faceplate. Use a screwdriver to carefully unscrew them. Place the screws in a small bowl or container to avoid losing them.
Next, gently pull the faceplate away from the wall. If it feels stuck, wiggle it lightly. Avoid using excessive force to prevent damage to the wall or the thermostat.
Careful Handling Of Wires
Behind the faceplate, you’ll see several wires connected to the thermostat. These wires are crucial for the operation of your new Honeywell Pro Series Thermostat.
- Take a photo of the wiring configuration. This will serve as a reference for wiring the new thermostat.
- Label each wire with masking tape and a pen. Write the corresponding terminal letter on each piece of tape.
Once labeled, gently disconnect each wire. Use a small piece of tape to secure the wires to the wall. This will keep them from slipping back into the wall cavity.
With the wires safely secured, remove any mounting screws that hold the old thermostat base to the wall. Keep these screws in the same container as the faceplate screws.
Congratulations, you have successfully removed your old thermostat. Now, you are ready to wire your new Honeywell Pro Series Thermostat.
Mounting The Honeywell Pro Series Plate
The first step in installing your new Honeywell Pro Series Thermostat is mounting the plate. This is a critical part of the process. A properly mounted plate ensures your thermostat functions correctly. Let’s break down the steps.
Positioning The New Plate
Find the right spot on your wall for the thermostat plate. The location should be away from direct sunlight, drafts, and heat sources. Use a level to ensure the plate is straight. A crooked plate can cause issues.
Mark the screw holes with a pencil. Hold the plate against the wall and mark where the screws will go. This makes the next step easier.
Securing The Plate To The Wall
Drill pilot holes where you marked the screw locations. Pilot holes make it easier to insert screws and prevent the wall from cracking.
Insert wall anchors if you are mounting on drywall. Wall anchors provide extra support and ensure the plate stays in place.
Screw the plate to the wall using the provided screws. Make sure the plate is tight and secure. A loose plate can cause the thermostat to malfunction.
| Step | Description |
|---|---|
| Find the right spot | Away from sunlight, drafts, and heat sources |
| Mark the screw holes | Use a pencil to mark the screw locations |
| Drill pilot holes | Drill where you marked the screw locations |
| Insert wall anchors | For extra support on drywall |
| Screw the plate | Ensure the plate is tight and secure |

Credit: www.reddit.com
Connecting The Wires
Connecting the wires to your Honeywell Pro Series Thermostat is a crucial step in the installation process. It ensures the proper functioning of your heating and cooling system. Follow this guide to make the process simple and efficient.
Matching Wires To Corresponding Terminals
First, turn off the power to your HVAC system. This will keep you safe from electrical hazards.
Next, remove the thermostat cover to expose the wiring terminals. You will see labeled terminals like R, C, W, Y, G, and O/B.
Check Best Thermostat Pricing in Amazon
** As an Amazon Associate, I earn from qualifying purchases.
Match each wire from your wall to the corresponding terminal on the thermostat. Use the following table for reference:
| Wire Color | Terminal |
|---|---|
| Red | R |
| White | W |
| Yellow | Y |
| Green | G |
| Blue or Black | C |
| Orange | O/B |
Ensuring Secure Connections
Strip about 1/4 inch of insulation from each wire. This will expose the bare copper for a secure connection.
Insert each wire into its corresponding terminal. Tighten the terminal screws to hold the wires firmly in place.
Check that all wires are secure and none are loose. Loose wires can cause the thermostat to malfunction.
Use electrical tape to bundle the wires neatly. This will prevent any accidental disconnection.
Finally, replace the thermostat cover and turn the power back on to your HVAC system. Your Honeywell Pro Series Thermostat should now be ready to use.
Attaching The Thermostat To The Wall Plate
Attaching the Honeywell Pro Series Thermostat to the wall plate is a crucial step. This ensures your thermostat works correctly. It also keeps the device secure and stable.
Aligning The Pins And Snapping In Place
First, you need to align the pins on the thermostat with the slots on the wall plate. Make sure each pin is lined up perfectly. Hold the thermostat steady and press it against the wall plate. You should hear a ‘click’ sound when it snaps into place. This sound confirms that the thermostat is securely attached.
Avoid forcing the device. If it doesn’t snap easily, check the alignment again. Misalignment can damage the pins and the wall plate.
Double-checking Wire Placement
After snapping the thermostat in place, double-check the wire connections. Ensure each wire is connected to the correct terminal. Loose wires can cause the thermostat to malfunction.
Use the following table to verify wire placement:
| Wire Color | Terminal Label |
|---|---|
| Red | R |
| White | W |
| Yellow | Y |
| Green | G |
| Blue | C |
Make sure all wires are secured tightly. Loose wires can lead to poor performance or damage.
Check the display on the thermostat. It should light up and show the current room temperature. This indicates that the wiring is correct and the thermostat is functioning.
Final Steps And Testing
After wiring your Honeywell Pro Series Thermostat, ensure everything works correctly. This section will guide you through the final steps, including turning the power back on and programming the thermostat. Testing your setup ensures it functions as expected.
Turning The Power Back On
Ensure all wires are securely connected and the thermostat is mounted properly. Go to your circuit breaker panel. Locate the switch you turned off earlier.
Turn the power back on by flipping the switch to the “ON” position. Return to your thermostat. Check if the screen lights up. This indicates it is receiving power.
Programming And Calibration
Once the thermostat powers up, it’s time to program it. Follow the instructions in the user manual. Set the date and time first. Next, program your desired temperature settings.
Calibrate the thermostat by adjusting it to match the actual room temperature. Use a separate thermometer to check accuracy. Make any necessary adjustments in the settings.
| Step | Action |
|---|---|
| 1 | Ensure all wires are connected securely |
| 2 | Turn the power back on at the circuit breaker |
| 3 | Check if the thermostat screen lights up |
| 4 | Set the date and time on the thermostat |
| 5 | Program your desired temperature settings |
| 6 | Calibrate the thermostat for accuracy |
Follow these steps carefully. This ensures your Honeywell Pro Series Thermostat functions efficiently. Enjoy a comfortable home environment.
Troubleshooting Common Issues
While installing a Honeywell Pro Series Thermostat, you might face some issues. These problems often stem from incorrect wiring or power issues. This section will guide you through troubleshooting these common issues.
Dealing With Incorrect Wiring
Incorrect wiring can cause your thermostat to malfunction. Double-check the wiring diagram provided in the thermostat manual. Make sure each wire is connected to the correct terminal.
- Check for loose connections. Ensure all wires are tightly connected.
- Verify wire colors. Each color should match the corresponding terminal.
- Use the right tools. Proper tools help in securely connecting wires.
If you still face issues, refer to the Honeywell support website for detailed wiring instructions.
What To Do When The Thermostat Won’t Power On
If the thermostat doesn’t power on, it could be due to power issues. Follow these steps to troubleshoot:
- Check the circuit breaker. Ensure it is switched on.
- Inspect the batteries. Replace them if they are old or weak.
- Examine the C-wire. Ensure it is connected properly. The C-wire provides continuous power to the thermostat.
- Use a multimeter. Test the voltage to ensure power is reaching the thermostat.
By following these steps, you can identify the issue and resolve it quickly.
Maintenance Tips For Longevity
Ensuring your Honeywell Pro Series Thermostat works efficiently requires regular maintenance. Follow these tips to extend the lifespan of your device and maintain its optimal performance.
Regular Cleaning And Dusting
Dust can accumulate on your thermostat over time. This can affect its performance. Use a soft, dry cloth to clean the surface of the thermostat. Avoid using water or chemical cleaners. These can damage the device.
Keep the area around the thermostat free from dust. This helps in accurate temperature readings. Clean the vents and surrounding walls as well. These simple steps can prevent overheating and ensure accurate readings.
Software Updates And Battery Checks
Check for software updates regularly. Updating the software can fix bugs and improve performance. Visit the Honeywell website for the latest firmware updates.
Battery checks are crucial. Replace the batteries at least once a year. Low batteries can lead to inaccurate temperature readings. Follow these simple steps to keep your thermostat running smoothly:
- Remove the thermostat from the wall.
- Open the battery compartment.
- Replace the old batteries with new ones.
- Reattach the thermostat to the wall.
Use high-quality batteries for best results. This ensures your thermostat performs well and lasts longer.
Credit: m.youtube.com
Frequently Asked Questions
What Color Wires Go Where On A Honeywell Thermostat?
For a Honeywell thermostat, typically connect Red to R, White to W, Yellow to Y, Green to G, and Blue to C. Always check the specific model’s manual for exact wiring details.
How Many Wires Go To A Honeywell Thermostat?
A Honeywell thermostat typically uses 2 to 5 wires. The exact number depends on your HVAC system model.
How Do You Wire A Honeywell Thermostat With Four Wires?
Connect the red wire to R, yellow to Y, green to G, and white to W on the Honeywell thermostat.
What Is W1 And W2 On A Thermostat?
W1 and W2 on a thermostat are terminals for heating stages. W1 controls the first stage, W2 the second.
Conclusion
Mastering how to wire a Honeywell Pro Series Thermostat enhances home comfort. Follow the steps carefully for a smooth installation. Ensure all connections are secure for optimal performance. With this guide, you can confidently tackle the wiring process. Enjoy the benefits of a well-regulated home environment.
Check Best Thermostat Pricing in Amazon
** As an Amazon Associate, I earn from qualifying purchases.