

Check Best Thermostat Pricing in Amazon
** As an Amazon Associate, I earn from qualifying purchases.
Wiring your AC unit to your thermostat might sound tricky, but it doesn’t have to be. Imagine controlling your home’s temperature with ease, saving energy, and staying comfortable all year round.
In this guide, you’ll learn exactly how to connect your AC unit to your thermostat step-by-step. Whether you’re a beginner or just need a clear, simple walkthrough, this article will give you the confidence to get it done right. Keep reading, and you’ll discover the straightforward way to take control of your cooling system today.
Credit: superiorhomesupplies.com
Tools And Materials Needed
Wiring an AC unit to a thermostat requires specific tools and materials. Having everything ready helps the job go smoothly. Using the right equipment keeps you safe and ensures proper installation.
Essential Tools
- Voltage tester to check electrical current
- Screwdrivers, both flathead and Phillips
- Wire strippers for clean wire ends
- Needle-nose pliers for bending and holding wires
- Drill with bits for mounting the thermostat
- Level to keep the thermostat straight
- Electrical tape for securing wire connections
- Multimeter to measure voltage and continuity
Required Materials
- Thermostat compatible with your AC unit
- Thermostat base and cover plate
- Low-voltage thermostat wire (usually 18-22 gauge)
- Wire connectors or wire nuts
- Mounting screws and anchors
- Instruction manual specific to your thermostat model
Credit: www.reddit.com
Safety Precautions
Safety is the top priority when wiring an AC unit to a thermostat. Working with electricity can be risky. Taking the right precautions helps avoid accidents. Follow clear steps to protect yourself and your home.
Power Off Procedures
Always turn off the main power before starting work. Locate the circuit breaker and switch it off. Double-check that the power is off by testing the thermostat or AC unit. Do not skip this step. Electricity can cause serious injury or fire.
Handling Electrical Components
Use insulated tools to handle wires and terminals. Avoid touching bare wires with your hands. Wear rubber-soled shoes for extra protection. Keep the work area dry. Never work on live circuits to prevent shocks. Label wires to avoid confusion during installation.
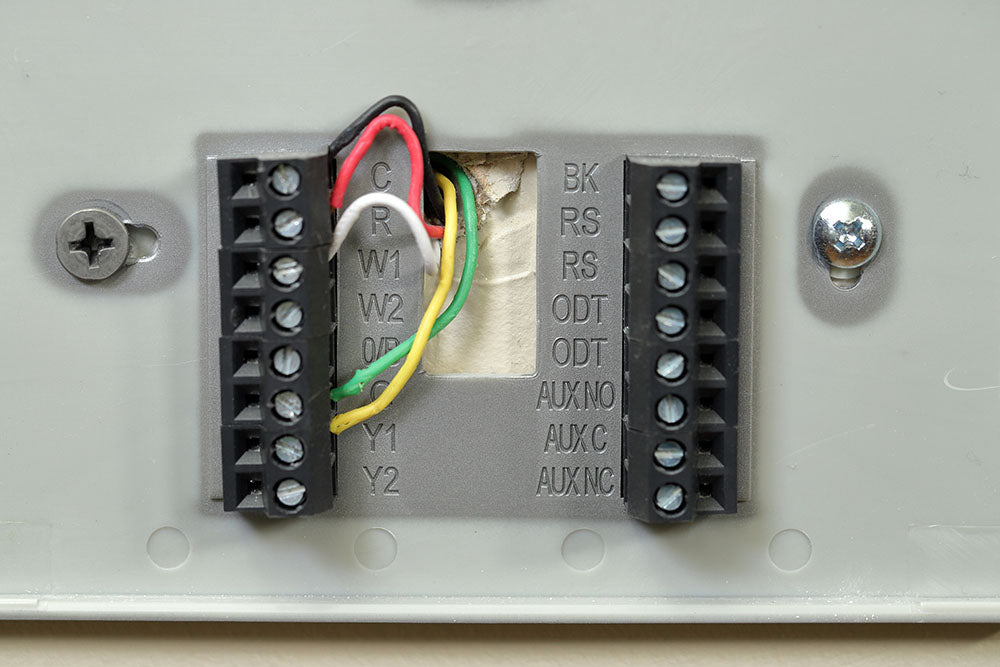
Identify Thermostat And Ac Unit Wires
Identifying the wires for your thermostat and AC unit is the first step in wiring them correctly. Knowing which wire does what helps avoid mistakes. It also ensures your AC runs smoothly with the thermostat.
Wires come in different colors and serve specific functions. Recognizing these colors and functions makes the wiring process easier and safer.
Common Wire Colors
Thermostat and AC wires often use standard colors. Red wires usually carry power from the transformer. White wires connect to the heating system. Green wires control the fan. Yellow wires link to the cooling system. Blue or black wires serve as common wires. These colors may vary in older systems. Always check your system’s manual if unsure.
Wire Functions
Each wire has a clear job in the system. The red wire (R) provides power. The white wire (W) activates heat. The green wire (G) controls the fan. The yellow wire (Y) starts the cooling. The blue or black wire (C) completes the circuit by providing a return path for power. Understanding these functions helps you connect wires properly without confusion.
Remove Old Thermostat
Removing the old thermostat is the first step before wiring your AC unit. It helps to avoid confusion with wires and ensures a clean setup. Take your time to carefully remove it without damaging the wall or the wires. This section guides you through the safe removal process.
Disconnecting Wires
Turn off the power to your HVAC system at the breaker. This stops any electrical shock or damage. Take a picture or label each wire before disconnecting. This helps with correct wiring later. Use a screwdriver to loosen the screws holding the wires. Gently pull each wire free from the thermostat terminals. Avoid pulling the wires too hard to prevent damage.
Removing Mounting Hardware
Check for screws or clips holding the thermostat base to the wall. Use a screwdriver to remove all screws carefully. Keep the screws safe for the new thermostat installation. Slowly pull the base away from the wall. If there is any paint or adhesive, loosen it gently. Avoid damaging the wall surface to make the new install easier.
Wiring The New Thermostat
Wiring the new thermostat is a key step in setting up your AC unit. It controls your home’s temperature and comfort. Proper wiring ensures your system runs smoothly and safely. Follow these steps to connect each wire correctly.
Connecting Power Wires
Start with the power wires. These usually come from the HVAC system’s control board. The red wire (R) provides 24 volts of power to the thermostat. Connect this wire to the R terminal on the thermostat. Some systems have separate wires for heating (Rh) and cooling (Rc). If so, link Rh and Rc with a jumper wire or as the thermostat instructions say.
Connecting Cooling Wires
The cooling wire controls the AC compressor. This wire is often blue or green and connects to the Y terminal. Attach the cooling wire to the Y terminal on your thermostat. This connection signals your AC to start cooling when needed. Make sure the wire is secure and free of damage for reliable operation.
Connecting Fan Wires
The fan wire controls the blower fan inside your AC unit. It is usually green and connects to the G terminal. Connecting this wire allows the thermostat to turn the fan on and off separately from the cooling system. This helps circulate air effectively throughout your home.
Using The Common Wire
The common wire, or C wire, provides a continuous flow of power to the thermostat. Not all thermostats need it, but many smart models do. The C wire is usually black or blue. Connect this wire to the C terminal on the thermostat. This connection keeps your thermostat powered without draining batteries.
Check Best Thermostat Pricing in Amazon
** As an Amazon Associate, I earn from qualifying purchases.

Credit: support.rfwel.com
Mounting The Thermostat
Mounting the thermostat correctly is an important step in wiring your AC unit. It ensures the device stays secure and works properly. A well-mounted thermostat reads the room temperature accurately and controls the AC efficiently.
Start by picking the right spot on the wall. Avoid places near heat sources or direct sunlight. The thermostat should be at eye level for easy access and reading.
Securing The Thermostat To The Wall
Hold the thermostat base against the wall. Use a pencil to mark the screw holes. Drill small holes where you marked. Insert wall anchors if the wall is drywall. Screw the base tightly to the wall. Make sure it does not wobble or move.
Attaching The Thermostat Cover
Align the thermostat cover with the base. Press the cover gently until it snaps into place. Check that all buttons and display are visible. The cover should fit snugly without gaps. This protects the wiring and keeps the thermostat clean.
Testing The System
Testing the system is a key step after wiring your AC unit to the thermostat. This step ensures everything works correctly and safely. You avoid damage and save time on repairs. Follow these simple checks to confirm proper operation.
Restoring Power
First, turn the power back on at the circuit breaker. Make sure the breaker is fully switched to the ON position. Check the thermostat display lights up. This shows the thermostat receives power. If no lights appear, double-check your wiring and breaker.
Verifying Cooling Function
Set the thermostat to a cooler temperature than the room. The AC unit should start running after a few seconds. Listen for the outdoor unit’s fan and compressor. Feel the air from the vents for coolness. If the air stays warm, check the thermostat settings and wiring again.
Troubleshooting Common Issues
If the system does not respond, inspect the wiring connections. Loose or incorrect wires cause most problems. Confirm all wires match the thermostat terminals. Check the fuse in the outdoor unit’s disconnect box. Replace it if blown. Also, ensure the thermostat batteries have power if applicable.
Tips For Efficient Wiring
Efficient wiring ensures your AC unit and thermostat work smoothly. It saves time and prevents future problems. Following simple tips helps keep wiring safe and organized. This section shares practical advice to wire your AC unit to the thermostat correctly.
Labeling Wires
Label each wire before disconnecting it. Use small tags or tape with clear letters. This avoids confusion during reconnection. Match labels with the thermostat and AC unit terminals. Labeling helps identify wires quickly and reduces errors.
Using Wire Connectors
Use wire connectors to join wires securely. They prevent loose connections that cause faults. Twist wires tightly before adding connectors. Choose connectors suitable for wire size and type. Proper connectors improve safety and signal flow.
Avoiding Common Mistakes
Do not mix up wire colors or terminals. Double-check the wiring diagram from the manual. Avoid pulling wires forcefully or bending them sharply. Keep wires away from sharp edges and heat sources. These steps prevent damage and maintain proper function.
Frequently Asked Questions
How Do I Connect Ac Unit Wires To Thermostat?
Turn off power first. Match thermostat wires to AC terminal labels. Connect wires securely. Follow manufacturer’s wiring diagram for accuracy.
What Tools Are Needed To Wire Ac To Thermostat?
You need a screwdriver, wire stripper, and voltage tester. These tools help safely connect and secure wires during installation.
Can I Wire A Thermostat Without Professional Help?
Yes, if you follow instructions carefully. Turn off power and use wiring diagrams. Call a professional if unsure or uncomfortable.
Which Wire Controls The Ac Compressor Function?
The “Y” wire usually controls the compressor. It signals the AC unit to start cooling when thermostat calls for it.
Conclusion
Wiring your AC unit to the thermostat is simple with clear steps. Always turn off power before starting any work. Follow the wiring diagram carefully to avoid mistakes. Double-check connections to ensure everything fits securely. Proper wiring helps your AC run efficiently and saves energy.
Take your time and work safely for best results. You can enjoy cool comfort once the setup is complete. Stay patient and confident throughout the process. This guide makes your task easier and safer.
Check Best Thermostat Pricing in Amazon
** As an Amazon Associate, I earn from qualifying purchases.