
Check Best Thermostat Pricing in Amazon
** As an Amazon Associate, I earn from qualifying purchases.
Are you ready to take control of your home’s comfort? Wiring a two-wire thermostat might sound daunting, but it’s simpler than you think.
Imagine effortlessly managing your heating system, saving energy, and cutting costs—all with just a few steps. This guide will walk you through the process, empowering you to master your thermostat installation with confidence. Whether you’re a seasoned DIY enthusiast or just starting out, you’ll discover how easy it is to enhance your home’s efficiency.
Don’t miss out on this opportunity to upgrade your living space and take charge of your environment. Dive in, and unlock the secrets to a perfectly wired thermostat today!

Credit: forums.wyze.com
- Tools And Materials Needed
- Safety Precautions
- Understanding Thermostat Basics
- Identifying Thermostat Wires
- Removing The Old Thermostat
- Preparing The New Thermostat
- Connecting The Wires
- Securing The Thermostat
- Testing The Installation
- Troubleshooting Common Issues
- Maintenance Tips
- Frequently Asked Questions
- Conclusion
Tools And Materials Needed
Wiring a two-wire thermostat is a straightforward task. It requires specific tools and materials to ensure a smooth process. Proper preparation is key for a successful installation. Having the right items on hand will make the work efficient and safe.
Tools Needed
A screwdriver is essential. It helps remove the thermostat cover and secure wires. Wire strippers are also necessary. They expose the copper wire for connection. A voltage tester ensures safety. It checks if the wires are live before starting.
Materials Needed
Thermostat wires are crucial. They connect the thermostat to the heating system. Wall anchors and screws hold the thermostat securely. Electrical tape insulates wire connections. A new thermostat completes the list. Choose one compatible with your heating system.
Safety Equipment
Safety goggles protect your eyes. Wear them while working with wires. Gloves safeguard your hands from cuts. They also prevent electric shocks. An insulated mat is useful. It offers additional protection against electrical hazards.
Safety Precautions
Ensuring safety is crucial when wiring a two-wire thermostat. Always disconnect power before starting to avoid electric shock. Use insulated tools and check connections twice for secure and proper installation.
Wiring a two-wire thermostat can seem like a straightforward task, but it’s essential to prioritize safety above all else. A small oversight might not only lead to damage but can also pose serious risks to your well-being. Before diving into the actual wiring process, understanding the necessary safety precautions can save you from potential pitfalls and ensure a smooth installation experience.1. Turn Off The Power
Always ensure the power is off before starting any electrical work. Head to your circuit breaker and switch off the power supply to the area where you’ll be working. It’s a simple step that can prevent electric shocks. Double-check by using a voltage tester on the wires. If there’s any sign of power, do not proceed until you’re sure it’s off. This might sound basic, but it’s a crucial step often overlooked.2. Use The Right Tools
Having the right tools on hand makes a world of difference. Use insulated tools to prevent accidental contact with live wires. A reliable screwdriver, wire stripper, and voltage tester are essential. Investing in quality tools ensures they don’t break mid-job, which can be both frustrating and dangerous. Remember, tools are your trusted allies in this task.3. Read The Manual
Thermostats come with manuals for a reason. They provide specific instructions related to your device. Spend a few minutes to go through it and understand any unique requirements. While manuals might not be the most exciting read, they often contain valuable safety information pertinent to your specific model. Ignoring them could lead to improper installation.4. Ensure Proper Wiring Practices
Check that the wires are not frayed or damaged before you begin. If they are, replace them to avoid potential fire hazards. Securely connect wires and ensure they’re tightly fastened. Poor connections can lead to malfunction or short circuits. Take the time to do it right the first time; it’s worth the effort to ensure safety and reliability.5. Wear Safety Gear
Basic safety gear like gloves and goggles can offer protection from unexpected sparks or sharp wire ends. It might feel cumbersome, but it significantly reduces the risk of injury. I once underestimated the importance of gloves, only to end up with a nasty cut. Trust me, safety gear is not optional.6. Keep Your Work Area Organized
A tidy workspace minimizes accidents. Keep your tools and materials organized and within reach. Clear away any unnecessary clutter that could cause a distraction or trip hazard. An organized workspace not only enhances safety but also improves efficiency. It’s easier to focus when everything is in its place.7. Consult A Professional If Uncertain
If at any point you feel unsure, don’t hesitate to consult a professional. While DIY projects are rewarding, safety should never be compromised. A quick call to an electrician can provide peace of mind and prevent costly errors. It’s always better to ask than to guess, especially where safety is concerned. Incorporating these safety measures can make your thermostat wiring project smoother and safer. What other safety practices do you find essential when tackling DIY electrical tasks?Understanding Thermostat Basics
Understanding thermostat basics is vital for effective home temperature control. These devices regulate heating and cooling systems, ensuring comfort and energy efficiency. Knowing the fundamentals helps in making informed decisions during installation and troubleshooting.
Thermostat Components
A thermostat typically consists of a sensor, display, and control panel. The sensor detects room temperature and sends signals to the heating or cooling system. The display shows current settings, while the control panel allows adjustments.
Thermostat Types
There are various types of thermostats, including digital, programmable, and smart models. Digital thermostats offer basic manual controls. Programmable thermostats let you set different temperatures for specific times. Smart thermostats connect to Wi-Fi for remote access and monitoring.
Two Wire Thermostat Basics
A two wire thermostat is the simplest type. It connects directly to the heating system. These thermostats are commonly used for basic heating systems without cooling functions.
Installation Considerations
Before wiring a two wire thermostat, check compatibility with your heating system. Ensure power is turned off to avoid electrical hazards. Follow manufacturer instructions carefully for successful installation.
Credit: www.reddit.com
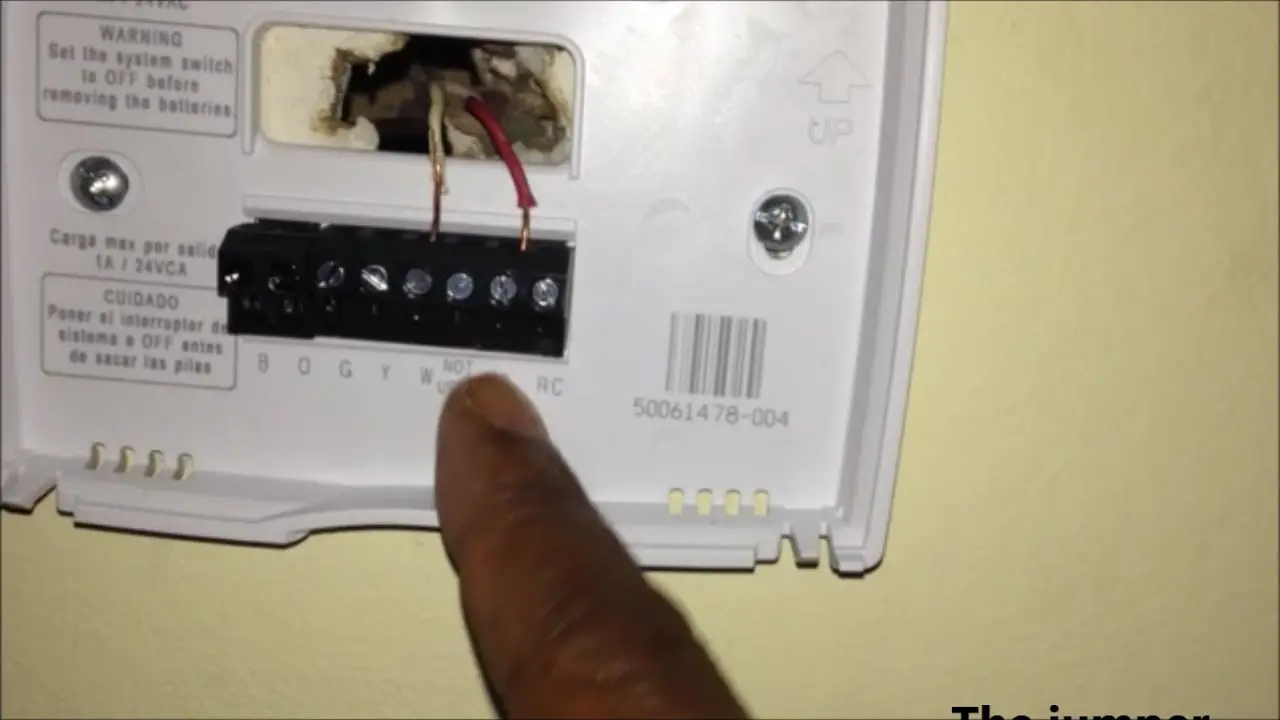
Identifying Thermostat Wires
Understanding thermostat wires is crucial for a successful installation. These wires connect your thermostat to the HVAC system. Identifying them correctly ensures your system works efficiently. Let’s dive into the basics.
Understanding Wire Colors
Thermostat wires come in different colors. Each color has a specific function. Common colors include red, white, and green. Red is often the power wire. White connects to the heating system. Green controls the fan. Knowing these colors helps in proper wiring.
Using A Multimeter
A multimeter is a handy tool. It checks the voltage of wires. Set the multimeter to the voltage setting. Touch the probes to the wire ends. A reading confirms the wire’s function. Use this tool to ensure safety and accuracy.
Referencing The User Manual
Your thermostat’s user manual is a valuable resource. It provides specific wiring diagrams. Each diagram matches the wires to the correct terminals. Follow the manual closely. This reduces errors and ensures proper installation.
Labeling The Wires
Label wires before disconnecting them. Use masking tape and a pen. Write down each wire’s function. This helps during reinstallation. Proper labeling prevents confusion and mistakes.
Removing The Old Thermostat
Disconnecting an old thermostat is the first step in wiring a two-wire thermostat. Ensure the power is off to avoid shocks. Carefully note the wire connections before removal. This helps in connecting the new thermostat correctly.
Removing the old thermostat might seem daunting at first, but it’s a straightforward task that sets the stage for installing your new two-wire thermostat. Whether you’re upgrading for energy efficiency or simply replacing a malfunctioning unit, knowing how to safely and effectively remove your old thermostat is crucial. This process requires patience and attention to detail, ensuring you don’t damage any existing wiring or wall space.Shut Off The Power
Before you begin, ensure your safety by shutting off the power to your HVAC system at the circuit breaker. This prevents any electrical mishaps and keeps you safe from potential shocks.Remove The Thermostat Cover
Most thermostats are covered by a protective casing. Gently pull it off, using your fingers or a small flathead screwdriver if needed. This exposes the wires and mounting screws.Note The Wire Configuration
Take a moment to observe the wiring setup. Use your phone to snap a picture or jot down notes. This can be invaluable when connecting your new thermostat, ensuring you match the correct wires.Detach The Wires
Using a screwdriver, carefully loosen the screws that hold the wires in place. Make sure you don’t let the wires slip back into the wall. It can be helpful to use tape to secure them temporarily.Remove The Mounting Plate
With the wires detached, you can now unscrew the mounting plate from the wall. Keep these screws handy as they might be useful for installing the new thermostat.Inspect The Area
After removing the old thermostat, check the wall area for any damage or debris. A clean surface is ideal for installing your new thermostat. If needed, patch any holes or marks. Removing an old thermostat isn’t just about technical know-how; it’s also a bit of a journey into your home’s past choices. Did you find that the wiring was straightforward, or did you uncover a surprise? How did it compare to your expectations? Taking a moment to reflect can make the next steps more intuitive and rewarding.Preparing The New Thermostat
Installing a new thermostat can improve your home’s comfort. Preparing the new thermostat is a crucial step. It ensures efficient operation and prolongs its lifespan. This section guides you through the preparation process. You’ll learn how to handle your thermostat with care.
Gathering Necessary Tools
Start by collecting essential tools. A screwdriver and wire strippers are vital. Keep a voltage tester handy to ensure safety. Make sure you have a drill for mounting, if needed. These tools make the installation smooth and hassle-free.
Reading The Instructions
Read the thermostat’s manual carefully. Understand its unique features and requirements. Each model may have specific instructions. Familiarize yourself with diagrams and setup guides. This knowledge prevents mistakes and saves time.
Checking Compatibility
Verify that your thermostat is compatible with your system. Most are designed for common heating setups. Confirm it works with two-wire systems. This ensures proper operation and avoids issues. Check the voltage compatibility as well.
Turning Off Power
Safety is paramount when working with wiring. Turn off the power to your HVAC system. Use the voltage tester to confirm no electricity flow. This step prevents accidents and ensures a safe environment.
Carefully detach the old thermostat from the wall. Unscrew it and gently disconnect the wires. Note their placement for easy reference. This helps in connecting the new thermostat correctly.
Check Best Thermostat Pricing in Amazon
** As an Amazon Associate, I earn from qualifying purchases.
Connecting The Wires
Connecting the wires of a two-wire thermostat might seem daunting at first, but with a little guidance, it becomes straightforward and rewarding. This part of the installation process is essential for ensuring your thermostat communicates effectively with your heating system. Let’s break it down and make sure you’re ready to tackle this task confidently.
Understanding The Wire Types
When dealing with a two-wire thermostat, you’re typically working with a power wire and a control wire. The power wire supplies electricity to the thermostat, while the control wire connects to your heating system. Remember, safety first! Ensure your power is turned off before handling any wires.
Identifying The Terminals
Take a moment to look at your thermostat’s terminal labels. You’ll usually find labels like ‘R’ for power and ‘W’ for heat. Having a clear understanding of these labels helps avoid confusion. If your thermostat manual is handy, give it a quick glance for any specific instructions.
Connecting The Power Wire
Begin by connecting the power wire to the ‘R’ terminal. This wire is typically red, but always double-check. Tighten the screw securely to avoid loose connections. A firm connection ensures your thermostat receives a steady power supply.
Connecting The Control Wire
Next, connect the control wire to the ‘W’ terminal. Often, this wire is white. Make sure it’s snug and secure. This connection allows your thermostat to communicate with your heating system, making temperature adjustments possible.
Testing Your Connections
Once you’ve connected the wires, it’s time to test your setup. Restore power and check if your thermostat lights up. Adjust the temperature setting and listen for the heating system’s response. If everything works smoothly, you’ve done it right!
What If Something Goes Wrong?
Sometimes, things don’t go as planned. If your thermostat isn’t functioning, double-check your connections. Are the wires firmly attached? Did you follow the terminal labels correctly? Troubleshooting is part of the process, so don’t be discouraged.
Have you considered how a small misstep can affect your heating system’s efficiency? Ensuring proper wire connections is key to optimal performance. So, are you ready to connect those wires and enjoy a perfectly functioning thermostat?
Securing The Thermostat
Wiring a two-wire thermostat is simple and crucial for efficient home heating. Start by turning off the power. Then, connect one wire to the R terminal and the other to the W terminal. This setup helps in maintaining a consistent temperature, ensuring comfort and energy efficiency.
Securing a thermostat might seem like a simple task, but it plays a crucial role in ensuring your heating or cooling system works efficiently. A loose or improperly installed thermostat can lead to inaccurate temperature readings and unexpected energy bills. As someone who once struggled with inconsistent room temperatures, I found that securing the thermostat properly was a game-changer. Let’s dive into the steps to make sure your thermostat stays firmly in place and operates flawlessly.Gathering Your Tools
Before you start, make sure you have all the necessary tools. You’ll need a screwdriver, level, and maybe some wall anchors. Having everything ready saves time and prevents frustration.Choosing The Right Location
Placement is key to accurate temperature reading. Avoid areas near windows, doors, or heat sources. A stable room temperature ensures the thermostat functions efficiently.Using A Level
Make sure your thermostat is perfectly horizontal. A tilted thermostat can lead to inaccurate temperature readings. Use a level to verify that it’s straight.Securing With Screws
Hold the thermostat base against the wall and mark the screw holes. Secure it with screws, ensuring they are tightly fitted. A loose installation can cause it to wobble.Testing Stability
After securing the thermostat, gently wiggle it to check its stability. It should be firm and not move. If it shifts, tighten the screws further.Checking Functionality
Once secured, test the thermostat settings. Set a temperature and monitor if your HVAC system responds correctly. This confirms proper installation. Securing your thermostat is more than just screwing it into the wall. It’s about ensuring it reads temperatures accurately, leading to comfort and energy efficiency. Have you ever faced issues due to a loosely installed thermostat? Share your experiences; your insights might help someone else in need.Testing The Installation
After wiring a two-wire thermostat, testing the installation is vital. This step ensures the thermostat is functioning correctly. A simple process, but important for effective temperature control. Proper testing guarantees comfort and energy efficiency.
Check The Power Supply
Ensure the power supply to the thermostat is active. Use a voltage tester for accuracy. A working power supply means the thermostat can operate.
Set The Desired Temperature
Set the thermostat to a temperature above room temperature. This action should prompt the heating system to engage. Listen for the system starting up.
Verify Heating System Activation
Once the thermostat signals the system, check for heat production. Feel the vents or radiator. Warm air or heat means the installation is correct.
Observe The System’s Response
Monitor how the system responds to temperature changes. Adjust the thermostat to a lower setting. The system should stop heating after a short time.
Double-check The Connections
If issues arise, inspect the wiring connections. Ensure each wire is secure and in the correct terminal. Proper connections prevent malfunctions.
Consult The Manual
Refer to the thermostat’s manual for troubleshooting tips. Manuals offer guidance on specific models. They provide insights into unique features and settings.
Troubleshooting Common Issues
Learn how to wire a two-wire thermostat with ease. Discover common issues like incorrect connections and power failures. Follow simple steps to troubleshoot and ensure efficient operation for your heating system.
When you’re dealing with a two-wire thermostat, you might find yourself in a bit of a jam if it stops working as expected. But don’t worry, troubleshooting common issues can be quite straightforward. Whether you’re a DIY enthusiast or just trying to save on a service call, understanding the possible problems and their solutions is essential.Loose Or Disconnected Wires
One of the most frequent issues is loose or disconnected wires. A simple tug can sometimes dislodge them from their terminals. Make sure to power off your system before you start. Double-check that each wire is securely connected to its respective terminal.Thermostat Not Responding
Is your thermostat not responding? It might seem like a no-brainer, but ensure that the system is powered. Check the circuit breaker or fuse box for any tripped breakers. Resetting them might just bring your thermostat back to life.Incorrect Thermostat Settings
Sometimes, the issue lies in the settings. Revisit the manufacturer’s manual to ensure the thermostat is set correctly. Is it set to ‘Heat’ when you need ‘Cool’? Small tweaks in settings can make a big difference.Old Or Faulty Thermostat
Your thermostat might simply be showing its age. If it’s been in use for a long time, it might be time to consider a replacement. Take a moment to reflect—is holding onto an outdated device really worth the hassle?Temperature Discrepancies
Ever notice your room feels warmer or cooler than the thermostat indicates? This could be due to incorrect calibration. Use an external thermometer to verify the room’s actual temperature. If there’s a significant difference, recalibrating the thermostat might be necessary.Dirty Components
Dust and debris can accumulate over time, affecting performance. Regular maintenance can prevent this. Gently clean the thermostat with a soft brush or cloth. It’s a small task, but it can have a big impact on functionality. Remember, tackling these issues requires patience and attention. What’s the most challenging problem you’ve faced with your thermostat? Solving these problems can be satisfying, and knowing your way around can save you time and money.Maintenance Tips
Wiring a two-wire thermostat can be simple with the right steps. First, identify the wires and their connections. Then, securely attach them to the thermostat’s terminals. Always ensure the power is off before starting.
Maintaining your two-wire thermostat is key to ensuring it works efficiently year-round. Regular upkeep can prevent minor issues from becoming major headaches. Here, we’ll dive into some practical maintenance tips to keep your thermostat in top-notch condition.Check The Battery Status Regularly
Ensure your thermostat’s battery is always functional. A weak battery can disrupt your thermostat’s performance and cause unexpected temperature changes. Set a reminder to check the battery every few months, especially before the winter and summer seasons.Clean The Thermostat
Dust and dirt can accumulate on your thermostat over time. A clean surface ensures accurate temperature readings. Use a soft, dry cloth to wipe the exterior of your thermostat gently. Avoid using water or any cleaning agents that might seep into the device.Inspect Wiring Connections
Loose connections can lead to faulty readings. Periodically inspect the wiring to ensure everything is secure. If you’re unfamiliar with handling wires, consider consulting a professional to avoid any mishaps.Test The Thermostat’s Response
It’s important to test your thermostat’s response to temperature changes. Set it a few degrees higher or lower than the current room temperature and listen for the click indicating the system has kicked on. If there’s no response, it might be time to troubleshoot further or seek expert help.Update The Thermostat’s Settings Seasonally
As seasons change, so do your heating and cooling needs. Adjusting the thermostat settings to match the current season can enhance comfort and efficiency. This simple step can also help in cutting down energy bills.Keep An Eye On Temperature Fluctuations
Notice any irregular temperature changes in your home? This could indicate an issue with the thermostat. Consistent monitoring will help you catch these discrepancies early. Don’t ignore these signs; addressing them promptly can save you from costly repairs later. Regular maintenance doesn’t just prolong the life of your thermostat; it ensures your home remains comfortable. What other maintenance tips have you found useful? Share your insights in the comments!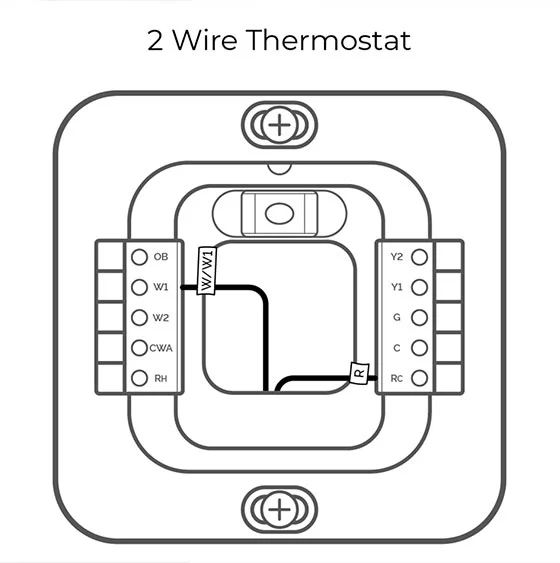
Credit: cielowigle.com
Frequently Asked Questions
Can You Wire A Thermostat With Two Wires?
Yes, you can wire a thermostat with two wires. It typically controls a heating-only system. Ensure compatibility with your specific thermostat model.
What Happens If You Wire A Two Wire Thermostat Wrong?
Wiring a two-wire thermostat incorrectly can cause the system to malfunction. The heating or cooling may not turn on. This can lead to temperature control issues, and potential damage to the thermostat or HVAC system. Always follow the manufacturer’s instructions for proper installation.
What Does It Mean If My Thermostat Only Has Two Wires?
A two-wire thermostat typically controls heating only. It lacks the connections for cooling or fan operation. This system is common in older homes. Ensure compatibility with modern thermostats before upgrading. Proper installation is crucial for effective operation. Always consult a professional if you’re uncertain about wiring.
How To Add A Common Wire To A 2 Wire Thermostat?
Turn off the power. Connect a “C” wire from the HVAC system to the thermostat. Use a “C-wire adapter” if needed. Secure connections and restore power. Test the thermostat for proper functionality.
Conclusion
Wiring a two-wire thermostat can seem tricky at first. But with the right steps, it’s manageable. Follow instructions carefully and double-check each connection. Safety should always come first. Ensure the power is off before you begin. Use clear, simple tools for the job.
Practice patience and take your time. You’ll achieve a successful installation. A well-wired thermostat ensures a comfortable home. Plus, it can save energy and reduce bills. Feel confident in your ability to complete this task. You are now better equipped to handle future projects.
Happy wiring!
Check Best Thermostat Pricing in Amazon
** As an Amazon Associate, I earn from qualifying purchases.