

Check Best Thermostat Pricing in Amazon
** As an Amazon Associate, I earn from qualifying purchases.
Wiring a thermostat with just three wires might seem tricky at first, but it doesn’t have to be. If you want to take control of your home’s heating and cooling without calling a professional, this guide is for you.
You’ll learn simple steps that anyone can follow, even if you’re not an expert. By the end, you’ll feel confident handling your thermostat wiring and saving money on installation. Ready to get started? Let’s dive in and make your home more comfortable today.
Tools And Materials Needed
Before wiring a thermostat with three wires, gather the right tools and materials. Having everything ready helps the process go smoothly. It also keeps you safe and avoids mistakes.
Each item plays a key role. The right tools make handling wires easier. The correct materials ensure a strong, lasting connection.
Tools Needed
You need a screwdriver to open the thermostat panel and secure wires. A wire stripper is essential to remove insulation without damaging wires. A voltage tester helps check power is off for safety. Needle-nose pliers make bending and holding wires easier. A drill may be necessary for mounting the thermostat.
Materials Needed
Use a three-wire thermostat compatible with your HVAC system. Electrical tape keeps connections safe and insulated. Wire connectors join wires securely without loose ends. Wall anchors and screws hold the thermostat firmly. Keep the user manual handy for reference during installation.
Identifying The Three Wires
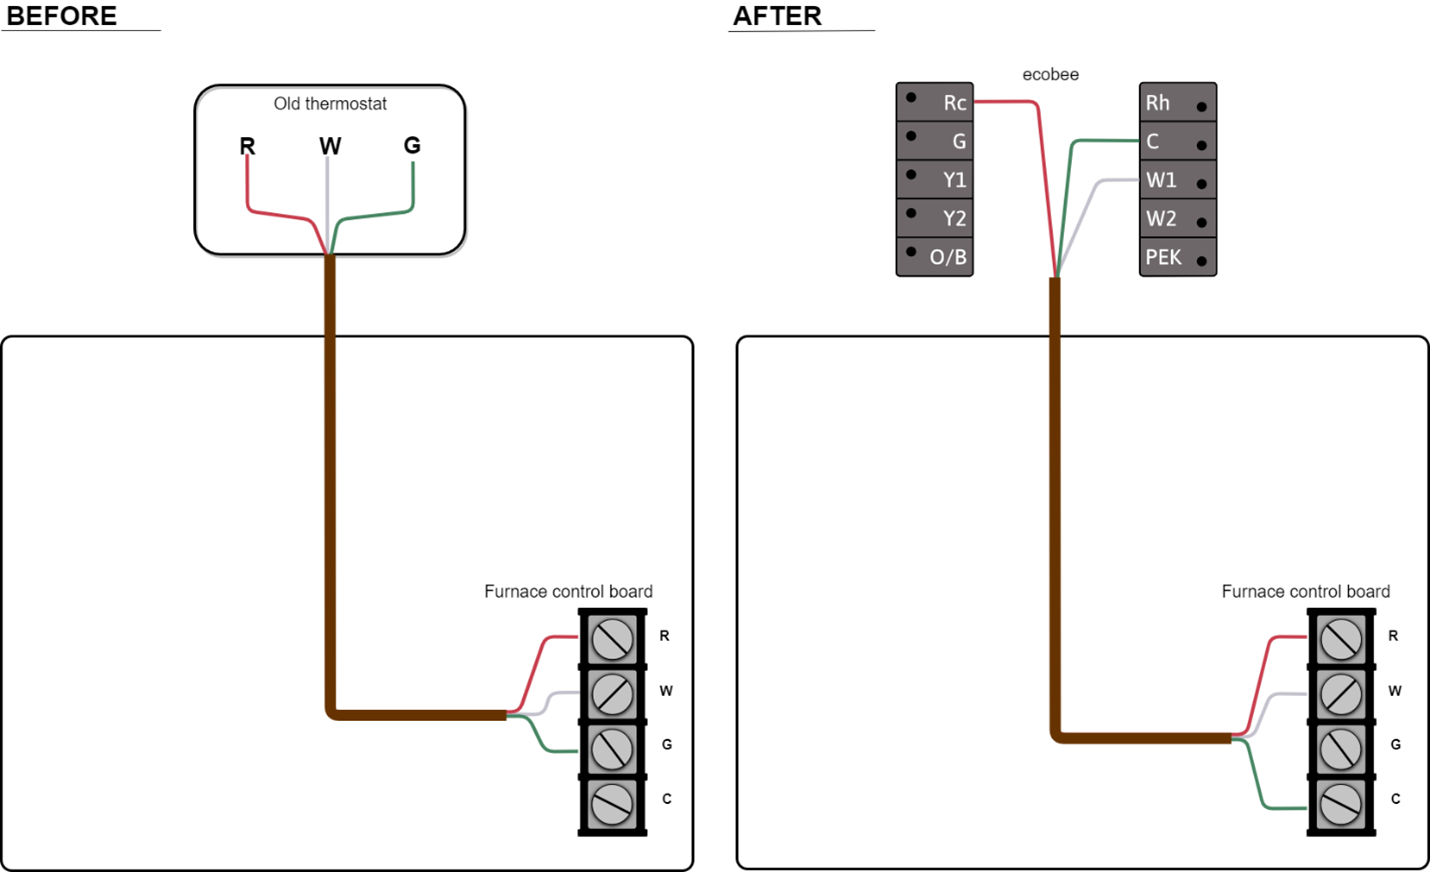
Identifying the three wires in a thermostat setup is the first step to proper installation. Each wire has a specific role in controlling your heating or cooling system. Knowing which wire does what helps avoid mistakes and ensures your thermostat works correctly. This section breaks down the common wire colors and the purpose of each wire.
Common Wire Colors
Thermostat wires usually come in three colors: red, white, and green. Red wires often carry power from the furnace or heating system. White wires typically connect to the heating control. Green wires generally connect to the fan. These colors help identify the wires easily. Some systems may use different colors. Always check your system’s manual for exact details.
Purpose Of Each Wire
The red wire supplies the 24-volt power to the thermostat. Without it, the thermostat cannot function. The white wire controls the heating system. It signals the furnace to turn on or off. The green wire manages the fan. It tells the fan when to start or stop blowing air. Understanding each wire’s role helps you wire the thermostat correctly and safely.
Safety Precautions
Safety is the top priority when wiring a thermostat with 3 wires. Electricity can cause serious injury or damage. Taking proper safety steps protects you and your home.
Follow clear rules before starting the wiring process. Use the right tools and stay alert. Even small mistakes can lead to big problems.
Turn Off The Power
Always switch off the power at the circuit breaker. Confirm no electricity flows to the wires. Use a voltage tester for extra safety. This prevents shocks while working on the thermostat.
Use Insulated Tools
Choose tools with insulated handles. They reduce the risk of electric shocks. Avoid metal tools without insulation. Safe tools help keep you protected during wiring.
Wear Protective Gear
Wear gloves and safety glasses. Gloves protect your hands from sharp wires. Glasses shield your eyes from sparks or debris. Safety gear reduces injury risks significantly.
Check Wire Labels
Identify each wire correctly before connecting. Use labels or take photos of the original setup. Wrong connections can damage your system or cause hazards. Clear wire identification is essential.
Work In A Dry Area
Avoid wiring in wet or damp places. Water increases the risk of electric shock. Ensure the area is dry before starting. Dry conditions make the work safer and easier.

Credit: diy.stackexchange.com
Turning Off Power
Turning off the power is the first step before wiring a thermostat with 3 wires. It keeps you safe from electrical shocks. Always make sure the power is completely off to avoid accidents. This step protects both you and your equipment.
Skipping this step can cause serious injury or damage. Take time to double-check that no current flows to the thermostat wires. Safety should be your top priority.
Locate The Circuit Breaker
Find your home’s circuit breaker panel. It is usually in the basement or utility room. Look for the switch labeled for your heating or cooling system. This breaker controls the power to the thermostat.
Turn Off The Correct Breaker
Flip the breaker switch to the off position. This stops electricity from reaching the thermostat wires. Do not rely on just turning off the thermostat. The breaker switch fully cuts the power supply.
Test The Power Is Off
Use a voltage tester or a non-contact voltage detector. Check the thermostat wires to confirm no electricity flows. If the tester shows no power, it is safe to proceed. Never assume power is off without testing.
Removing The Old Thermostat
Removing the old thermostat is the first step before installing a new one. It requires care to avoid damage to wires or walls. This part of the process is simple but important for safety and accuracy. Follow each step closely to ensure a smooth removal.
Turn Off The Power
Switch off the power to the heating and cooling system. Use the circuit breaker or fuse box. This prevents electrical shocks and protects the system.
Remove The Thermostat Cover
Gently pull or unscrew the thermostat cover. This exposes the wiring and mounting plate. Take care not to break the cover or wires.
Take A Photo Of The Wiring
Use your phone or camera to capture the wire connections. This photo helps during the new thermostat installation. Label each wire if you can.
Disconnect The Wires
Loosen the screws holding the wires. Carefully pull each wire away from the terminals. Avoid letting wires slip back into the wall.
Remove The Mounting Plate
Unscrew the plate that holds the thermostat to the wall. Keep the screws safe for the new thermostat. Check the wall for any damage or dirt.
Credit: support.ecobee.com
Check Best Thermostat Pricing in Amazon
** As an Amazon Associate, I earn from qualifying purchases.
Wiring The New Thermostat
Wiring the new thermostat is a simple task with just three wires. Each wire has a special role in controlling your heating and cooling system. Understanding where each wire connects helps your thermostat work properly. Follow these steps to connect the wires correctly and safely.
Connecting The R Wire
The R wire is the power wire. It brings electricity from your furnace or HVAC system to the thermostat. Look for the red wire and connect it to the terminal marked “R” on the thermostat. This connection powers the thermostat so it can control the system.
Connecting The W Wire
The W wire controls the heating system. Usually, it is white. Connect this wire to the terminal labeled “W” on the thermostat. This wire tells your heater when to turn on and off based on the temperature settings.
Connecting The G Wire
The G wire manages the fan. It is often green. Attach this wire to the “G” terminal on the thermostat. This connection allows the thermostat to turn the fan on or off independently of heating or cooling.
Mounting The Thermostat
Mounting the thermostat is a key step in wiring a thermostat with 3 wires. It ensures the device works properly and controls your heating or cooling system efficiently. Place the thermostat where it can read the room temperature accurately.
A good location avoids direct sunlight, drafts, or heat sources like lamps and vents. The thermostat should be about 5 feet above the floor on an interior wall. This placement helps the thermostat sense the average room temperature.
Choosing The Right Spot For The Thermostat
Pick a spot away from windows, doors, and vents. Avoid walls that touch the outside or rooms that get very hot or cold. The thermostat needs a stable temperature to work well. Choose a location that represents the room’s usual temperature.
Preparing The Wall For Mounting
Use a level to mark where the thermostat will go. Drill holes for screws, making sure they match the mounting plate. Clean the wall surface before attaching the thermostat base. This helps the thermostat stick well and stay secure.
Attaching The Thermostat To The Wall
Connect the wires to the thermostat terminals first. Then, align the thermostat base with the holes. Use screws to fix the base tightly to the wall. Finally, snap the thermostat unit onto the base. Check that it fits firmly and does not move.
Powering On And Testing
Powering on and testing your thermostat is a key step after wiring it with three wires. This stage ensures your connections work correctly. Without testing, the thermostat may not control your heating or cooling properly.
Careful testing can save time and avoid damage to your system. It confirms that the thermostat receives power and can send signals to your HVAC system. Follow the steps below to power on and check your setup safely.
Turn On The Power Supply
First, restore power to your HVAC system at the circuit breaker. Make sure the breaker controlling your heating and cooling is switched on. This action powers your thermostat and the whole system.
Wait a few moments after turning on the power. This pause lets the thermostat boot up and initialize. You should see the display light up or the screen turn on.
Check Thermostat Display And Settings
Look at the thermostat screen. It should show the current temperature or system status. If the screen remains blank, check your wiring and power supply again.
Set the thermostat to heating or cooling mode. Adjust the temperature setting to trigger the system. This test helps confirm the thermostat controls the HVAC unit.
Listen For Hvac System Response
After setting the temperature, listen for sounds from your furnace or air conditioner. A click or hum means the system received the signal. If no sound occurs, double-check wiring connections.
Check if warm or cool air starts flowing. This proves the thermostat works with your HVAC system. If nothing happens, the issue may be with wiring or the HVAC system itself.
Troubleshooting Common Issues
Troubleshooting common issues with a 3-wire thermostat can save time and frustration. Understanding simple problems helps you fix your system quickly. This section covers frequent issues and easy solutions. Follow these tips to get your thermostat working well again.
Thermostat Not Powering On
Check if the thermostat has power from the circuit breaker. Sometimes a tripped breaker stops power supply. Verify the wiring connections are tight and correct. Loose wires can cause no power to the thermostat. Replace batteries if your thermostat uses them. A dead battery can prevent it from turning on.
Heating Or Cooling Not Responding
Ensure the thermostat is set to the correct mode. The system won’t run if set wrong. Check the wiring between the thermostat and HVAC system. Incorrect or loose wiring may stop heating or cooling. Look for blown fuses in the HVAC control panel. Replace any damaged fuses to restore function.
Incorrect Temperature Readings
Place the thermostat away from direct sunlight or drafts. External heat or cold affects its sensor accuracy. Clean the thermostat’s sensor area gently to remove dust. Dust buildup can cause wrong temperature readings. Calibrate the thermostat if it continues to show errors. Follow the manual’s instructions for calibration steps.

Credit: forums.wyze.com
Frequently Asked Questions
How Do I Identify The Three Thermostat Wires?
The three thermostat wires typically include a red wire (power), a white wire (heat), and a green wire (fan). Use a voltage tester to confirm wire functions before wiring to avoid mistakes and ensure safety.
Can I Wire A Thermostat Without A C Wire?
Yes, you can wire a thermostat without a C wire if it uses batteries or a power-stealing method. Many modern thermostats support 3-wire setups without needing a dedicated common wire.
What Tools Are Needed To Wire A 3-wire Thermostat?
You need a screwdriver, wire stripper, voltage tester, and sometimes electrical tape. These tools help safely connect and secure the thermostat wires to the correct terminals.
Is Wiring A Thermostat With 3 Wires Difficult?
Wiring a thermostat with 3 wires is generally straightforward if you follow instructions carefully. Understanding wire functions and terminal labels is essential for proper installation.
Conclusion
Wiring a thermostat with three wires is simple and clear. Follow each step carefully to avoid mistakes. Check your connections twice for safety. Use the right tools to make the job easier. A well-wired thermostat helps control your home’s temperature better.
Take your time and stay patient throughout the process. Soon, you will enjoy a comfortable home with an easy thermostat setup. This guide makes the task less confusing for anyone. You can handle this wiring project with confidence.
Check Best Thermostat Pricing in Amazon
** As an Amazon Associate, I earn from qualifying purchases.