
Check Best Thermostat Pricing in Amazon
** As an Amazon Associate, I earn from qualifying purchases.
Are you tired of shivering in the winter or sweating through summer because your thermostat just won’t cooperate? Learning how to wire a thermostat to your furnace can be a game-changer for your comfort at home.
Imagine having complete control over your home’s climate, with the perfect temperature at your fingertips. This isn’t just about convenience; it’s about taking charge of your environment and making your living space truly yours. In this guide, we’ll demystify the process of wiring a thermostat to your furnace, breaking it down into simple, actionable steps.
You don’t need to be a tech guru or a professional electrician to get this done. With a little patience and the right instructions, you’ll be able to tackle this task with confidence. So, why wait any longer to enjoy a cozy, perfectly balanced home? Dive in to discover how you can transform your living space by mastering this essential skill.
Credit: www.youtube.com
Tools And Materials Needed
Gather essential tools like a screwdriver, pliers, and wire strippers. Have materials such as electrical tape, wire nuts, and thermostat wire ready.
Wiring a thermostat to a furnace might seem daunting, but with the right tools and materials, you can tackle this task with ease. Whether you’re looking to save money or simply enjoy the satisfaction of DIY projects, understanding what you need before you start is crucial. Imagine having everything ready at your fingertips—this preparation transforms the process into a smooth and enjoyable experience.Basic Tools
Begin with the essentials. A screwdriver set is fundamental; you’ll need both flathead and Phillips screwdrivers. These will help you open the thermostat and furnace panels. Wire strippers are another must-have. They allow you to cut and strip the insulation from the wires, ensuring a good connection.Additional Tools
Consider adding a voltage tester to your toolbox. It helps you verify that there’s no electrical current running through the wires, keeping you safe from shocks. Needle-nose pliers can be handy for gripping and bending wires or tightening small screws.Materials
Gather the necessary materials. You’ll need thermostat wire, typically 18-gauge, which is flexible enough for threading through walls and durable enough to handle the electrical load. Don’t forget electrical tape—perfect for securing wire connections and labeling them for future reference.Safety Equipment
Safety should always be a priority. Wear insulated gloves to protect your hands from accidental electrical contact. Safety goggles are a wise choice to shield your eyes from debris while working in tight spaces.Organizational Tools
An unexpected but invaluable tool is a labeling kit. As you disconnect and reconnect wires, labels help keep track of each wire’s purpose, preventing confusion. A small flashlight can be useful for illuminating dim areas within your furnace or behind walls. Can you picture the confidence you’ll feel with these tools and materials at hand? Having everything ready not only speeds up the process but also boosts your confidence as you work.
Credit: colemanhvacparts.com
Safety Precautions
Ensure safety by turning off power before wiring a thermostat to a furnace. Use insulated tools to prevent accidents. Double-check connections to avoid electrical hazards.
Before you start wiring your thermostat to the furnace, it’s crucial to consider safety precautions. Electricity, while essential, can be hazardous if handled incorrectly. Protecting yourself and your home should always be your top priority.1. Wear Protective Gear
When dealing with electrical wiring, always wear rubber-soled shoes. This simple step can help insulate you from electric shocks. Consider wearing safety goggles to protect your eyes from unexpected sparks.2. Turn Off The Power
This might seem obvious, but it’s a step often overlooked. Make sure to switch off the power at the circuit breaker before starting. Double-check by testing the wires with a voltage tester to ensure there’s no electricity running through them.3. Use The Right Tools
Using the correct tools is essential to avoid accidents. Invest in a good-quality wire stripper and a screwdriver that fits snugly. A loose tool can slip and cause injury or damage.4. Double-check Wiring Diagrams
Every furnace and thermostat model can have different wiring configurations. Carefully review the wiring diagram that comes with your new thermostat. Mismatched connections can cause your system to malfunction or become a fire hazard.5. Keep Your Workspace Organized
A cluttered workspace can lead to accidents. Keep your tools, wires, and manuals neatly organized. This not only helps in efficiency but also ensures that nothing is accidentally knocked over or misplaced.6. Ask For Help If Needed
Don’t hesitate to consult a professional if you’re unsure about any step. While DIY projects can be rewarding, your safety is paramount. Consider asking a friend with experience for help or hiring a certified electrician for peace of mind. Remember, the goal is not just to complete the task but to do it safely. Have you ever taken a safety step that felt unnecessary at the time, only to realize later how crucial it was? Share your experiences and keep the conversation going!Choosing The Right Thermostat
Choosing the right thermostat is crucial for maximizing your furnace’s efficiency and ensuring comfort in your home. With a range of options available, it’s easy to get overwhelmed. However, with some guidance, you can find the perfect thermostat that meets your needs.
Understand Your Furnace Type
Before you decide on a thermostat, you need to know your furnace type. Is it a gas, electric, or oil furnace? Each type has specific compatibility requirements. For example, a gas furnace might need a different thermostat compared to an electric one. Check your furnace’s manual or consult a professional if you’re unsure.
Consider Your Lifestyle
Your daily routine should influence your thermostat choice. If you’re always on the go, a programmable thermostat can help you save energy by adjusting temperatures automatically based on your schedule. On the other hand, a smart thermostat offers remote control, perfect for tech-savvy individuals who want to manage their home’s climate from their smartphone.
Evaluate Features And Compatibility
Thermostats come with various features that can enhance your comfort and convenience. Some offer Wi-Fi connectivity, touchscreen displays, or voice control. However, ensure the thermostat you choose is compatible with your existing HVAC system. Double-check the voltage requirements and wiring compatibility to avoid installation headaches.
Budget Considerations
Thermostats vary in price, from budget-friendly options to high-end models with advanced features. Determine how much you’re willing to spend and weigh it against the benefits each thermostat offers. Sometimes, investing a bit more upfront can lead to long-term savings on your energy bill.
Choosing the right thermostat is not just about the latest features or best deals. It’s about finding what fits your specific needs and lifestyle. Have you ever bought a device that seemed perfect but just didn’t work well for you? Make sure your thermostat choice is the right fit for your home and your life.
Removing The Old Thermostat
Removing the old thermostat is the first step in wiring a thermostat to a furnace. Carefully disconnect wires and label them for easy installation of the new unit. Remember to turn off power to avoid any electrical hazards.
Removing an old thermostat might seem daunting, but with a few simple steps, you can handle it smoothly. Before you know it, you’ll be ready to install the new thermostat, bringing you a step closer to a more energy-efficient home. Let’s dive into the process of safely removing that outdated device.Turning Off Power
Safety first! Always start by turning off the power to your HVAC system. You can do this at the circuit breaker panel. If you’ve never done this before, it might seem a bit intimidating, but rest assured, it’s straightforward. Look for the breaker labeled for your furnace or HVAC system and switch it to the “off” position. Double-check that the power is off by trying to turn on the thermostat. No response? You’re good to go.Labeling Wires
This step is crucial for a smooth installation of your new thermostat. Carefully remove the cover of your old thermostat to expose the wires. You might find a jumble of colorful wires staring back at you. Grab a roll of masking tape and a marker. As you disconnect each wire, label it according to the terminal it was connected to. This will save you from a potential headache later on. Have you ever misplaced a wire and spent ages figuring it out? Proper labeling prevents that hassle and keeps the process efficient. Keep your labels clear and concise, like “R” for the red wire on the “R” terminal. Feeling confident? Great, you’ve successfully prepped your wiring for the next step. With these tasks completed, you’re well on your way to a seamless thermostat upgrade.Installing The New Thermostat
Learn to wire a thermostat to a furnace for better home comfort. Connect wires correctly for safe operation. Follow instructions carefully to avoid mistakes.
Installing a new thermostat can seem like a daunting task at first, but with a little patience and the right tools, you can do it yourself and enjoy better control over your home’s heating system. Whether you’re upgrading to a smart thermostat or simply replacing an old model, wiring it correctly ensures optimal performance and energy efficiency. Let’s dive into the practical steps of mounting your new thermostat and connecting the wires securely.Mounting The Thermostat
The first step in installing your new thermostat is finding the perfect spot on the wall. Choose a location that’s away from direct sunlight, drafts, and any appliances that generate heat. This ensures accurate readings of your home’s temperature. Once you’ve chosen the spot, use a level to make sure your thermostat will be straight. Mark the screw holes using a pencil. If you’re like me, you’ll appreciate the importance of taking your time to get this right; a crooked thermostat can be surprisingly annoying! Next, drill small pilot holes for the screws. This helps prevent wall damage and makes it easier to secure the unit. With the provided screws, attach the mounting plate to the wall. Double-check the alignment before tightening the screws completely.Connecting The Wires
Now that your thermostat is mounted, it’s time to connect the wires. This part requires attention to detail, but it’s straightforward with the right approach. Begin by turning off power to the furnace at the circuit breaker to avoid any electrical mishaps. Carefully remove the cover from your old thermostat to expose the wires. You’ll likely see a few color-coded wires: red, white, green, and possibly blue or yellow. These correspond to different functions, such as heating, cooling, and fan control. Unhook the wires from the old unit and connect them to the matching terminals on the new thermostat. If you’re unsure, refer to the installation manual or consult a wiring diagram. As you work, consider the peace of mind that comes with knowing your system is installed safely and correctly. Secure the wires in place, ensuring they’re snug but not too tight. Double-check each connection to make sure there are no loose ends. Once connected, reattach the thermostat cover and restore power at the circuit breaker. — Do you remember the satisfaction of completing a DIY project successfully? Installing a thermostat yourself not only gives you control over your home’s comfort but also saves money. Have you ever faced challenges while doing similar tasks? Share your thoughts and experiences in the comments below!
Credit: forums.wyze.com
Connecting To The Furnace
Connecting your thermostat to the furnace might seem daunting, but it’s a straightforward process if you follow the right steps. Think of it as linking two crucial parts of a system to create a comfortable living environment. It’s essential to understand how these components interact. By connecting correctly, you ensure that your furnace responds accurately to your thermostat’s signals, keeping your home at the perfect temperature. Let’s break it down step-by-step, starting with locating the furnace terminals and attaching the wires.
Check Best Thermostat Pricing in Amazon
** As an Amazon Associate, I earn from qualifying purchases.
Locating The Furnace Terminals
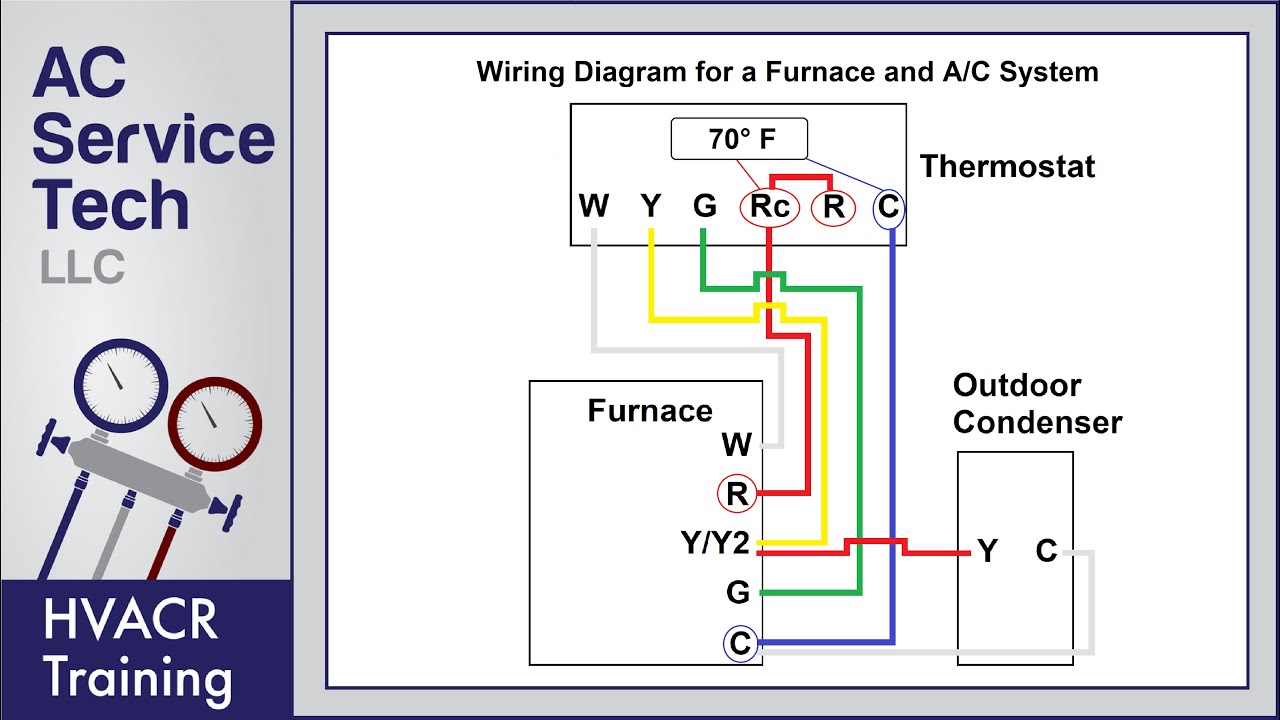
First, find the access panel on your furnace. This panel usually has screws or clips and is located on the front or side of the unit. Once removed, you’ll see a terminal block with several labeled connections. Look for labels like “R,” “W,” “Y,” and “G.” These are the points where your thermostat wires will connect.
Make sure you turn off the power to the furnace before you start. This simple safety step prevents electrical shocks. Use a flashlight if needed to ensure you have a clear view of the terminals. Knowing exactly where each wire needs to go will save you time and frustration.
Attaching The Wires
Begin by identifying the wires coming from your thermostat. Typically, these wires are color-coded. The red wire connects to the “R” terminal, which supplies power. The white wire connects to the “W” terminal, signaling the furnace to heat. The yellow wire goes to “Y,” controlling the air conditioning, while the green wire connects to “G,” managing the fan.
Secure each wire into its corresponding terminal using a screwdriver. Tighten the screws firmly, but be careful not to over-tighten and damage the wire. A loose connection can cause the thermostat to malfunction, so ensure each wire is snugly in place.
Have you ever thought about what happens if you swap the wires? Incorrect wiring can lead to unexpected heating or cooling issues. Double-check the connections before closing the panel. This small step can save you from future headaches.
Now, your thermostat is connected to the furnace, and you’re ready to enjoy a well-regulated home climate. The satisfaction of a job well done is just as rewarding as the comfort it brings.
Testing The System
Connecting a thermostat to a furnace requires careful attention to wiring. Start by identifying the correct terminals for each wire. Ensure connections are secure for efficient heating control.
Testing the system is the final step in wiring your thermostat to the furnace, ensuring everything operates as expected. This part often brings excitement and a sense of accomplishment. Imagine the warmth enveloping your home once you verify that the system is working flawlessly.Restoring Power
Before you start testing, you need to restore power to your furnace. It’s as simple as flipping the switch on your circuit breaker. Once the power is back on, listen for any unusual sounds from the furnace—silence is golden here. Hearing the furnace kick in is often the first sign of success. If you’ve ever had a moment of doubt after a DIY project, hearing that familiar hum can be incredibly reassuring.Checking Thermostat Functions
Now it’s time to test the thermostat functions. Begin by setting the thermostat to a temperature higher than the current room temperature. You should hear a click, followed by the furnace igniting. Feel for warmth from your vents—it’s more than just hot air; it’s confirmation that your hard work paid off. Next, lower the thermostat setting to a cooler temperature and check if the furnace shuts off. This ensures the thermostat is effectively communicating with the furnace. If any issues arise, double-check your wiring and settings. Testing is not just about verifying connections; it’s about ensuring a cozy environment for you and your family. Remember, testing your system is crucial. Wouldn’t you prefer knowing everything is working perfectly before the first cold snap hits?Troubleshooting Common Issues
Connecting a thermostat to a furnace can sometimes present challenges. Ensure wires match the correct terminals to avoid errors. Double-check connections for secure and proper fitting to guarantee smooth operation.
Troubleshooting common issues with your thermostat can be quite a task. Many face challenges in ensuring their thermostat works seamlessly with their furnace. Incorrect wiring and unresponsive thermostats are typical problems. Understanding these issues aids in resolving them efficiently.Incorrect Wiring
Incorrect wiring often causes thermostat malfunctions. Check connections to ensure they match the manufacturer’s instructions. Misconnections may lead to inaccurate temperature readings. Use a wiring diagram for guidance. This helps in identifying misplaced wires. Secure all connections firmly to avoid loose wires.Thermostat Not Responding
A thermostat not responding can be frustrating. First, check if the thermostat has power. Replace batteries if necessary. Inspect the circuit breaker for any tripped switches. Ensure the thermostat is set to the right mode. Sometimes, dust and dirt affect thermostat functionality. Clean it gently to restore responsiveness.Maintenance Tips
Connecting a thermostat to a furnace involves careful handling of wires and understanding their functions. Ensure the power is off before starting. Match the wire colors to their corresponding terminals for a successful installation.
Maintaining your thermostat and furnace wiring is crucial for ensuring efficient performance and preventing potential issues. Proper upkeep can save you time and money in the long run. But how do you keep everything in top shape? Let’s dive into some practical maintenance tips to keep your heating system running smoothly.Regular Visual Inspections
Check the wiring connections regularly for any visible wear or damage. Look for frayed wires or loose connections. If you notice anything unusual, it’s better to address it sooner rather than later.Clean Your Thermostat
Dust and dirt can accumulate inside your thermostat, affecting its performance. Gently clean it with a soft brush or a vacuum cleaner. Keeping it clean ensures accurate temperature readings.Check Battery Life
If your thermostat is battery-operated, replace the batteries at least once a year. A low battery can lead to inaccurate readings or even a complete shutdown. Keeping spare batteries handy can be a lifesaver during unexpected outages.Schedule Professional Inspections
While DIY maintenance is helpful, a professional inspection can catch issues you might miss. Schedule a yearly check-up with a certified HVAC technician. They can provide insights into system performance and future maintenance needs.Update Your Thermostat
Technology evolves, and so should your thermostat. Consider upgrading to a programmable or smart thermostat for better efficiency. It could lower your energy bills and offer more control over your home’s climate.Listen For Unusual Noises
Strange noises from your furnace or thermostat can signal a problem. Pay attention to any unusual sounds and investigate their source. Sometimes, a simple fix can prevent a major issue. Do you often forget to check your thermostat’s battery or wiring? Setting reminders can keep your maintenance routine on track. With these tips, you’ll ensure your system runs smoothly throughout the year.Frequently Asked Questions
How Does A Thermostat Connect To A Furnace?
A thermostat connects to a furnace using low-voltage wires. These wires link the thermostat to the furnace’s control board. When the thermostat senses temperature changes, it sends signals to the furnace to adjust heating. This connection ensures efficient home temperature management.
What Wires Go Where On A Thermostat?
Connect red wire to R, white to W, green to G, and yellow to Y terminals. Check your thermostat’s manual for specific instructions. Always ensure power is off before wiring to prevent electrical shock.
How Many Wires For A Furnace Thermostat?
A furnace thermostat typically uses 2 to 5 wires. Common wire connections include R (power), W (heat), Y (cooling), G (fan), and C (common). The exact number depends on the system’s features and configuration. Always check your furnace and thermostat manuals for specific wiring requirements.
Does The R Wire Go To The Rc Or Rh Thermostat?
The R wire connects to either RC or RH, depending on your HVAC system type. RC is for cooling; RH is for heating. Ensure proper configuration for optimal performance and energy efficiency. Always refer to the thermostat manual for specific wiring instructions.
Conclusion
Wiring a thermostat to a furnace can seem challenging. But with patience, it’s manageable. Always remember safety first. Turn off power before starting. Refer to the furnace manual for guidance. Use the right tools for the job. Double-check connections for accuracy.
If unsure, consult a professional for help. Proper wiring ensures efficient heating. This saves energy and keeps your home comfortable. With these steps, you’ll enjoy a warm and cozy home. Happy wiring!
Check Best Thermostat Pricing in Amazon
** As an Amazon Associate, I earn from qualifying purchases.