
Check Best Thermostat Pricing in Amazon
** As an Amazon Associate, I earn from qualifying purchases.
Wiring a thermostat to a furnace is a common DIY task. Many homeowners can handle it with the right guidance.
A thermostat controls the temperature inside your home. Connecting it to your furnace ensures consistent heating. This process involves matching wires to the correct terminals. It might seem complicated at first, but with some basic knowledge, it’s manageable. Understanding the wiring process will save you money and time.
Plus, you’ll gain a sense of accomplishment from fixing things yourself. Whether you’re upgrading your thermostat or replacing an old one, wiring it correctly is crucial for efficient furnace operation. Let’s dive into the steps to wire a thermostat to a furnace effectively.
Tools And Materials
Gather essential tools like a screwdriver, wire stripper, and pliers. Ensure you have the correct thermostat and furnace wiring materials.
When wiring a thermostat to a furnace, having the right tools and materials is crucial. This ensures that the job is done efficiently and safely. You don’t want to find yourself halfway through and realize you’re missing something important. Let’s look at the essential tools and materials you’ll need.Required Tools
You’ll need a basic set of tools for this task. Here’s a quick list:- Screwdriver set: Phillips and flathead screwdrivers are essential for removing and securing screws.
- Wire strippers: These are necessary for stripping the ends of the wires without damaging them.
- Drill: A power drill might be needed if you have to make new holes for mounting the thermostat.
- Voltage tester: This tool helps you ensure that there is no live current running through the wires while you work.
Necessary Materials
In addition to your tools, you’ll need specific materials to complete the wiring. Here’s what to gather:- Thermostat: Choose a model that is compatible with your furnace system. Check the manufacturer’s instructions for compatibility.
- Wire: Thermostat wire usually comes in 18-gauge with multiple color-coded strands. Make sure you have enough length to reach from the thermostat to the furnace.
- Wire nuts: These are used to securely connect the wires together. They help in preventing any loose connections.
- Mounting hardware: Screws and wall anchors for attaching the thermostat to the wall.
Safety Precautions
Wiring a thermostat to a furnace requires attention to safety. Ignoring safety steps can lead to accidents or damage. Follow these precautions to ensure a safe and successful installation.
Turn Off Power
First, always turn off the power. Locate the circuit breaker panel. Flip the switch that controls the furnace. This step prevents electrical shocks. Double-check by trying to turn on the furnace. It should not start.
Wear Protective Gear
Wear protective gear before starting. Use gloves to protect your hands. Safety goggles shield your eyes from debris. Non-slip shoes keep you stable. These items minimize the risk of injury.
Remove Old Thermostat
Removing an old thermostat is the first step in wiring a new one to a furnace. Follow the labeled wires to ensure correct installation.
When it comes to wiring a new thermostat to your furnace, the first step is to remove the old thermostat. This might seem daunting, but with the right approach, you can do it safely and efficiently. Let’s break it down into manageable steps to make the process as smooth as possible. ###Disconnect Wires
Start by turning off the power to your heating system. This is crucial for your safety. Next, remove the cover of the old thermostat. You might need a small screwdriver to do this. Carefully disconnect the wires connected to the old thermostat. Use masking tape to label each wire with the corresponding terminal. This helps you remember where each wire goes when you connect the new thermostat. ###Remove Wall Plate
After the wires are disconnected, unscrew the wall plate from the wall. Keep these screws, as you might need them for the new thermostat. If the wall plate is stuck, gently pry it off with a flathead screwdriver. Be cautious not to damage the wall. Once the wall plate is off, you can see the hole where the wires come through. Clean the area to prepare it for the new thermostat. Now, you’re ready to move on to installing the new thermostat. Removing the old one wasn’t so bad, right? How do you feel about the process so far? Are there any steps that seem unclear?
Credit: support.rfwel.com
Prepare New Thermostat
Install your new thermostat by connecting it to the furnace wires. Carefully match the wire colors to the terminals. Secure the connections and mount the thermostat on the wall.
Preparing your new thermostat is a critical step in ensuring that your furnace runs smoothly. This process might seem daunting, but breaking it down into manageable tasks will make it simpler. By following these steps, you’ll be on your way to a cozy and well-regulated home in no time.Read Instructions
First, always read the instructions that come with your new thermostat. This may sound obvious, but it’s often overlooked. The instructions are your best friend here, providing specific details about your thermostat model. Even though most thermostats follow a similar wiring process, slight variations can exist. These differences can affect how you connect the wires and set up the device. So, take a few minutes to familiarize yourself with the manual. It will save you a lot of time and trouble later.Label Wires
Labeling the wires is a simple yet crucial step. Before you disconnect the old thermostat, take a moment to tag each wire. You can use masking tape and a pen for this task. Marking each wire ensures you know exactly where each one goes in the new thermostat. This minimizes the risk of errors and makes the installation process smoother. For instance, if you have a red wire connected to the “R” terminal, label it as such. Do the same for all other wires. This way, when you attach them to the new thermostat, you’ll know precisely where each wire belongs. Have you ever mixed up wires in a project and had to start over? It’s frustrating, right? Labeling prevents that hassle. Taking these steps will set you up for a successful installation, making your home more comfortable and efficient. So, are you ready to get started? Grab your tools and let’s make this process as straightforward as possible.Mount New Thermostat
Mounting a new thermostat involves connecting it to your furnace. First, turn off the power. Next, match the wires to the correct terminals.
Mounting a new thermostat can seem like a daunting task. However, with a bit of patience and attention to detail, you can do it yourself. Let’s break it down step by step.Install Wall Plate
First, you need to install the wall plate. This is the base of your thermostat and keeps it securely mounted to the wall. Make sure you turn off the power to your furnace before you start. This is crucial for your safety. Use a level to ensure the wall plate is straight. Mark the screw holes with a pencil. Drill pilot holes where you’ve marked the wall. Insert wall anchors if necessary, especially if you’re mounting on drywall. Attach the wall plate with screws. Tighten them until the plate is secure but not overly tight to avoid damaging the wall.Attach Wires
Now it’s time to attach the wires. This part can be tricky, but with careful attention, you can get it right. Identify the wires coming from your furnace. Typically, they are color-coded. The red wire is usually the power wire (R), and the white wire is for heat (W). Connect each wire to the corresponding terminal on the thermostat. Many modern thermostats have clearly labeled terminals. Ensure each wire is securely connected. A loose connection can cause your thermostat to malfunction. Tuck the wires neatly into the wall plate. This keeps them from being pinched when you attach the thermostat. Mount the thermostat onto the wall plate. It should click or snap into place easily. Turn the power back on and test your new thermostat. Set the temperature and listen for the furnace to kick in. Congratulations, you’ve successfully mounted your new thermostat! How did it go for you? Any surprises along the way? Share your thoughts in the comments below.
Credit: www.youtube.com
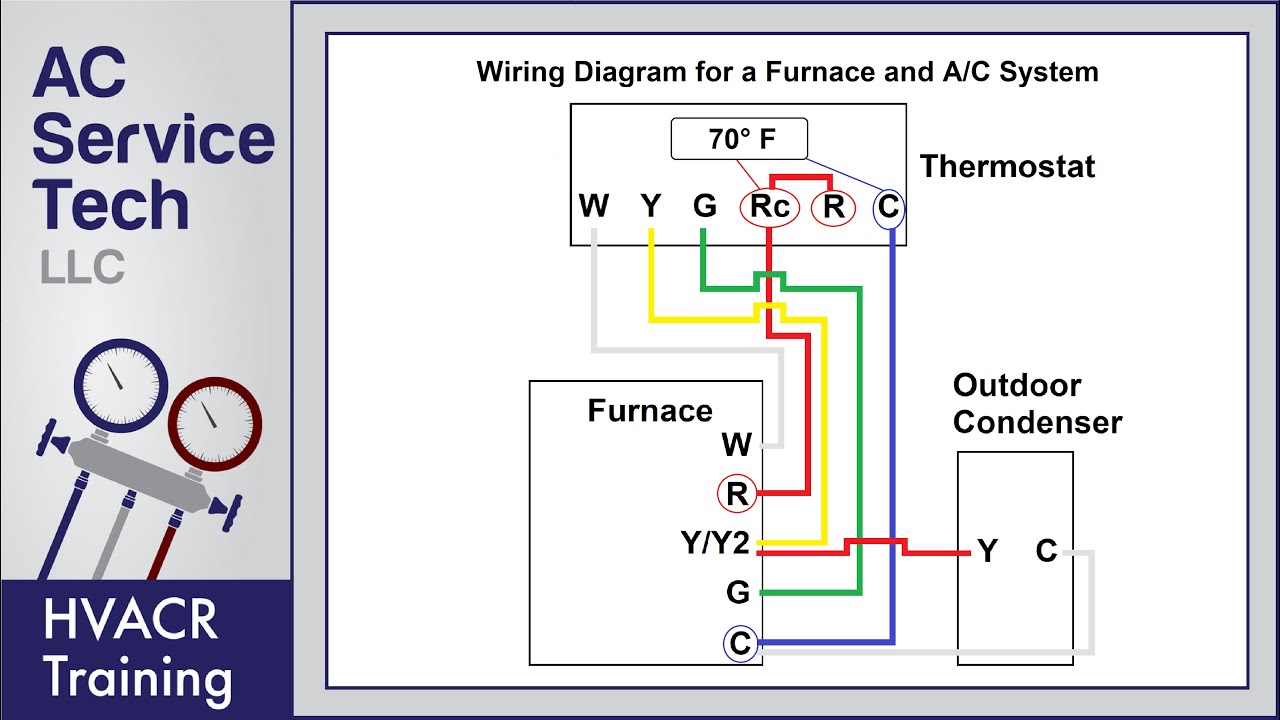
Connect To Furnace
Connecting your thermostat to the furnace is a critical step. It ensures your heating system functions smoothly. In this section, we’ll guide you through the process.
Locate Terminals
First, find the terminals on the furnace. These are usually labeled R, W, C, G, and Y. Each terminal has a specific function. The R terminal is for power. The W terminal controls heating. The C terminal is for the common wire. The G terminal handles the fan. The Y terminal is for cooling. Read your furnace manual if unsure.
Secure Connections
Now, connect the wires to the terminals. Match each wire to its corresponding terminal. Ensure the connections are tight. Loose wires can cause problems. Use a screwdriver to secure the wires. Double-check your work. Make sure there are no loose ends. This step is crucial for safety and efficiency.
Check Best Thermostat Pricing in Amazon
** As an Amazon Associate, I earn from qualifying purchases.
Test The System
Connect the wires from the thermostat to the furnace following the manufacturer’s instructions. Ensure the connections are secure and test the system for proper functionality.
Once you’ve successfully wired your thermostat to your furnace, it’s time to test the system. This step ensures everything is working correctly and efficiently. By following a few simple steps, you can restore power and check the functionality of your new setup.Restore Power
First, head to your circuit breaker or fuse box. Restore power to your HVAC system by flipping the appropriate switch or replacing the fuse. Wait a few seconds to let the system stabilize. Your thermostat should light up or display its home screen, indicating it’s receiving power.Check Functionality
Once power is restored, set your thermostat to a comfortable temperature. Listen for the furnace to kick on. You should hear a humming sound or the blower starting up. Feel the vents to ensure warm air is circulating through your home. If the furnace doesn’t start, double-check your wiring connections. Make sure they are secure and correctly placed. Ask yourself: Is the thermostat responding as expected? If not, consult your thermostat’s manual for troubleshooting tips. By testing the system, you ensure a cozy home throughout the colder months.Troubleshooting Tips
Wiring a thermostat to a furnace can sometimes lead to issues. These problems can cause discomfort and frustration. Knowing how to troubleshoot common issues is essential. This will help you get your heating system back on track quickly.
Common Issues
Several common problems can arise during the wiring process. One frequent issue is a lack of power to the thermostat. This can happen if the circuit breaker trips or if there is a loose wire.
Another common problem is incorrect wiring. This can cause the furnace to malfunction or not work at all. A faulty thermostat can also be an issue. It may give inaccurate temperature readings or fail to communicate with the furnace.
Solutions
First, check if the thermostat has power. Ensure the circuit breaker is on. Confirm all wires are securely connected. If the thermostat still has no power, the problem may be with the circuit.
For incorrect wiring, double-check the connections. Ensure you follow the furnace and thermostat manuals. Match the wire colors correctly. This will help avoid wiring mistakes.
If the thermostat seems faulty, test it with a multimeter. This tool can check if the thermostat is working. If it is not, consider replacing it with a new one. Ensure the new thermostat is compatible with your furnace.
Credit: www.youtube.com
Frequently Asked Questions
What Color Wires Go Where On A Furnace?
On a furnace, the red wire connects to the R terminal, white to W, green to G, and yellow to Y.
How Is A Thermostat Connected To A Furnace?
A thermostat connects to a furnace using wires. These wires link the thermostat’s terminals to the furnace’s control board.
What Color Wires Go Where On A Thermostat?
For a thermostat, red wires connect to R terminal, white to W, green to G, yellow to Y, and blue to C.
Does The R Wire Go To The Rc Or Rh Thermostat?
The R wire typically connects to the RC terminal. For systems with separate heating and cooling, use RH for heating and RC for cooling.
Conclusion
Wiring a thermostat to a furnace can seem daunting. But, with patience and careful steps, it becomes manageable. Ensure you have the right tools. Follow the instructions closely. Always double-check connections for safety. Your home will soon enjoy efficient heating.
A properly wired thermostat enhances comfort. You save energy and reduce costs. Remember to consult your thermostat manual. Don’t hesitate to seek professional help if needed. Stay safe and warm this winter!
Check Best Thermostat Pricing in Amazon
** As an Amazon Associate, I earn from qualifying purchases.