
Check Best Thermostat Pricing in Amazon
** As an Amazon Associate, I earn from qualifying purchases.
To wire a heating element to a thermostat, first, turn off the power supply. Connect the heating element and thermostat according to the manufacturer’s instructions.
Wiring a heating element to a thermostat involves a few simple steps. Ensure safety by turning off the power supply before starting. The thermostat regulates the temperature by controlling the heating element. This setup ensures efficient energy use and consistent warmth.
Proper installation enhances the longevity of your heating system. Always follow the manufacturer’s guidelines for accurate wiring. Use appropriate tools and materials to avoid electrical hazards. Consulting a professional can provide extra assurance. Understanding the basic wiring process can simplify future troubleshooting.
Introduction To Thermostat Wiring
Wiring a heating element to a thermostat can seem tricky. But, with the right guide, it becomes simple. This post will explain how to do it step-by-step.
A thermostat controls the temperature by regulating the heating element. Knowing how to wire these components correctly is important. This ensures your heating system runs efficiently and safely.
Safety Precautions
Safety should always come first. Before starting, make sure to switch off the power supply. Working with live wires can be dangerous.
- Turn off the main power switch.
- Use insulated tools.
- Wear safety gloves.
- Ensure the area is dry.
Tools And Materials Needed
Having the right tools and materials makes the job easier. Here’s a list of what you will need.
| Tool | Purpose |
|---|---|
| Wire Stripper | For stripping wire insulation |
| Screwdriver | For securing wires |
| Multimeter | For checking voltage |
| Electrical Tape | For insulating wire connections |
| Thermostat | To control the heating element |
| Heating Element | The component that heats up |
Make sure you have everything before you start. This will save you time and keep you organized.

Credit: www.facebook.com
Understanding Heating Elements
Heating elements are crucial in many appliances. They convert electrical energy into heat. This heat is used in ovens, dryers, and water heaters. Understanding heating elements helps in wiring them correctly to a thermostat. Let’s explore the different types and their roles in temperature regulation.
Types Of Heating Elements
There are several types of heating elements. Each type has unique characteristics and uses. Here are the most common types:
- Metal Wire Elements: These are often found in electric ovens and toasters. They are made of high-resistance wire like nichrome.
- Ceramic Elements: These elements are used in space heaters and hair dryers. They heat up quickly and can retain heat for longer periods.
- Infrared Elements: These are used in industrial heating and some home heaters. They emit infrared radiation to heat objects directly.
- PTC Elements: Positive Temperature Coefficient (PTC) elements are used in self-regulating heaters. They increase resistance as temperature rises, preventing overheating.
Role In Temperature Regulation
Heating elements play a significant role in temperature regulation. They ensure that the appliance maintains the desired temperature. Here’s how they work:
- Heat Generation: The element generates heat when electricity passes through it. The amount of heat depends on the element’s resistance.
- Heat Transfer: The generated heat is transferred to the surrounding area or material. This can be air, water, or any other medium.
- Temperature Feedback: A thermostat monitors the temperature. It provides feedback to the heating element. This ensures the appliance does not overheat or underheat.
- Temperature Adjustment: The thermostat adjusts the power supply to the heating element. This maintains the desired temperature.
Understanding the types and roles of heating elements helps in wiring them effectively. It ensures the appliance functions safely and efficiently.
Thermostat Basics
Understanding thermostat basics is essential before wiring a heating element. Thermostats regulate temperature, ensuring a comfortable living environment. Below, we delve into how thermostats work and how to choose the right one for your needs.
How Thermostats Work
Thermostats control heating and cooling systems. They detect temperature changes and signal the heating element to turn on or off.
A thermostat has sensors that monitor room temperature. When the temperature drops below the set point, the thermostat activates the heating element. Conversely, it deactivates the heating element once the desired temperature is reached.
Modern thermostats offer programmable settings. These settings allow you to schedule temperature changes throughout the day.
Choosing The Right Thermostat
Selecting the right thermostat is crucial for efficient heating. Consider these factors:
- Compatibility: Ensure the thermostat is compatible with your heating system.
- Features: Look for programmable settings, Wi-Fi connectivity, and remote control options.
- Energy Efficiency: Choose a model that helps conserve energy and reduce utility bills.
- Ease of Use: Opt for a thermostat with a user-friendly interface.
Researching and comparing models can help you find the best thermostat for your home. Reading reviews and checking product specifications ensures you make an informed decision.
By understanding thermostat basics and selecting the right one, you can ensure your heating system operates efficiently. This knowledge is vital for wiring a heating element to a thermostat successfully.
Preparation For Wiring
Wiring a heating element to a thermostat requires careful preparation. Safety is the top priority. This guide will help you get ready for the task. Follow these steps to ensure a smooth process.
Unveiling The Thermostat
Start by removing the cover of the thermostat. Usually, you can do this by lifting or unscrewing it. Keep the screws safe if there are any. You will see the wiring terminals inside.
Check the thermostat manual. It will show you which wires go where. Label the wires if needed. This will help you later.
Powering Off The System
Turn off the power to the heating system. Go to the circuit breaker and switch off the correct breaker. This step is crucial for safety.
Double-check the power. Use a voltage tester to make sure there is no electricity. Never skip this step.
Once you are sure the power is off, you can start wiring. Safety comes first. Always be cautious.
Wiring The Heating Element
Wiring a heating element to a thermostat is a crucial task. It ensures that your heating system works efficiently. Follow these steps to wire the heating element correctly.
Identifying Wiring Connections
Before starting, identify the wiring connections. Most heating elements have two wires. These wires are often marked as Line and Load.
- Line: This wire connects to the power source.
- Load: This wire connects to the thermostat.
Ensure you have the right tools. Use a multimeter to check the wires. This ensures they are live or neutral.
Connecting The Wires
First, turn off the power supply. Safety is crucial when working with electrical components.
- Connect the Line wire: Attach the Line wire from the heating element to the power source. Use a wire nut to secure the connection.
- Connect the Load wire: Attach the Load wire from the heating element to the thermostat. Ensure the connection is tight.
- Grounding: Attach the ground wire, if available, to a metal part of the heating element. This prevents electric shocks.
Double-check all connections. Make sure there are no loose wires. Loose wires can cause malfunctions or even fire hazards.
| Step | Action |
|---|---|
| 1 | Identify Line and Load wires |
| 2 | Turn off the power supply |
| 3 | Connect Line wire to power source |
| 4 | Connect Load wire to thermostat |
| 5 | Secure ground wire |
Finally, turn the power back on. Test the heating element to ensure it works properly. If everything is correct, your heating element is now wired to the thermostat.
Check Best Thermostat Pricing in Amazon
** As an Amazon Associate, I earn from qualifying purchases.
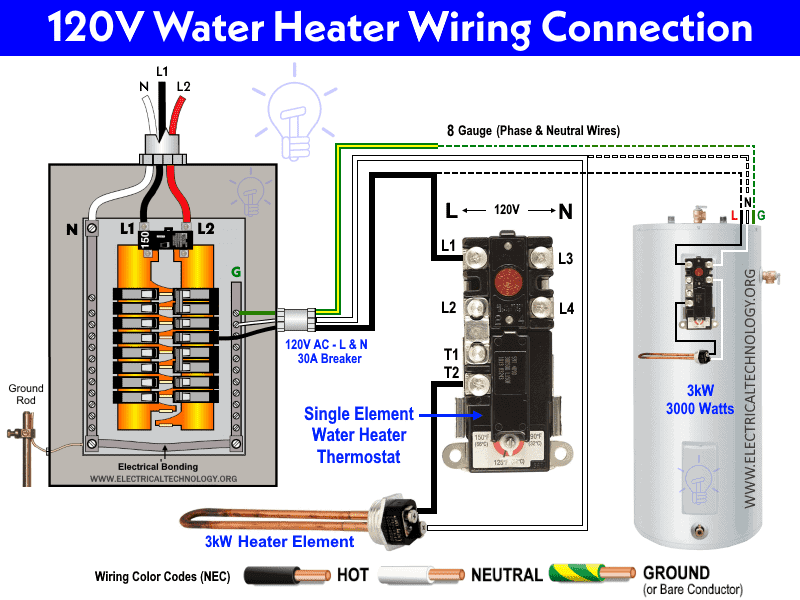
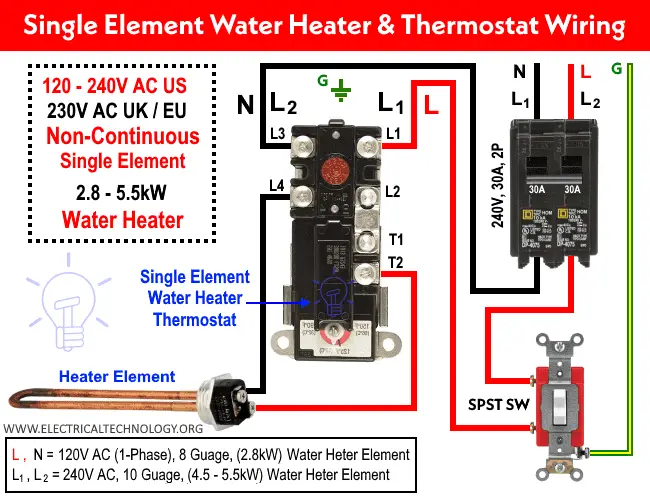
Credit: www.electricaltechnology.org
Connecting To The Thermostat
Connecting a heating element to a thermostat is a crucial step in setting up your heating system. This process ensures that your heating element works efficiently and safely. Follow these steps to make sure everything is connected correctly.
Securing The Wires
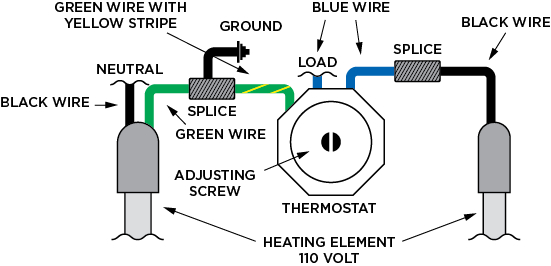
First, locate the wires that will connect to the thermostat. These wires usually come in two colors: red and black. The red wire is typically the live wire, while the black one is the neutral wire.
- Strip about 1/2 inch of insulation from the ends of both wires.
- Twist the exposed ends to ensure they are tight and free of frays.
- Use wire nuts to secure the ends if needed.
- Connect the red wire to the thermostat’s live terminal.
- Connect the black wire to the neutral terminal.
Ensuring Proper Polarity
Proper polarity is essential for the correct operation of your heating element. Incorrect polarity can lead to malfunction or even damage.
| Wire Color | Connection Point |
|---|---|
| Red | Live Terminal |
| Black | Neutral Terminal |
Check the manual of your thermostat to confirm the polarity. Once confirmed, attach the wires securely.
Use a multimeter to test the connections. Make sure the live wire is connected to the live terminal and the neutral to the neutral terminal.
By following these steps, you ensure your heating element works perfectly. This setup provides a safe and efficient heating system for your home.
Testing The Connection
Testing the connection between your heating element and thermostat is crucial. It ensures your setup works safely and efficiently. Follow these steps to make sure everything is in order.
Safety Checks
Before testing, prioritize safety. Here are some essential safety checks:
- Turn off the power at the main circuit breaker.
- Use a voltage tester to confirm no electricity flows through the wires.
- Inspect all connections to ensure they are tight and secure.
- Check for any frayed wires or damaged insulation.
These steps help prevent electrical shocks and other hazards.
Initial Test Run
Once safety checks are complete, proceed with the initial test run:
- Turn the power back on at the main circuit breaker.
- Set your thermostat to a temperature higher than the current room temperature.
- Listen for the clicking sound from the thermostat. This indicates it’s sending power to the heating element.
- After a few minutes, check if the heating element is warming up.
If the heating element warms up, your connection is correct. If not, recheck your wiring and try again.
Testing the connection is a vital step. It ensures your heating system operates effectively and safely.
Troubleshooting Common Issues
Wiring a heating element to a thermostat can be tricky. Even small mistakes can cause big problems. Knowing how to troubleshoot common issues is essential. This guide will help you fix wiring mistakes and know when to seek professional help.
Addressing Wiring Mistakes
Incorrect wiring can lead to a malfunctioning heating system. Here are some common wiring mistakes and how to fix them:
| Mistake | Solution |
|---|---|
| Wires not connected properly | Ensure all wires are securely connected. |
| Crossed wires | Check wire colors and positions. Match them correctly. |
| Loose connections | Tighten all connections to avoid loose ends. |
Use a multimeter to test connections. It ensures the wiring is correct. Always turn off the power before checking.
When To Seek Professional Help
Some issues need a professional touch. Here are signs you should call an expert:
- Burning smell from the heating element
- Thermostat not working even after rewiring
- Frequent tripping of circuit breakers
- Visible damage to wires or components
Safety first. If unsure, always get professional help. It ensures your system works safely and efficiently.
Maintaining Your System
Proper maintenance of your heating element and thermostat is crucial. It ensures efficiency and longevity. Regular check-ups and prompt repairs prevent larger issues. Below, we discuss how to maintain your system.
Regular Check-ups
Conducting regular check-ups on your heating system is vital. It helps identify minor issues before they become major problems. Scheduling inspections at least twice a year is recommended.
During check-ups, ensure all connections are secure. Look for any signs of wear and tear. Verify that the thermostat is functioning correctly. A well-maintained system operates more efficiently.
Signs Of Potential Problems
Be aware of the signs of potential problems. Early detection can save you time and money. Here are some common indicators:
- Unusual noises from the heating unit
- Inconsistent temperatures
- Higher than usual energy bills
- Frequent cycling on and off
If you notice any of these signs, take action immediately. Delaying repairs can lead to more significant issues.
Common Issues And Solutions
Below is a table of common issues and their solutions. This can help you troubleshoot problems quickly.
| Issue | Solution |
|---|---|
| Thermostat not responding | Check batteries and connections |
| Heating element not heating | Inspect for damage, replace if necessary |
| Strange noises | Check for loose parts, tighten if needed |
Maintaining your heating element and thermostat is simple. Regular checks and prompt repairs ensure your system runs smoothly.
Credit: johnsonconcreteproducts.com
Frequently Asked Questions
What Wire Goes Where On A Heating Element?
Connect the positive wire to one terminal of the heating element. Attach the negative wire to the other terminal. Ensure connections are secure and insulated. Consult the heating element’s manual for specific wiring instructions.
How Are Heating Elements Connected?
Heating elements are connected in series or parallel configurations. Series connections increase voltage, while parallel connections increase current. Ensure proper insulation and secure connections.
How To Hook Up A Heating Element?
Turn off power. Connect the heating element wires to the designated terminals. Secure connections tightly. Restore power and test the heating element. Ensure proper functioning.
Which Two Wires Are Connected To The Heating Element Of The Heater?
The two wires connected to the heating element of the heater are typically the live (or hot) wire and the neutral wire.
Conclusion
Mastering how to wire a heating element to a thermostat enhances your DIY skills. Follow the steps carefully to ensure safety. Proper wiring ensures efficient operation and longevity of your heating system. Always consult a professional if unsure. Happy wiring!
Check Best Thermostat Pricing in Amazon
** As an Amazon Associate, I earn from qualifying purchases.