
Check Best Thermostat Pricing in Amazon
** As an Amazon Associate, I earn from qualifying purchases.
Wiring a heat pump thermostat can seem daunting. With the right guide, it’s manageable and straightforward.
A heat pump thermostat helps regulate your home’s temperature efficiently. Proper wiring ensures the system functions optimally, saving energy and providing comfort. This guide simplifies the wiring process, breaking it down into easy steps. You’ll learn the essential tools needed and precautions to take.
Understanding the wiring basics can prevent common mistakes and ensure your thermostat works perfectly. Whether you’re a DIY enthusiast or a beginner, this guide is designed to help you wire your heat pump thermostat successfully. Ready to dive in? Let’s make your home cozier with an efficient thermostat setup!

Credit: cyncsupport.gelighting.com
Introduction To Heat Pump Thermostats
Heat pump thermostats play a crucial role in regulating indoor temperature. They ensure your heat pump system runs efficiently and keeps your home comfortable. Understanding how to wire a heat pump thermostat can save you time and money.
What Is A Heat Pump?
A heat pump is a device that transfers heat from one place to another. It can heat or cool your home. During cold months, it extracts heat from outside and transfers it inside. In warm months, it works in reverse, removing heat from inside your home and releasing it outside.
Importance Of Proper Wiring
Proper wiring of your heat pump thermostat is essential. Incorrect wiring can lead to system malfunction or damage. It ensures the thermostat communicates effectively with the heat pump. This communication helps maintain the desired temperature and improves energy efficiency.
Following the correct wiring process guarantees safety. It also prolongs the life of your heat pump system. Always refer to the manufacturer’s instructions. If unsure, consider consulting a professional.
Tools And Materials Needed
Wiring a heat pump thermostat can seem complex. But with the right tools and materials, you can complete it efficiently. This section will guide you through the necessary tools and materials needed for wiring a heat pump thermostat.
Essential Tools
Having the correct tools will make the job easier. Here are the essential tools:
- Screwdrivers (Phillips and flathead)
- Wire stripper
- Needle-nose pliers
- Voltage tester
Screwdrivers help to remove and install screws. The wire stripper is used to remove the insulation from the wires. Needle-nose pliers are useful for bending and twisting wires. A voltage tester ensures the power is off before you start working.
Required Materials
Along with the tools, you will need specific materials. These materials include:
- Heat pump thermostat
- Thermostat wiring
- Wire nuts
- Electrical tape
The heat pump thermostat is the main component. Thermostat wiring connects the thermostat to the heat pump. Wire nuts secure the wire connections. Electrical tape is used to insulate the wire connections.
With these tools and materials, you are ready to wire your heat pump thermostat. Stay safe and follow the instructions carefully.
Safety Precautions
Wiring a heat pump thermostat involves intricate electrical work. Safety should be a priority. Taking the right precautions can prevent accidents and ensure a smooth installation process. This guide covers essential safety measures.
Turning Off Power
Before you start, turn off the power at the circuit breaker. This step is crucial to avoid electric shocks. Verify that the power is off by using a voltage tester. This ensures no current is flowing to the thermostat. Double-checking this can prevent serious injuries.
Using Protective Gear
Wear protective gear to safeguard yourself. Insulated gloves protect your hands from electric shocks. Safety goggles shield your eyes from sparks. These small steps can make a big difference. Always work in a well-lit area. This helps you see wires clearly and avoid mistakes. Proper gear and lighting can prevent accidents.
Understanding Thermostat Wiring
When wiring a heat pump thermostat, understanding the wiring is crucial. It might seem daunting at first, but once you grasp the basics, it becomes straightforward. Recognizing wire colors and their functions can save you time and prevent mistakes.
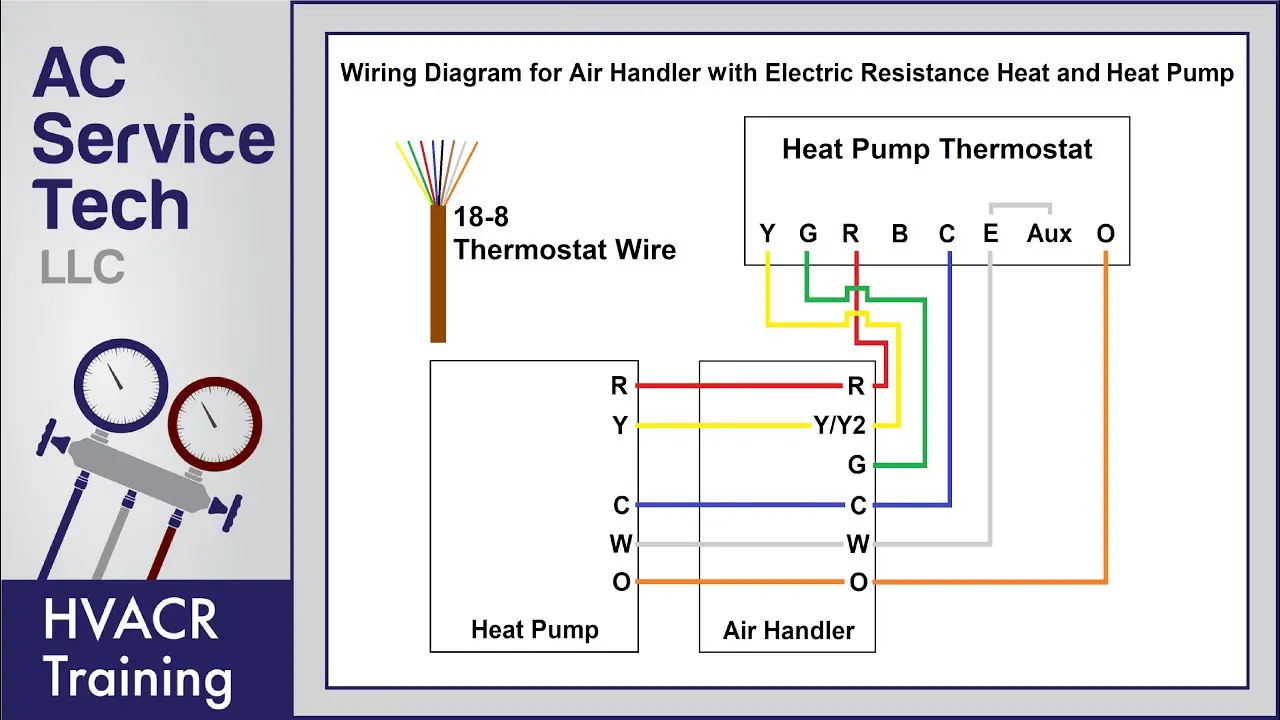
Common Wire Colors
Thermostat wires are color-coded for easier identification. However, it’s essential to double-check as the colors might not always follow the standard.
- Red (R): This wire provides power from the transformer.
- Green (G): This controls the fan relay and allows the fan to turn on.
- Yellow (Y): This wire connects to the compressor, managing the cooling function.
- White (W): This one is used for the heating system.
- Orange (O): This wire controls the reversing valve, which is essential for heat pump systems.
- Blue or Black (C): This is the common wire, providing a return path for the current.
Functions Of Each Wire
Each wire in your thermostat setup has a specific role. Knowing these can help you troubleshoot and ensure everything is connected correctly.
Red (R) wire: Think of this as the lifeline of your thermostat. It carries the power from your HVAC system’s transformer. Without it, nothing will work.
Green (G) wire: If you want to feel the breeze from your fan, this wire is responsible. It signals the fan to turn on and circulate air.
Yellow (Y) wire: This wire is crucial for cooling. It tells the compressor to kick in and start the cooling cycle. Imagine a hot day without this wire working correctly!
White (W) wire: When it’s cold outside, this wire ensures your heating system activates. It’s the wire that brings warmth to your home.
Orange (O) wire: Unique to heat pump systems, this wire changes the direction of the flow of refrigerant. It switches your system from heating to cooling mode and vice versa.
Blue or Black (C) wire: Known as the common wire, it completes the circuit. If your thermostat has a digital display or requires constant power, this wire is essential.
Understanding these wires can help you install your thermostat confidently. Imagine the satisfaction of knowing you did it yourself. Have you ever wired a thermostat before? What was your experience?
Removing The Old Thermostat
Removing the old thermostat involves disconnecting the power and carefully labeling wires. Make sure to document their positions before detaching.
When you’re ready to wire a new heat pump thermostat, the first step is removing the old thermostat. This might seem like a simple task, but there are a few important steps to follow to ensure everything goes smoothly. Removing the old thermostat correctly sets the stage for a successful installation of your new unit.Labeling Wires
Before you detach any wires, it’s crucial to label them. Take a moment to look at the wiring setup of your old thermostat. Use small pieces of tape or pre-made wire labels. Write down the corresponding terminal letters and numbers. This will save you a lot of confusion later. For instance, you might label a wire connected to the “Y” terminal as “Y”. This way, when you attach the wires to your new thermostat, you’ll know exactly where each one goes. Labeling wires is a small step, but it makes a big difference. It prevents mistakes that could lead to a malfunctioning thermostat.Detaching The Unit
Once you’ve labeled all the wires, it’s time to detach the old thermostat. First, make sure the power to your HVAC system is turned off. This is a safety measure to prevent any electrical shocks. Next, use a screwdriver to remove the screws holding the thermostat cover. Gently pull the cover off and set it aside. After the cover is removed, you’ll see the baseplate with the labeled wires attached. Carefully unscrew the wires from their terminals. Keep the screws in a small bowl or a magnetic tray so you don’t lose them. As you detach each wire, gently pull it away from the baseplate. Be careful not to tug too hard to avoid damaging the wires. With all the wires detached, you can now remove the baseplate from the wall. Again, use your screwdriver to take out the screws holding it in place. Removing the old thermostat might seem like a minor task, but it’s a crucial step. Have you ever found yourself halfway through a project and realized you missed something simple? Labeling and careful detaching help you avoid those frustrating moments.Installing The New Thermostat
Installing the new thermostat for your heat pump may seem daunting, but it’s quite manageable with the right guidance. You don’t need to be an expert electrician to get this done. Follow these steps carefully, and you’ll have your new thermostat up and running in no time.
Mounting The New Unit
First, ensure the power to your heat pump system is turned off. This is crucial for your safety.
Next, remove the old thermostat from the wall. This should expose the wiring and mounting plate.
Mount the new thermostat’s backplate to the wall. Use a level to make sure it’s straight. Secure it with the screws provided in the kit.
It’s essential that the backplate is firmly in place. A loose backplate can cause connectivity issues.
Connecting Wires
Before connecting the wires, take a picture of the wiring configuration of your old thermostat. This will serve as a handy reference.
Check Best Thermostat Pricing in Amazon
** As an Amazon Associate, I earn from qualifying purchases.
Match each wire to its corresponding terminal on the new thermostat. Typically, the wires are color-coded. For instance, the red wire usually connects to the ‘R’ terminal, the white wire to the ‘W’ terminal, and so forth.
If you’re unsure about any wire, refer to the thermostat’s manual. Many thermostats come with labels for ease of installation.
Once all wires are connected, double-check your work. Ensure each wire is secured firmly in its terminal. Loose connections can cause the system to malfunction.
After connecting the wires, attach the thermostat to the backplate. It should snap or screw into place easily.
Finally, turn the power back on and test the thermostat. Set it to a comfortable temperature and ensure that both the heating and cooling functions are working correctly.
Have you ever installed a thermostat before? What tips or tricks did you find most helpful? Share your experiences in the comments below!
Testing The Installation
After wiring your heat pump thermostat, testing the installation is crucial. This ensures the system works correctly and safely. Follow these steps to verify your installation.
Turning On Power
First, turn on the power to your HVAC system. Ensure the breaker is in the “on” position. Check the thermostat display to see if it powers up. If it does not, recheck your wiring connections.
Checking Thermostat Functions
Next, test the thermostat’s functions. Set the thermostat to heating mode. Adjust the temperature to a few degrees higher than the room temperature. Listen for the heat pump to start running. Feel the vents to confirm warm air is blowing.
Switch the thermostat to cooling mode. Set the temperature lower than the room temperature. Listen for the system to switch to cooling. Check the vents for cool air.
Test the fan function by setting the thermostat to “fan only” mode. Ensure the fan operates without heating or cooling. Verify all settings and adjustments work correctly.
Troubleshooting Common Issues
Wiring a heat pump thermostat can be tricky. Even if you follow instructions, issues can arise. Troubleshooting these issues is essential for a functional system. Let’s look at some common problems and how to fix them.
Incorrect Wiring
Incorrect wiring is a frequent problem. It can cause the heat pump to malfunction. Check the wiring connections. Ensure each wire is in the correct terminal. Use the wiring diagram for your thermostat model. Verify that all wires are secure. Loose connections can lead to failure.
Thermostat Not Responding
Sometimes, the thermostat may not respond. This can be due to various reasons. First, check the power supply. Ensure the thermostat is receiving power. Replace batteries if needed. Next, inspect the wiring connections. Ensure all wires are correctly placed.
Another common issue is a faulty thermostat. If wiring and power are correct, the thermostat may be defective. Test with a different thermostat to confirm. If the new thermostat works, replace the old one. Always follow the manufacturer’s instructions for troubleshooting.
Maintenance Tips
Maintaining your heat pump thermostat is essential for ensuring its longevity and efficiency. Neglecting regular upkeep can lead to higher energy bills and unexpected breakdowns. Here are some practical tips to keep your thermostat in top shape.
Regular Inspections
Regular inspections are crucial. Check your thermostat at least once a month. Ensure it is properly calibrated and functioning.
Look for any visible signs of wear and tear. Loose wires or a cracked screen can affect performance. If you notice anything unusual, it might be time for a professional inspection.
Don’t forget to test the system settings. Make sure your heating and cooling schedules align with your lifestyle. This small step can save you money and keep your home comfortable.
Cleaning The Thermostat
Cleaning the thermostat is often overlooked. Dust and grime can accumulate and cause malfunctions. A simple wipe down can prevent this.
Use a soft, dry cloth to clean the exterior. Avoid using water or cleaning chemicals. These can damage the sensitive components inside.
Pay special attention to the buttons and screen. Dust can build up and make them unresponsive. A clean thermostat not only looks better but works better too.
Have you ever noticed your energy bills spiking for no apparent reason? A dirty thermostat might be the culprit. Keep it clean and see the difference.
What maintenance tips do you swear by? Share your experiences and help others keep their homes comfortable!

Credit: forums.wyze.com
Credit: www.youtube.com
Frequently Asked Questions
How Many Wires For Heat Pump Thermostat?
A heat pump thermostat typically requires 8 wires. These include R, C, Y, G, O/B, W, and Aux/E. Always check the manufacturer’s specifications.
Does My Heat Pump Use An O Or B Wire?
Check your heat pump’s thermostat manual. O wire is for cooling, B wire is for heating.
What Color Wire Controls A Heat Pump?
The orange wire typically controls the reversing valve in a heat pump. This wire manages the switch between heating and cooling modes.
What Is Terminal W2 Used For On A Thermostat On A Heat Pump System?
Terminal W2 on a thermostat controls the second stage of heating in a heat pump system. It activates auxiliary heat.
Conclusion
Wiring a heat pump thermostat might seem tricky at first. But with patience and careful steps, it becomes manageable. Always turn off the power before you start. Follow the wiring diagram for your model. Double-check connections to avoid mistakes. Seek help if unsure about any step.
Proper wiring ensures your system runs efficiently. Now, you’re ready to enjoy a comfortable home climate.
Check Best Thermostat Pricing in Amazon
** As an Amazon Associate, I earn from qualifying purchases.