
Check Best Thermostat Pricing in Amazon
** As an Amazon Associate, I earn from qualifying purchases.
Testing your water heater thermostat can seem challenging. But it’s easier than you think.
Follow our guide to ensure your water heater works efficiently. Water heaters are essential in every home, providing hot water for daily needs. A malfunctioning thermostat can cause inconsistent water temperatures or even no hot water at all. Testing the thermostat helps identify problems early, saving you from bigger issues later.
This guide will walk you through simple steps to test your water heater thermostat. Whether you have an electric or gas water heater, these steps will help you diagnose and fix common problems. Stay warm and save money by keeping your water heater in top condition.
Credit: www.home-repair-central.com
Safety Precautions
Ensure power is off to avoid electrical shock when testing your water heater thermostat. Use a multimeter to check for continuity.
Testing a water heater thermostat can be a straightforward task if done correctly. However, safety should always come first. Before you begin, make sure to follow these essential precautions to protect yourself from potential hazards.Turn Off Power Supply
To ensure your safety, the first step is to turn off the power supply to the water heater. Locate the breaker box and switch off the breaker that controls the water heater. Double-check that the power is off by using a voltage tester. This simple step can prevent electric shocks and serious injuries. Remember, safety starts with ensuring there’s no live electricity running through the system.Use Insulated Tools
Using insulated tools is another crucial safety measure. Insulated tools protect you from electrical currents if you accidentally touch a live wire. Make sure all your tools have insulated handles. This includes screwdrivers, pliers, and any other tools you might use. When I first tested my water heater thermostat, I made the mistake of using regular tools. Thankfully, I quickly realized the risk and switched to insulated ones. Learn from my experience and use the right tools from the start. Have you ever found yourself in a situation where you underestimated a simple task’s risks? It’s better to be overly cautious than to face unexpected dangers. Following these safety precautions will make your water heater thermostat testing not only effective but also safe. Always prioritize your well-being.
Credit: www.reddit.com
Gather Necessary Tools
Testing a water heater thermostat requires specific tools. Having the right tools simplifies the process. It ensures you perform the task accurately and safely. Before you start, gather all the necessary tools. This preparation helps avoid interruptions during the testing process.
Multimeter
A multimeter is essential for testing the water heater thermostat. It measures voltage, current, and resistance. Make sure your multimeter is digital for accurate readings. Set it to the lowest ohms setting. This setting allows you to test the thermostat’s continuity. Check the multimeter’s battery before use. A dead battery can give false readings.
Screwdriver
A screwdriver is another crucial tool. Use it to remove the water heater’s access panel. Typically, a Phillips head screwdriver works best. Keep different sizes handy. Different models of water heaters may have different screw sizes. Ensure your screwdriver is in good condition. Stripped or damaged screwdrivers can make the task harder.
Access The Thermostat
Understanding how to access your water heater thermostat is crucial for any homeowner. Whether you’re troubleshooting temperature issues or performing regular maintenance, knowing the steps can save you time and money. Here’s a step-by-step guide to help you get to the thermostat safely and efficiently.
Remove Water Heater Cover
First, ensure the power to the water heater is off. Safety should always be your top priority.
Next, locate the water heater cover. This is usually a metal panel on the side of the unit.
Use a screwdriver to remove the screws holding the cover in place. Keep the screws in a safe place, as you’ll need them to reattach the cover later.
Gently remove the cover and set it aside. You should now see the insulation and the thermostat underneath.
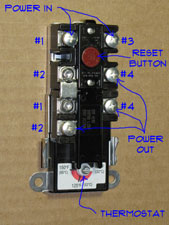
Locate The Thermostat
With the cover removed, carefully pull back the insulation to expose the thermostat.
The thermostat is usually a rectangular device with a dial or a digital display, depending on your water heater model.
If you have a dual-element water heater, you’ll see two thermostats—one at the top and one at the bottom. The upper thermostat generally controls the lower one.
Take a moment to inspect the thermostat for any visible signs of damage. If everything looks good, you’re ready to test the thermostat.
Check Best Thermostat Pricing in Amazon
** As an Amazon Associate, I earn from qualifying purchases.
Have you ever had to troubleshoot your water heater before? Share your experiences in the comments below and let us know if you have any tips!
Test The Upper Thermostat
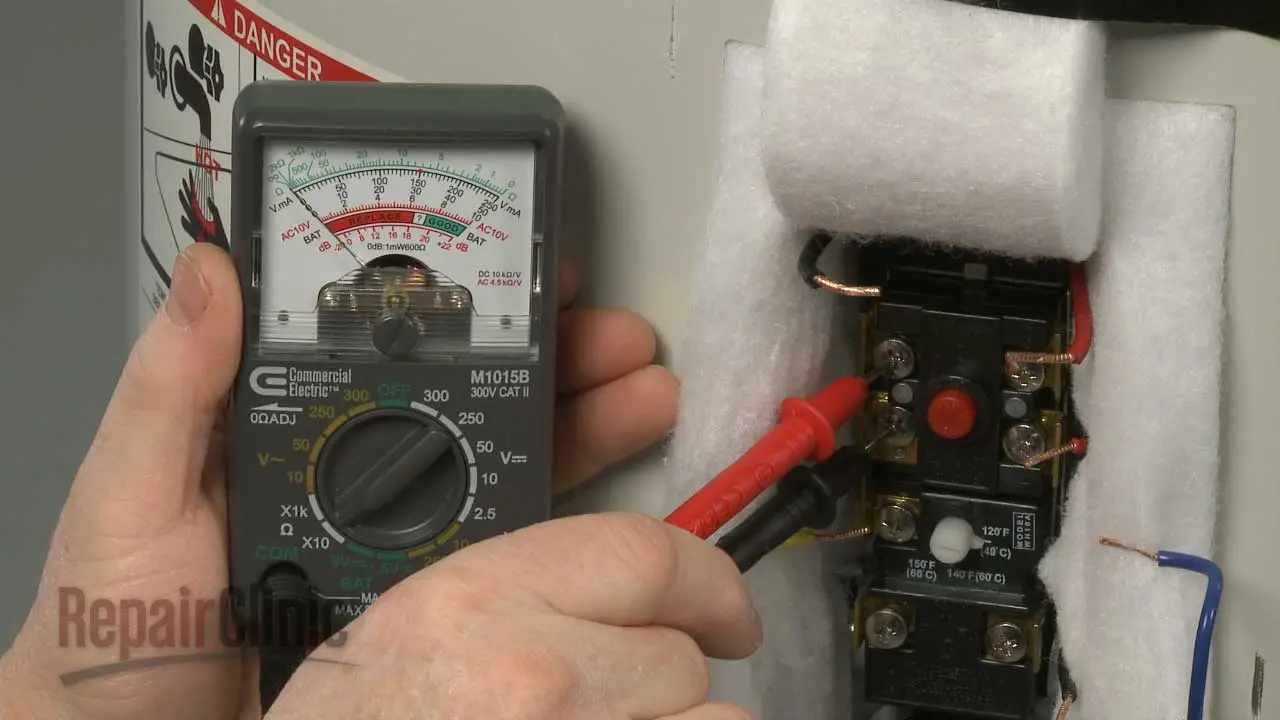
Test the upper thermostat by turning off the power supply. Remove the access panel and insulation. Use a multimeter to check the thermostat’s continuity.
Testing the upper thermostat of your water heater can be a straightforward task if you know the right steps to follow. The upper thermostat is crucial because it controls the heating element responsible for heating your water. A malfunctioning thermostat can lead to cold showers and high energy bills. Here’s how you can test the upper thermostat of your water heater.Set Multimeter To Ohms
First, you need to set your multimeter to the ohms setting. This is often marked with the Greek letter omega (Ω). Make sure your water heater is powered off to avoid any electrical hazards. Safety always comes first. Place the multimeter probes on the terminals of the thermostat to get a reading.Check For Continuity
Next, you need to check for continuity. Continuity means that there is a complete electrical path present. Place one probe on the terminal where the power enters the thermostat and the other probe on the terminal where the power exits to the heating element. If your multimeter beeps or shows a low resistance reading, the thermostat has continuity and is likely working fine. If not, it may need to be replaced. Testing your upper thermostat is not just a technical task; it’s an opportunity to learn more about your home’s appliances. It empowers you to take control of minor issues before they become major problems. Have you ever tested your water heater thermostat? How did it go? Share your experiences in the comments below!Test The Lower Thermostat
Testing the lower thermostat of a water heater is crucial. It ensures your heater works efficiently. This guide will help you test it easily. Follow these steps carefully. Safety first! Turn off the power before you start.
Switch Multimeter Probes
Start by setting your multimeter to the lowest Ohm setting. Remove the thermostat cover. Locate the lower thermostat. Place one probe on the left side terminal. Place the other probe on the right side terminal. Read the multimeter display. The reading should be zero or close to zero. If not, the thermostat might be faulty.
Compare Readings
Next, compare the readings. Check the upper thermostat in the same way. The readings should be similar. Significant differences indicate an issue. Replace the faulty thermostat if needed. Regular checks prevent sudden breakdowns. Keep your water heater in good condition. A well-maintained heater lasts longer. Enjoy consistent hot water all year round!
Interpreting Results
Testing a water heater thermostat can help ensure it works properly. Knowing how to interpret the results is crucial. This section will guide you through understanding what your readings mean.
Normal Reading Range
A normal thermostat reading should fall within a specific range. For most water heaters, it ranges between 0 and 20 ohms. This indicates the thermostat is functioning well. Use a multimeter to check these readings accurately. If your reading is within this range, your thermostat is in good condition.
Signs Of A Faulty Thermostat
If the reading is outside the normal range, the thermostat may be faulty. A reading of zero ohms shows a short circuit. This means the thermostat needs replacement. High resistance, or no reading at all, indicates an open circuit. This also suggests the thermostat is broken. Other signs include irregular water temperature and the heater not turning on. Testing and interpreting these results can save you from bigger issues.
Replacing A Faulty Thermostat
Testing a water heater thermostat involves checking power supply and continuity. Use a multimeter to ensure accurate readings. Replace the thermostat if it shows no continuity.
Replacing a faulty thermostat in your water heater can seem daunting. It doesn’t have to be. With the right guide, you can do it yourself. This section will help you through the process.Purchase The Correct Thermostat
First, find the right thermostat for your water heater. Check your heater’s model number. You can find this on the label. Use this information when buying a new thermostat. Make sure it matches your heater’s specifications. Visit a hardware store or order online. Double-check the product details. Ensure you have the correct part before starting the replacement.Install The New Thermostat
Turn off the power to your water heater. Safety first. Use a screwdriver to remove the thermostat cover. Take a photo of the wiring for reference. Carefully disconnect the wires from the old thermostat. Remove it from the mounting bracket. Place the new thermostat in the same position. Connect the wires according to your reference photo. Secure the thermostat in place. Replace the cover. Turn the power back on. Test your water heater to ensure it works properly. Remember, always follow safety guidelines. If unsure, seek professional help. “`
Credit: diy.repairclinic.com
Frequently Asked Questions
How Do I Know If My Hot Water Heater Thermostat Is Bad?
Check for inconsistent water temperatures. Inspect for no hot water. Test with a multimeter. Listen for unusual noises.
How To Test A Water Heater Thermostat With A Multimeter?
Turn off power. Remove thermostat cover. Set multimeter to ohms. Place probes on terminals. A reading of zero or infinity indicates a faulty thermostat.
Which Element Turns On First In An Electric Water Heater?
The upper heating element turns on first in an electric water heater. It heats the top of the tank quickly.
What Trips The Reset Button On A Hot Water Heater?
The reset button on a hot water heater trips due to overheating, faulty thermostat, or electrical issues. Regular maintenance can prevent these problems.
Conclusion
Testing your water heater thermostat ensures efficient and safe operation. Follow the steps carefully for accurate results. Regular checks prevent unexpected breakdowns. Ensure you have the right tools before starting. Safety first—always turn off power before testing. A well-maintained thermostat can extend your water heater’s lifespan.
Keep a routine check to avoid costly repairs. Understanding your water heater saves money and energy. You can handle this with basic knowledge and tools. Enjoy consistent hot water all year round.
Check Best Thermostat Pricing in Amazon
** As an Amazon Associate, I earn from qualifying purchases.