
Check Best Thermostat Pricing in Amazon
** As an Amazon Associate, I earn from qualifying purchases.
Testing the thermostat on your water heater is crucial. It ensures your heater works efficiently.
Checking the thermostat helps prevent issues like lack of hot water or overheating. Knowing how to test it can save you money and trouble. In this guide, you’ll learn simple steps to check your water heater thermostat. It’s a straightforward process that anyone can do with basic tools.
By the end, you’ll have peace of mind knowing your water heater is functioning properly. Let’s dive in and make sure your thermostat is in top shape!

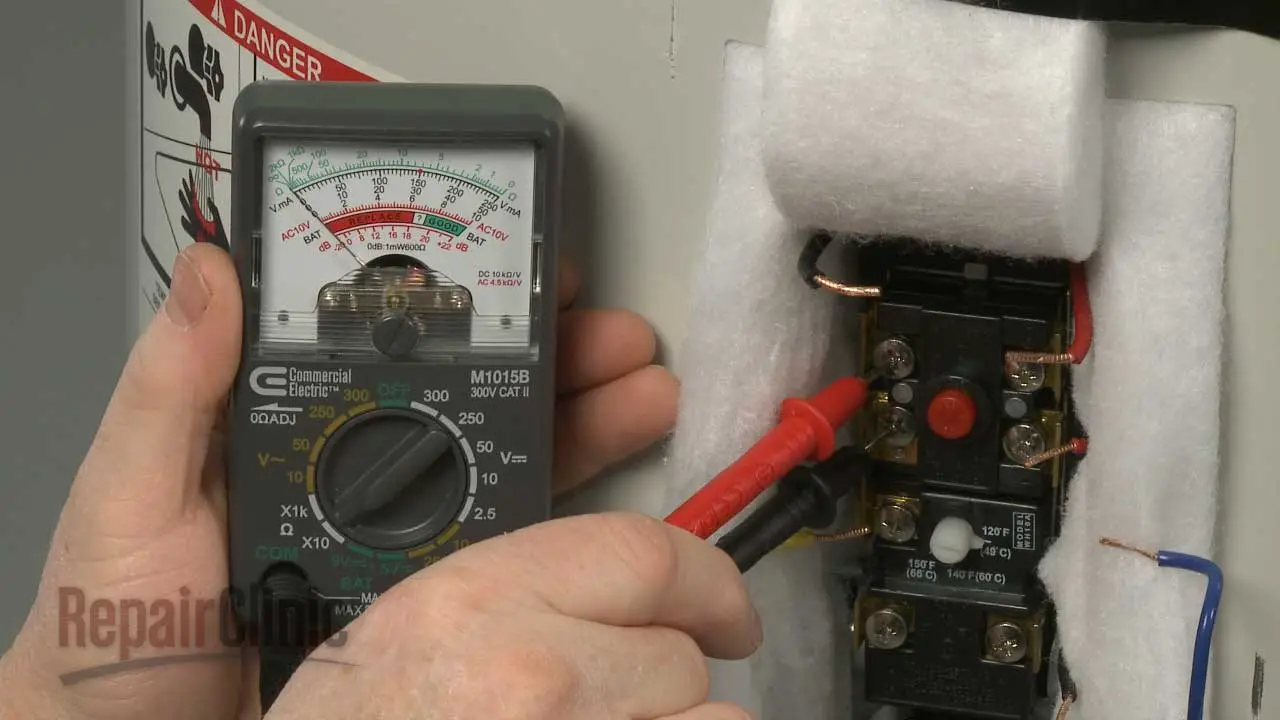
Credit: johnowensservices.com
Introduction To Water Heater Thermostats
A water heater thermostat regulates water temperature. It ensures comfort and safety. The thermostat controls the heating elements. This helps maintain a consistent water temperature. Understanding how it works is crucial. It helps in troubleshooting common issues.
Importance Of Proper Functioning
A properly functioning thermostat is vital. It ensures your water heater operates efficiently. This can save on energy bills. It also prevents water from getting too hot. Scalding water can cause burns. Consistent water temperature enhances comfort. It makes daily tasks easier.
Common Issues
Thermostats can face various issues. One common problem is inaccurate temperature readings. This can lead to water being too hot or too cold. Another issue is the thermostat not turning on the heating element. This results in no hot water. Faulty wiring can also be a problem. It can disrupt the thermostat’s function.
Knowing these common issues helps. It allows you to diagnose and address problems quickly. Regular maintenance can prevent many of these issues. Keeping the thermostat clean and checking connections is key. This ensures your water heater runs smoothly.
Safety Precautions
Ensure the water heater is off and unplugged. Use a multimeter to check the thermostat for continuity and proper function. Wear safety gloves to avoid electric shock.
Testing the thermostat on your water heater is essential for efficient performance and safety. However, before you dive into this task, it’s crucial to prioritize safety. This section will guide you through the necessary precautions to ensure you stay safe while working on your water heater.Turning Off Power
First things first, always turn off the power supply to your water heater. If your water heater is electric, locate the circuit breaker and switch it off. This step is non-negotiable. It prevents any risk of electric shock. If you’re dealing with a gas water heater, turn off the gas supply. This will typically involve turning a valve to the “off” position. Ensuring there’s no gas flow is vital to prevent any accidents.Using Protective Gear
Safety gear is not just for professionals. Even if you’re a DIY enthusiast, you need protective equipment. Always wear insulated gloves to protect against electrical shocks. These gloves will also safeguard your hands from hot surfaces. Safety goggles are another must-have. They protect your eyes from any unexpected splashes or debris. Think of it as a simple step that can prevent serious injury. Remember to wear sturdy shoes. You never know what you might step on. Protecting your feet is just as important as protecting your hands and eyes. Would you feel comfortable working on your water heater without these precautions? Probably not. Taking these steps ensures that you’re not just safe, but also confident in your ability to handle the task.Tools And Materials Needed
To test the thermostat on your water heater, you need some specific tools and materials. These tools help you perform the test safely and accurately. Using the right equipment ensures your water heater functions well.
Essential Tools
You need a few basic tools to test your water heater’s thermostat. A multimeter is crucial. It measures voltage and resistance. A screwdriver set is also necessary. These help you remove the access panels on the water heater. A non-contact voltage tester ensures your safety by confirming the power is off. You will also need a pair of needle-nose pliers. They help in handling small parts and wires.
Optional Accessories
Some accessories can make the testing process easier. An infrared thermometer measures the water temperature without contact. This ensures accurate readings. A flashlight or headlamp can illuminate dark areas. This helps you see inside the water heater. A small mirror is useful. It allows you to see hidden components. Insulated gloves provide extra safety. They protect your hands from electric shocks.
Locating The Thermostat
Find the thermostat on your water heater by removing the access panel. It’s usually near the bottom.
Locating the Thermostat Finding the thermostat on your water heater can seem like a daunting task. However, with some simple steps, you can locate it easily. Understanding the layout of your water heater is the first step in testing the thermostat. ###Accessing The Panel
First, you need to access the panel covering the thermostat. Ensure your water heater is turned off before you begin. Safety is crucial, so double-check by turning off the breaker or unplugging the unit. Use a screwdriver to remove the screws holding the panel in place. Keep these screws in a safe place to avoid losing them. Gently lift the panel off to reveal the components inside. ###Identifying Components
Once the panel is removed, you’ll see several parts inside. The thermostat is usually located near the heating elements. It is a flat, rectangular component with wires connected to it. Look for the two heating elements if you are unsure. The thermostat is typically right above or below these elements. Some water heaters have upper and lower thermostats, so you might need to check both areas. Remember, even if you are not an expert, you can identify these parts. The key is to stay safe and follow the steps methodically. Have you ever tried locating a thermostat before? What challenges did you face? By knowing where to find the thermostat, you are one step closer to testing it. Stay patient and careful, and you will be able to handle this task with ease.Testing The Upper Thermostat
Testing the upper thermostat of your water heater is vital. It ensures your water heater functions correctly. A faulty thermostat can lead to inconsistent water temperatures. This guide will help you test the upper thermostat efficiently.
Setting Multimeter
First, you need a multimeter. Set it to the lowest ohms setting. This setting measures resistance. Multimeters are available at hardware stores. They are essential tools for electrical testing.
Next, turn off the power to the water heater. Safety first. Remove the access panel to expose the upper thermostat. Now, locate the two wires connected to the thermostat. Carefully remove these wires. You are now ready to test the thermostat.
Interpreting Results
Place one multimeter probe on one terminal of the thermostat. Place the other probe on the other terminal. Look at the multimeter reading. A good thermostat shows a reading of zero or close to zero. This indicates continuity.
If the reading is high or infinite, the thermostat is faulty. It needs replacing. Ensure you double-check your readings. Accurate readings are important for proper diagnosis. Remember to reconnect the wires after testing.
Testing the upper thermostat is simple. It helps maintain your water heater’s efficiency. Follow these steps to ensure your water heater works well.
Check Best Thermostat Pricing in Amazon
** As an Amazon Associate, I earn from qualifying purchases.

Credit: www.reddit.com
Testing The Lower Thermostat
Testing the lower thermostat on a water heater ensures proper functioning. Use a multimeter to measure the resistance. Adjust or replace if needed.
Testing the lower thermostat on your water heater can help you determine if it’s functioning correctly. A faulty thermostat can result in inconsistent water temperatures, which can be frustrating. Let’s dive into the process of testing the lower thermostat to ensure your water heater is working efficiently.Measuring Resistance
First, turn off the power to your water heater at the circuit breaker. Safety is paramount, so double-check that the power is off using a voltage tester. Next, remove the access panel and insulation covering the thermostat. You’ll see two terminals on the thermostat. With a multimeter set to the lowest ohms setting, touch each probe to a terminal. A working thermostat should show a reading close to zero. If the resistance is significantly higher, the thermostat may be faulty.Evaluating Performance
Reattach the thermostat and turn the power back on. Allow the water heater to run for a few hours. Check the water temperature at a faucet. Is it consistent with your thermostat setting? If not, the thermostat might be struggling to maintain the correct temperature. Observe if the water heater cycles on and off correctly. A malfunctioning thermostat might cause the heater to run continuously or not at all, leading to either very hot water or no hot water. Have you noticed any unusual behavior from your water heater? Testing the lower thermostat could reveal underlying issues you weren’t aware of. Addressing these problems promptly can save you from larger, costlier repairs down the line. Don’t hesitate to consult a professional if you’re unsure about your findings.Interpreting Test Results
Interpreting test results from your water heater’s thermostat can seem tricky. But breaking it down makes it easier. This section will help you understand what normal readings look like. It also highlights signs of malfunction. This knowledge ensures your water heater works efficiently and safely.
Normal Readings
Normal readings indicate a healthy thermostat. When testing, expect a certain range. For most water heaters, a normal reading should be between 120°F and 140°F. This range ensures hot water is available without being scalding. If your reading falls within this range, your thermostat is working correctly. Keep an eye on this regularly to ensure consistency.
Signs Of Malfunction
Malfunctions can present in various ways. One sign is a reading outside the normal range. If the temperature is too low, it might not heat water effectively. If too high, it poses a scalding risk. Another sign is fluctuating temperatures. If readings change significantly in a short time, the thermostat might be faulty. Consistent inaccurate readings also point to problems. In such cases, consider replacing the thermostat.
Replacing A Faulty Thermostat
Replacing a faulty thermostat on your water heater might seem daunting, but it’s a task you can accomplish with some basic tools and a bit of patience. The thermostat is crucial for maintaining the desired temperature of your water. If it fails, your heater might not work efficiently or could even pose safety risks. Here’s how you can choose the right replacement and install it correctly.
Choosing The Right Replacement
Before diving into the replacement process, ensure you have the correct thermostat for your water heater. Check the model number and specifications of your current thermostat. This information is usually found on the thermostat itself or the water heater’s manual.
Visit a reliable hardware store or search online with these details to find a matching thermostat. It’s essential to get an exact match to ensure proper functionality. If you’re unsure, consult with a store employee or a professional for guidance.
Installation Steps
Once you have the right thermostat, it’s time to install it. Here are the steps:
- Turn off the power: Safety first! Turn off the power to the water heater at the circuit breaker. Double-check with a voltage tester to ensure no power is flowing.
- Remove access panels: Use a screwdriver to remove the access panels on the water heater. You might need to remove insulation to access the thermostat.
- Disconnect the wires: Take a photo or make a note of the wiring configuration. Carefully disconnect the wires from the faulty thermostat.
- Remove the faulty thermostat: Unscrew the thermostat from its mounting bracket and remove it. Dispose of it properly.
- Install the new thermostat: Place the new thermostat in the mounting bracket and secure it with screws. Reconnect the wires according to your notes or photo.
- Replace insulation and panels: Put the insulation back in place and reattach the access panels securely.
- Turn on the power: Restore power at the circuit breaker. Set the thermostat to your desired temperature and test the water heater to ensure it’s working correctly.
Have you ever replaced a thermostat before? How did it go? Share your experiences in the comments below!
Maintaining Water Heater Efficiency
Testing the thermostat on your water heater helps maintain efficiency. Use a multimeter to check for proper function. Regular checks can prevent costly repairs and ensure hot water availability.
Maintaining Water Heater Efficiency Maintaining the efficiency of your water heater is crucial for saving energy and ensuring you have hot water when you need it. Regular maintenance can extend the life of your water heater and save you money on utility bills. One key aspect of this maintenance is testing the thermostat to ensure it’s working correctly. ###Regular Inspections
Conducting regular inspections is the first step in maintaining your water heater’s efficiency. Check for any signs of rust or corrosion around the tank. Pay attention to the connections and valves for any leaks or drips. Inspect the thermostat settings and ensure they are at the recommended temperature, usually around 120 degrees Fahrenheit. If you notice any irregularities, it might be time to test the thermostat. ###Preventive Measures
Preventive measures can help you avoid sudden breakdowns and costly repairs. Flush the tank periodically to remove sediment build-up, which can affect the thermostat’s performance. Install a water heater blanket to improve insulation and reduce heat loss. This simple step can enhance efficiency and save energy. Make a habit of checking the water heater’s pressure relief valve. This valve releases excess pressure, preventing potential damage to your heater. If it’s faulty, replace it immediately. Testing your water heater thermostat doesn’t have to be complicated. Regular inspections and preventive measures can go a long way in maintaining your water heater’s efficiency. By dedicating a little time to upkeep, you can enjoy a more reliable and cost-effective system.
Credit: diy.repairclinic.com
Frequently Asked Questions
How Do I Know If My Water Heater Thermostat Is Bad?
Check if water temperature fluctuates or water is not heating. Listen for unusual noises. Inspect for visible damage or burnt wires.
How Do I Test My Water Heater Thermostat With A Multimeter?
Turn off the power. Remove the thermostat cover. Set the multimeter to the lowest ohm setting. Place the probes on the thermostat terminals. A reading of zero or near zero means the thermostat is working.
How Many Ohms Should A Water Heater Thermostat Read?
A water heater thermostat should read 0 to 1 ohm when tested for continuity. This indicates it is functioning properly.
What Causes A Water Heater Thermostat To Burn Up?
A water heater thermostat can burn up due to electrical issues, faulty wiring, or a defective thermostat. Regular maintenance helps prevent this.
Conclusion
Testing your water heater’s thermostat is crucial for efficient operation. Following these steps ensures your thermostat works correctly. Regular checks prevent unexpected issues and maintain consistent water temperature. Proper maintenance extends the lifespan of your water heater. Now, you can confidently test and troubleshoot your thermostat.
Keep your water heater running smoothly and enjoy hot water without interruptions. Remember, routine inspections save time and money in the long run. Happy testing!
Check Best Thermostat Pricing in Amazon
** As an Amazon Associate, I earn from qualifying purchases.