
Check Best Thermostat Pricing in Amazon
** As an Amazon Associate, I earn from qualifying purchases.
Testing a refrigerator thermostat is simple and essential. A faulty thermostat can ruin your food.
Understanding how to test your refrigerator thermostat is crucial. This small device controls the temperature inside your fridge. If it’s not working correctly, your food might spoil, or your fridge might freeze everything. Regular testing ensures your refrigerator stays in top shape.
You don’t need to be an expert to check it. With a few basic steps and tools, you can test the thermostat yourself. This guide will walk you through the process, making it easy to keep your fridge running smoothly. Save money on repairs and keep your food fresh by learning how to test your refrigerator thermostat today.
Tools Needed
Testing your refrigerator thermostat ensures your appliance works efficiently. Using the right tools makes the process easier and more accurate. In this section, we will cover both essential and optional tools needed for this task.
Essential Tools
To test a refrigerator thermostat, you need a few basic tools. These tools are necessary for almost any testing procedure.
- Multimeter: A multimeter is crucial for checking electrical continuity.
- Screwdriver: Use a screwdriver to remove the thermostat cover and access internal parts.
- Thermometer: A basic thermometer checks the internal temperature of the fridge.
Optional Tools
While not required, some optional tools can simplify the process. These tools can help you diagnose problems more effectively.
- Needle-nose pliers: Pliers help with gripping and maneuvering small components.
- Flashlight: Use a flashlight to see clearly in dark or hard-to-reach areas.
- Manuals: Having the refrigerator’s manual can provide specific instructions and schematics.
Credit: www.doityourself.com
Safety Precautions
Testing your refrigerator thermostat requires careful attention to safety. Electrical components can be dangerous if not handled correctly. Following safety precautions is essential to avoid accidents. Below are some key steps to ensure your safety.
Unplugging The Refrigerator
First, unplug the refrigerator from the power source. This step is crucial. It prevents electric shock while you work. Do not skip this step.
Handling Electrical Components
Next, handle all electrical components with care. Use insulated tools to avoid electric shock. Wear rubber gloves for extra protection. Keep children and pets away from your workspace.
Do not touch any wires with wet hands. Make sure your hands are dry before proceeding. Avoid working in damp or wet areas.
Locating The Thermostat
Testing your refrigerator thermostat ensures your food stays fresh and your appliance runs efficiently. Before you start testing, you need to locate the thermostat. This small device controls the temperature inside the refrigerator. Knowing where it is can save you time and effort.
Inside The Refrigerator
The thermostat is usually found inside the refrigerator. Open the fridge door and look for a small dial or switch. It may be hidden behind a panel or cover. The thermostat often has temperature settings marked on it.
Common Thermostat Locations
In many models, the thermostat is near the top or back of the refrigerator. Check the control panel area. Some units have it in the fresh food section. Look near the light bulb or air vents. In side-by-side models, it may be in the freezer section.
Removing The Thermostat
To test a refrigerator thermostat, first remove it carefully. A faulty thermostat can cause cooling issues. Test with a multimeter to check for continuity.
Removing the thermostat from your refrigerator might seem daunting, but it’s a straightforward process. A few simple steps are all it takes, and you don’t need to be an expert. This guide will help you navigate the process with ease. ###Accessing The Thermostat
First, ensure your refrigerator is unplugged to avoid any electrical hazards. Safety is paramount. Next, locate the thermostat. In most refrigerators, it’s typically found behind the control panel or inside the fridge near the top. You might need a screwdriver to remove any panels or covers. Once you’ve accessed the thermostat, take a moment to observe its position and connections. This will be crucial when you need to reconnect it later. ###Disconnecting Wires
Now comes the part where you disconnect the wires attached to the thermostat. Take a photo of the wiring before you start. This will be your reference for reassembly. Carefully disconnect each wire. They might be attached with screws or clips, so use the appropriate tool to release them. Handle the wires gently to avoid damaging them. Once all the wires are disconnected, you can remove the thermostat completely. By following these steps, you can easily remove the thermostat from your refrigerator. Have you ever tackled a similar DIY project at home? Share your experiences in the comments!Testing The Thermostat
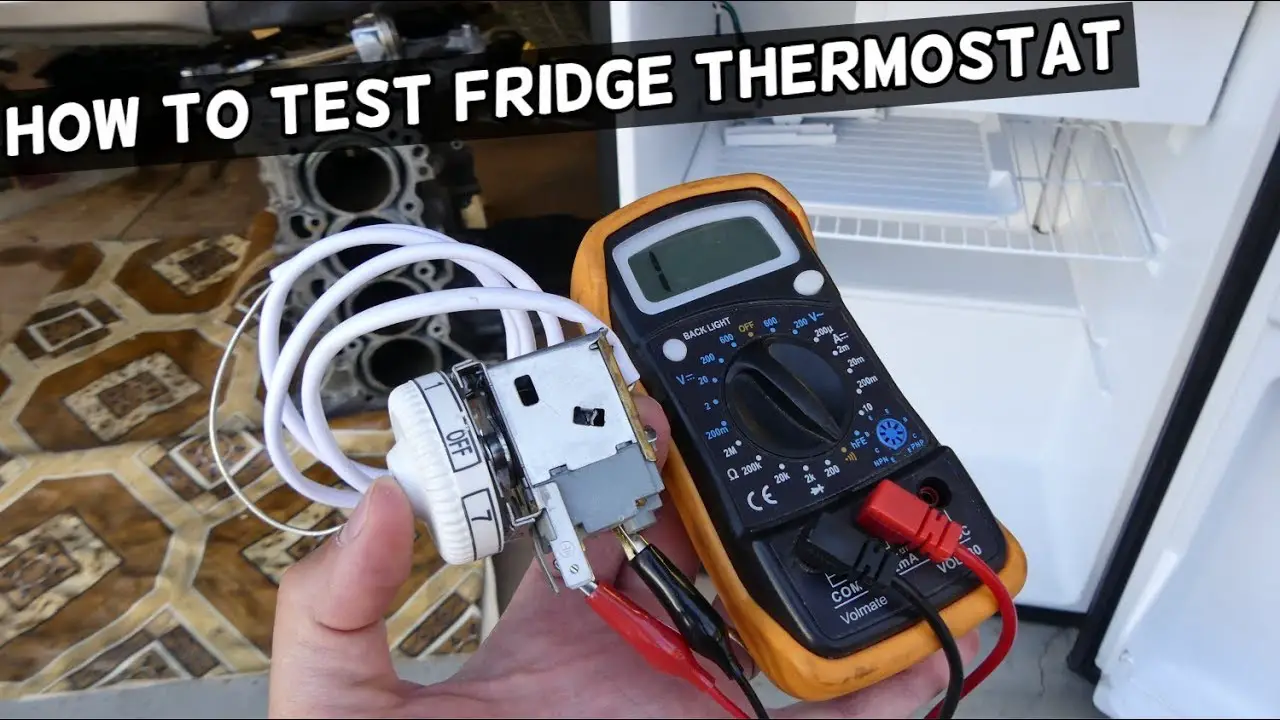
Testing your refrigerator thermostat ensures it keeps your food at the right temperature. A faulty thermostat can lead to spoiled food. Testing it is easy and only requires a few tools. Follow these steps to ensure your thermostat works properly.
Using A Multimeter
A multimeter helps check if the thermostat is functioning. First, unplug the refrigerator to ensure safety. Locate the thermostat; it is usually behind the control panel. Remove the thermostat for testing.
Set the multimeter to the lowest ohms setting. Connect the multimeter probes to the thermostat terminals. The multimeter will show a reading if the thermostat is working. If the reading does not change, the thermostat may be faulty.
Interpreting Results
A good thermostat should show a reading of zero or close to zero. This means the thermostat is allowing electricity to pass through. A reading far from zero indicates a problem. The thermostat might need replacement.
Check Best Thermostat Pricing in Amazon
** As an Amazon Associate, I earn from qualifying purchases.
If the reading is infinity, the thermostat is not working. It blocks electricity from passing through. Replace the thermostat to keep your refrigerator functioning. Regular checks can prevent food spoilage and ensure efficiency.
Replacing The Thermostat
When your refrigerator isn’t maintaining the right temperature, a faulty thermostat could be the culprit. Replacing the thermostat yourself can save time and money. Let’s dive into the steps required for a smooth replacement process.
Choosing A Replacement
First, you’ll need to choose the right replacement thermostat for your refrigerator model. Check your refrigerator’s manual or the manufacturer’s website for compatible parts. Ensure the new thermostat matches the specifications of the old one.
It’s crucial to get an exact match to avoid any compatibility issues. If in doubt, consult with a professional or contact customer service. A mismatched thermostat can lead to further issues down the line.
Installing The New Thermostat
Before starting, unplug your refrigerator to ensure safety. Remove any shelves or drawers blocking access to the thermostat. Use a screwdriver to gently detach the old thermostat from its mounting bracket.
Next, disconnect the wiring from the old thermostat, making a note of how each wire connects. Attach the wires to the new thermostat in the same configuration. Secure the new thermostat in place using the mounting bracket.
Once installed, plug your refrigerator back in and set the thermostat to the desired temperature. Monitor the refrigerator to ensure it reaches and maintains the correct temperature. Did you notice an immediate improvement?
Replacing a refrigerator thermostat might seem daunting, but with the right steps, it’s entirely doable. Have you ever replaced a thermostat before? Share your experience in the comments below!
Reassembling The Refrigerator
Testing a refrigerator thermostat involves several steps. Start by unplugging the fridge. Use a multimeter to check the thermostat’s continuity.
Reassembling the Refrigerator is a crucial step after testing the thermostat. It’s not just about putting everything back in place; it’s about ensuring your fridge runs smoothly again. Let’s dive into the specific steps to make sure you get it right.Reconnecting Wires
First things first, you need to reconnect the wires you disconnected earlier. It might seem daunting at first, but it’s actually straightforward. Take a photo before you disconnect anything. This will help you remember where each wire goes. Match the wires to their respective terminals as shown in your photo. Ensure each wire is snug in its place. Loose wires can cause malfunctions. If your refrigerator had any wire clamps or holders, make sure to use them.Securing Panels
Once the wires are reconnected, it’s time to secure the panels. Panels protect the internal components and keep your fridge looking neat. Start with the inner panel. Align it properly and screw it back into place. Double-check to ensure it’s not loose or misaligned. Next, put back the outer panel. This is usually the larger piece that covers everything up. Make sure it fits snugly and securely. If you have extra screws, you probably missed a step. Retrace your steps to find where they belong. By following these steps, you’ll ensure your refrigerator is back in top shape. Have you ever reassembled something only to find leftover parts? Share your experiences and tips in the comments below.
Credit: www.hnkparts.com
Testing The Refrigerator
Testing your refrigerator thermostat is simple. Set the thermostat to a mid-range temperature. Wait 24 hours, then check if the fridge maintains a consistent cool temperature.
Testing the Refrigerator Are you wondering if your refrigerator is keeping your food at the right temperature? A faulty thermostat could be the culprit. Testing the refrigerator thermostat can help you maintain the freshness of your food and save on energy bills. Let’s dive into the process step-by-step.Powering On
First, ensure your refrigerator is plugged in and receiving power. Check the power cord for any signs of damage. If the cord looks good, plug it into a working outlet. Next, open the fridge door and see if the light turns on. This is a quick way to verify that your refrigerator is getting power. If the light doesn’t turn on, you might be dealing with a larger electrical issue.Checking Temperature
Once you confirm the refrigerator is powered on, it’s time to check the temperature inside. Place a thermometer in a glass of water and put it in the fridge. Leave it there for at least 24 hours to get an accurate reading. The ideal temperature should be between 35°F and 38°F. If the temperature is off, adjust the thermostat dial inside the fridge. Wait another 24 hours and check again. If the temperature still isn’t right, your thermostat might be faulty. This is a good time to consult your fridge’s manual or call a professional for further assistance. Testing your refrigerator’s thermostat is a simple task that can keep your food fresh and your energy bills low. Have you tested your fridge’s thermostat recently?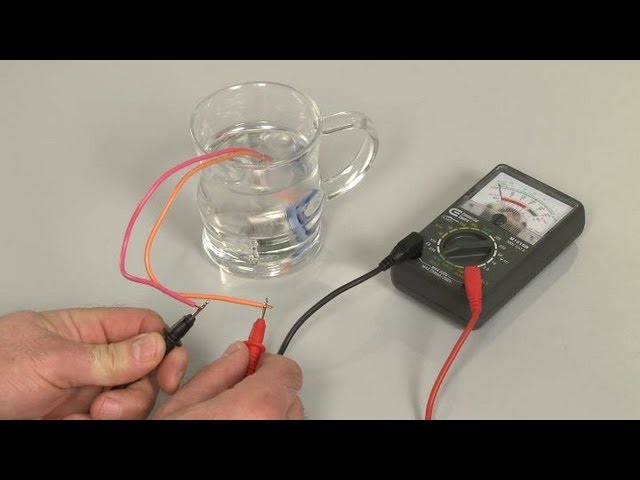
Credit: www.youtube.com
Frequently Asked Questions
How To Know If A Refrigerator Thermostat Is Bad?
Check for inconsistent temperatures, strange noises, or a fridge that’s too warm or too cold. Use a multimeter to test thermostat continuity.
How To Test A Fridge Thermostat With A Multimeter?
Turn off the fridge and unplug it. Set the multimeter to the lowest ohms setting. Remove the thermostat. Place the multimeter probes on the thermostat terminals. A reading of zero or infinity indicates a faulty thermostat.
How To Test Thermostat Without Removing From System?
Use a multimeter to check voltage and continuity. Set to AC voltage, test terminals for correct voltage. Switch to ohms, check for continuity.
How Do You Test A Refrigerator Thermistor With A Multimeter?
Set your multimeter to measure resistance. Disconnect the thermistor from the refrigerator. Place probes on thermistor terminals. Compare reading to manufacturer specifications.
Conclusion
Testing your refrigerator thermostat is simple and important. It ensures your food stays fresh. Just follow these steps. Check the power source, use a multimeter, and adjust the thermostat. Doing this regularly helps maintain your fridge’s efficiency. Save money on energy bills.
Avoid spoiled food. Keeping your refrigerator in top shape ensures a healthy kitchen. Stay proactive with maintenance. Your fridge will last longer. Enjoy peace of mind. Happy testing!
Check Best Thermostat Pricing in Amazon
** As an Amazon Associate, I earn from qualifying purchases.