
Check Best Thermostat Pricing in Amazon
** As an Amazon Associate, I earn from qualifying purchases.
To test a hot water thermostat, start by ensuring the power is off. Then, use a multimeter to check for continuity.
Testing a hot water thermostat is crucial for maintaining efficient water heating. A malfunctioning thermostat can lead to inconsistent water temperatures, causing inconvenience and higher energy bills. Knowing how to test your thermostat can save you time and money by identifying issues early.
This guide will walk you through the process, making it easy to ensure your hot water system is working correctly. Whether you’re a DIY enthusiast or just want to understand your home’s appliances better, learning how to test your hot water thermostat is a valuable skill. Let’s dive into the details to keep your water heater running smoothly.
Safety Precautions
Testing a hot water thermostat requires caution. Incorrect handling can lead to accidents. Safety should always be your priority. Follow these safety precautions to ensure a smooth and secure process.
Wear Protective Gear
Always wear safety gear before starting. Use rubber gloves to avoid electric shocks. Wear safety glasses to protect your eyes. Protective clothing can prevent burns. These simple steps ensure your safety.
Turn Off Power
Ensure the power is off before testing the thermostat. Locate the circuit breaker. Switch off the power supply to the water heater. This step prevents electric shocks. Double-check that the power is off using a voltage tester.
Credit: www.home-repair-central.com
Tools Needed
Testing a hot water thermostat ensures your water heater works properly. You’ll need a few tools to make the process easier and safe. Below, we discuss the essential tools needed for testing a hot water thermostat.
Multimeter
A multimeter is a crucial tool for testing a thermostat. It measures electrical values like voltage, current, and resistance. You can find both digital and analog multimeters. Choose one that you find easy to use. Make sure the multimeter has a good battery. A faulty multimeter can give incorrect readings. Follow the manufacturer’s instructions for correct usage. This ensures safety and accuracy.
Screwdriver
A screwdriver helps you remove the cover of the water heater. It also helps in accessing the thermostat and other internal parts. You might need different types of screwdrivers. A flat-head screwdriver is common, but some heaters need a Phillips-head. Check the screws on your water heater first. Using the right type prevents damage. Handle the screwdriver carefully to avoid injury. Store it safely after use.
Locate Thermostat
Testing a hot water thermostat involves checking its temperature settings and ensuring it functions properly. Start by turning off the power. Then, use a multimeter to test for continuity.
When your hot water isn’t working, the thermostat might be the culprit. Testing it is a crucial step to ensure your water heater functions properly. Before diving into testing, you need to locate the thermostat. This guide will walk you through the process in a clear and straightforward way. ###Find Access Panel
The first step is to find the access panel on your water heater. This is usually a small door located on the side of the heater. If you’re unsure, look for a panel with screws holding it in place. Removing the screws should give you access to the thermostat. ###Identify Thermostat
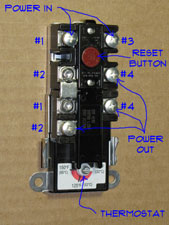
Once the panel is off, you’ll need to identify the thermostat. It’s typically a small device with a dial or a digital display. Look for wires connected to it; this is a good indicator. If there are two thermostats, one is for the upper heating element and the other for the lower. Testing your thermostat is essential for diagnosing hot water issues. Have you ever faced a cold shower because of a faulty thermostat? By following these steps, you can avoid such surprises and ensure your water heater is always in top shape.Remove Access Panel
Testing your hot water thermostat involves a few steps. One important step is removing the access panel. This panel covers the internal components of your water heater. Removing it allows you to inspect and test the thermostat.
Unscrew Panel
First, unscrew the panel to access the thermostat. Use a screwdriver for this task. Turn off the power supply before you begin. This ensures safety. Locate the screws holding the panel in place. Remove the screws and set them aside. Carefully lift the panel away from the unit.
Check For Loose Connections
Next, check for loose connections inside the panel. Loose connections can affect thermostat performance. Inspect all wires and connections. Ensure each wire is secure. Tighten any loose connections you find. This simple check can prevent many issues.
Test Thermostat
Testing a hot water thermostat is an essential task to ensure your water heater is working efficiently. A malfunctioning thermostat can lead to inconsistent water temperatures, which can be quite inconvenient. To test the thermostat, you will need a multimeter to measure resistance accurately. This might sound technical, but with the right guidance, you can easily do it yourself. Let’s break it down into simple steps.
Set Multimeter
First, you need to prepare your multimeter. Turn off the power to your water heater to avoid any electrical hazards.
Then, set your multimeter to the lowest Ohm setting, which is often marked with an Omega (Ω) symbol. This setting allows you to measure resistance accurately.
Ensure the probes are correctly connected to the multimeter—black in the common (COM) port and red in the VΩmA port.
Measure Resistance
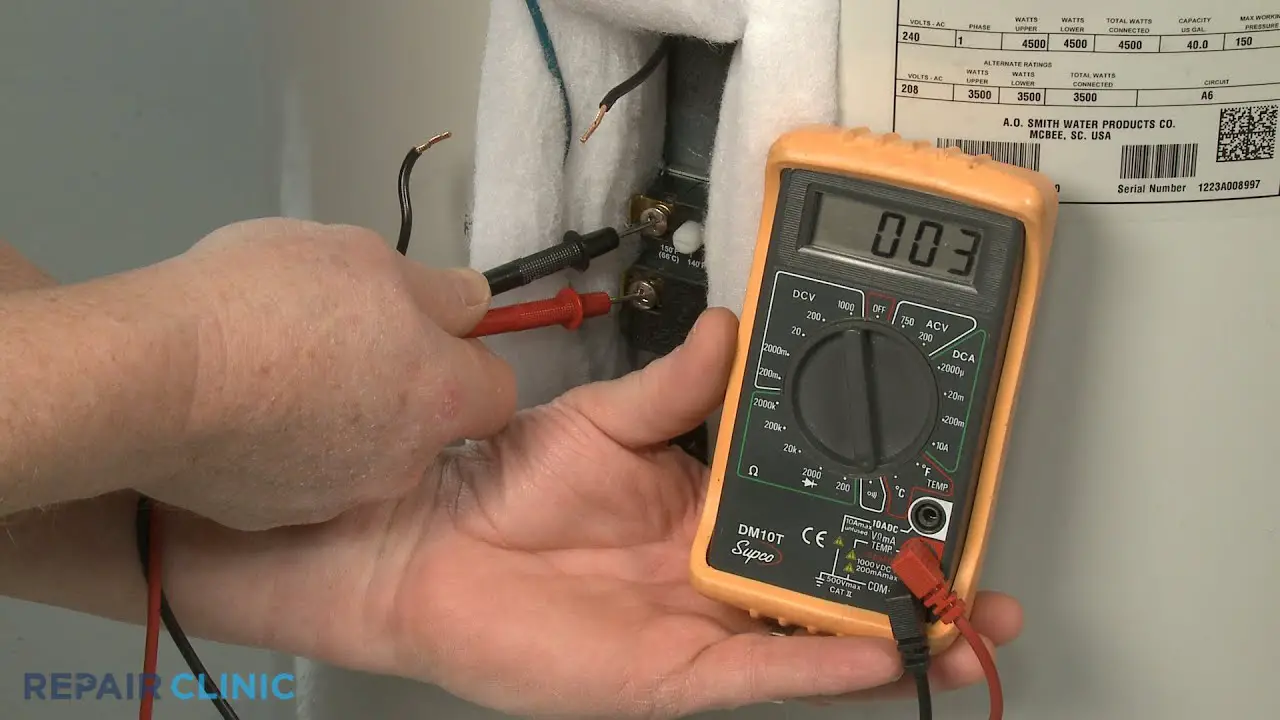
Now, you are ready to measure the resistance of your water heater thermostat. Carefully remove the thermostat cover to access the terminals.
Place the multimeter probes on the thermostat terminals. It doesn’t matter which probe goes to which terminal.
A functional thermostat should show a reading of zero or close to zero Ohms. If the reading is significantly higher or shows infinity, your thermostat might be faulty.
Testing your hot water thermostat can save you from unexpected cold showers. Have you ever tested your thermostat before? If not, now is a good time to start and ensure your hot water supply remains consistent.

Credit: www.reddit.com
Analyze Results
After you’ve tested your hot water thermostat, it’s time to analyze the results. This step helps you understand the readings and pinpoint any issues. Let’s break it down into simple steps for clarity.
Check Best Thermostat Pricing in Amazon
** As an Amazon Associate, I earn from qualifying purchases.
Compare Readings
Start by comparing your thermostat readings with the manufacturer’s recommended settings. If your readings align, your thermostat is likely in good shape. If not, you may need to adjust or replace it.
Keep a log of your readings. This can help you track any changes over time. If you notice a pattern of inconsistency, it could indicate a deeper problem.
Ask yourself: Are the readings stable? Do they fluctuate wildly? Stability often points to a functioning thermostat, while fluctuations might suggest an issue.
Identify Issues
Look for signs of wear and tear. Rust or corrosion on the thermostat can affect its performance. Clean any debris and check if the connections are secure.
Check for unusual noises. A humming or buzzing sound could mean the thermostat is struggling. This might require professional attention.
Consider the age of your thermostat. Older models might not perform as well as newer ones. If your thermostat is over a decade old, it might be time for an upgrade.
Reflect on your hot water usage patterns. Are there times when the water isn’t as hot as expected? This can be a clue that your thermostat needs adjustment or replacement.
By following these steps, you can effectively analyze the results of your hot water thermostat test. This ensures your water heating system runs efficiently and safely. What did you discover about your thermostat? Share your experience in the comments below!
Replace Faulty Thermostat
Replacing a faulty thermostat in your hot water system can restore efficiency. It’s essential to choose the right replacement and install it correctly. This guide will help you through the process step-by-step.
Choose New Thermostat
First, identify the make and model of your current thermostat. Check your water heater’s manual or existing thermostat for details. This information ensures compatibility with your system. Purchase a replacement thermostat from a reputable supplier. Quality matters for long-term performance.
Look for thermostats with good reviews and ratings. Ensure it matches your water heater’s specifications. Avoid cheap, low-quality options. They may fail quickly.
Install Replacement
Before starting, turn off the power to your water heater. Safety first. Next, drain some water from the tank. This step prevents any accidental spills.
Remove the access panel covering the thermostat. Use a screwdriver to detach it. Carefully disconnect the wires from the faulty thermostat. Take note of their positions. This helps with reconnecting later.
Install the new thermostat by connecting the wires as they were. Secure it in place with screws. Replace the access panel and turn the power back on. Finally, test your new thermostat to ensure it works correctly. Adjust settings as needed.
Reassemble Unit
Testing a hot water thermostat involves turning off the power supply. Remove the access panel and insulation. Use a multimeter to check the thermostat’s continuity and settings. Adjust the temperature if needed and reassemble the unit.
Reassemble Unit After successfully testing your hot water thermostat, the next crucial step is to reassemble the unit. Ensuring everything is put back in place correctly guarantees the functionality and safety of your water heater. It’s a straightforward process if you follow the steps methodically.Secure Access Panel
First, you need to secure the access panel. This is the panel you removed to access the thermostat. Ensure that it is aligned properly before fastening the screws. Using a screwdriver, tighten each screw until it is snug but not overly tight. Over-tightening can strip the screws or damage the panel. Double-check to make sure there are no loose wires or insulation hanging out. The access panel should sit flush against the unit.Turn On Power
Once the panel is secure, you can turn the power back on. Go to your circuit breaker and switch the power back to the water heater. Wait for about 30 minutes and then check the hot water from your tap. It should be at the desired temperature. If the water is not heating correctly, you may need to recheck the thermostat settings or consult a professional. Reassembling the unit is a simple yet important task. It ensures your water heater operates safely and efficiently. Have you reassembled a hot water unit before? What challenges did you face?
Credit: www.youtube.com
Frequently Asked Questions
How Do I Know If My Hot Water Thermostat Is Bad?
Check for inconsistent water temperatures. Listen for unusual noises from the heater. Inspect for visible damage. Test with a multimeter for electrical issues. Replace the thermostat if problems persist.
How To Test Heater Thermostat?
To test a heater thermostat, turn off the power, remove the thermostat, and use a multimeter to check for continuity. If there’s no continuity, replace the thermostat.
Can A Water Heater Thermostat Get Stuck On?
Yes, a water heater thermostat can get stuck on. This can cause overheating and potential damage.
Can You Test A Thermostat In Boiling Water?
Yes, you can test a thermostat in boiling water. Ensure it reads 212°F (100°C) at boiling point.
Conclusion
Testing a hot water thermostat ensures efficient heating. Follow the steps carefully. Safety is key. Always turn off power before starting. Use a multimeter for accurate readings. Compare results with manufacturer specifications. Replace faulty thermostats promptly. Regular testing prevents unexpected issues.
Keep your water heater running smoothly. Happy testing!
Check Best Thermostat Pricing in Amazon
** As an Amazon Associate, I earn from qualifying purchases.