
Check Best Thermostat Pricing in Amazon
** As an Amazon Associate, I earn from qualifying purchases.
Is your hot water heater not working as it should? You might be dealing with a thermostat issue.
Knowing how to test your hot water heater thermostat can save you time, money, and frustration. Imagine the luxury of never running out of hot water unexpectedly, feeling the comfort of a warm shower whenever you desire. In this guide, you’ll learn simple steps to check if your thermostat is in top condition, ensuring your home’s hot water supply remains consistent.
Don’t let a faulty thermostat ruin your day; dive in to discover how you can take control and keep the warmth flowing smoothly.
Tools And Materials Needed
Testing your hot water heater thermostat is essential. It ensures your appliance works correctly. Before starting, gather the necessary tools and materials. Having everything ready makes the process smoother. It helps prevent any disruption during testing.
Tools Needed
A multimeter is the main tool required. It measures electrical resistance. Ensure the multimeter is functioning properly. You also need a screwdriver. It’s used to open the access panel. Pliers are useful for handling wires safely.
Materials Needed
Safety gloves are crucial. They protect your hands from electrical hazards. Insulated gloves are the best choice. Make sure you have a flashlight. It helps illuminate dark areas inside the heater. Lastly, have a notebook and pen. They assist in recording readings from the multimeter.

Credit: www.youtube.com
Safety Precautions
Testing your hot water heater thermostat is essential. But safety is more important. Incorrect handling can lead to accidents. Protect yourself and your home by following these safety precautions.
Turn Off The Power
First, switch off the power supply. This prevents electric shocks. Locate the circuit breaker. Flip it to the “off” position. Confirm the power is off using a voltage tester.
Wear Protective Gear
Always wear protective gear. Use rubber gloves and safety goggles. They shield you from unexpected sparks or splashes. Stay safe and avoid injuries.
Ensure A Dry Environment
Keep the area dry. Water and electricity are a dangerous mix. Wipe away any spills. Use a towel or cloth for drying surfaces.
Use The Right Tools
Gather the correct tools before starting. A screwdriver and multimeter are essential. Using the wrong tools can damage the unit. Ensure they are in good condition.
Work In A Well-lit Area
Good lighting helps you see clearly. It reduces the risk of mistakes. Use a flashlight if needed. Ensure the workspace is bright and clear.
Stay Focused And Avoid Distractions
Maintain focus on the task. Distractions can lead to errors. Turn off your phone or TV. Concentrate on the work at hand.
Check For Gas Leaks
If your heater uses gas, check for leaks. Use a gas detector or smell for gas. If detected, ventilate the area immediately. Call a professional for help.
Locating The Thermostat
Finding the thermostat on a hot water heater is simple. It’s usually behind an access panel on the tank. Carefully remove the cover to test and adjust the settings.
Locating the thermostat in your hot water heater is the first step in testing its functionality. Knowing exactly where it is can save you time and frustration. You might be surprised to find that accessing it is simpler than you think. With a bit of guidance, you can handle this task confidently.Understanding Your Hot Water Heater
Before diving in, familiarize yourself with the general layout of your hot water heater. Most units have a panel on the outside that covers the thermostat. This panel is usually held in place by screws. Grab a screwdriver and you’re ready to begin.Identifying The Access Panel
Look for a rectangular metal cover on the side of your hot water heater. It’s usually located near the bottom or middle of the unit. This cover protects the thermostat and heating elements. If you have an electric water heater, there might be two thermostats—one for each heating element.Safety First: Turning Off The Power
Before removing the panel, ensure safety by turning off the power supply to the heater. Locate the circuit breaker panel in your home and flip the switch for the water heater. This step is crucial to avoid electric shock. Have you ever skipped this step and regretted it later?Removing The Access Panel
Once the power is off, use your screwdriver to remove the screws holding the panel in place. Keep the screws in a safe spot so you don’t lose them. Gently take off the panel to reveal the thermostat beneath. Inside, you will see a small metal box with a dial or a set of wires leading to it. This is your thermostat. If your heater has two thermostats, you’ll see one near the top and another near the bottom. Adjusting these can help regulate your water temperature.Taking Note Of The Current Settings
Before making any changes, note down the current settings of the thermostat. This will allow you to return to the original settings if needed. It’s a simple step, but one that many overlook.Getting Ready For Testing
Now that you have located your thermostat, you can proceed with testing its functionality. Remember, the key to success here is careful observation and safety. Testing your thermostat is not just about fixing problems, but understanding your appliance better. How does your newfound knowledge empower you?
Credit: www.reddit.com
Turning Off Power
Testing your hot water heater thermostat is crucial for efficient performance. Before you begin, ensure you turn off the power. This step is vital for your safety and the longevity of your appliance. Handling electrical components requires caution. So, let’s dive into the steps for turning off the power to your hot water heater.
Locating The Circuit Breaker
First, find your home’s main electrical panel. It’s often located in the garage, basement, or a utility area. Look for a labeled circuit breaker for the hot water heater. The label might read “water heater” or “hot water.” Identifying the correct breaker is essential to ensure safety.
Switching Off The Breaker
Once identified, switch off the breaker. Push the switch to the “off” position. This action cuts the electricity to your hot water heater. Double-check to ensure it’s fully off. This step prevents electrical hazards during the test.
Confirming Power Disconnection
Use a non-contact voltage tester to confirm the power is off. Hold it near the thermostat wiring. The tester should not light up or beep. This confirms the absence of electricity. Ensure complete disconnection before proceeding.
Accessing The Thermostat
Testing a hot water heater thermostat involves accessing the thermostat carefully. First, disconnect power to ensure safety. Use a multimeter to check continuity and temperature settings for proper function.
Accessing the thermostat of your hot water heater might seem daunting, but it’s a straightforward process that you can handle with a few simple steps. Whether your water isn’t getting hot enough or staying too hot, checking the thermostat is a key troubleshooting step. Understanding how to access it will empower you to maintain an efficient and safe water heater system in your home.Locate Your Hot Water Heater
Begin by finding the location of your hot water heater. Typically, it’s in a basement, laundry room, or garage. Make sure the area is well-lit and has easy access. Have you ever stumbled across a hidden storage space while searching for your heater? Knowing its location can save you time and effort.Ensure Safety First
Before you proceed, safety is paramount. Turn off the power supply to the water heater at the circuit breaker. This prevents electrical shocks and accidents. Have you ever felt the jolt of static electricity? Imagine that, but much worse—it’s not worth the risk. Double-check that the power is off before moving forward.Remove The Access Panel
Once the power is off, locate the access panel on the heater. It’s usually secured with screws, so you’ll need a screwdriver to open it. Removing this panel reveals the thermostat. Have you ever discovered a hidden gem in your garage? Removing the panel might not offer treasures, but it uncovers the source of your water woes.Identify The Thermostat
With the panel removed, you can now see the thermostat. It’s usually a small device with temperature settings. Look for any visible signs of damage or wear. Remember that time you found an old toy in mint condition? Identifying the thermostat is similar—you’re assessing the condition to determine its functionality.Prepare For Testing
Before testing, ensure you have a multimeter on hand. It’s an essential tool for checking electrical components. Are you ready to put your DIY skills to the test? With the thermostat in sight and your tools ready, you’re set to dive deeper into ensuring your water heater runs smoothly. Accessing the thermostat doesn’t require professional skills, just patience and a bit of curiosity. You’re on your way to becoming a savvy home maintenance expert. What’s the most surprising thing you’ve discovered during a DIY project? Share your thoughts and experiences in the comments below!
Credit: www.tiktok.com
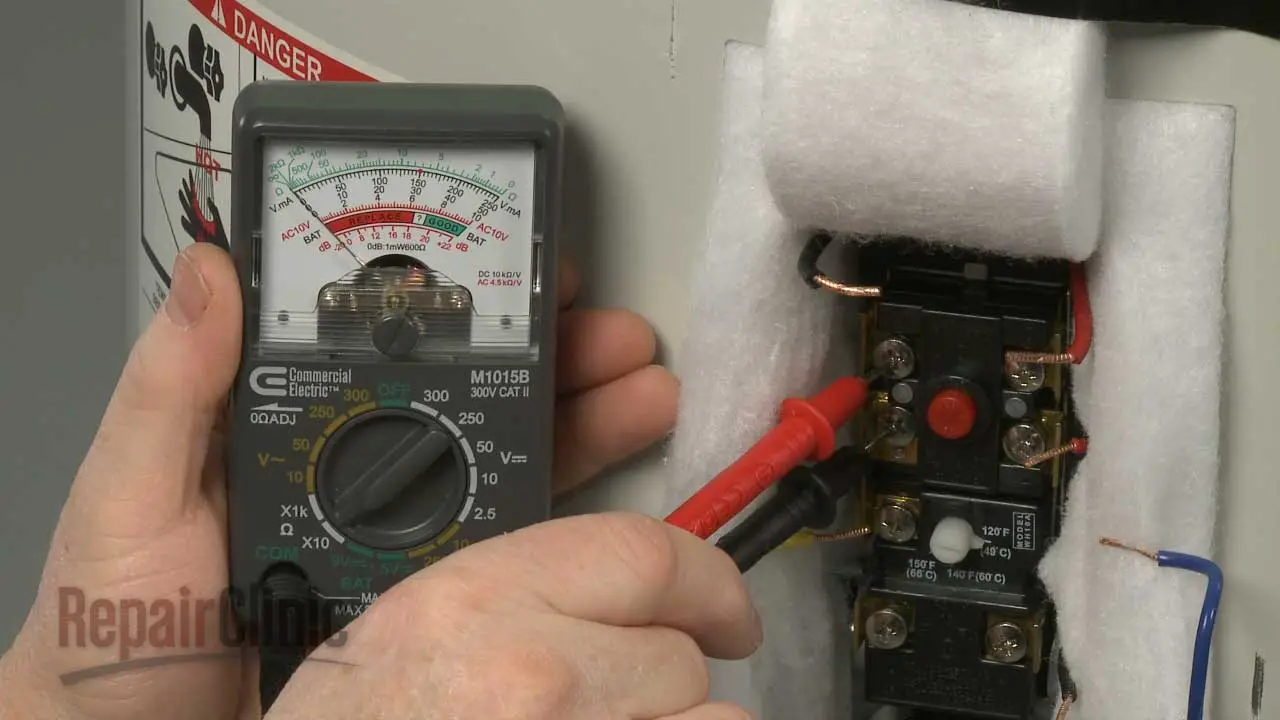
Testing With A Multimeter
Testing your hot water heater thermostat with a multimeter helps ensure functionality. First, turn off power to the heater. Next, set the multimeter to the ohms setting. Finally, check the thermostat terminals for continuity, ensuring proper operation.
Check Best Thermostat Pricing in Amazon
** As an Amazon Associate, I earn from qualifying purchases.
Setting Up The Multimeter
To kickstart your testing process, you need to set up your multimeter correctly. Begin by turning off the power supply to the water heater to ensure safety. Set your multimeter to the resistance or ohms setting, typically represented by the omega symbol (Ω). This setting will allow you to measure the continuity of the thermostat. Ensure your multimeter probes are firmly connected. The black probe should be in the common socket, while the red probe goes into the socket labeled for measuring voltage, resistance, or continuity. This setup is crucial for obtaining accurate readings.Checking Thermostat Continuity
Once your multimeter is set, it’s time to check the thermostat’s continuity. Place one probe on the terminal where the thermostat connects to the heating element. Place the other probe on the terminal for the other heating element connection. Look at the multimeter display. A reading of zero or close to zero indicates good continuity, meaning your thermostat is functioning properly. A higher reading suggests the thermostat might be faulty and needs replacement. Think about the last time your shower was unexpectedly cold. Could a faulty thermostat be the culprit? Testing it might prevent such surprises in the future. How often do you check your home appliances to ensure they’re working as they should? By regularly testing your thermostat, you ensure peace of mind and consistent hot water availability. It’s a small effort with a big payoff—no more cold showers or unexpected repair bills.Interpreting Results
Testing a hot water heater thermostat involves checking the device with a multimeter. Ensure the heater is off. Remove the thermostat cover. Set the multimeter to the ohm setting. Connect it to the thermostat terminals. Look for resistance readings. These indicate proper function.
No reading may suggest replacement is needed.
Interpreting the results of a hot water heater thermostat test can feel daunting, but it’s a critical step in maintaining your home’s comfort. Understanding the readings can tell you a lot about the health and efficiency of your appliance. Whether you’re seeing familiar numbers or something unexpected, knowing what each result signifies can guide your next steps effectively.Understanding Normal Temperature Readings
Normal thermostat readings typically range between 120°F to 140°F. If your multimeter shows a reading within this range, your thermostat is functioning properly. This means your water heater is efficiently providing hot water without wasting energy.Identifying Faulty Thermostat Readings
A reading that is significantly lower or higher than the normal range might indicate a problem. If the temperature is too low, you might find your showers less satisfying. On the other hand, excessively high readings can lead to scalding and energy waste.Determining Thermostat Replacement Needs
Consistently abnormal readings may mean it’s time to replace the thermostat. Before deciding, check if recalibrating or resetting it resolves the issue. However, if the problem persists, a new thermostat might be necessary to ensure efficient heating.Evaluating Energy Efficiency
Regularly testing and interpreting your thermostat’s readings can help you assess your water heater’s energy efficiency. Are you noticing spikes in your energy bills? Abnormal readings could be the culprit, signaling inefficiencies that need addressing.Addressing Common Misinterpretations
It’s easy to misread the signs. I once thought my thermostat was faulty due to fluctuating temperatures, only to discover it was an issue with the heating element. Have you ever jumped to conclusions, only to find a simpler solution?Seeking Professional Help
Sometimes, DIY solutions aren’t enough. If your readings are confusing or if replacing the thermostat doesn’t solve the issue, consulting a professional might be your best option. After all, safety and efficiency are paramount. By understanding what your thermostat readings mean, you can maintain your hot water heater’s performance and ensure your household’s comfort. What surprising insights have you discovered from testing your thermostat?Adjusting Or Replacing The Thermostat
Testing a hot water heater thermostat involves checking its functionality to ensure consistent water temperature. Begin by turning off the power supply, then remove the access panel. Use a multimeter to measure the thermostat’s resistance, ensuring readings match manufacturer specifications for proper operation.
Adjusting or replacing the thermostat in your hot water heater can seem daunting at first, but it’s a task that many homeowners find manageable with a little guidance. Whether you’re facing water that’s too hot, too cold, or just inconsistent, tweaking or swapping the thermostat can often solve the issue. This section will guide you through making the necessary adjustments or replacing a faulty thermostat to ensure your water heater operates efficiently.Making Necessary Adjustments
Sometimes, all your water heater needs is a slight thermostat adjustment. Begin by checking the current temperature setting. You might find it’s set higher or lower than necessary. Adjust the dial to a temperature that suits your household needs, usually between 120°F and 140°F. Before you start, ensure your heater is off to avoid any electrical hazards. Use a screwdriver to access the thermostat, and with gentle precision, adjust the temperature dial. Does the thought of handling electrical components make you nervous? Take a deep breath and proceed with caution; it’s simpler than it seems. After adjusting, turn your heater back on and test the water temperature after a few hours. Is it just right now? If not, you may need to make further tweaks or consider replacing the thermostat.Replacing A Faulty Thermostat
If adjustments don’t solve the problem, replacing the thermostat might be necessary. Begin by gathering your tools: a screwdriver, a voltage tester, and a new thermostat compatible with your heater model. Safety first—ensure the heater is off and the breaker is switched to avoid any electrical mishaps. Remove the access panel and disconnect the wires using your screwdriver. With the voltage tester, confirm there’s no electricity flowing through the wires. How do you feel about this task? It’s empowering to know you’re taking control of your home’s comfort. Carefully remove the old thermostat and install the new one, following the manufacturer’s instructions. Reconnect the wires and replace the panel. Once the thermostat is securely in place, turn the power back on and test the water temperature over the next few days. Is it consistent? If so, you’ve successfully tackled the task. Taking the time to adjust or replace your thermostat can save money and improve your home’s efficiency. Are you ready to try these steps and enjoy a consistent hot water supply? Dive in and take control of your comfort today!Restoring Power And Testing
Restoring power and testing the hot water heater thermostat is crucial. This step ensures your water heater functions correctly. Testing the thermostat can seem complex. Yet, a clear guide simplifies the process. Follow these steps to restore power and test efficiently.
Restoring Power To The Water Heater
First, ensure all connections are secure. Check the circuit breaker. It should be in the ‘ON’ position. Turn on the power supply to the heater. Listen for any unusual sounds. They may indicate issues. Confirm the heater is receiving power.
Testing The Thermostat
Use a multimeter for accurate results. Set it to the lowest ohm setting. Place the probes on the thermostat terminals. A reading will appear. A zero or near-zero reading indicates continuity. This means the thermostat is functioning.
Interpreting The Multimeter Readings
A high reading suggests a problem. The thermostat might be faulty. Replace it if necessary. Consistent readings ensure reliable performance. The multimeter provides a clear status. Trust these readings for accuracy.
Safety Tips During Testing
Always prioritize safety. Wear insulated gloves. Ensure the area is dry. Avoid touching live wires. Follow these precautions strictly. Safety should never be compromised. Confidence in testing comes with practice.
Regular Maintenance Tips
Regular maintenance of your hot water heater thermostat is essential to ensure it functions efficiently and lasts longer. Neglecting these tasks can lead to unexpected cold showers or even costly repairs. By following a few simple steps, you can keep your thermostat in top shape and avoid unnecessary headaches.
Check The Power Source
Start by making sure your thermostat is receiving power. This is often overlooked, yet it’s crucial. Check if the circuit breaker is on and that the heater is plugged in correctly. It’s surprising how often issues stem from a simple power problem.
Inspect For Physical Damage
Look for any visible signs of wear and tear. Cracks or rust can indicate potential failures. If you spot anything suspicious, consider replacing parts before they lead to more significant issues. A stitch in time saves nine.
Clean The Thermostat
Dust and debris can accumulate over time, affecting performance. Use a soft brush or cloth to gently clean the thermostat. Keeping it free from dirt ensures accurate temperature readings and efficient operation.
Test Temperature Settings
Adjust the thermostat to different settings and observe the response. Does it heat up quickly? Does the temperature remain stable? If not, recalibrate the settings or consult the manual for troubleshooting tips.
Check For Unusual Noises
Listen closely when your heater is running. Strange sounds can be an early warning sign of problems. Clicking or buzzing noises might indicate electrical issues, while banging could mean sediment buildup. Investigate promptly to avoid bigger troubles.
Monitor Energy Usage
Keep an eye on your energy bills. A sudden increase might signal inefficiency. Compare usage over months to spot trends. If your bills are climbing, it might be time to examine the thermostat or heating elements.
Maintaining your hot water heater thermostat doesn’t require a degree in engineering. Simple regular checks can save you from icy surprises and costly repairs. Are you ready to give your thermostat the attention it deserves?
Frequently Asked Questions
How Do I Know If My Water Heater Thermostat Is Bad?
Check for inconsistent water temperatures or a lack of hot water. Listen for unusual noises. Test with a multimeter for continuity.
How To Test Heater Thermostat With Multimeter?
Turn off power to the heater. Set the multimeter to ohms. Remove thermostat wires. Place multimeter probes on terminals. A reading of zero indicates a working thermostat. A high reading suggests a faulty thermostat. Reconnect wires and restore power when done.
How Do You Test A Gas Water Heater Thermostat?
Turn off the gas supply. Remove the thermostat cover. Use a multimeter to check for continuity. Set the multimeter to the lowest ohm setting. Place probes on the thermostat terminals. A reading of zero or infinity indicates a faulty thermostat.
Replace if necessary.
How To Test A Thermostat With Boiling Water?
To test a thermostat with boiling water, remove it and submerge it in boiling water. Observe if the thermostat opens. If it opens at the specified temperature, it works fine. Replace if it doesn’t respond, ensuring optimal home heating or cooling performance.
Conclusion
Testing your hot water heater thermostat can save you trouble. It ensures your water heater works efficiently. Regular checks help you spot issues early. This prevents costly repairs. Always follow safety steps when testing. Use tools carefully to avoid accidents.
If unsure, consult a professional. They can provide expert advice. Remember, a well-maintained thermostat keeps your water heater in top shape. This leads to consistent hot water supply. Enjoy peace of mind with a working thermostat. Keep your home comfortable and safe.
Check Best Thermostat Pricing in Amazon
** As an Amazon Associate, I earn from qualifying purchases.