
Check Best Thermostat Pricing in Amazon
** As an Amazon Associate, I earn from qualifying purchases.
Are you suddenly facing cold showers when you expected a warm embrace of soothing water? If your electric water heater isn’t living up to its promise, the thermostat might be to blame.
Testing your electric water heater thermostat can seem daunting, but it doesn’t have to be. Imagine the satisfaction of diagnosing and perhaps even solving the issue yourself, without the need for costly professional help. In this guide, you’ll discover step-by-step instructions to test your thermostat safely and effectively.
You’ll gain the confidence to tackle this task, ensuring your showers are always the perfect temperature. Don’t let a malfunctioning thermostat disrupt your comfort. Dive in and learn how to keep your water heater in top shape, all while saving time and money. Keep reading to transform your water heater woes into a warm, welcoming experience every day.

Credit: www.tiktok.com
Gather Necessary Tools
Gather essential tools like a multimeter and screwdriver. Ensure safety by turning off power first. These tools help you test the electric water heater thermostat effectively.
Testing your electric water heater thermostat starts with gathering the right tools. You might be surprised how much easier the process becomes when you’re well-equipped. Imagine diving into a task only to find you’re missing a key piece of equipment—frustrating, right? So, before you roll up your sleeves, make sure you’ve got everything you need at hand. This step not only streamlines the process but also saves you precious time.1. Multimeter
A multimeter is essential for testing your thermostat. It’s a handy device that measures voltage, current, and resistance. If you don’t have one, consider borrowing from a neighbor or purchasing one. It’s a good investment for any homeowner.2. Screwdriver
You’ll need a screwdriver to access the thermostat. Phillips or flathead, depending on your heater’s make, will do the trick. Ensure the screwdriver fits snugly to avoid stripping screws. It’s a small detail that can make a big difference.3. Insulated Gloves
Safety first! Insulated gloves protect you from electric shocks. They’re not just for professionals; anyone working with electricity should wear them. Think of it as an extra layer of protection.4. Flashlight
A flashlight comes in handy to see into those dark corners. Even in well-lit areas, a focused light can help you spot small details. It’s amazing what a bit of extra light can reveal.5. Notebook And Pen
Keep a notebook and pen nearby to jot down readings. Recording data helps track changes and diagnose issues effectively. You’ll thank yourself later when you have clear records to refer back to. — Imagine being in the middle of your testing and realizing you forgot something crucial. It disrupts your flow and can lead to hasty mistakes. By preparing these tools ahead of time, you’re setting yourself up for a smoother, more efficient testing process. So, what’s stopping you from checking your toolbox now?Ensure Safety First
Testing your electric water heater thermostat is important. Safety is the top priority. Working with electricity can be dangerous. Always follow safety steps. This ensures a secure environment. It prevents accidents and injuries.
Start by making sure everything is in order. Proper precautions save lives. A few careful steps can make a big difference. Below are key actions to ensure safety.
Turn Off Power
Always cut power before testing the thermostat. Locate the circuit breaker. Flip the switch to the off position. This stops electricity from flowing. It makes the environment safe. Electric shock is no joke. Always double-check the power is off.
Use A Voltage Tester
Never assume the power is off. Use a voltage tester. This tool checks for live wires. Place it on the wires connected to the thermostat. If the tester lights up, power is still on. Wait until it shows no signal. Only then is it safe to proceed.
Voltage testers are easy to use. They are a must-have for safety. Always have one handy when working with electricity.
Access The Thermostat
Testing an electric water heater thermostat involves accessing it safely. Turn off the power first. Then, remove the thermostat cover. Use a multimeter to check the settings. Make sure readings match the heater’s specifications. Adjust if needed for efficient heating.
Accessing the thermostat of your electric water heater might sound like a daunting task, but it’s simpler than you think. Getting to the heart of the heater means finding the thermostat, which is crucial for ensuring your heater operates at its best. Have you ever wondered why your water isn’t as hot as it used to be? It might be a thermostat issue. Let’s break down the steps to access it and ensure your heater is in tip-top shape.Remove Access Panels
Start by turning off the power supply to your water heater. Safety first, right? Once that’s done, grab a screwdriver and remove the access panels on the heater’s side. These panels shield the thermostat and heating elements. Removing them gives you a clear view and access. Have you ever tried removing a panel only to find a hidden screw? Check the edges carefully to avoid surprises.Locate The Thermostat
With the panels off, spotting the thermostat should be easy. Typically, you’ll find it nestled behind some insulation. Carefully peel back the insulation to reveal the thermostat and any wiring. It’s usually a small, rectangular device with a dial or digital display. Does it look different from what you expected? Sometimes, manufacturers place labels to guide you. Once you locate the thermostat, you’re ready to test it. Knowing exactly where it is makes troubleshooting quicker and efficient. Is it as straightforward as you thought? Accessing the thermostat can solve many heating issues without professional help.Test The Upper Thermostat
Testing the upper thermostat of an electric water heater is crucial. It ensures the heater functions efficiently. A malfunctioning thermostat can lead to uneven water temperatures. This can cause inconvenience and increase energy bills. Proper testing helps identify any issues early. This prevents costly repairs or replacements in the future. Below, you’ll find the steps to test the upper thermostat efficiently.
Adjust The Thermostat Setting
Start by adjusting the thermostat setting. Locate the access panel on the water heater. Use a screwdriver to remove the panel. You will see the thermostat dial inside. Turn the dial to adjust the temperature setting. Ensure the setting is slightly higher than the current temperature. This helps in testing the thermostat effectively.
Check For Power Supply
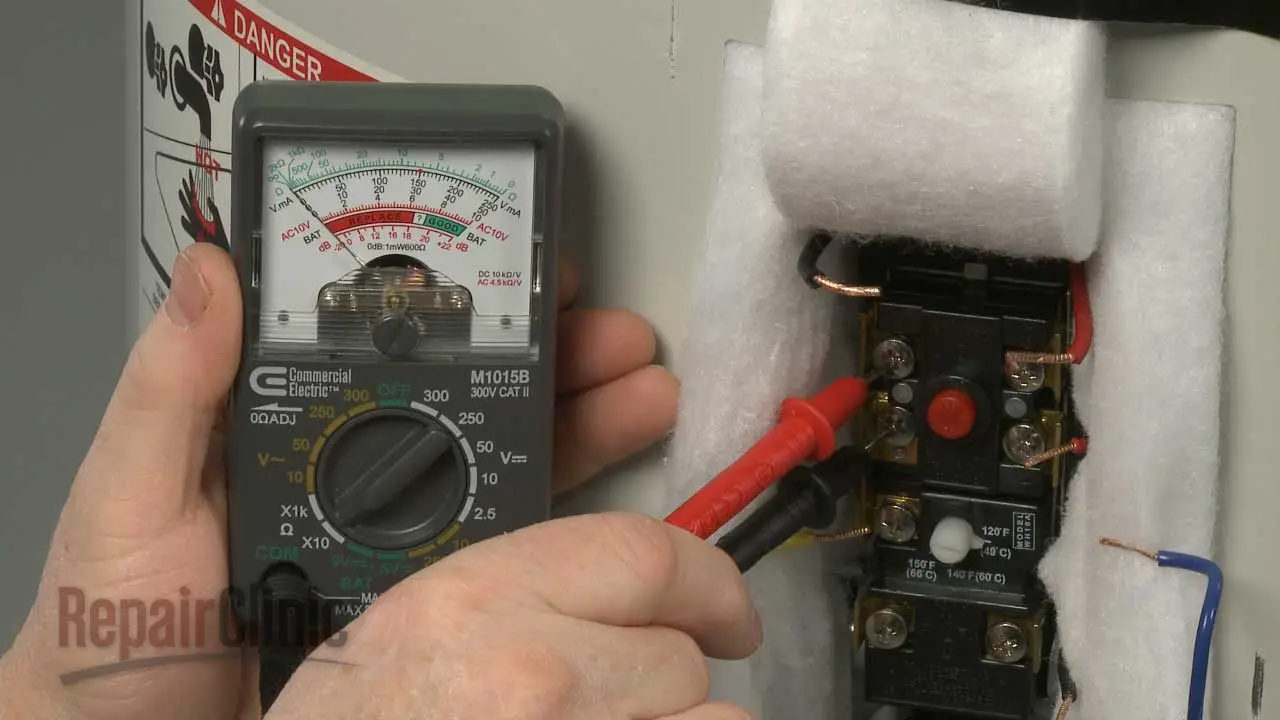
Before proceeding, check for power supply to the heater. Ensure the circuit breaker is in the ‘ON’ position. Use a multimeter to verify the power supply. Set the multimeter to AC voltage. Place the probes on the thermostat terminals. A reading should indicate proper voltage supply. No reading means there’s a power issue.
Test The Lower Thermostat
Testing the lower thermostat of an electric water heater ensures it functions correctly. Start by turning off the power. Next, use a multimeter to check the thermostat’s continuity. A proper reading confirms it’s in good condition.
Testing the lower thermostat of an electric water heater is essential. It ensures your water heater functions properly. This process helps identify issues that might affect heating efficiency. By following simple steps, you can test and adjust the thermostat easily.Adjust The Thermostat Setting
First, locate the lower thermostat on your water heater. Usually, it’s behind a panel at the bottom of the unit. Use a screwdriver to remove the panel. Once exposed, find the thermostat dial. Use a flathead screwdriver to adjust the dial. Set it to your desired temperature. A typical setting is around 120 degrees Fahrenheit. Adjusting the dial helps ensure the heater maintains the correct water temperature.Check For Continuity
Turn off the power supply to the water heater. Safety is crucial during this step. Use a multimeter to check the thermostat’s continuity. Place the multimeter probes on the thermostat terminals. A reading indicates continuity; the thermostat is functional. If there’s no reading, the thermostat might be faulty. Replace it to ensure effective water heating. Checking for continuity helps identify electrical issues early. This ensures the heater operates efficiently.
Credit: www.reddit.com
Check Best Thermostat Pricing in Amazon
** As an Amazon Associate, I earn from qualifying purchases.
Evaluate Thermostat Performance
Evaluating the performance of your electric water heater thermostat is crucial for ensuring your hot water system operates efficiently. You might think everything’s fine, but a malfunctioning thermostat can lead to higher energy bills or lukewarm showers. By regularly testing and evaluating your thermostat’s performance, you can catch issues before they become costly problems.
Analyze Test Results
After conducting a series of tests on your thermostat, it’s time to analyze the results. Did the thermostat respond correctly when adjusting the temperature settings? If the water temperature doesn’t align with the thermostat setting, this discrepancy could indicate a malfunction.
Check if the water heats up within the expected time frame. A sluggish response might mean your thermostat is on its last legs. Keep an eye on any unusual noises or fluctuations in temperature, as these are red flags you shouldn’t ignore.
Determine If Replacement Is Needed
So, your test results are in. What’s next? If you notice persistent issues like fluctuating temperatures or a complete lack of hot water, it might be time to consider replacing the thermostat.
Think about how often you’ve had to adjust the thermostat just to get the right water temperature. If it’s a frequent task, replacement could be a practical solution. Don’t wait until you’re caught off guard by a cold shower—addressing the problem sooner rather than later can save you headaches and money.
Have you ever replaced a thermostat before? If not, this might be a good opportunity to learn a new skill. Alternatively, consult a professional to ensure the job is done right. Either way, taking action can lead to a more efficient water heating system and a better home experience.
Reassemble The Heater
Testing an electric water heater thermostat involves a few simple steps. Ensure the power is off. Remove the access panel. Then, use a multimeter to check for continuity. A working thermostat will show a reading. If not, replacement might be necessary.
Reassembling the heater is a crucial step. It ensures the electric water heater functions properly. After testing the thermostat, reassembling must be done carefully. This process involves securing panels and restoring power. Ensuring safety is vital during these steps.Secure Access Panels
Begin by aligning the access panels. They protect the internal components. Make sure they fit perfectly. Misaligned panels can cause issues. Use a screwdriver to secure the screws. Tighten them firmly. Loose screws might lead to vibrations or damage. Double-check all screws before proceeding. Ensuring access panels are secure maintains safety. It also prevents dust and debris from entering.Restore Power Safely
Restoring power needs caution. Turn off the breaker before starting. This prevents electrical hazards. Attach the wires carefully. Follow the wiring diagram on the panel. Avoid touching live wires. Ensure all connections are tight. Loose connections can cause sparks or short circuits. Switch on the breaker. Observe the heater’s function. Watch for any unusual sounds. Ensure everything is operating smoothly. A properly restored power supply ensures efficient heating.
Credit: www.youtube.com
Frequently Asked Questions
How To Test An Electric Hot Water Thermostat?
Turn off power supply. Use a multimeter to check thermostat continuity. Place probes on terminals. If it reads zero, it’s faulty. Adjust temperature settings and test again. Ensure connections are tight. Consult a professional if unsure. Regular testing ensures efficiency and safety.
How To Test An Electric Thermostat With A Multimeter?
Turn off power to the thermostat. Set the multimeter to the ohms scale. Remove thermostat cover. Place multimeter probes on the thermostat terminals. A reading of zero or infinity indicates a faulty thermostat. A reading between 0 and 1 ohms means it’s functioning correctly.
How To Fix A Faulty Thermostat In A Water Heater?
Turn off the power to the water heater. Remove the access panel and insulation. Test the thermostat with a multimeter. If faulty, unscrew and replace it. Reassemble the unit and restore power. Check the heater for proper operation.
How To Test If A Thermostat Is Bad?
Turn off the power and remove the thermostat cover. Check for loose wires or dirt. Use a multimeter to test continuity. No continuity indicates a bad thermostat. Replace if needed.
Conclusion
Testing an electric water heater thermostat is simple. Follow the steps carefully. Ensure safety by switching off the power first. Use a multimeter to check the thermostat’s function. Proper testing can prevent unexpected cold showers. Regular maintenance extends your heater’s lifespan.
Saving money by avoiding costly repairs. Understanding thermostat testing boosts your confidence. You can tackle small issues yourself. No need for professional help often. Keep your home running smoothly. Enjoy warm showers all year round. Stay proactive with home appliance care.
It benefits you in the long run.
Check Best Thermostat Pricing in Amazon
** As an Amazon Associate, I earn from qualifying purchases.