
Check Best Thermostat Pricing in Amazon
** As an Amazon Associate, I earn from qualifying purchases.
Feeling a chill in your morning shower or noticing inconsistent water temperatures? It might be time to test your water heater’s thermostat.
Your water heater works tirelessly behind the scenes, but when its thermostat falters, it can disrupt your daily routine. You’re probably wondering, “How can I test it myself? ” Don’t worry; you don’t need to be an expert or spend money on a technician.
By following a few simple steps, you can ensure your water heater operates efficiently, saving you time, stress, and even money on your energy bills. Curious to learn how? Let’s dive in and empower you with the knowledge to keep your water heater in top shape.
Tools And Materials Needed
Gather basic tools like a screwdriver and a multimeter. You’ll also need safety gear and a flashlight. Ensure all materials are accessible before starting the thermostat test.
Testing a thermostat on a water heater might seem like a daunting task, but with the right tools and materials, you’ll find it’s quite straightforward. Whether you’re troubleshooting a problem or simply ensuring your heater’s efficiency, gathering the necessary items will set the foundation for a successful check-up. As you prepare, consider the experience as a learning opportunity. Just a few simple tools can empower you to save time and money.Basic Toolkit
A basic toolkit is your first stop. You’ll need a screwdriver to access the thermostat panel. Make sure it’s the correct size to avoid damaging screws or the panel itself. A pair of pliers can also be handy for handling wires safely.Multimeter
A multimeter is essential for measuring electrical resistance and voltage. It’s your most reliable ally in diagnosing thermostat issues. If you don’t have one, they’re available at most hardware stores and come with easy-to-follow instructions.Safety Equipment
Safety should always be your priority. Wear safety goggles to protect your eyes from any accidental splashes or debris. Insulated gloves will protect you from electrical shocks, ensuring a safe testing process.Notebook And Pen
Keep a notebook and pen nearby. Jotting down the readings from your multimeter can help you track changes or identify patterns over time. It’s a small detail that can offer big insights later on.Extra Time And Patience
Finally, allocate enough time for the task. Rushing can lead to mistakes or overlooked details. Approach the test with patience, and consider it an opportunity to better understand your home’s appliances. What tools have you found indispensable for DIY projects? Sharing your experiences could inspire others and turn this chore into an empowering moment.
Credit: johnowensservices.com
Safety Precautions
Ensure your safety by turning off the power before testing a water heater thermostat. Use a voltage tester to check for electricity. Wear insulated gloves and follow all safety instructions to prevent accidents.
Testing a thermostat on a water heater might seem like a straightforward task, but ensuring safety is crucial. Before you dive into testing, it’s essential to equip yourself with the right knowledge and tools. Safety precautions not only protect you but also ensure the longevity of your water heater.1. Turn Off The Power
Always start by turning off the power supply to the water heater. This step is crucial to prevent electrical shocks. Locate the circuit breaker for the water heater and switch it off before proceeding with any testing.2. Use Insulated Tools
When testing a thermostat, use tools with insulated handles. This provides an extra layer of protection against any accidental electrical contact. A simple slip can be dangerous, so ensure your tools are up to the task.3. Wear Protective Gear
Safety goggles and gloves are your best friends here. Goggles protect your eyes from any unexpected splashes or debris. Gloves help you maintain a firm grip on tools while providing a protective barrier.4. Verify Power Is Off
Double-check that the power is indeed off before you start working. Use a voltage tester to ensure there’s no electrical current running through the water heater. This step might seem redundant, but it’s better to be safe than sorry.5. Clear The Area
Make sure the area around your water heater is free from any clutter. This reduces the risk of tripping or knocking over tools while you’re focused on the task at hand. A clear workspace enhances both safety and efficiency.6. Check For Water Leaks
Inspect the water heater for any signs of leaks before you start testing. Leaks can complicate the process and pose additional hazards. Address any leaks immediately to prevent further issues.7. Follow The Manual
Refer to your water heater’s manual for specific safety instructions. Each model might have unique features or precautions you need to be aware of. Familiarize yourself with these details to ensure a smooth testing process. Implementing these safety precautions can make the difference between a successful thermostat test and a hazardous situation. Have you ever skipped a safety step and regretted it later? Share your thoughts in the comments.Power Off The Water Heater
Testing a thermostat on a water heater requires careful steps. First, ensure the power is off. This step is crucial for safety. Turning off the power prevents electric shocks. It also protects the thermostat and other components.
Always prioritize safety during any repair or testing. This simple action sets the stage for a successful test. Let’s explore how to safely power off a water heater.
Locate The Circuit Breaker
Find the right circuit breaker for your water heater. This breaker controls the power supply. It’s usually in the main electrical panel. The panel might be in a garage, basement, or utility room.
Switch Off The Breaker
Once located, switch off the breaker. This cuts off electricity to the water heater. Ensure the switch is fully moved to the “off” position. Double-check to prevent any accidental power flow.
Verify The Power Is Off
Confirm the power is off before proceeding. Use a voltage tester for this task. Place the tester on the heater’s electrical connections. No readings mean the power is completely off. This step ensures absolute safety.
Proceed With Testing
With the power off, start testing the thermostat. Follow the instructions specific to your thermostat model. Use appropriate tools to ensure accurate results. Proper testing prevents future issues with the water heater.

Credit: www.reddit.com
Access The Thermostat
Testing a thermostat on a water heater ensures proper function and energy efficiency. First, turn off the power supply. Then, use a multimeter to check the thermostat’s continuity. Adjust settings if needed for optimal performance.
Accessing the thermostat of a water heater is an essential step. It allows you to inspect and test for any issues. Before starting, ensure safety by turning off the power supply. This prevents electrical hazards. Once the power is off, you can begin accessing the thermostat.Remove Access Panel
The first step is to remove the access panel. Most water heaters have a panel on the side. Use a screwdriver to take out the screws. Keep them safe for reassembly. Gently remove the panel to reveal the thermostat. Be careful not to damage any wires.Locate The Thermostat
After removing the panel, locate the thermostat. It usually sits close to the heating element. The thermostat has a dial or a set of controls. It is often covered with insulation. Carefully move the insulation aside. This will give you a clear view of the thermostat for further testing.Check The Temperature Setting
Adjust the thermostat to a recommended setting of 120°F. This ensures efficient heating without wasting energy. Use a thermometer to check the water temperature. If it differs, the thermostat may need replacing.
Checking the temperature setting on your water heater’s thermostat might seem straightforward, but it can be a game-changer in terms of energy efficiency and comfort. Have you ever felt the water is too hot or not warm enough, despite adjusting the dial? If so, your thermostat setting might be misleading. This simple check can help you ensure the perfect temperature while also saving on energy costs.Understanding The Dial
Most water heaters have a dial to set the temperature. It’s usually located near the bottom of the heater. Look for a knob or a digital display. Once you find it, take a closer look at the markings. Some models have a range from low to high, while others show specific temperature numbers. Knowing your model helps in setting the exact temperature you want.Setting The Ideal Temperature
What temperature do you prefer for a relaxing shower? Experts suggest setting your water heater thermostat to 120°F (49°C). This temperature ensures comfort and minimizes the risk of scalding. Plus, it keeps bacteria at bay, which is especially important for families with young children or elderly members.Adjusting The Dial
Adjusting the thermostat is easy but requires careful handling. If you’re dealing with a dial, turn it gently to your preferred setting. For digital thermostats, use the buttons to adjust the temperature. Once set, wait a few hours to see if the water temperature matches your expectations. Remember, it’s not instant, so be patient.Verify With A Thermometer
Are you skeptical about the accuracy of your thermostat? Use a thermometer to test the water temperature. Run the hot water from a tap and fill a cup. Insert the thermometer and check the reading. If it’s off, adjust the dial again until you find the sweet spot.Safety First
Safety is crucial when dealing with hot water. Always check the temperature with caution. If the water is too hot, it can cause burns. Consider marking your thermostat setting for future reference. This way, you won’t forget your preferred temperature setting. Checking your thermostat’s temperature setting can transform your water heating experience. Have you ever been surprised by your water heater’s temperature? These simple steps ensure you’re never caught off guard again, enjoying perfect showers every time.Test The Thermostat Continuity
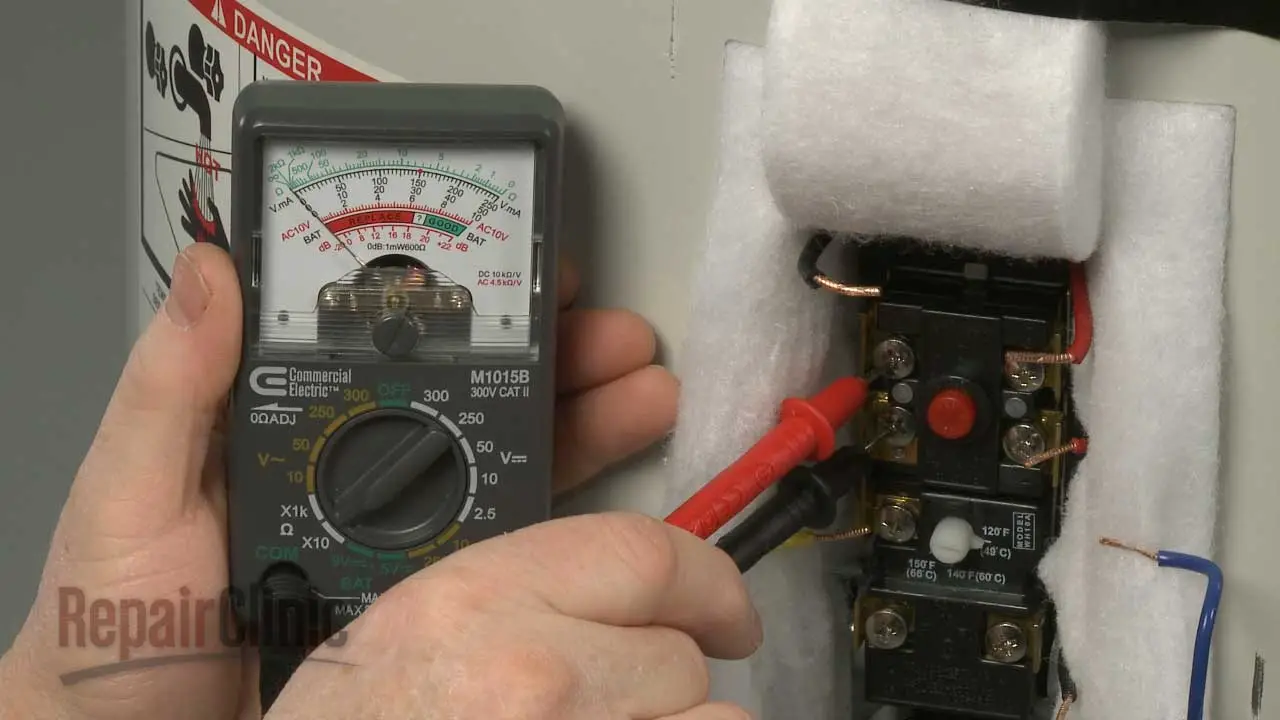
Testing the thermostat continuity on your water heater is a crucial step to ensure it’s functioning correctly. A malfunctioning thermostat can lead to inconsistent water temperatures or even a complete lack of hot water. Understanding how to test this component can save you from unnecessary repairs and help maintain your water heater’s efficiency. Let’s dive into the process, starting with using a multimeter to check the thermostat’s continuity.
Use A Multimeter
To test the thermostat’s continuity, you’ll need a multimeter. If you don’t have one, they’re relatively inexpensive and can be found at any hardware store. Make sure your multimeter is set to measure ohms, which is symbolized by the Greek letter omega (Ω).
Before you begin, ensure the power to your water heater is completely turned off for safety. It’s always wise to double-check with a voltage tester. Once confirmed, locate the thermostat, typically hidden behind a cover panel on your heater.
Disconnect the wires attached to the thermostat. You need clear access to the terminals for accurate readings. Connect the multimeter probes to the thermostat terminals. This will help you determine if there’s continuity in the circuit.
Interpret The Readings
Interpreting multimeter readings might seem daunting, but it’s straightforward with a little guidance. A good thermostat will show a reading close to zero ohms, indicating continuity. This means the electrical path is complete, which is essential for the thermostat to function.
On the other hand, a reading of infinity or no change at all suggests a broken circuit. This indicates the thermostat may need replacing. If you’re getting these readings, it might be time to consult a professional or consider purchasing a new thermostat.
Why does this matter? A faulty thermostat can lead to increased energy bills, inconsistent water temperatures, and frustration. Testing it yourself can save time and money. Have you ever wondered why your water heater isn’t performing as expected? Checking the thermostat is a great first step.
Check Best Thermostat Pricing in Amazon
** As an Amazon Associate, I earn from qualifying purchases.
Keep this process in mind next time your water heater acts up. It’s a simple, effective method to diagnose potential issues without diving into complex repairs. Remember, regular maintenance can prevent these problems from arising in the first place.
Adjust Or Replace The Thermostat
Testing a water heater thermostat ensures efficient operation. Start by turning off the power supply. Use a multimeter to check for continuity. Adjust or replace the thermostat if readings are off.
Testing a thermostat on a water heater might seem daunting, but with the right steps, it’s manageable. Sometimes, you may need to adjust the thermostat to ensure your water heater operates at optimal efficiency. Other times, replacement might be necessary if adjustments don’t resolve the issue. Knowing when to adjust or replace the thermostat can save you a lot of hassle and ensure your water heater keeps running smoothly.Adjusting The Temperature
The first step in adjusting the thermostat is checking the current temperature setting. Most water heaters have a recommended temperature of 120 degrees Fahrenheit. Grab a thermometer and test the water temperature from the tap. If it’s colder or hotter than expected, your thermostat might need an adjustment. Adjusting the thermostat is usually straightforward. Turn the dial on the thermostat to reach the desired temperature. It’s like setting the perfect temperature for your shower. Remember, safety comes first. Always turn off the power to your water heater before making any adjustments.Replacing The Thermostat
If adjusting doesn’t solve the problem, it might be time to replace the thermostat. First, ensure you have the right replacement part for your specific water heater model. Replacing a thermostat can be a bit tricky, but it’s not impossible. Unscrew the panel to access the thermostat, making sure the power is off to avoid accidents. Remove the old thermostat and install the new one. Follow the manufacturer’s instructions for installation to avoid any mishaps. Ask yourself, is a professional needed for this task? If you’re unsure, seeking expert help can prevent costly mistakes. Replacing the thermostat ensures your water heater functions efficiently. It’s a small change that can make a big difference in your daily comfort. Testing your water heater’s thermostat doesn’t have to be a chore. With these steps, you can quickly determine whether an adjustment or replacement is needed. Isn’t it satisfying to know you can tackle this task with confidence?Reassemble And Restore Power
Reassembling and restoring power to your water heater is crucial. It ensures your thermostat functions properly. Once you’ve completed testing the thermostat, it’s time to put everything back together. This process involves careful attention to detail. It ensures safety and optimal performance.
Reassemble The Water Heater Components
Begin by placing the thermostat back in its position. Secure the mounting screws tightly. Ensure they are firm to prevent any movement. Align the wires correctly to avoid mishaps. Double-check connections for safety.
Next, reattach the access panels. Ensure they fit securely without gaps. This helps in maintaining the heater’s efficiency. It also prevents dust or debris from entering.
Restore Power To The Water Heater
Start by turning the breaker switch back on. This restores electricity to the unit. Confirm the switch is fully engaged. Listen for any unusual sounds from the heater.
Check the heater’s indicator light. It should turn on, signaling power restoration. If the light doesn’t turn on, recheck the connections.
Monitor The Water Heater Functionality
Observe the heater for a few minutes. Ensure it starts heating water. Monitor the temperature gauge. It should rise steadily without fluctuations.
If the heater fails to operate, revisit the connections. Double-check the thermostat’s alignment. Ensure all components are correctly assembled.
Conduct Final Safety Checks
Inspect for any leaks around the heater. Tighten loose connections if necessary. Ensure the area around the heater is clear. This prevents overheating and ensures safety.
Listen for odd noises. They might indicate a problem. Adjust components if needed to stop them.
Verify Water Heater Functionality
Testing a water heater thermostat ensures efficient operation. Start by switching off the power supply. Then, use a multimeter to check for continuity. If readings are inconsistent, consider replacing the thermostat. Proper maintenance prevents future issues and enhances performance.
Verifying the functionality of your water heater is a crucial step in maintaining efficient home utility systems. Have you ever stepped into a shower expecting warmth, only to be greeted by icy water? Testing your water heater’s thermostat can prevent such surprises. It ensures that the device is working correctly and your water stays at the right temperature. This task might sound technical, but with a little guidance, you can handle it yourself.Understanding The Basics Of Your Water Heater
Before diving into testing, get familiar with your water heater’s components. Locate the thermostat, usually found beneath an access panel on the side of your heater. Knowing the basics helps you understand what you’re looking at and where potential issues might arise.Gathering The Necessary Tools
Before testing, gather a few essential tools. You’ll need a screwdriver to open the access panel and a multimeter to check the thermostat’s continuity. Having these tools handy saves time and makes the process smoother.Turning Off The Power
Safety first. Turn off the power to your water heater from the breaker box. This step is crucial to prevent electrical shocks during the testing process. Double-check that the power is off by using a voltage tester.Accessing The Thermostat
Carefully remove the access panel with your screwdriver. Once open, you’ll see the thermostat and heating elements. Take a moment to observe their arrangement and ensure nothing looks burnt or damaged.Testing The Thermostat With A Multimeter
Set your multimeter to the continuity setting. Touch the multimeter probes to the thermostat terminals. A continuous beep or reading indicates that the thermostat is functioning. No sound or reading suggests a replacement is needed.Adjusting The Thermostat Settings
Sometimes, the issue is as simple as incorrect settings. Check the thermostat’s temperature dial and adjust it to your preferred setting, typically between 120°F and 140°F. This small tweak can often resolve lukewarm water issues.Reassembling And Restoring Power
After testing, securely replace the access panel. Turn the power back on at the breaker box. Allow the water heater some time to adjust before checking if your water reaches the desired temperature. Testing your thermostat can seem daunting initially, but it’s a manageable task with the right approach. Imagine the peace of mind knowing your water heater is in top shape. Have you ever tried fixing something yourself and felt accomplished afterward? This could be one of those satisfying moments.
Credit: www.youtube.com
Frequently Asked Questions
How Do I Know If My Water Heater Thermostat Is Bad?
Check for inconsistent water temperature, no hot water, or high energy bills. Listen for unusual noises. Use a multimeter to test for faulty readings. These signs can indicate a bad water heater thermostat. Consult a professional if needed.
How To Test Thermostat On Water Heater With Multimeter?
To test a water heater thermostat, first turn off the power. Remove the thermostat cover. Set the multimeter to the ohms setting. Place probes on thermostat terminals. A zero reading indicates it’s working. Infinite resistance means it’s faulty.
How To Test If A Thermostat Is Bad?
Test a thermostat by checking for power and ensuring it opens and closes properly. Use a multimeter to verify voltage. Remove the thermostat, place it in hot water, and watch for movement. Replace if it stays closed or shows no response.
How Do You Test A Gas Water Heater Thermostat?
To test a gas water heater thermostat, turn off power and gas. Remove the thermostat cover. Use a multimeter to check continuity across the terminals. Replace the thermostat if there’s no continuity. Always prioritize safety by following manufacturer instructions and consulting a professional if needed.
Conclusion
Testing your water heater’s thermostat is crucial. It ensures efficient operation. Regular checks help prevent unexpected cold showers. Follow the steps outlined above carefully. Safety is important, so switch off power first. Use a multimeter to check the thermostat’s function.
Replace faulty thermostats promptly to avoid bigger issues. Proper maintenance saves energy and money. A well-functioning thermostat provides consistent hot water. It’s peace of mind for your household. If problems persist, consult a professional. Keep your water heater in top shape.
Enjoy reliable hot water every day.
Check Best Thermostat Pricing in Amazon
** As an Amazon Associate, I earn from qualifying purchases.