
Check Best Thermostat Pricing in Amazon
** As an Amazon Associate, I earn from qualifying purchases.
Is your electric water heater not heating water properly? It might be time to check your thermostat.
Knowing how to test your electric water heater thermostat can save you time, money, and hassle. In this guide, you’ll learn simple steps to diagnose if the thermostat is working or needs replacement. By the end, you’ll feel confident handling this task on your own, avoiding costly repairs or unnecessary calls to a technician.
Ready to find out if your thermostat is the problem? Let’s dive in.

Credit: www.youtube.com
Signs Of A Faulty Thermostat
Knowing the signs of a faulty thermostat helps you fix your electric water heater fast. The thermostat controls water temperature. If it fails, your water heater won’t work right.
Watch for unusual changes in water temperature. These signs often point to thermostat problems. Catching issues early saves money on repairs and keeps your water heater running smoothly.
Inconsistent Water Temperature
Water temperature changes a lot during use. One moment it is hot, the next it is cold. This inconsistency means the thermostat is not regulating heat properly. It may be turning the heater on and off at the wrong times.
No Hot Water
No hot water comes out of the tap at all. This is a clear sign the thermostat is broken or stuck. The heater does not turn on to warm the water. This problem needs quick attention to restore hot water.
Water Too Hot
Water feels too hot and can cause burns. The thermostat may be stuck in the “on” position. It keeps heating water beyond the set level. This is dangerous and wastes energy.
Tools Needed For Testing
Testing an electric water heater thermostat requires a few basic tools. These tools help check if the thermostat works correctly. Having the right tools makes the process safe and simple.
Each tool plays a specific role in testing the thermostat. Knowing what to use and how helps avoid mistakes.
Multimeter
A multimeter measures electrical values like voltage and resistance. It checks if the thermostat receives power and sends it properly. Set the multimeter to the ohm setting to test continuity. This tool is essential for accurate testing.
Screwdriver
A screwdriver helps remove the access panel on the water heater. It also loosens screws holding the thermostat in place. Choose the right type and size to avoid damaging screws. A simple flathead or Phillips screwdriver usually works.
Safety Gear
Safety gear protects you while testing the thermostat. Wear insulated gloves to avoid electric shocks. Safety glasses shield your eyes from dust or sparks. Always turn off power before starting any work.
Preparing For The Test
Preparing to test an electric water heater thermostat is important for safety and accuracy. Before starting, gather the right tools and understand the steps clearly. This preparation helps avoid mistakes and keeps you safe during the test.
Turn Off Power Supply
First, switch off the power to the water heater. Locate the circuit breaker that controls the heater. Flip the breaker to the off position. Double-check that the power is really off. Use a voltage tester on the wires to confirm no electricity flows. Never work on the thermostat with power on.
Accessing The Thermostat
Remove the access panel covering the thermostat. Use a screwdriver to take off the screws. Set the panel and screws aside carefully. You may find insulation behind the panel. Push it back gently to see the thermostat clearly. Note the thermostat’s location for easy testing.
Ensuring Safety
Wear insulated gloves to protect your hands. Stand on a dry surface to avoid electric shock. Keep tools away from water or damp areas. Avoid touching any wires directly. Follow safety steps strictly to prevent accidents during testing.
Testing The Thermostat With A Multimeter
Testing the thermostat of an electric water heater is a key step in fixing heating problems. A multimeter helps check if the thermostat works correctly. This tool measures electrical continuity and resistance, giving clear results. Understanding how to use a multimeter for this task saves time and money.
Follow these simple steps to test the thermostat with a multimeter. Each step ensures you get accurate readings. This method works for most electric water heaters.
Set Multimeter To Ohms
Turn on the multimeter. Set it to the ohms (Ω) setting. This mode measures resistance in the thermostat. Use a low range, usually 200 ohms, to get precise results. This setting is best for checking continuity. Prepare the multimeter before touching the thermostat terminals.
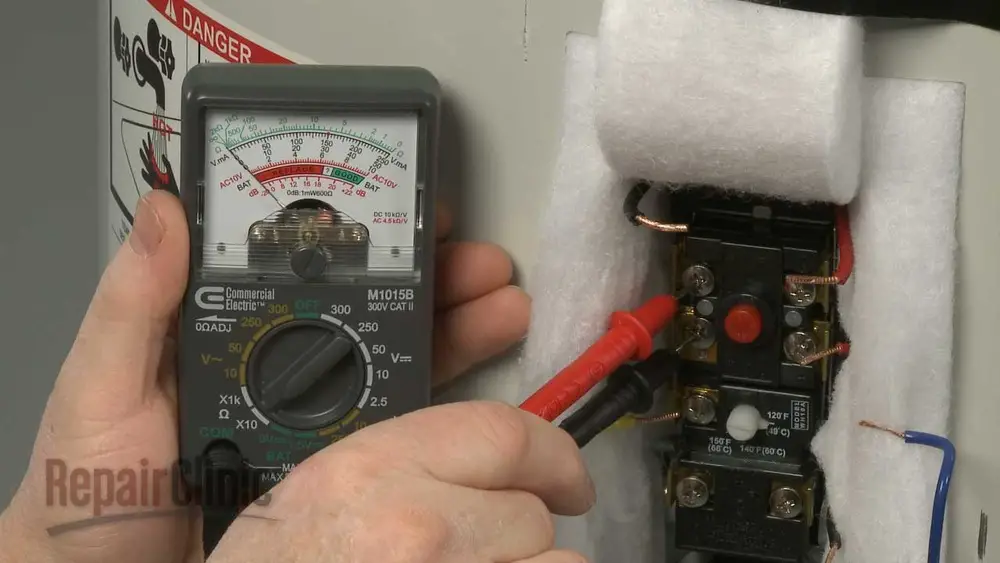
Check Thermostat Continuity
Locate the thermostat terminals on the water heater. Place one multimeter probe on each terminal. Watch the multimeter display. A continuous circuit shows little or no resistance. No reading or infinite resistance means the thermostat is faulty. Test all thermostat terminals for full inspection.
Interpreting Multimeter Readings
A reading close to zero ohms means good continuity. The thermostat allows electrical flow, so it works fine. A very high or infinite reading means no continuity. The thermostat is broken and needs replacement. Use this simple check to decide on repairs or replacement quickly.
Adjusting The Thermostat
Adjusting the thermostat on an electric water heater helps control water temperature. Proper adjustment saves energy and prevents scalding. It also extends the heater’s life by avoiding overheating.
Small changes can make a big difference in comfort and safety. Follow these steps to adjust the thermostat correctly.
Check Best Thermostat Pricing in Amazon
** As an Amazon Associate, I earn from qualifying purchases.
Locate Adjustment Screw
First, turn off the power to the water heater. Safety is important to avoid electric shock. Remove the access panel on the heater. You may need a screwdriver for this.
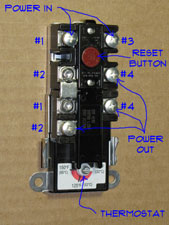
Find the thermostat inside. Look for a small screw or dial. This is the adjustment screw. It controls the water temperature setting.
Set Desired Temperature
Use a flathead screwdriver to turn the adjustment screw. Turn it slowly and carefully. Clockwise usually raises the temperature. Counterclockwise lowers it.
Set the temperature between 120°F and 140°F. This range is safe and energy efficient. Avoid setting it too high to prevent burns.
Recheck Functionality
Replace the access panel and turn the power back on. Wait about an hour for water temperature to stabilize. Check hot water at a faucet.
Use a thermometer for accurate reading. Adjust the screw again if needed. Repeat until the water reaches your desired temperature.

Credit: www.reddit.com
When To Replace The Thermostat
Knowing when to replace your electric water heater thermostat is important. A faulty thermostat can cause poor water heating and increase energy costs. Regular checks help avoid bigger problems and keep your water heater working well.
Here are some clear signs that mean it is time to replace the thermostat.
No Continuity Detected
Testing the thermostat with a multimeter may show no continuity. This means the electrical path is broken inside the thermostat. Without continuity, the thermostat cannot control the heating element. A lack of continuity is a strong sign to replace the part.
Physical Damage Signs
Look for cracks, burns, or corrosion on the thermostat. Physical damage can stop it from working correctly. Damage may also cause safety risks like short circuits. Replace the thermostat if you see any visible damage to ensure safe operation.
Repeated Malfunctions
If the thermostat fails frequently, replacement is best. Constant problems mean it cannot keep the water temperature steady. Replacing the thermostat prevents ongoing issues and saves repair time. It also helps maintain hot water supply without interruptions.
Safety Tips During Testing
Testing an electric water heater thermostat needs care and attention. Safety is the top priority during this process. Follow simple safety tips to protect yourself and your home.
Ignoring safety steps can cause serious injuries or damage. Read and apply these important safety guidelines before starting.
Avoid Electrical Shock
Turn off the power supply at the breaker box before testing. Use a voltage tester to confirm no power is present. Never touch wires or terminals with wet hands. Wear rubber-soled shoes for extra protection. Keep tools insulated to prevent shocks.
Handle Components Carefully
Water heater parts can be fragile and hot. Allow the heater to cool down before touching it. Use tools gently to avoid breaking parts. Do not force any components during testing. Keep screws and small parts safe to prevent loss.
Follow Manufacturer Guidelines
Read the thermostat manual carefully before testing. Each model may have unique instructions and warnings. Use recommended tools and methods only. Follow all steps exactly as described. This reduces risk and ensures accurate results.
Credit: ciclica.eu
Frequently Asked Questions
How Do I Test An Electric Water Heater Thermostat?
To test the thermostat, first turn off power. Use a multimeter to check for continuity. No continuity means a faulty thermostat.
What Tools Are Needed To Test The Thermostat?
You need a screwdriver and a multimeter. The screwdriver removes the access panel. The multimeter measures electrical continuity in the thermostat.
Can A Faulty Thermostat Cause No Hot Water?
Yes, a bad thermostat can stop heating. It controls the heating element’s power supply. Replacing the thermostat often restores hot water.
How Do I Safely Access The Thermostat On My Heater?
Turn off the power at the breaker. Remove the access panel carefully. Use insulated tools to avoid electric shock.
Conclusion
Testing your electric water heater thermostat is simple and important. It helps keep your water at the right temperature. Use a multimeter to check for proper function. Safety matters—always turn off power first. Regular checks can save you from costly repairs.
Knowing how to test saves time and money. Stay safe, follow steps carefully, and enjoy steady hot water daily.
Check Best Thermostat Pricing in Amazon
** As an Amazon Associate, I earn from qualifying purchases.