
Check Best Thermostat Pricing in Amazon
** As an Amazon Associate, I earn from qualifying purchases.
Taking off a Honeywell thermostat is simple. Follow a few steps to remove it.
Honeywell thermostats are popular for home temperature control. Sometimes, you need to remove or replace one. Maybe you’re upgrading or troubleshooting. Knowing how to take off the thermostat safely is crucial. This guide will help you understand the steps. You’ll learn how to disconnect it without damaging the system.
With clear instructions, you can handle the task confidently. Let’s get started and make the process easy for you.
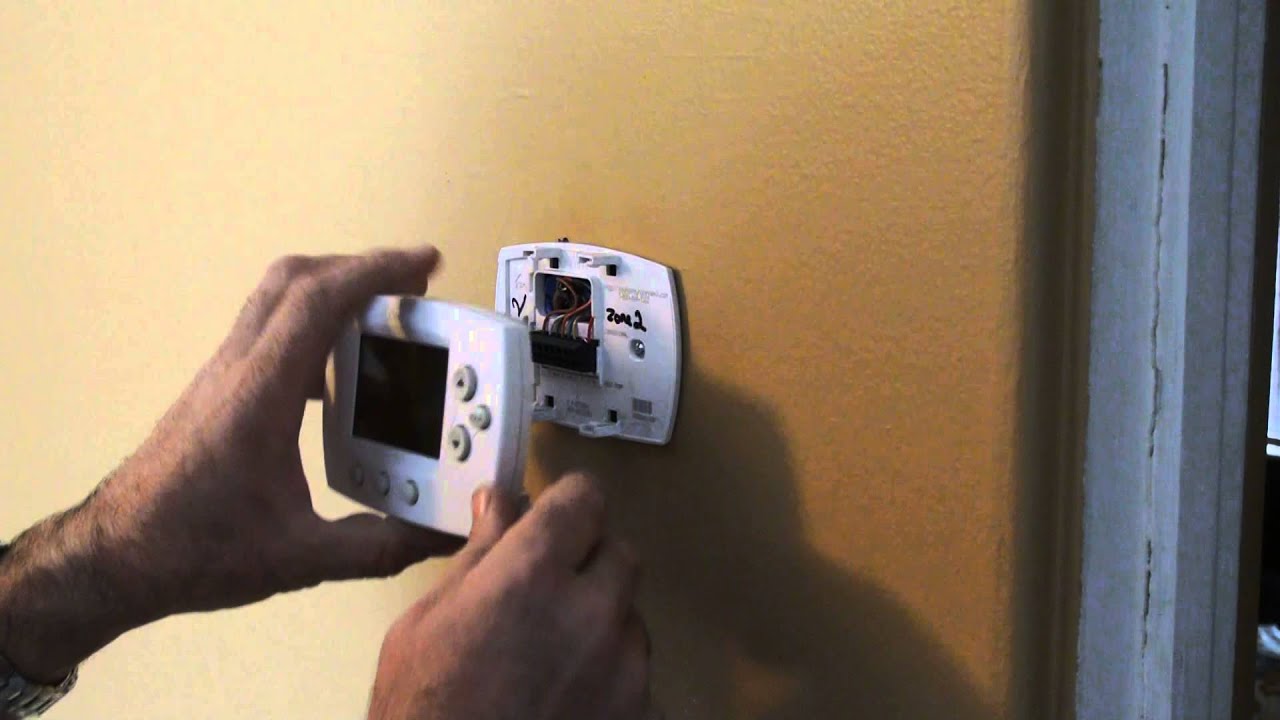
Credit: www.youtube.com
Tools Needed
Gather a small flathead screwdriver, a Phillips screwdriver, and possibly a power drill. Ensure the power is off before starting.
Taking off a Honeywell thermostat can seem like a daunting task, but with the right tools, it becomes manageable. You don’t need to be a professional to do this; having a few basic tools and some safety gear will suffice. Let’s dive into what you need to get started. ###Basic Tools
First and foremost, having a screwdriver is essential. Most Honeywell thermostats are secured with screws, so make sure you have a Phillips-head screwdriver on hand. It’s a common tool that you probably already have in your toolbox. A small level can also be helpful. While it’s not necessary for removing the thermostat, it can assist you in ensuring that the new thermostat is installed straight and aligned correctly. Another useful tool is a small flashlight. This helps you see the screws and wiring clearly, especially if your thermostat is in a dimly lit area. A flashlight can make the job much easier and prevent mistakes. ###Safety Gear
Safety should always come first. Make sure you have a pair of work gloves. These will protect your hands from any sharp edges or unexpected debris behind the thermostat. Safety glasses are also a good idea. They protect your eyes from dust and small particles that might come loose during the removal process. Lastly, consider having a dust mask. Thermostat areas can collect dust over the years, and you don’t want to be inhaling that while you work. By having these basic tools and safety gear, you can confidently and safely remove your Honeywell thermostat. What other tools or gear do you think might be useful for this task?Turn Off Power
Before you start removing your Honeywell thermostat, it’s essential to turn off the power. This step ensures your safety and prevents any electrical mishaps. You don’t want to deal with a shock or short circuit, right? Let’s walk through the steps to make sure the power is completely off.
Locate Circuit Breaker
First, find your home’s circuit breaker panel. It’s usually in a garage, basement, or utility room. If you’re unsure, ask someone in your household or check your home’s blueprint. Once found, open the panel to see the various switches.
Switch Off Power
Look for the switch labeled “HVAC” or “thermostat.” If the labels are unclear, you might need to switch off the main power. Use a flashlight if it’s dark in the panel area.
Once identified, flip the switch to the “off” position. This cuts the power to your thermostat, ensuring you can safely remove it without any risk. Double-check by seeing if your HVAC system stops running.
Have you ever forgotten to turn off the power before a DIY project? It’s a common mistake but one you can easily avoid. Taking these steps now saves you from potential headaches later. Your safety should always come first.
Remove Thermostat Cover
Gently pull on the sides of the Honeywell thermostat cover. Lift it off from the base. Ensure the power is off for safety.
Removing the cover of your Honeywell thermostat might seem like a simple task, but it can be tricky if you haven’t done it before. Whether you need to change the batteries or adjust the settings, knowing how to safely remove the cover is essential. Let’s walk through the process step-by-step to ensure you do it correctly and avoid any damage.Identify Cover Type
First, identify the type of cover on your thermostat. Honeywell thermostats come in different models, and each may have a slightly different cover. Some have a snap-on cover, while others might have screws or tabs holding them in place. Check your thermostat manual if you’re unsure. The manual often has diagrams that show how the cover is attached. If you don’t have the manual, search online using your thermostat’s model number.Gently Pry Off Cover
Once you’ve identified the cover type, it’s time to remove it. If your thermostat has a snap-on cover, gently pry it off. Use a flathead screwdriver or even your fingernails. Insert the tool into the gap between the cover and the base. Apply gentle, even pressure to avoid cracking the cover. If your thermostat has screws, use a small Phillips screwdriver to remove them. Keep the screws in a safe place to avoid losing them. Once the screws are out, the cover should come off easily. Remember: Always handle the cover with care. Rough handling can break the plastic or damage the internal components. Taking these steps will help you remove the cover without any hassle. Have you ever struggled with removing a thermostat cover? Share your experiences in the comments!Disconnect Wires
Disconnecting the wires from your Honeywell thermostat is a crucial step. It ensures safety and prepares the thermostat for removal. Follow these steps carefully to avoid any damage or confusion.
Label Wires
Before you disconnect any wires, label them. This will make reinstallation easier. Use small pieces of masking tape and a pen. Write down the corresponding terminals on the tape. Place the labeled tape on each wire.
This simple step can save a lot of time. You won’t have to guess where each wire goes later. It also prevents potential wiring mistakes.
Use Screwdriver
Next, use a screwdriver to loosen the screws holding the wires. Be gentle to avoid damaging the terminals. Slowly turn the screws counterclockwise. Once they are loose, carefully pull out the wires.
Place the wires to the side. Ensure they do not touch each other. This prevents short circuits or other electrical issues. Now, you are ready to move on to the next step in removing your Honeywell thermostat.
Remove Thermostat Base
Removing the thermostat base of your Honeywell thermostat might seem intimidating, but with a few careful steps, it’s quite simple. Whether you’re upgrading your system or troubleshooting an issue, knowing how to remove the thermostat base can save you time and money. Let’s walk through the process together.
Unscrew Base
First, you need to unscrew the base of your Honeywell thermostat. This is typically secured with a few screws. Use a small screwdriver to carefully remove each screw, making sure not to strip them.
Place the screws in a small container to avoid losing them. This step is crucial for reinstallation later. Have you ever lost a screw and had to search for a replacement? Not fun!
Carefully Detach Base
Once the screws are out, it’s time to carefully detach the base from the wall. Gently pull the base away from the wall. Be cautious of any connected wires; you don’t want to damage them.
Take your time and ensure that you don’t pull too hard. Have you ever accidentally yanked something too forcefully and regretted it? Better to be gentle here. If any wires are still connected, make a note of their positions before disconnecting.
And there you have it! The thermostat base is now removed, and you can proceed with your next steps. Have you ever felt a sense of accomplishment from completing a DIY task? This could be one of those moments. What’s your next project?
Check Best Thermostat Pricing in Amazon
** As an Amazon Associate, I earn from qualifying purchases.
Inspect Wall
Before you dive into removing your Honeywell thermostat, it’s crucial to inspect the wall where the thermostat is mounted. This step ensures that you don’t face any unforeseen issues during or after the removal process. Here are some key points to consider as you inspect the wall.
Check For Damage
Take a close look at the wall around the thermostat. Is there any visible damage like cracks, holes, or peeling paint? Identifying these issues early can save you from bigger headaches later.
I once found a small crack behind my thermostat. Fixing it before installation saved me from future complications. Have you checked if your wall is in good shape?
Clean Wall Surface
Dust and grime can accumulate around your thermostat over time. A clean surface ensures better adhesion if you plan to mount another device there.
Use a damp cloth to wipe down the area. Avoid using harsh chemicals that could damage the wall. Have you considered how a clean surface can make your new installation more secure?
Inspecting the wall may seem trivial, but it can make a big difference. A little effort now can prevent bigger issues later. Are you ready to take the next step in your thermostat removal process?
Prepare For New Thermostat
Removing a Honeywell thermostat requires turning off the power supply first. Gently detach the thermostat from the wall plate. Carefully disconnect the wires, noting their placement for easy reinstallation.
Before you take off your old Honeywell thermostat, prepare for the new one. This process ensures a smooth transition. It also helps avoid any potential issues.Gather New Thermostat
First, gather all the parts of your new thermostat. Check the box for wires, screws, and other components. Confirm that everything is included. Missing parts could delay your installation.Review Installation Instructions
Next, review the installation instructions. Every thermostat model has different steps. Read the manual carefully. Familiarize yourself with the process. This helps avoid mistakes during installation. By preparing ahead, you make the transition smoother. You also save time and avoid frustration. “`
Credit: www.reddit.com
Reconnect Power
Once you’ve successfully removed your Honeywell thermostat and carried out any necessary maintenance, the next crucial step is to reconnect the power. Ensuring the thermostat powers back up correctly is key to restoring your home’s temperature control. In this section, we’ll walk you through the steps to safely and effectively reconnect power to your Honeywell thermostat.
Switch On Circuit Breaker
First things first, head over to your home’s circuit breaker panel. Locate the switch that corresponds to your thermostat. This is typically labeled, but if not, it’s usually the one marked ‘HVAC’ or ‘Furnace’. Flip this switch back to the ‘on’ position.
Double-check to make sure the switch stays in place. If it trips again, there might be an underlying issue with your electrical system. You might need to consult a professional at this point.
Test Power Supply
Now that the circuit breaker is back on, it’s time to test the power supply to your thermostat. Approach your Honeywell thermostat and look for any signs of life—does the screen light up or display any information? If so, you’re on the right track.
If your thermostat remains unresponsive, don’t panic. Ensure the batteries are correctly inserted if your model uses them. Still no luck? Double-check all the wiring connections to make sure nothing came loose during the removal process.
Reconnecting power to your Honeywell thermostat is straightforward, but it requires your careful attention. Have you ever experienced any hiccups while reconnecting power? Share your thoughts and experiences in the comments below!

Credit: www.reddit.com
Frequently Asked Questions
How Do You Take Off A Honeywell Thermostat?
To remove a Honeywell thermostat, turn off the power. Detach the faceplate by pulling it off. Unscrew the mounting screws and disconnect the wires.
How To Take Honeywell Thermostat Off Wall To Change Battery?
To remove a Honeywell thermostat, gently pull the faceplate off the wall. Replace the batteries inside the compartment. Reattach the faceplate securely.
How Do I Remove A Thermostat From My Honeywell Account?
Log into your Honeywell account. Select the thermostat you wish to remove. Click “Settings” then “Delete Thermostat. ” Confirm deletion.
How To Take Off A Thermostat?
Turn off the power. Remove the cover. Disconnect wires, noting their positions. Unscrew the thermostat. Remove from the wall.
Conclusion
Removing a Honeywell thermostat is simple. Follow the steps for a smooth process. Disconnect power to ensure safety. Use tools like a screwdriver for screws. Detach wires carefully to avoid damage. Keep track of each wire’s position. Store removed parts safely.
Reinstalling is just as easy. Use the reverse steps for reattachment. Enjoy a hassle-free experience with your thermostat. With this guide, you can handle the task confidently. Happy home improvement!
Check Best Thermostat Pricing in Amazon
** As an Amazon Associate, I earn from qualifying purchases.