
Check Best Thermostat Pricing in Amazon
** As an Amazon Associate, I earn from qualifying purchases.
Switching out your Hz311 thermostat for an Ecobee Premium thermostat can improve your home’s climate control and energy efficiency. This guide will show you how to do it step-by-step.
Upgrading to a smart thermostat like the Ecobee Premium offers many benefits. It makes managing your home’s temperature easier and more efficient. Smart thermostats can save you money on energy bills and provide convenience with modern features. The process might seem complicated, but with the right instructions, it becomes manageable.
You’ll learn how to safely remove your old Hz311 thermostat and install the new Ecobee Premium. This guide ensures you understand each step, making the switch smooth and stress-free. Let’s dive into the details and get your new thermostat up and running.

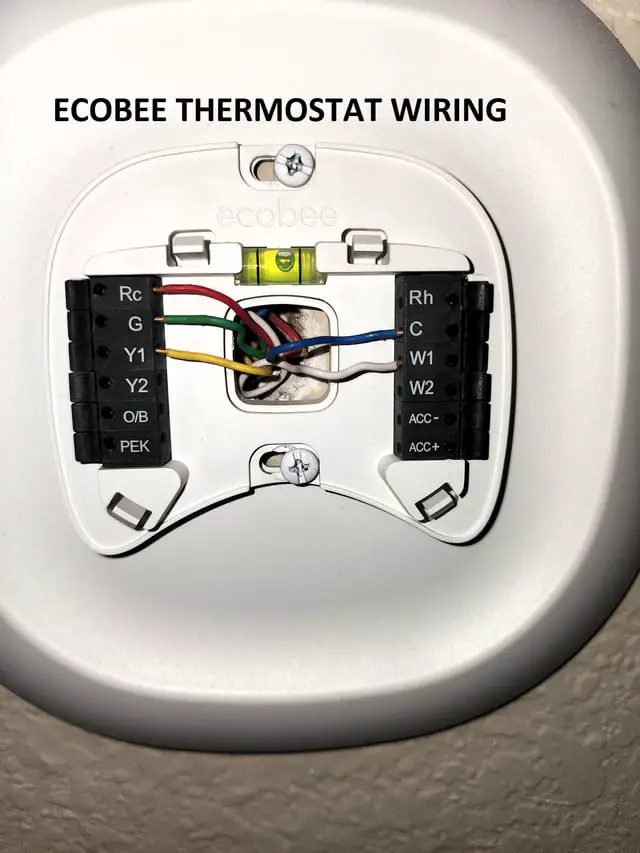
Credit: www.reddit.com
Tools And Materials Needed
Gather a screwdriver, wire labels, drill, and your new Ecobee Premium Thermostat. Ensure you have the installation guide. These tools and materials make the switch easy.
Switching out your old Hz311 thermostat for a new Ecobee Premium Thermostat is a smart move. The upgrade offers improved energy efficiency and a more intuitive user experience. But before you dive into the installation process, it’s essential to have the right tools and materials on hand.Essential Tools
To start, you need a few basic tools. A Phillips head screwdriver will come in handy for removing and attaching the thermostat. You might also need a flathead screwdriver to handle any delicate prying tasks. A small level will ensure your new thermostat is installed straight, which is crucial for accurate readings. Additionally, a drill and a set of drill bits are useful if you need to make new holes for mounting the Ecobee.Required Materials
Ensure you have the Ecobee Premium Thermostat and its installation guide. You will also need mounting screws and anchors, which usually come with the thermostat. Wire labels are crucial for keeping track of the wiring during the switch. If you don’t have any, small pieces of masking tape and a pen can work in a pinch. Having a pencil to mark your drill points will make the process smoother. Lastly, ensure you have a smartphone or tablet to follow the digital setup instructions through the Ecobee app. Switching thermostats can seem intimidating at first. But with the right tools and materials, you’ll find the process straightforward. Have you ever tried switching out a thermostat? What challenges did you face? Share your thoughts in the comments!Pre-installation Steps
Prepare for the switch by turning off the power to your thermostat. Gather necessary tools like a screwdriver. Label the wires to avoid confusion later.
Switching out an Hz311 thermostat for an Ecobee Premium Thermostat is a great way to modernize your home’s heating and cooling system. But before diving into the installation, it’s crucial to take some pre-installation steps to ensure a smooth transition. These steps will help you avoid common pitfalls and set you up for success.Turn Off Power
First and foremost, turn off the power to your HVAC system. This is a critical safety step that you should never skip. Locate your home’s circuit breaker panel and switch off the breaker that supplies power to your HVAC system. Double-check that the power is off by trying to turn on the HVAC system using your current thermostat. If it doesn’t respond, you’re good to go. Skipping this step can lead to electrical shocks or damage to the new thermostat.Label Wires
Next, take a moment to label your wires. This might seem like an unnecessary step, but it can save you a lot of headaches later on. Use small pieces of masking tape or wire labels to mark each wire according to the terminal it connects to on your old thermostat. For example, if a wire is connected to a terminal labeled “G,” label that wire “G.” This will make connecting the wires to the new Ecobee thermostat much easier. Take a picture of the wire setup before you disconnect anything. This provides a visual reference in case you need to double-check your labels. You’ll thank yourself later when you’re connecting everything to the new thermostat. As you prepare to switch out your thermostat, think about how these simple steps can make a big difference. Have you ever skipped a prep step and regretted it? Taking a few extra minutes now can save you hours of frustration down the line.Removing The Hz311 Thermostat
Switching out the Hz311 thermostat for an Ecobee Premium thermostat is straightforward. Disconnect power, remove the old unit, and follow Ecobee’s installation guide. Enjoy improved efficiency and smart features with your new thermostat.
Switching out your Hz311 thermostat for an Ecobee Premium Thermostat can seem daunting. But with a few simple steps, you can easily make the upgrade. Removing the Hz311 thermostat is the first step. Here’s how to do it.Detach Thermostat Faceplate
Start by removing the faceplate of your Hz311 thermostat. This is usually attached by clips or screws. Carefully pry it off with a flathead screwdriver or your fingers. Ensure you do not use excessive force to avoid damaging the wall. Once the faceplate is removed, you will see the wires connected to the back. Note their positions and take a picture for reference. This will make reconnecting them to your new thermostat much easier.Disconnect Wires
Turn off the power to your HVAC system at the breaker. This step is crucial for your safety. Now, use a small screwdriver to loosen the screws holding the wires in place. Label each wire with masking tape to remember their positions. This step will save you a lot of hassle later. Gently pull the wires out and ensure they do not slip back into the wall. Have you ever wondered how simple actions can make a complex task much more manageable? By labeling and taking photos, you ensure a smoother installation process. What are your tips for keeping track of wiring? Making these small efforts now will save you time and frustration later. Next, get ready to install your new Ecobee Premium Thermostat.Installing The Ecobee Premium Thermostat
Installing the Ecobee Premium Thermostat can upgrade your home’s comfort. It is a smart choice to replace your old Hz311 thermostat. This guide helps you with the steps.
Mounting The Ecobee
First, turn off the power to your HVAC system. It is important for safety. Next, remove the old Hz311 thermostat. Carefully detach it from the wall. You will see a set of wires. Label each wire for easy connection later.
Now, take the Ecobee base plate. Use the provided screws to mount it to the wall. Ensure it is level. Tighten the screws securely. The base plate is now ready for wire connections.
Connecting Wires
Carefully connect each labeled wire to the matching terminal on the Ecobee base. Use the wire labels you made earlier. It helps avoid mistakes. Ensure each wire is snug in its terminal.
Once all wires are connected, attach the Ecobee thermostat to the base plate. It should click into place. Turn the power back on to your HVAC system. The Ecobee should light up. Follow the on-screen setup instructions. Your new smart thermostat is now installed and ready to use.
Configuring The Ecobee
Replace your Hz311 thermostat with the Ecobee Premium Thermostat for better control. Follow simple steps to configure it for your home. Enjoy more comfort and energy savings.
Configuring the Ecobee thermostat can seem like a daunting task, but with the right guidance, you’ll have it up and running in no time. After successfully installing the device, the next important step is to configure it properly. This ensures that your thermostat functions optimally to provide the comfort and energy savings you desire. ###Powering Up
The first step in configuring your new Ecobee thermostat is powering it up. When you connect it to your HVAC system, make sure all wires are securely fastened. Double-check the wiring diagram provided in the manual for accuracy. Once everything is connected, attach the Ecobee to its base. You should see a bright, welcoming screen come to life. This is your cue that you’re on the right track. Have you ever felt the thrill of seeing a new gadget power up for the first time? It’s that small victory that sets the tone for the rest of the setup. Now, let’s move on to the initial setup. ###Initial Setup
When the Ecobee powers up, it guides you through a simple setup process. Follow the on-screen prompts to select your language and connect to your Wi-Fi network. This is crucial for future updates and remote control via the Ecobee app. You will also be asked to create an account or log in if you already have one. This account syncs your device with the app, allowing you to control your thermostat from anywhere. Imagine adjusting your home’s temperature while you’re still in bed or even when you’re away on vacation! Next, it will ask you to input details about your home and HVAC system. This helps the thermostat optimize its settings. The more accurate the information, the better the performance. Lastly, take a few minutes to set your preferred temperature ranges. The Ecobee uses these settings to create a schedule that keeps you comfortable and saves energy. Have you thought about how much you could save on energy bills just by optimizing your thermostat settings? With these steps, your Ecobee thermostat is now configured and ready to go. You’ll soon enjoy a more comfortable, energy-efficient home.
Credit: www.reddit.com
Check Best Thermostat Pricing in Amazon
** As an Amazon Associate, I earn from qualifying purchases.
Connecting To Wi-fi And Smart Home Devices
Connecting your Ecobee Premium Thermostat to Wi-Fi and smart home devices is essential. This allows you to fully enjoy its smart features. This guide will help you through the process. Follow these steps to ensure a smooth setup.
Wi-fi Setup
First, turn on your Ecobee Premium Thermostat. Go to the main menu by tapping the screen. Select “Settings” and then “Wi-Fi.” The thermostat will scan for available networks. Choose your home Wi-Fi network from the list. Enter your Wi-Fi password carefully. Wait for the thermostat to connect. Once connected, the Wi-Fi icon will appear on the screen. This means your thermostat is now online.
Integrating With Smart Devices
Next, you can integrate your Ecobee with other smart home devices. Open the Ecobee app on your smartphone. Go to the “Integrations” section. You will see options like Amazon Alexa, Google Assistant, and Apple HomeKit. Choose the smart home platform you use. Follow the on-screen instructions to link your accounts. This will allow you to control your thermostat with voice commands. You can also create routines and automations.
Make sure all your smart home devices are on the same Wi-Fi network. This ensures smooth communication between them. Test the setup by giving a voice command or using the app. Your Ecobee should respond as expected. If you face any issues, refer to the Ecobee support page for troubleshooting tips.
Troubleshooting Common Issues
Switching out an Hz311 thermostat for an Ecobee Premium Thermostat can solve many common issues. Follow the step-by-step guide for a smooth installation. Ensure your system is compatible for the best results.
Switching from an Hz311 thermostat to an Ecobee Premium Thermostat can significantly enhance your home’s climate control. However, like any upgrade, you might run into some issues. Understanding how to troubleshoot common problems will ensure a smooth transition. Let’s dive into some common issues you might face and how to address them.Connection Problems
You might experience connection problems during the installation process. This is often due to incorrect wiring or incompatible systems. First, double-check your wiring. Ensure each wire is securely connected to the correct terminal. If your Ecobee Premium Thermostat isn’t powering on, it could be a C-wire issue. The C-wire provides the necessary power for Wi-Fi and other advanced features. No C-wire? No problem! You can use the Ecobee Power Extender Kit (PEK) that comes with the thermostat. It’s simple to install and solves most power issues. Still facing issues? Check your Wi-Fi connection. Ensure your router is functioning properly and that your thermostat is within range.Incorrect Readings
Incorrect temperature readings can be frustrating. They can lead to your home being too hot or too cold. First, make sure your thermostat is placed correctly. Avoid installing it near heat sources or drafty areas. Next, calibrate your thermostat. This can be done through the settings menu on the Ecobee app. Follow the on-screen instructions to adjust the temperature reading. If your thermostat is still reading incorrectly, check for firmware updates. Sometimes, a simple update can fix bugs and improve accuracy. Lastly, ensure there are no obstructions around your thermostat. Objects blocking the sensors can cause inaccurate readings. By addressing these common issues, you can enjoy the full benefits of your Ecobee Premium Thermostat. Have you faced any other challenges during the switch? Share your experiences and tips below!
Credit: www.reddit.com
Frequently Asked Questions
How To Reset Ecobee Premium Thermostat?
To reset your ecobee premium thermostat, go to the main menu. Select “Settings”, then “Reset”. Choose “Reset All Settings”. Confirm the reset.
Are Ecobee Thermostats Interchangeable?
Yes, ecobee thermostats are interchangeable. They can be swapped out easily without needing additional wiring or setup changes.
Is The Ecobee Thermostat Being Discontinued?
No, the ecobee thermostat is not being discontinued. It continues to be available for purchase and support.
How Do I Unlink My Ecobee Thermostat?
To unlink your ecobee thermostat, open the ecobee app. Go to settings, select “Thermostat” and choose “Remove Device. ” Confirm the action.
Conclusion
Switching to an Ecobee Premium thermostat is a smart choice. You gain improved energy efficiency and modern features. Installation is straightforward with our guide. Follow the steps carefully for smooth setup. Enjoy better control of your home’s temperature. Save on energy bills and enhance comfort.
Make the switch today and experience the benefits. Happy upgrading!
Check Best Thermostat Pricing in Amazon
** As an Amazon Associate, I earn from qualifying purchases.