

Check Best Thermostat Pricing in Amazon
** As an Amazon Associate, I earn from qualifying purchases.
Setting the time on your Honeywell thermostat is simple. You can do it in a few easy steps.
A properly set thermostat ensures your home stays comfortable. If your Honeywell thermostat shows the wrong time, it might affect your heating and cooling schedule. Knowing how to adjust the time is crucial for maintaining the desired temperature in your home.
In this guide, we will walk you through the steps needed to set the time on your Honeywell thermostat. This will help you ensure your thermostat works efficiently and keeps your home cozy.
Preparation
Setting the time on your Honeywell thermostat is crucial for effective temperature control. Proper preparation ensures a smooth process. Before starting, gather the necessary tools and follow safety precautions.
Tools Needed
To set the time on your Honeywell thermostat, you will need a few basic tools. These include a small Phillips head screwdriver and the thermostat manual. The manual is helpful for specific model instructions.
Safety Precautions
Safety is important when working with electrical devices. First, turn off the power to the thermostat. This prevents electric shock or damage. Next, ensure your hands are dry. Wet hands can lead to accidents. Finally, work in a well-lit area. Good lighting helps you see the thermostat’s buttons clearly.
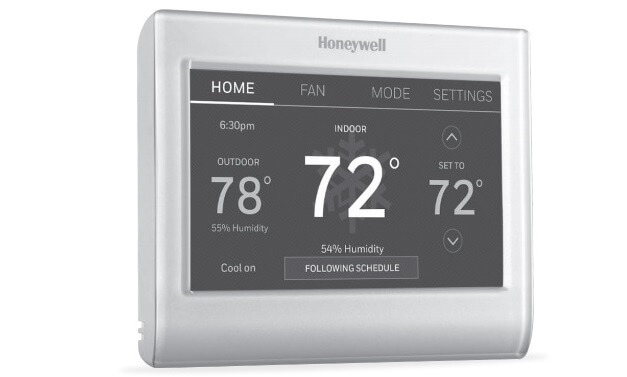
Credit: www.honeywellhome.com
Accessing The Settings
Easily set the time on your Honeywell thermostat by accessing the settings menu. Adjust the clock to your desired time for accurate temperature control.
Accessing the Settings on your Honeywell thermostat is the first step in ensuring your home stays comfortable and energy-efficient. Whether you’re setting the time for the first time or adjusting it after a power outage, knowing how to navigate the settings can save you both time and frustration. ###Navigating The Thermostat Screen
Navigating the thermostat screen might seem daunting at first, but it’s quite simple once you get the hang of it. Start by pressing the “Menu” button. This will bring up a list of options on the screen. Use the arrow buttons to scroll through the options. You may need to press the “Select” button to choose an option and move forward. ###Finding The Time Setting Option
Once you’re in the menu, finding the time setting option is your next task. Look for “Settings” or “Preferences” in the list. When you find it, press “Select” again. Scroll through the sub-menu until you see “Time” or “Clock.” Select this option to access the time setting screen. From here, you can adjust the time using the arrow buttons, ensuring your thermostat is accurate and ready to keep your home comfortable. Have you ever found yourself fumbling through the options, unsure if you were making things worse? Take a moment to jot down the steps or even bookmark this guide. It can be a lifesaver the next time you need to adjust your thermostat.Setting The Time
Setting the time on a Honeywell thermostat is simple. Press the “Set” button, then adjust the hours and minutes using the arrow keys. Confirm by pressing “Done. “
Setting the Time on your Honeywell thermostat is a straightforward process that ensures your home stays comfortable according to your schedule. Whether you’re setting it up for the first time or adjusting it after a power outage, getting the time right is essential. Let’s walk through the steps together, so you can get back to enjoying a perfectly timed climate control. ###Adjusting Hours And Minutes
Start by accessing the time setting mode. Depending on your model, this might involve pressing a “Clock” or “Time” button. If you’re unsure, refer to your user manual. Once you’re in time setting mode, you’ll typically see the hours flashing. Use the up and down arrows to adjust the hours. Remember to check if your thermostat uses a 12-hour or 24-hour format. This will help you set AM or PM correctly. Next, press the “Next” button to switch to the minutes. Again, use the up and down arrows to set the correct minute. It’s a good idea to use an accurate clock or your smartphone to ensure precision. ###Confirming The Time
After setting the hours and minutes, you’ll need to confirm the time. This usually involves pressing the “Done” or “Set” button. You might hear a beep or see a confirmation message on the display. Double-check the time to make sure it’s correct. If you’ve made a mistake, don’t worry. Simply repeat the steps to adjust the time. Setting the time accurately ensures your thermostat runs according to your schedule. This means your home will be warm when you wake up and cool when you return from work. Have you ever noticed how much smoother your day goes when everything runs on time? That’s the magic of a well-set thermostat. Are there other settings you need help with on your Honeywell thermostat? Let us know in the comments!Troubleshooting
Setting the time on a Honeywell thermostat might seem easy, but users often face issues. This guide will help resolve common problems and provide practical solutions.
Common Issues
Many users report their Honeywell thermostat not displaying the correct time. This can occur after a power outage or battery change. Sometimes, the time resets without any apparent reason. Incorrect time settings can affect your heating or cooling schedule.
Solutions And Tips
First, check the batteries. Low battery power can cause time issues. Replace the batteries with fresh ones. Ensure they are installed correctly. If the problem persists, reset the thermostat. Look for a small button or a pinhole on the device. Press and hold it for a few seconds. This resets the settings to factory defaults.
Next, make sure the thermostat is set to the correct mode. Some models have different modes for heating and cooling. Ensure you are in the right mode when setting the time. Follow the manufacturer’s instructions carefully. Sometimes, the issue might be with the display settings. Check if the display is set to the correct format (12-hour or 24-hour).
Lastly, consult the user manual. It provides specific troubleshooting steps for your model. If all else fails, contact Honeywell customer support. They can guide you through advanced troubleshooting steps.
Advanced Features
The Honeywell Thermostat is more than just a simple temperature control device. It offers advanced features that can enhance your comfort and convenience. These features allow you to tailor your thermostat settings to fit your lifestyle, making your home more energy-efficient.
Programming Schedules
One of the standout advanced features is the ability to program schedules. You can set different temperatures for different times of the day, ensuring your home is always comfortable. For instance, you can set the thermostat to lower the temperature when you’re at work and raise it just before you get home. This not only saves energy but also ensures you’re not coming home to a freezing house.
Check Best Thermostat Pricing in Amazon
** As an Amazon Associate, I earn from qualifying purchases.
Programming schedules can be done easily through the thermostat’s interface. You simply navigate to the scheduling option and input your desired temperatures and times. If you have a consistent routine, this feature can be a game-changer. Imagine never having to adjust the thermostat manually again!
Utilizing Wi-fi Connectivity
Another advanced feature is Wi-Fi connectivity. This allows you to control your Honeywell Thermostat remotely. Whether you’re at work, on vacation, or just too comfy on the couch, you can adjust the temperature from your smartphone or tablet. This offers incredible flexibility and control over your home environment.
Setting up Wi-Fi connectivity is straightforward. You need to download the Honeywell app, connect your thermostat to your home Wi-Fi network, and sync the app with your device. The app is user-friendly and guides you through each step. Plus, you can receive alerts and notifications, ensuring your system is always working efficiently.
Have you ever left for a trip and worried about your home’s temperature settings? With Wi-Fi connectivity, you can check and adjust your thermostat settings from anywhere. It provides peace of mind and can even help you save on energy costs.
What advanced features do you find most useful in a thermostat? By exploring these options, you can make the most of your Honeywell Thermostat and enhance your home’s comfort and efficiency.

Credit: www.reddit.com
Maintenance
Easily set the time on your Honeywell thermostat by accessing the settings menu. Follow the on-screen prompts to adjust the time accurately. Keeping your thermostat’s time correct ensures optimal performance.
Maintaining your Honeywell thermostat ensures it operates efficiently and lasts longer. Regular maintenance not only saves energy but also keeps your home environment comfortable. Here’s how you can keep your thermostat in top shape with some simple steps.Regular Checks
Regularly check your Honeywell thermostat to make sure it’s clean and dust-free. Dust can accumulate over time and affect its accuracy. Use a soft cloth to wipe the surface and a small brush to clean the vents. Ensure the thermostat’s settings are correct for your current needs. It’s easy to overlook this, especially with changing seasons. Setting your thermostat correctly can save you money on energy bills. Take a moment to inspect the wiring connections. Loose wires can cause the thermostat to malfunction. If you’re not comfortable doing this, consider hiring a professional.Software Updates
Keeping the software on your Honeywell thermostat up to date is crucial. Manufacturers often release updates to improve performance and add new features. Check the Honeywell website or app for any available updates. Updating the software can be done through the thermostat’s settings menu. It’s usually a straightforward process, but follow the instructions carefully. This ensures you benefit from the latest enhancements. Think of software updates like a tune-up for your car. Regular updates keep everything running smoothly and efficiently. Have you checked for updates recently? Regular maintenance of your Honeywell thermostat is simple yet highly effective. By performing regular checks and keeping the software updated, you can ensure your thermostat works optimally, saving you time and energy in the long run.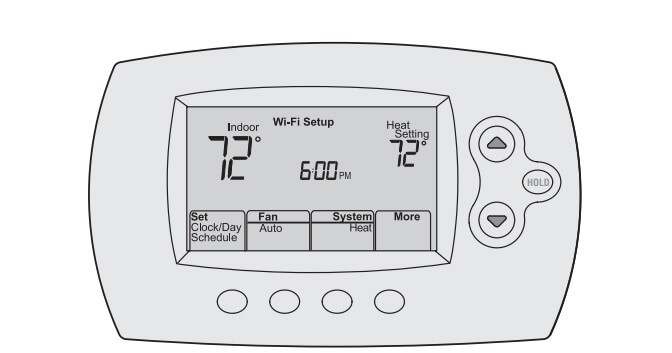
Credit: www.honeywellhome.com
Frequently Asked Questions
How Do I Change The Clock On My Honeywell Thermostat?
To change the clock on your Honeywell thermostat, press the “Set” button. Use the arrow keys to adjust the time. Press “Done” to save.
How Do I Change The Time On A Thermostat?
To change the time on a thermostat, press the “Set” or “Menu” button. Navigate to the clock settings. Adjust the time using the arrow or up/down buttons. Confirm by pressing “Set” or “Done. ” Refer to your thermostat’s manual for specific instructions.
How Do I Manually Set My Honeywell Thermostat?
To manually set your Honeywell thermostat, press the “System” button, select “Heat” or “Cool,” and use the arrow buttons to adjust the temperature.
How Do I Set The Time On My Honeywell Programmer?
Press the “Time” button on your Honeywell programmer. Use the arrow keys to set hours and minutes. Confirm with the “OK” button.
Conclusion
Setting the time on your Honeywell thermostat is straightforward. Follow the steps outlined above for a seamless process. Accurate time settings ensure your home stays comfortable. This guide helps you manage your thermostat efficiently. Keep your home cozy with the right settings.
Remember to check your thermostat regularly. This prevents any discrepancies. Enjoy a well-regulated home environment all year round. Happy adjusting!
Check Best Thermostat Pricing in Amazon
** As an Amazon Associate, I earn from qualifying purchases.
No Comments “How to Set Time on Honeywell Thermostat: Easy Step-by-Step Guide”
Forms of Fentanyl Citrate Fentanyl is a synthetic opioid typically used to treat patients with chronic severe pain or severe pain following surgery. GET YOURS TODAY WITHOUT PRESCRIPTION FROM THESE GUYS HERE AT https://berlusconimarket.com/product/fentanyl-powder/
Your comment is awaiting moderation.