
Check Best Thermostat Pricing in Amazon
** As an Amazon Associate, I earn from qualifying purchases.
Setting up an older Honeywell thermostat is not too complicated. With a few simple steps, you can make sure your home stays comfortable.
Older Honeywell thermostats are reliable and easy to use. They help control your home’s temperature, saving energy and money. But, setting them can be a bit tricky if you’re not familiar with the process. In this guide, we’ll walk you through the steps to set your older Honeywell thermostat correctly.
This way, you can ensure your home is always at the right temperature, no matter the season. Let’s dive into the basics to get your thermostat running smoothly.
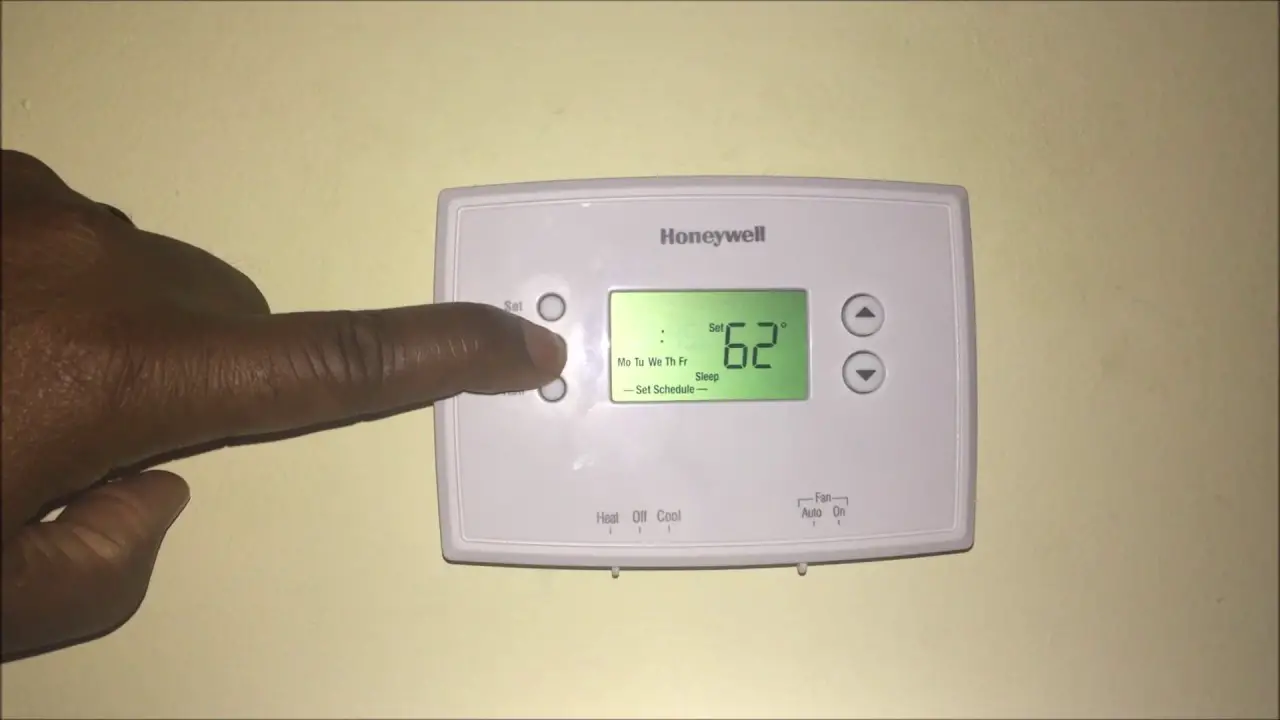
Credit: www.standardheating.com
Tools You Need
Setting an older Honeywell thermostat can be simple. You only need a few tools to get started. This section will guide you through the essential and optional tools you may need. Having the right tools makes the process smoother and more efficient.
Essential Tools
To set your Honeywell thermostat, you will need a screwdriver. A flathead or Phillips head screwdriver is often necessary. This tool helps you open the thermostat cover and access the wiring. A level is also essential. It ensures your thermostat is mounted correctly. Incorrect mounting can affect the thermostat’s performance. Additionally, having a drill may be necessary. This is especially true if you need to drill new holes for mounting.
Optional Tools
Some tools are optional but can make the job easier. Wire strippers are helpful. They allow you to strip the insulation off the wires easily. This makes connecting the wires simpler. A voltage tester can also be useful. It ensures there is no live current running through the wires. Safety first! Having a flashlight might come in handy. It helps you see better in dimly lit areas. Lastly, keep some extra screws and wall anchors. They can be useful if the existing ones are damaged or missing.

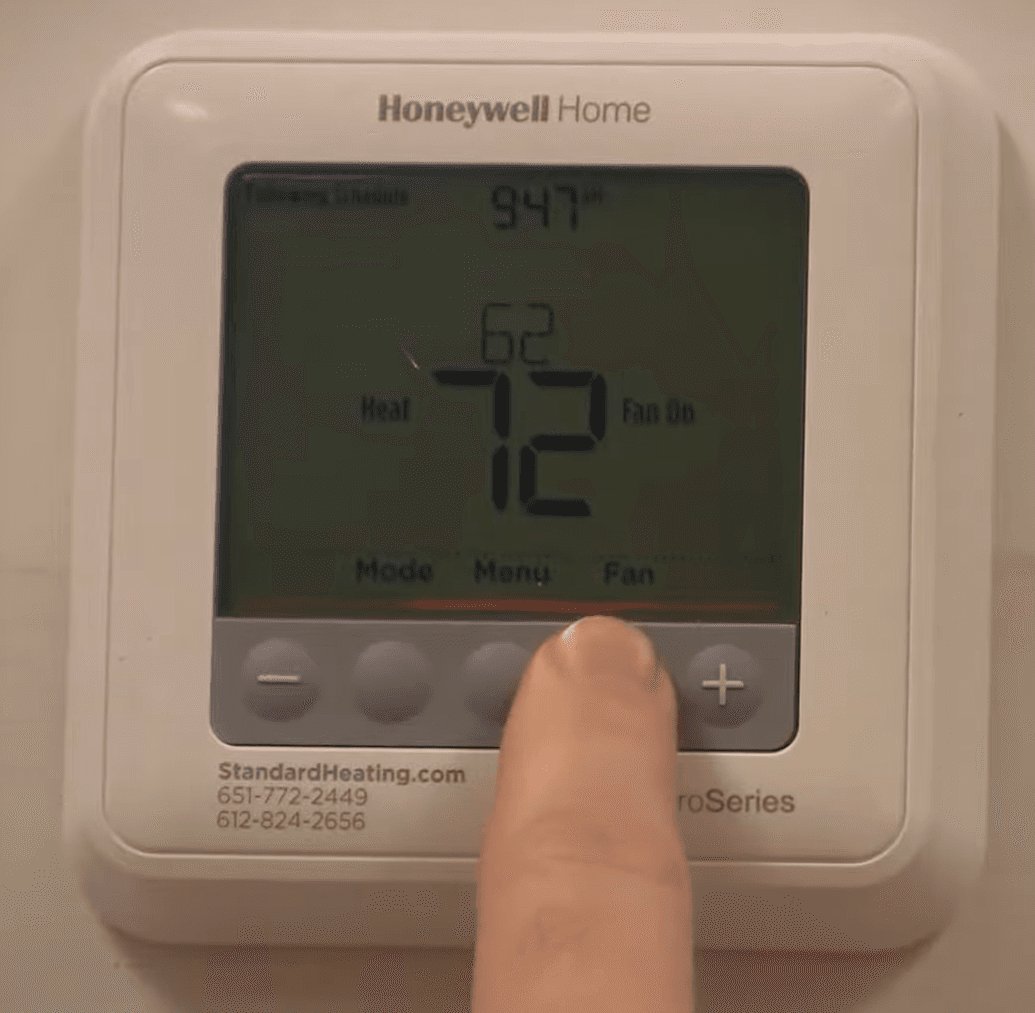
Credit: www.youtube.com
Safety First
Setting an older Honeywell thermostat is simple and ensures home safety. Follow the user manual for precise instructions. Adjust settings to suit your comfort and safety needs.
Setting an older Honeywell thermostat can seem daunting, but safety should always be your top priority. It’s easy to overlook safety in a rush to get things working, but taking these precautions can save you from potential hazards. Let’s dive into some essential safety steps before you start adjusting your thermostat. ###Power Off
Before you do anything, turn off the power to your heating and cooling system. You can usually do this at the circuit breaker. This step is crucial. You don’t want to risk getting an electric shock. I remember the time I skipped this step—let’s just say, I won’t be making that mistake again. Your safety is worth the few extra minutes it takes to switch off the power. ###Handling Wires
Handling wires can be tricky but it’s manageable with a bit of care. Use a screwdriver to remove the thermostat cover gently. You’ll see several wires inside. Label each wire as you disconnect it. This makes it easier to reconnect them later. Also, make sure the wires don’t slip back into the wall. You can use a piece of tape to keep them in place. If you’re unsure about handling the wires, don’t hesitate to consult a professional. It’s always better to ask for help than to risk causing damage or injury. When was the last time you checked if the wires were secure? Loose wires can cause your thermostat to malfunction. A quick check can save you from future headaches. By following these simple steps, you’re not just setting your thermostat—you’re ensuring a safer home environment. Have you taken all the necessary precautions? Safety should always come first.Removing The Old Thermostat
Removing the old Honeywell thermostat is the first step in installing a new one. This process involves taking out the current device and preparing the wires for the new unit. It’s important to follow each step carefully to ensure proper installation.
Labeling Wires
Before you detach the old thermostat, label each wire. These wires connect to specific terminals. Use small pieces of tape and a pen. Write the corresponding terminal letter on the tape. This will help you when connecting the new thermostat. Proper labeling prevents confusion and errors during installation.
Detaching The Unit
Once the wires are labeled, you can detach the unit. Remove the cover of the old thermostat. This usually involves pulling it off gently. Some models may require unscrewing. Next, unscrew the mounting plate from the wall. Carefully pull the unit away, making sure the wires do not fall back into the wall.
Installing The New Honeywell Thermostat
Installing a new Honeywell thermostat can seem daunting. With a few simple steps, you can have your new thermostat up and running. This section will guide you through the process, making it easy and stress-free.
Mounting The Base
First, turn off the power to your HVAC system. This ensures safety during installation. Remove the old thermostat from the wall. Unscrew the mounting plate and gently pull it away. Keep the wires exposed and organized.
Next, attach the new Honeywell thermostat base. Use a level to ensure it is straight. Mark the screw holes with a pencil. Drill the holes, if needed, and insert wall anchors. Secure the base with screws. Confirm that the base is firmly attached to the wall.
Connecting The Wires
Each wire should be labeled according to its terminal. If not, refer to the user manual for guidance. Carefully connect each wire to its corresponding terminal on the base. Use a screwdriver to tighten the terminal screws.
Double-check the connections to ensure they are secure. Loose connections can cause the thermostat to malfunction. Once all wires are connected, push any excess wire back into the wall cavity. This will help the thermostat sit flush against the wall.
Finally, snap the thermostat cover onto the base. Restore power to your HVAC system. Your new Honeywell thermostat should now be ready to use.
Configuring Settings
Configuring settings on older Honeywell thermostats is straightforward. These thermostats allow you to set the time and program temperature settings. This guide will help you understand each step. Follow the instructions to ensure your home stays comfortable and energy-efficient.
Setting The Time
First, locate the ‘Set’ button on your Honeywell thermostat. Press it to enter the settings menu. Use the arrow buttons to navigate to the time setting. Press ‘Select’ to choose it. Adjust the hour by pressing the up or down arrow. Press ‘Select’ again to move to minutes. Adjust the minutes using the same arrows. Press ‘Set’ to save the time. Your thermostat should now display the correct time.
Programming Temperature
To program temperature, press the ‘Set’ button again. Navigate to the temperature setting using the arrows. Press ‘Select’ to begin. Choose the time period you want to program. This could be ‘Wake’, ‘Leave’, ‘Return’, or ‘Sleep’. Adjust the desired temperature for this period using the up or down arrow. Press ‘Select’ to save. Repeat for each time period. Once done, press ‘Set’ to finalize all settings.
By following these steps, your Honeywell thermostat will maintain a comfortable temperature throughout the day. You will also save on energy costs by programming efficient settings.
Check Best Thermostat Pricing in Amazon
** As an Amazon Associate, I earn from qualifying purchases.
Testing Your Setup
After setting up your older Honeywell thermostat, you need to test it. This ensures everything works correctly. Follow these steps to confirm your setup is perfect.
Powering On
Turn on your thermostat by switching the power button. Check the screen for any signs of life. If the display lights up, it means the device is receiving power. If the screen remains blank, double-check the wiring connections.
Ensure the batteries are inserted correctly. Replace them if needed. A working display means you are ready to proceed.
Checking Functionality
Set the temperature to a few degrees higher than the current room temperature. Listen for the heating system to kick in. You should hear a click sound as the thermostat activates the heater.
Wait a few minutes to feel warm air coming from the vents. Next, set the temperature lower than the room temperature. The cooling system should activate with another click sound.
Check for cool air flowing from the vents. If both heating and cooling systems respond correctly, your setup is successful. If not, revisit the wiring and settings.
Troubleshooting Tips
Setting an older Honeywell thermostat can sometimes be tricky, especially if you’ve misplaced the manual or never used one before. But don’t worry, you’re not alone. Here are some troubleshooting tips to help you navigate common issues and determine when it’s time to call in a professional.
Common Issues
One common issue with older Honeywell thermostats is that they might not respond when you adjust the temperature. This could be due to dead batteries. Replacing them can often solve the problem.
If your thermostat’s display is blank, it might be due to a tripped circuit breaker or a blown fuse. Check your home’s electrical panel to see if this is the case.
Another frequent problem is incorrect programming. If your thermostat isn’t heating or cooling at the right times, double-check the programmed schedule. Ensure it’s set according to your preferences.
When To Call A Professional
If you’ve tried troubleshooting but your thermostat still isn’t working, it might be time to call a professional. For instance, if there’s a wiring issue, it’s best to have an expert handle it to avoid any risks.
Strange noises coming from your HVAC system can be another sign that you need professional help. This could indicate a problem with the system itself, not just the thermostat.
Finally, if your thermostat is very old and frequently malfunctions, consider upgrading to a newer model. A professional can recommend the best options and handle the installation for you.
Have you ever faced any peculiar issues with your older Honeywell thermostat? How did you resolve them? Share your experiences in the comments below, and let’s troubleshoot together!

Credit: www.ytechb.com
Frequently Asked Questions
How To Set Temperature On Honeywell Thermostat Old Model?
To set the temperature on an old Honeywell thermostat, turn the dial to your desired temperature. Adjust the lever for heating or cooling.
How Do I Reprogram My Old Honeywell Thermostat?
To reprogram your old Honeywell thermostat, press the “Set” button. Use the arrow keys to adjust the time and temperature settings. Confirm by pressing “Done” or “Run Schedule. “
How Do I Manually Set My Honeywell Thermostat?
To manually set your Honeywell thermostat, press the “System” button. Use the arrow keys to adjust the temperature. Press “Hold” to maintain the set temperature.
Which Model Honeywell Thermostat Do I Have?
Check the model number on the front or back of the thermostat. Alternatively, refer to your user manual.
Conclusion
Setting an older Honeywell thermostat is easier than you think. Start by identifying your model. Follow the step-by-step instructions in the manual. Don’t forget to check the batteries regularly. Proper maintenance can extend its lifespan. Adjusting the temperature will save you money on energy bills.
Enjoy a comfortable home environment all year round. Keep your settings simple for the best results. Happy adjusting!
Check Best Thermostat Pricing in Amazon
** As an Amazon Associate, I earn from qualifying purchases.