
Check Best Thermostat Pricing in Amazon
** As an Amazon Associate, I earn from qualifying purchases.
Setting an old Honeywell thermostat is straightforward. This guide will help you adjust it with ease.
Old Honeywell thermostats are reliable and user-friendly. Whether you need to set the temperature or change the settings, understanding the process can make your home more comfortable. These thermostats may lack the fancy features of modern models, but they are effective and simple to use.
Knowing how to set them correctly ensures your heating and cooling system runs efficiently, saving you money on energy bills. We’ll walk you through the steps to set your old Honeywell thermostat and keep your home cozy. Let’s dive in and make your thermostat work for you!
Gathering Tools
Learn how to set an old Honeywell thermostat easily. Follow simple steps to adjust temperature and settings for comfort. Understand the functions and enjoy a cozy home.
When you’re ready to set up your old Honeywell thermostat, gathering the right tools is your first step. Having everything you need at your fingertips can save you time and frustration. Plus, it ensures you can focus on the task without unnecessary interruptions.Necessary Tools
First, you need to collect some basic tools. A small flat-head screwdriver is essential. This tool will help you open the thermostat cover and access the inner components. A Phillips screwdriver is also a must-have. It’s used to remove and secure screws that hold the thermostat in place. Don’t forget a pair of needle-nose pliers. They are handy for gripping and maneuvering wires, which can be tricky with just your fingers. Lastly, keep a voltage tester nearby. Safety first! This tool ensures that the power is off before you start working.Safety Precautions
Safety should always be your top priority. Before you start, turn off the power to your thermostat at the circuit breaker. This step prevents any risk of electric shock. Use your voltage tester to double-check that the power is off. It’s a simple step, but it can save you from a nasty surprise. Wear protective gloves if you have them. This adds an extra layer of safety, especially when handling wires. Lastly, make sure your work area is well-lit. Good lighting helps you see small details and reduces the risk of errors. Have you ever tried setting up a thermostat without the right tools? It’s like trying to cook without pots and pans. Don’t let that happen to you. Gather your tools and follow these safety tips to ensure a smooth and efficient setup.
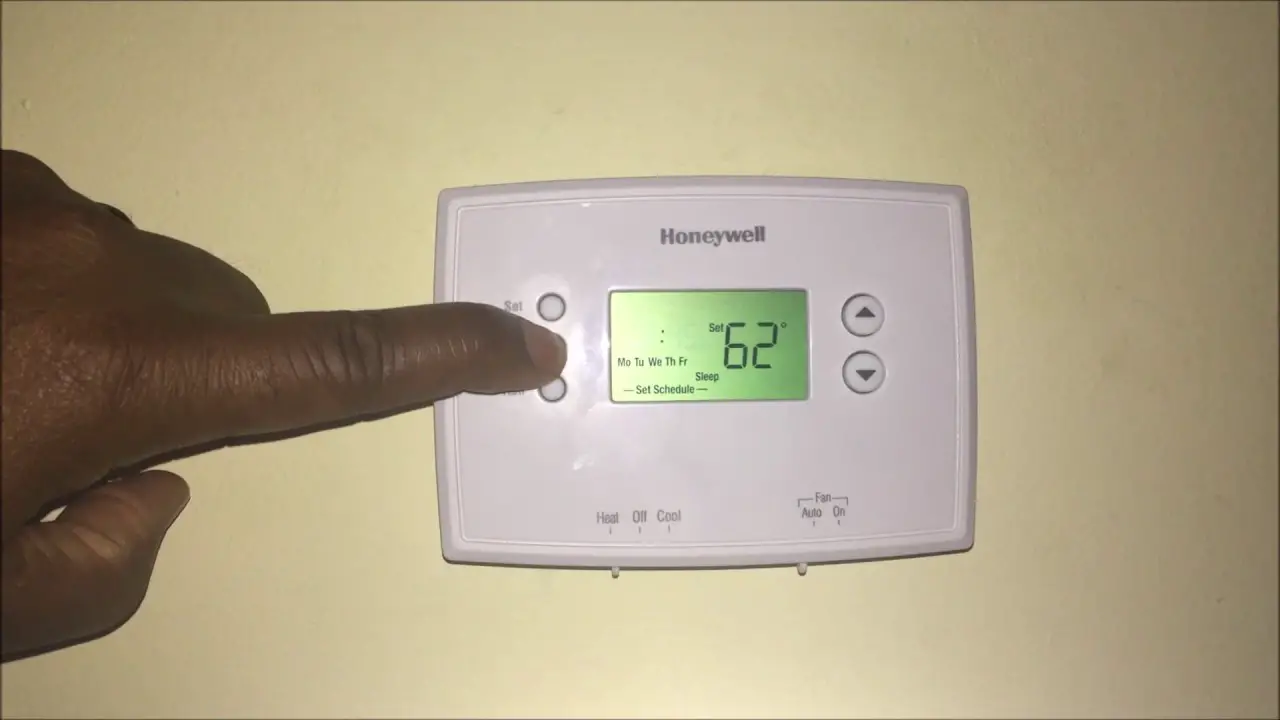
Credit: forums.wyze.com
Understanding Thermostat Models
Understanding thermostat models is essential for setting an old Honeywell thermostat correctly. Each model has unique features and functionalities. Knowing these differences will help you operate your thermostat better. This section will cover popular Honeywell models and their key differences.
Popular Honeywell Models
Honeywell has released several thermostat models over the years. Some of the popular ones include:
- Honeywell T87 Round Thermostat
- Honeywell RTH2300/RTH221 Thermostat
- Honeywell CT50K1002/E1 Thermostat
The T87 Round Thermostat is a classic design. It’s easy to use with a simple dial. The RTH2300/RTH221 models offer programmable settings. You can set different temperatures for different times of the day. The CT50K1002/E1 is a basic but reliable model. It provides manual control with straightforward functionality.
Key Differences
The main difference between these models lies in their control features. The T87 is purely manual. You turn the dial to adjust the temperature. The RTH2300/RTH221 models offer digital programming. This feature helps you save energy by setting specific temperatures for different times. The CT50K1002/E1 is a non-programmable model. It offers basic control with a simple interface.
Another difference is the display type. The T87 has no digital display. It’s entirely mechanical. The RTH2300/RTH221 models have digital displays. They show the current temperature and other settings. The CT50K1002/E1 has a basic display that shows the temperature setting. Understanding these differences helps you operate your Honeywell thermostat more effectively.
Powering Off The System
Powering off your old Honeywell thermostat is a crucial step. It ensures safety and prevents damage during maintenance. Follow these simple steps to power off your system correctly.
Locating The Power Source
First, find the main power source for your thermostat. Typically, it’s connected to your home’s electrical panel. Look for a switch labeled “Thermostat” or “HVAC”. If you can’t find it, check your thermostat’s user manual.
Steps To Turn Off
Once you locate the power source, switch it off. Flip the breaker switch to the “Off” position. This cuts power to the thermostat. Next, go to your thermostat unit. Ensure the display screen is blank. This confirms the power is off.
Now, you can safely proceed with any maintenance or adjustments. Always double-check the power is off before starting. Safety first!

Credit: www.youtube.com
Removing The Old Thermostat
Removing the old thermostat is a simple task. Turn off the power, then unscrew and detach the wires.
Removing the Old Thermostat So, you’ve decided to upgrade your old Honeywell thermostat. Great choice! Removing the old thermostat might seem like a daunting task, but it’s quite simple. Let’s break it down into manageable steps.Detaching The Cover
First things first, you’ll need to detach the cover of your old thermostat. Most Honeywell thermostat covers can be removed by gently pulling them off. If you’re worried about damaging it, take a deep breath. Just use a little bit of force, and it should pop right off. Make sure the power to your HVAC system is off before you begin. This is important for your safety.Unscrewing The Base
Once the cover is off, you’ll see the base of the thermostat. The base is usually attached to the wall with a couple of screws. Use a screwdriver to carefully unscrew them. Keep these screws in a safe place; you might need them for the new thermostat. Pay attention to the wires connected to the base. Take a photo or label them to remember where each wire goes. This will make installing the new thermostat a breeze. By following these steps, you’ll have your old Honeywell thermostat removed in no time. Ready to move on to the next step? Let’s get started!Wiring The New Thermostat
Setting up an old Honeywell thermostat involves connecting the wires correctly. Start by turning off the power. Then, match the wires to the right terminals.
Setting up an old Honeywell thermostat can seem like a daunting task, but wiring the new thermostat is a crucial step that you can handle with some guidance. In this section, we will break down the wiring process into simple steps. By the end, you’ll feel confident enough to wire your new thermostat correctly. ###Identifying Wires
Start by switching off the power to your HVAC system. This is a crucial safety measure. Once the power is off, remove the old thermostat cover. You will see several colored wires connected to different terminals. These wires usually have labels like R, W, Y, G, and C. Take a photo of the current wiring setup. This will serve as your reference. If you don’t have a smartphone handy, jot down the wire colors and their corresponding terminal letters on a piece of paper. ###Connecting Wires
Now, you’ll need to connect these wires to your new Honeywell thermostat. Match the wires with the same labels on the new thermostat. For instance, if you have a red wire connected to the R terminal on the old thermostat, connect it to the R terminal on the new one. Ensure each wire is securely fastened to avoid any loose connections. Some thermostats may have a jumper wire connecting the R and Rc terminals. If so, leave it in place unless your system specifically requires separate wires. If you encounter any wires you’re unsure about, consult the thermostat’s manual. It often provides a detailed wiring diagram. Have you ever wondered why some thermostats have a C wire? It’s there to provide continuous power to the thermostat. If your system has a C wire, connect it to the C terminal on the new thermostat. Before you finish, gently tug on each wire to ensure they are securely connected. Loose wires can cause the thermostat to malfunction. Finally, restore power to your HVAC system and test the thermostat. Make sure it’s controlling your heating and cooling system correctly. Feeling more confident about wiring your new thermostat? With these steps, you should be well on your way to a successful installation.Mounting The New Thermostat
Mounting your new Honeywell thermostat is a crucial step. It ensures your device functions correctly. This guide will help you mount it securely. Follow each step carefully for the best results.
Positioning The Base
First, find a good spot on your wall. It should be central in your home. The thermostat should be away from direct sunlight. Avoid placing it near vents or doors. These can affect temperature readings.
Hold the base against the wall. Use a level to make sure it is straight. Mark the screw holes with a pencil. These marks will guide your drilling.
Check Best Thermostat Pricing in Amazon
** As an Amazon Associate, I earn from qualifying purchases.
Securing The Screws
Drill holes at the marked spots. Use the appropriate size drill bit. Insert wall anchors if needed. These will help hold the screws securely.
Align the base with the drilled holes. Insert screws through the base into the wall. Tighten the screws securely. Make sure the base is firmly attached to the wall. This will ensure your thermostat stays in place.
Testing The Installation
Verify the installation by turning on the system. Ensure the thermostat displays the correct temperature and settings. Adjust as needed for accuracy.
Testing the installation of your old Honeywell thermostat is crucial. This step ensures that everything is working properly. Follow these simple steps to make sure your thermostat functions as expected.Powering On
First, turn on the power to your HVAC system. Locate the circuit breaker and flip the switch. This restores power to your thermostat. Next, check the thermostat display. It should light up and show the current room temperature. If the display remains blank, check the power connections. Ensure all wires are secure.Checking Functionality
Now, test the functionality of your thermostat. Set the thermostat to heating mode. Adjust the temperature to a setting higher than the current room temperature. Listen for the heating system to kick in. You should hear the furnace start. Feel for warm air coming from the vents. Switch to cooling mode. Lower the temperature setting. The air conditioning should start. Feel for cool air from the vents. If the system does not respond, check the wiring again. Make sure all connections are correct. By following these steps, you ensure your Honeywell thermostat works correctly. Proper testing prevents future issues and ensures comfort in your home.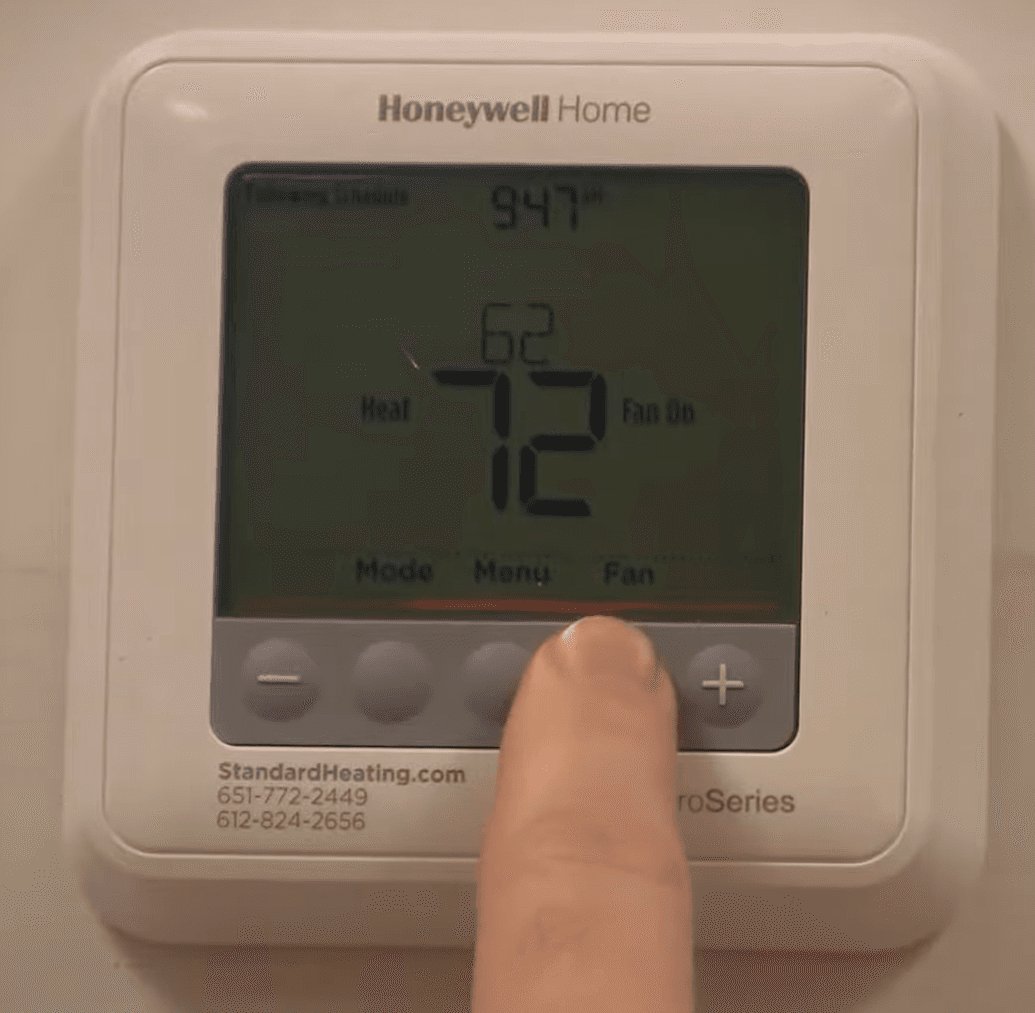
Credit: www.standardheating.com
Troubleshooting Tips
Setting an old Honeywell thermostat can sometimes be tricky, especially when things don’t seem to work as expected. It’s not uncommon to encounter issues, but don’t worry. Here are some troubleshooting tips to help you get your thermostat back on track.
Common Issues
First, let’s identify some common issues you might face with your old Honeywell thermostat. Sometimes, the thermostat might not turn on. This could be due to a dead battery or a tripped circuit breaker.
Another common issue is inaccurate temperature readings. This might be because the thermostat is placed in a location that doesn’t reflect the actual room temperature, like near a window or a heat source.
Have you ever found your thermostat stuck on one setting? This could be due to dust or debris inside the device, or the settings might be locked.
Quick Fixes
For a thermostat that won’t turn on, start by checking the batteries. Replace them if necessary. Also, ensure the circuit breaker hasn’t tripped. Reset it if you need to.
If the temperature readings seem off, try moving the thermostat to a more central location in your home. Avoid placing it near windows, doors, or heat-producing appliances.
To fix a thermostat stuck on one setting, gently open the device and clean it with a soft brush. Ensure the device is free from dust and debris. Check the user manual to see if the settings are locked and how to unlock them.
Remember, patience is key. Sometimes a simple adjustment can solve the problem. Have you ever tried these fixes? What worked for you?
Frequently Asked Questions
How Do I Set The Temperature On My Old Honeywell Thermostat?
To set the temperature on your old Honeywell thermostat, locate the temperature dial or lever. Adjust it to your desired setting. For digital models, use the up and down buttons. Ensure the system switch is set to “Heat” or “Cool” as needed.
How Do I Reprogram My Old Honeywell Thermostat?
To reprogram your old Honeywell thermostat, press “Set” until the display shows the time. Adjust using arrow buttons. Press “Set” again to confirm.
How Do I Manually Set My Honeywell Thermostat?
Press the “System” button to set the mode. Use the arrow buttons to adjust the temperature. Press “Done” to save.
Which Model Honeywell Thermostat Do I Have?
Check the model number on the front or back of your Honeywell thermostat. You can also find it in the user manual.
Conclusion
Setting your old Honeywell thermostat can be simple. Follow the steps provided, and you’ll have a comfortable home. Adjusting the temperature settings is crucial. Regular maintenance ensures optimal performance. Always refer to the manual for specific instructions. Troubleshooting common issues can help.
If problems persist, consult a professional. Maintaining your thermostat saves energy. Enjoy a cozy and efficient home year-round. Happy temperature setting!
Check Best Thermostat Pricing in Amazon
** As an Amazon Associate, I earn from qualifying purchases.