
Check Best Thermostat Pricing in Amazon
** As an Amazon Associate, I earn from qualifying purchases.
Replacing a water heater thermostat is essential for proper heating. It’s a task many homeowners can handle themselves.
A faulty thermostat can lead to inconsistent water temperature or no hot water at all. Understanding how to replace it can save you from an expensive service call. This guide will walk you through the process step-by-step, ensuring you can do it safely and efficiently.
Whether you have an electric or gas water heater, knowing how to replace the thermostat is a useful skill. It’s easier than you might think and can be done with basic tools you likely already have at home. Ready to get started? Let’s dive into the details.

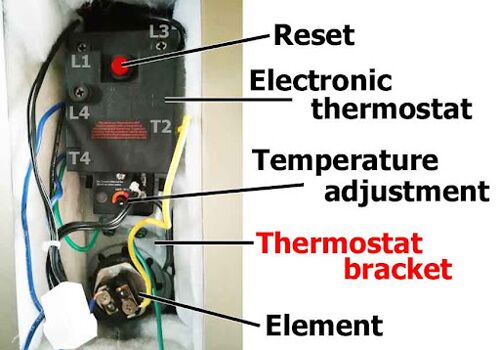
Credit: www.whirlpoolwaterheaters.com
Safety Precautions
Replacing a water heater thermostat requires careful attention to safety. Proper precautions are essential to avoid accidents. Follow these steps to ensure your safety throughout the process.
Turn Off Power
First, turn off the power to the water heater. Locate the circuit breaker in your home’s electrical panel. Flip the switch connected to the water heater to the off position. This step prevents electric shock and ensures your safety.
Verify the power is off by using a non-contact voltage tester. Place the tester near the thermostat’s wires. If the tester does not beep, the power is off. Always double-check for your safety.
Drain The Water Heater
Next, drain the water heater. Connect a garden hose to the drain valve at the bottom of the heater. Run the hose outside or to a floor drain. Open the drain valve to let the water flow out. This step prevents water damage and makes it easier to work on the thermostat.
Open a hot water tap in your home to allow air into the tank. This helps the water drain faster. Wait until the water heater is completely empty before proceeding.
Gather Necessary Tools
Before you start replacing your water heater thermostat, gather the right tools. This preparation will help you complete the job smoothly and efficiently. Having everything ready will save you time and frustration.
Required Tools List
Here’s what you need to replace your water heater thermostat:
- Screwdriver (Flathead and Phillips)
- Multimeter
- Needle-nose pliers
- Electrician’s tape
- Replacement thermostat
Ensure your screwdriver set includes both flathead and Phillips types. A multimeter will help you check the thermostat’s functionality. Needle-nose pliers make it easy to handle wires. Electrician’s tape is crucial for safety. Finally, make sure the replacement thermostat matches your water heater model.
Optional Tools
Some extra tools might come in handy:
- Flashlight
- Wire stripper
- Voltage tester
A flashlight will help you see better in tight spaces. A wire stripper can make cutting wires easier. A voltage tester provides an extra layer of safety by confirming power is off.
These optional tools are not essential but can make the task easier. Having them on hand can save time and effort.
Access The Thermostat
Accessing the thermostat of your water heater is a crucial step in replacing it. This task might seem daunting at first, but with a bit of guidance, you can do it smoothly. Let’s break it down into manageable steps: removing the access panels and locating the thermostat.
Remove Access Panels
First, ensure your safety by turning off the power to the water heater. You can do this at the circuit breaker. Once you’re sure the power is off, you can proceed.
Most water heaters have two access panels, one for the upper thermostat and one for the lower. Use a screwdriver to remove the screws holding the panels in place. Keep those screws in a safe spot—you don’t want to lose them!
With the panels removed, you’ll see some insulation. Carefully pull it back to reveal the thermostat and the heating elements. This step can be a bit messy, but it’s important to clear the area so you can work effectively.
Locate The Thermostat
Now that you’ve removed the access panels, it’s time to locate the thermostat. The thermostat is usually a small, rectangular device with wires connected to it. It sits directly above the heating element.
If you’re unsure which component is the thermostat, consult your water heater’s manual. Most manuals have diagrams that can help you identify parts.
Think about the last time you fixed something at home. Didn’t it feel great to solve the problem yourself? Finding the thermostat is a small victory, but it’s a crucial step in the repair process. You’re almost there!
Does this seem straightforward so far? If you have any doubts, it’s always okay to re-read the steps or consult additional resources. Confidence comes with understanding, and you’ve got this.

Credit: www.whirlpoolwaterheaters.com
Test The Thermostat
Check the thermostat to ensure it works correctly. A faulty thermostat may cause temperature issues in your water heater. Testing helps determine if a replacement is needed.
Testing the thermostat on your water heater is a crucial step in ensuring that it is functioning properly. A faulty thermostat can lead to inconsistent water temperatures or even a complete lack of hot water. With a few simple tools and a bit of patience, you can test the thermostat yourself. Let’s dive into the steps you need to take.Use A Multimeter
First, you will need a multimeter. This handy tool measures electrical voltage, current, and resistance, and is essential for checking your water heater’s thermostat. Before you start, ensure the power to your water heater is turned off. Safety first! Set your multimeter to the lowest ohms of resistance setting. This will allow you to measure the resistance of the thermostat.Check For Continuity
Next, you need to check for continuity. This means you are checking if the circuit is complete and electricity can flow through it. Place one probe of the multimeter on one terminal of the thermostat and the other probe on the second terminal. If the multimeter reads zero or very close to zero, the thermostat has continuity and is functioning correctly. If you get a different reading, it might be time to replace the thermostat. Testing the thermostat isn’t just about having the right tools, it’s also about understanding the process. Have you ever wondered why your shower suddenly turns cold? It might be a faulty thermostat. Testing it could save you from an unexpected chilly surprise. Have you tried using a multimeter before? If not, now is a great time to start. It’s a skill that can come in handy for many household repairs. By testing the thermostat yourself, you not only save money but also gain the confidence to handle minor repairs around your home. Isn’t it empowering to know you can take control of your home’s maintenance? So, grab that multimeter and test your water heater thermostat today!Remove The Old Thermostat
Before installing a new thermostat, the old one must be removed. This step is crucial. It ensures the new thermostat works efficiently. Follow these steps to remove the old thermostat carefully.
Check Best Thermostat Pricing in Amazon
** As an Amazon Associate, I earn from qualifying purchases.
Disconnect Wiring
First, ensure the power to the water heater is off. Safety is key. Locate the wires connected to the thermostat. Use a screwdriver to loosen the screws holding the wires. Carefully disconnect each wire. Note the wire positions for later reference.
Remove Mounting Screws
Next, find the mounting screws securing the thermostat. These screws hold the thermostat in place. Use a screwdriver to remove these screws. Gently pull the thermostat away from the heater. Be careful not to damage the surrounding area.
With the old thermostat removed, you are ready to install the new one. Keep the screws and wires handy. They will be needed for the new installation.

Credit: servicewhale.com
Install The New Thermostat
Installing the new thermostat is a crucial step in ensuring your water heater runs efficiently. If you’ve successfully removed the old thermostat, you’re halfway there. This part of the process might seem daunting, but with the right guidance, you can handle it with confidence. Ready to dive in?
Position The New Thermostat
Begin by positioning the new thermostat exactly where the old one was. This ensures it will function correctly and fit within the existing space. Align the mounting holes of the thermostat with those on the heater.
Make sure the thermostat is level. This prevents any misreading of temperature. Take a moment to double-check the alignment before securing it in place.
Reconnect Wiring
Next, it’s time to reconnect the wiring. This step is straightforward if you took a photo or labeled the wires before removal. Match each wire to its corresponding terminal on the new thermostat.
Tighten the screws to secure the wires. Ensure each connection is snug to prevent any loose wires, which can cause malfunction. Double-check your work to ensure all wires are connected correctly.
Have you ever had a DIY project go wrong due to a loose wire? This is your chance to avoid that mistake. Take your time to ensure all connections are solid.
By following these steps, you can install your new thermostat with confidence. Have you learned something new today? Share your thoughts or questions in the comments below!
Reassemble And Test
Reassemble the heater and test the new thermostat. Ensure it heats water properly and maintains the set temperature.
Replacing a water heater thermostat can seem daunting, but the process is straightforward when broken down step by step. Once you’ve installed the new thermostat, the next crucial step is reassembling and testing to ensure everything works perfectly. This section will guide you through reattaching the access panels and turning on the power to test the new thermostat.Reattach Access Panels
After securing the new thermostat in place, you’ll need to reattach the access panels. First, align the panel with the opening on the water heater. Ensure that the insulation is correctly positioned behind the panel. Next, use the screws you set aside earlier to fasten the panel securely. Double-check that the panel is firmly attached. Loose panels can cause safety issues and may affect the efficiency of your water heater.Turn On Power And Test
With the access panels in place, it’s time to turn the power back on. Go to your circuit breaker and switch the power back on for the water heater. Wait a few minutes and then check the water temperature. You should notice a difference as the new thermostat starts regulating the water heater. Run hot water from a faucet to test the temperature. Adjust the thermostat if necessary until you reach your desired water temperature. Remember, safety first! Always ensure the power is off when working with electrical components. Have you ever faced any unexpected issues while replacing a thermostat? Share your experiences in the comments! By following these steps, you can confidently replace your water heater thermostat and enjoy consistent hot water.Maintenance Tips
Replacing a water heater thermostat might seem like a daunting task, but with the right guidance, it can be straightforward. However, the job doesn’t end after replacement. Proper maintenance is crucial to ensure your water heater runs efficiently and lasts longer. Here’s a deeper look into some essential maintenance tips.
Regular Inspections
Regular inspections are a simple yet effective way to keep your water heater in top shape. Every few months, check for any signs of wear and tear. Look for rust, leaks, or any unusual noises.
Catch issues early before they become significant problems. I remember once ignoring a tiny rust spot, which eventually led to a costly replacement. A quick check could have saved me time and money.
Ask yourself, when was the last time you inspected your water heater? If it’s been a while, it might be time for a quick look.
Professional Help
While DIY inspections are great, sometimes professional help is necessary. Schedule a yearly check-up with a certified technician. They can spot hidden problems that might not be visible to an untrained eye.
Professionals can also provide valuable advice on maintaining your specific model. Have you ever wondered why your water heater’s efficiency seems to drop over time? A professional can diagnose and fix such issues.
Relying on experts not only ensures your water heater’s longevity but also gives you peace of mind. After all, isn’t it better to be safe than sorry?
Frequently Asked Questions
Can I Replace The Water Heater Thermostat Myself?
Yes, you can replace the water heater thermostat yourself. Ensure you follow safety guidelines and turn off the power. If unsure, consult a professional.
How Do I Tell If My Water Heater Thermostat Is Bad?
Check for inconsistent water temperatures, no hot water, or the reset button frequently tripping. Test with a multimeter.
Do You Have To Drain A Water Heater To Replace The Thermostat?
Yes, you must drain the water heater to replace the thermostat. This ensures safety and prevents water damage.
How Much Does It Cost To Replace A Thermostat In A Hot Water Heater?
Replacing a thermostat in a hot water heater costs $100 to $300. Labor and parts influence the total price.
Conclusion
Replacing a water heater thermostat is easier than it seems. Follow the steps carefully. Ensure safety by turning off power and water supply. Gather all necessary tools beforehand. This DIY project saves money and time. A functioning thermostat improves water heater efficiency.
Regular maintenance extends the heater’s lifespan. Stay patient and work methodically. Soon, you’ll enjoy reliable hot water again. Happy fixing!
Check Best Thermostat Pricing in Amazon
** As an Amazon Associate, I earn from qualifying purchases.