
Check Best Thermostat Pricing in Amazon
** As an Amazon Associate, I earn from qualifying purchases.
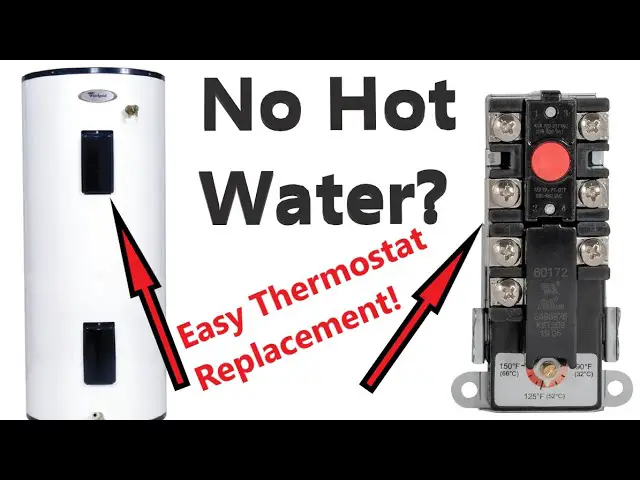
Replacing the thermostat on a hot water heater is a straightforward task. It requires basic tools and some safety precautions.
Hot water heaters are essential for everyday comfort. They provide warm showers and hot water for cleaning. Sometimes, the thermostat fails, leading to cold water. Fixing it yourself can save time and money. This guide will help you replace the thermostat quickly and safely.
You’ll learn the steps and tools needed. By the end, you’ll be confident in handling this repair. Let’s get started on making your hot water heater work perfectly again.
Safety First
Replacing the thermostat on a hot water heater can seem daunting. But, with the right steps and tools, it’s manageable. Safety should always be your top priority. Taking the time to ensure a safe environment can prevent accidents.
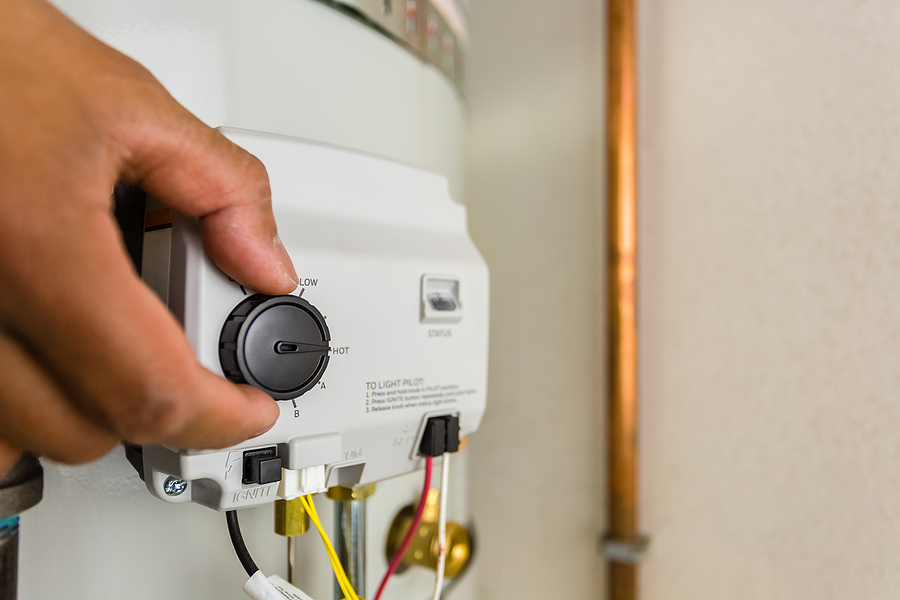
Turn Off Power Supply
First, turn off the power supply to the heater. Find the breaker in your electrical panel. Switch it off. This step is crucial. Electric shocks can be dangerous. Always double-check that the power is off. Use a voltage tester to be sure.
Gather Necessary Tools
Next, gather the necessary tools. You will need a screwdriver, voltage tester, and pliers. Having these tools at hand will make the job easier. Keep your workspace organized. This helps in avoiding mistakes.

Credit: www.whirlpoolwaterheaters.com
Accessing The Thermostat
Access the thermostat on a hot water heater by first turning off the power supply. Then remove the access panel to expose the thermostat.
To replace the thermostat on a hot water heater, you need to access it first. This process involves locating and removing certain components. Let’s break down the steps to make it easy for you.Locate The Thermostat
First, find the thermostat on your hot water heater. Most heaters have two thermostats. One at the top and one at the bottom. Check the heater’s manual if you’re unsure. Knowing the exact location helps in the next steps.Remove Access Panels
Next, remove the access panels to reach the thermostat. Turn off the power supply to the heater. Use a screwdriver to take off the screws holding the panels. Put the screws in a safe place. Carefully lift off the panels. Now, you can see the thermostat behind the insulation. By following these steps, you are on your way to replacing the thermostat. Stay safe and always refer to your heater’s manual for specific instructions. “`Testing The Thermostat
Testing the thermostat on your hot water heater ensures it works correctly. Faulty thermostats can cause water temperature issues. Testing helps identify if the thermostat needs replacement. This guide will show you how to test your thermostat step by step.
Use A Multimeter
First, you need a multimeter. This tool measures electrical values. Set your multimeter to the lowest ohm setting. Turn off the power to the water heater. Remove the access panel covering the thermostat. This will expose the thermostat and its connections.
Use the multimeter probes to touch the two terminals on the thermostat. The multimeter will give a reading. If the reading is zero, the thermostat is working. If the reading is higher, it may be faulty. Repeat this process for both upper and lower thermostats if you have two.
Interpret The Readings
After testing, you need to understand the readings. A zero reading indicates continuity. This means the thermostat is functioning. A high reading or no reading means no continuity. This indicates a faulty thermostat.
If the thermostat is faulty, it needs to be replaced. This ensures your water heater works efficiently. Regular testing can prevent unexpected issues. It’s an easy process with the right tools. Always ensure safety by turning off the power before testing.
Credit: www.ricksplumbing.com
Removing The Old Thermostat
Removing the old thermostat from your hot water heater might seem daunting, but it’s a straightforward process if you follow the steps carefully. The key is to be methodical and ensure safety measures are in place. Let’s break it down into simple, manageable steps.
Disconnect Wires
First, make sure the power to your hot water heater is turned off. This is crucial for your safety. You don’t want to get an electric shock.
Next, locate the thermostat. You’ll see several wires attached to it. Take a picture of the wiring configuration with your phone. This will help you remember where each wire goes when you install the new thermostat.
Carefully disconnect the wires. Use a screwdriver if needed to loosen the terminals. Make sure the wires don’t touch each other or any metal parts. You might want to label the wires with tape to keep track of their positions. This will make reinstallation much easier.
Unscrew And Remove
Now, it’s time to remove the thermostat itself. There are usually a couple of screws holding it in place. Use a screwdriver to remove these screws. Keep them in a safe place; you’ll need them for the new thermostat.
Once the screws are out, gently pull out the old thermostat. It might be a bit stuck, so wiggle it gently. Be careful not to damage any surrounding components.
Now, you have successfully removed the old thermostat. Take a moment to check the area for any signs of corrosion or damage. If everything looks good, you are ready to install the new thermostat.
Have you ever faced a tricky situation while doing a DIY project? How did you overcome it? Share your experiences and tips in the comments below!
Installing The New Thermostat
After removing the old thermostat, it’s time to install the new one. This process is crucial for restoring your hot water heater’s efficiency. Follow these steps carefully to ensure everything is in place and connected correctly.
Check Best Thermostat Pricing in Amazon
** As an Amazon Associate, I earn from qualifying purchases.
Position The New Unit
First, take the new thermostat out of its packaging. Align it with the mounting bracket inside the heater. Ensure that the thermostat sits flush against the tank. This placement is vital for accurate temperature readings.
Secure the thermostat using the screws provided. Tighten them firmly, but avoid over-tightening. You want the thermostat to stay in place without damaging it.
Reconnect Wires
Next, reconnect the wires to the new thermostat. Refer to your notes or photos from the removal process. Attach each wire to the correct terminal. This ensures the thermostat works properly.
Use a screwdriver to secure the wires. Make sure each connection is tight. Loose wires can cause malfunctions or safety issues. Once connected, double-check your work. Confirm that all wires are attached and secure.
With the wires connected, cover the thermostat with the protective panel. Fasten the screws on the panel to keep everything in place. Your new thermostat is now installed.
Reassembling And Testing
Reattach the wires to the new thermostat, then secure the cover. Turn on the power and test the heater. Ensure it reaches the desired temperature.
Once the thermostat replacement is complete, it’s time to reassemble and test. This step ensures the hot water heater works correctly. Follow these straightforward steps to wrap up the process.Replace Access Panels
Start by replacing the access panels. Align the panel with the heater body. Secure it with the screws you removed earlier. Make sure the panel sits flush against the heater. This prevents any heat loss and protects the inner components.Turn On Power And Test
Now it’s time to turn on the power. Head to the circuit breaker and flip the switch back on. Wait a few moments for the heater to start working. Check if the water is heating up. Test with a faucet to confirm the water temperature. Ensure it reaches the desired warmth. If everything works well, your replacement is successful. With these steps, your hot water heater should be back to normal. Enjoy the consistent hot water and peace of mind. “`Maintenance Tips
Maintaining your hot water heater is crucial to ensuring its longevity and efficiency. Small routine checks can save you from costly repairs and sudden cold showers. Below, we’ll dive into some key maintenance tips to keep your hot water heater running smoothly.
Regular Inspections
Regular inspections are essential. Make it a habit to check your hot water heater once a month.
Look for any signs of wear and tear, such as rust or leaks. Pay attention to the area around the heater for any water puddles.
If you notice any unusual noises, it might be an indication that something is wrong. Addressing issues early can prevent bigger problems down the line.
When To Call A Professional
Sometimes, despite your best efforts, problems arise that require professional attention. Knowing when to call a professional can save you time and hassle.
If your water heater isn’t heating water properly, it might be an issue beyond a simple fix. Also, if you’re dealing with electrical components and feel unsure, it’s better to be safe and call an expert.
For instance, I once tried to fix a heating element myself and ended up causing more damage. A professional quickly identified the problem and had it fixed in no time. Don’t hesitate to seek help when needed.
Have you ever dealt with a stubborn hot water heater issue? Share your experiences or tips in the comments below!
Credit: www.expresssewer.com
Frequently Asked Questions
Can I Replace The Water Heater Thermostat Myself?
Yes, you can replace the water heater thermostat yourself. Ensure you follow safety guidelines and turn off the power.
How Do I Tell If My Water Heater Thermostat Is Bad?
Check for inconsistent water temperature, no hot water, or tripped breaker. Use a multimeter to test for continuity.
How Much Does It Cost To Replace A Thermostat In A Hot Water Heater?
Replacing a thermostat in a hot water heater typically costs between $100 and $300. This includes parts and labor. Pricing may vary depending on the model and location.
Do I Have To Drain My Water Heater To Change The Thermostat?
No, you don’t have to drain your water heater to change the thermostat. Turn off the power and water supply before starting.
Conclusion
Replacing the thermostat on a hot water heater is simple. Follow the steps carefully. Ensure power is off before starting. Remove the old thermostat. Install the new one. Reconnect wires and restore power. Test to confirm proper function. Regular maintenance helps prevent issues.
Anyone can do this with basic tools. Save money by doing it yourself. Keep your hot water heater in top shape. Enjoy consistent hot water without hassle.
Check Best Thermostat Pricing in Amazon
** As an Amazon Associate, I earn from qualifying purchases.