
Check Best Thermostat Pricing in Amazon
** As an Amazon Associate, I earn from qualifying purchases.
Replacing the battery in your Nest Thermostat is a simple process. This quick guide will show you how to do it in a few easy steps.
A Nest Thermostat is a handy device that helps manage your home’s temperature. Over time, its battery can wear out, causing it to malfunction. Knowing how to replace the battery can save you from unnecessary stress and discomfort. In this guide, we will walk you through the process, ensuring you can do it yourself without any hassle.
This will keep your thermostat running smoothly and efficiently. Stay with us to learn the steps and keep your Nest Thermostat in top shape.
Credit: www.youtube.com
Tools Needed
Replacing the battery in your Nest Thermostat is straightforward, but having the right tools can make the process even smoother. Gathering your tools beforehand ensures you won’t be scrambling around mid-task. Here’s what you’ll need to get started:
Screwdriver
A screwdriver is essential for removing the Nest Thermostat from its base. Most Nest Thermostats will require a small Phillips-head screwdriver, but check your model to be sure. Keeping a variety of screwdrivers on hand can save you a trip back to the toolbox.
I remember thinking I could use a butter knife instead of a proper screwdriver. Trust me, this is a bad idea. A screwdriver will make the job quicker and prevent any accidental damage to your thermostat.
New Battery
Having a new battery ready is crucial. The Nest Thermostat generally uses a standard lithium-ion battery. Make sure you purchase the correct type for your model.
Installing a new battery is quick, but using the wrong one can cause issues or even damage your device. I learned this the hard way when I had to make a second trip to the store because I bought the wrong battery type. Save yourself the hassle and double-check the specifications.
Do you have all your tools ready? Making sure you have everything prepared will make replacing your Nest Thermostat battery a breeze. Are there any other tools you think might be needed? Share your thoughts in the comments below!
Safety Precautions
Ensure the thermostat is turned off before replacing the Nest battery. Keep tools nearby and follow instructions carefully to avoid accidents.
When replacing the battery in your Nest Thermostat, safety should be your top priority. Ensuring that you follow the right precautions can save you from potential hazards. Let’s go through some essential safety measures you should take before you begin. ###Turn Off Power
First and foremost, turn off the power to your Nest Thermostat. This is crucial to avoid any risk of electric shock. Go to your breaker box and switch off the circuit that powers your thermostat. Double-check by making sure the display on your Nest Thermostat is off. If it’s still on, you haven’t cut the power properly. This simple step can save you from a nasty shock or even more severe injuries. ###Wear Safety Gear
Wearing the right safety gear can make a big difference. Put on a pair of insulated gloves to protect your hands from any unexpected electrical discharge. Safety goggles are also a good idea to protect your eyes from dust and debris. Even if you think you don’t need them, these precautions are worth the small effort. Imagine a tiny spark flying into your eye or a sudden jolt through your hand. It’s always better to be safe than sorry. Have you ever skipped wearing safety gear and regretted it? Don’t let a small task like replacing a battery turn into an emergency room visit. Safety gear is your first line of defense. Following these steps ensures that you replace your Nest Thermostat battery safely and efficiently. What other safety tips do you follow when working with electrical devices? Share your thoughts and experiences in the comments below.Removing Thermostat Cover
Replacing the battery of your Nest Thermostat is a simple task. The first step is removing the thermostat cover. This process may seem tricky, but it is straightforward with the right guidance.
Locate Cover
First, find the thermostat on your wall. The cover is the front part of the device. It protects the internal components. Ensure the thermostat is off before proceeding.
Unscrewing Cover
Next, use a screwdriver to unscrew the cover. Some models may not have screws. In this case, gently pull the cover off. Be careful not to damage the thermostat. Place the screws in a safe place for later.
Once the cover is removed, you can access the battery compartment. Follow the next steps to replace the battery. This ensures your Nest Thermostat continues working efficiently.
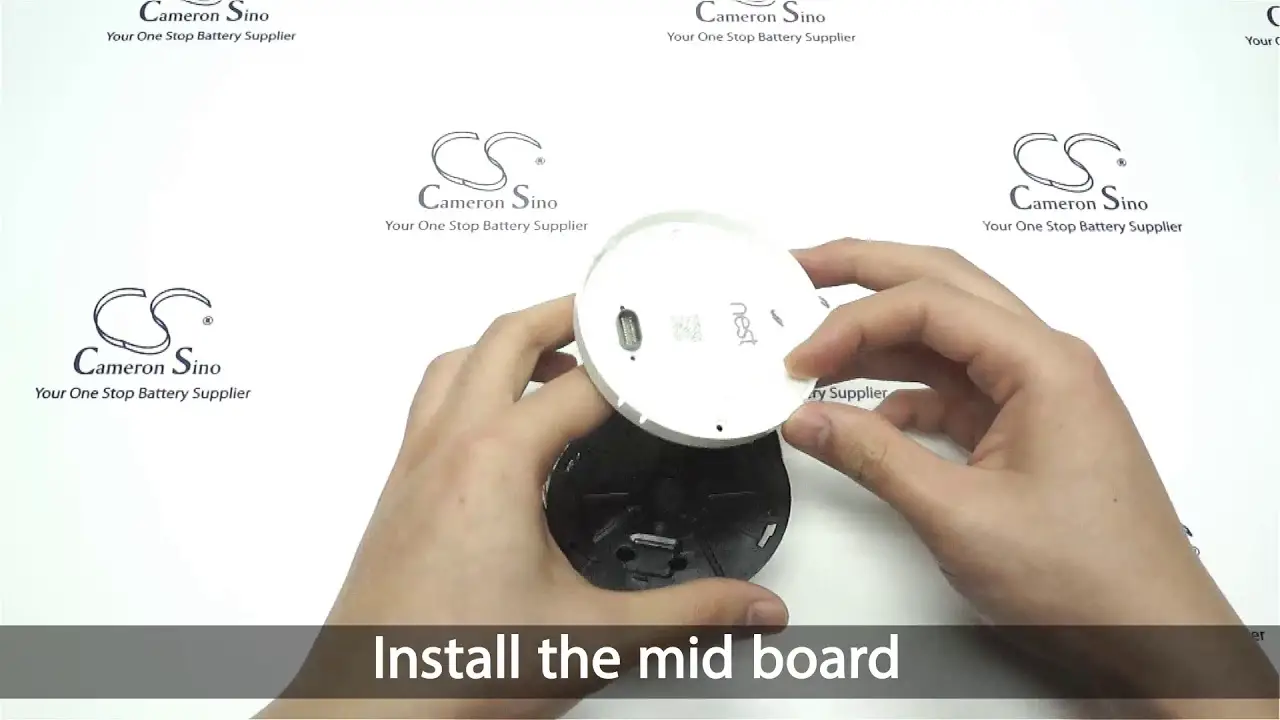
Accessing Battery Compartment
Accessing the battery compartment of your Nest Thermostat might seem a bit tricky, but it’s quite straightforward. This guide will help you navigate through the process with ease. Let’s dive into the specifics to ensure a smooth and hassle-free experience.
Finding Battery Slot
First, you need to locate the battery slot on your Nest Thermostat. The slot is usually at the back of the device. Gently pull the thermostat display off the base to reveal the back panel. You should see a small slot meant for the battery.
Opening Battery Compartment
Opening the battery compartment is the next step. Use a small tool, like a flathead screwdriver, to carefully open the slot. Insert the tool into the notch and gently pry it open. Be cautious to avoid damaging any internal components.
Have you ever struggled with opening a stubborn battery slot? Taking your time and applying gentle pressure can save you from potential damage and frustration. Remember, patience is key!
Now that you’ve accessed the compartment, replacing the battery is just around the corner. Have you thought about the type of battery you need? Make sure you have the correct replacement on hand. This ensures that your Nest Thermostat continues to function efficiently.
Did you find this section helpful? What challenges have you faced while changing batteries in your devices? Share your thoughts in the comments below!
Removing Old Battery
Easily replace your Nest Thermostat battery by first removing the old battery. Gently pop it out of its slot.
Check Best Thermostat Pricing in Amazon
** As an Amazon Associate, I earn from qualifying purchases.
Disconnecting Battery
First things first, you need to disconnect the battery. Begin by gently pulling the Nest thermostat off its base. It should come off with minimal effort. Once the thermostat is off, you’ll see the battery compartment. Use a small screwdriver to remove the screws holding the battery cover in place. Carefully lift the cover to expose the battery. Disconnect the battery by gently pulling it out from the compartment.Proper Disposal
You can’t just throw the old battery in the trash. Batteries contain harmful chemicals that can harm the environment. Take your old battery to a local recycling center. Many electronics stores also offer battery disposal services. Properly disposing of your old battery ensures it’s recycled safely. It’s a small step that makes a big difference for our planet. Have you ever wondered how many batteries end up in landfills every year? By recycling, you help reduce that number and protect our environment.
Credit: support.google.com
Installing New Battery
Replacing the battery in your Nest Thermostat can seem daunting, but it’s a straightforward task that you can easily do yourself. In this section, we’ll walk you through the steps to install the new battery. You don’t need to be a tech expert to follow along.
Positioning Battery
First, locate the battery compartment at the back of your Nest Thermostat. Gently remove the old battery by pulling it out.
Next, take your new battery and position it correctly. Ensure the positive and negative ends match the markings in the compartment.
Proper alignment is crucial, so double-check before moving on. Misalignment can prevent your thermostat from working correctly.
Securing Battery
Once positioned correctly, press the battery down firmly. It should click into place.
If it feels loose, double-check the alignment and re-secure it. A secure battery ensures consistent performance.
Close the battery compartment cover. Ensure it snaps shut to keep the battery in place.
How did your installation go? Were there any surprises? Share your experience in the comments. Your tips could help others!
Reassembling Thermostat
Replacing the Nest thermostat battery involves removing the front cover. After that, you’ll see the battery compartment. Simply swap the old battery with a new one.
Reassembling your Nest Thermostat after replacing the battery might seem tricky. But don’t worry, it’s easier than you think. Here’s a step-by-step guide to ensure you do it correctly.Replacing Cover
First, align the cover with the base. The Nest logo should be at the top. This helps ensure you’re placing it correctly. Once aligned, gently press the cover until it clicks into place. You’ll know it’s secure when you hear the click. Make sure there are no gaps between the cover and the base.Screwing Back
Next, locate the screws you removed earlier. Place them back into their original holes. Use a screwdriver to tighten them. Remember, don’t over-tighten. This can damage the thermostat. Just make sure they’re snug enough to hold the cover securely. Have you ever struggled with screwing things back together? I did, and I learned that a little patience goes a long way. Now, check if the thermostat is working by turning it on. If everything lights up, you’ve done it correctly. If not, double-check the screws and cover alignment. Reassembling your thermostat isn’t just about putting things back. It’s about ensuring everything works perfectly. Did you find these steps helpful? Let me know in the comments!Testing Thermostat
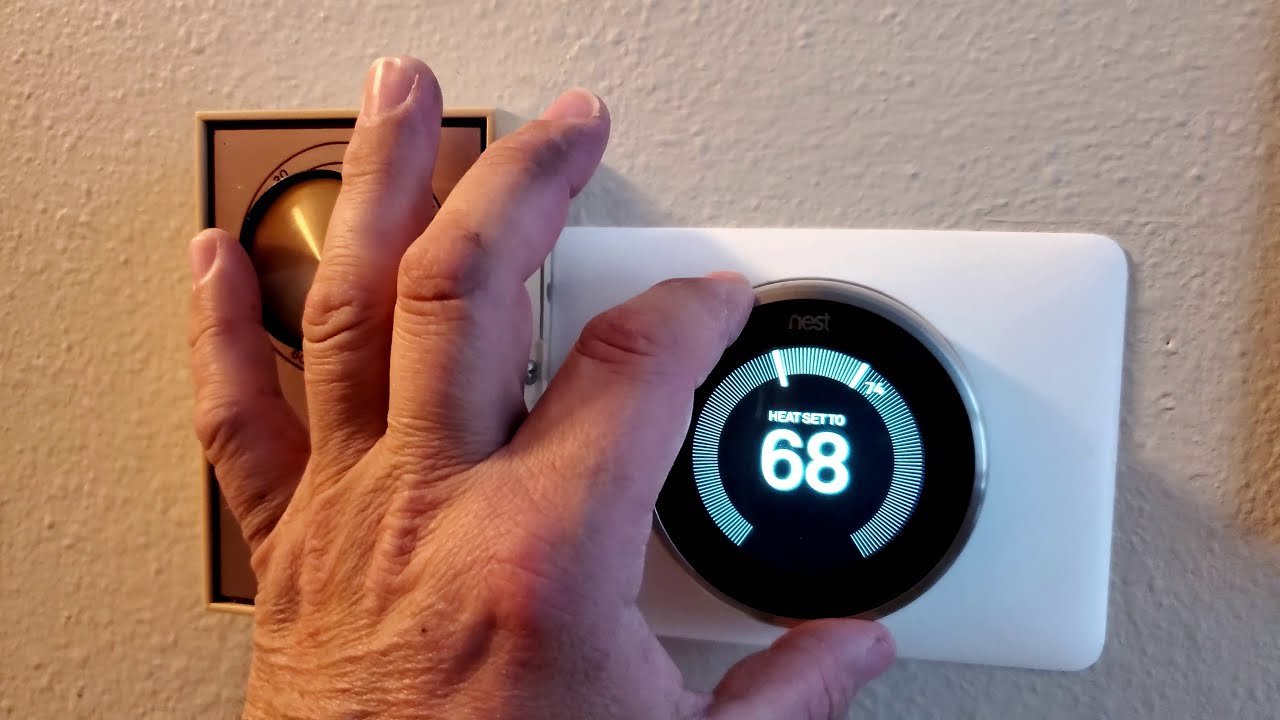
Testing your Nest Thermostat after replacing the battery is crucial. This ensures everything works smoothly. This step verifies the new battery is properly installed. It also confirms the thermostat is functioning correctly. Below are steps to test your thermostat efficiently.
Power On
First, turn on the Nest Thermostat. Observe if the display lights up. A bright screen shows power is restored. If the screen stays dark, recheck the battery installation. Ensure contacts are clean and correctly aligned.
Checking Functionality
Next, test the thermostat’s basic functions. Adjust the temperature up and down. Verify the heating or cooling system responds. Listen for any noises from your HVAC system. This confirms the thermostat communicates with your system.
Navigate through the thermostat menu. Check if all settings are accessible. Ensure Wi-Fi connectivity is stable. Test the app control feature on your smartphone. A fully functional thermostat should sync with your phone seamlessly.

Credit: www.ifixit.com
Frequently Asked Questions
Can The Nest Thermostat Battery Be Replaced?
Yes, the Nest thermostat battery can be replaced. Use a compatible rechargeable battery for best performance.
How Do I Charge My Nest Thermostat Battery?
Charge your Nest thermostat battery by connecting it to a USB port using the included cable. It takes about two hours.
What Happens If The Nest Thermostat Battery Dies?
The Nest thermostat stops working if the battery dies. It can’t control your HVAC system. Charge or replace the battery to resume normal operation.
How To Remove Nest Thermostat Cover?
To remove the Nest thermostat cover, gently pull it straight off. Ensure the power is off to avoid damage.
Conclusion
Replacing the Nest thermostat battery is simple. Follow the steps for a smooth process. Start by removing the thermostat from the wall. Open the back cover gently. Take out the old battery and insert the new one. Place the cover back and reattach the thermostat.
Ensure it clicks into place. Verify the thermostat is working properly. Regularly check your thermostat battery for optimal performance. It helps maintain your home temperature efficiently. Save energy and keep your home comfortable.
Check Best Thermostat Pricing in Amazon
** As an Amazon Associate, I earn from qualifying purchases.