
Check Best Thermostat Pricing in Amazon
** As an Amazon Associate, I earn from qualifying purchases.
Is your thermostat acting up or showing a low battery warning? You might be surprised how often simple battery replacement can fix the problem and keep your home comfortable.
Knowing how to replace batteries in your thermostat is a quick, easy skill that can save you time and money. In this guide, you’ll learn exactly what to do step-by-step—no confusion, no hassle. Keep reading to make sure your thermostat stays powered and your home stays cozy all year round.

Credit: www.youtube.com
Signs Your Thermostat Needs New Batteries
Knowing when your thermostat needs new batteries can save you from sudden heating or cooling problems. Batteries power many thermostats, so weak batteries can cause several issues. Watch for clear signs that show it’s time to replace the batteries.
Low Battery Indicators
Many thermostats show a low battery icon on the screen. This symbol looks like a small battery or a warning sign. It appears to warn you that the battery power is running low. Don’t ignore this sign. Replace the batteries soon to avoid system failure.
Thermostat Display Issues
The screen may flicker or go dark when batteries are weak. Sometimes, the display shows strange characters or blank spaces. The backlight might dim or turn off entirely. These problems happen because the thermostat isn’t getting enough power.
Unresponsive Controls
Buttons might stop working or respond slowly with low batteries. You may press buttons and see no change on the display. The thermostat might also reset itself or lose your settings. These are clear signs that the batteries need replacing.
Tools And Materials Needed
Replacing batteries in a thermostat requires some basic tools and materials. Having the right items ready makes the task quick and easy. This section lists what you need to prepare before starting the replacement.
Types Of Batteries
Most thermostats use standard batteries. The common types include AA, AAA, and 9-volt batteries. Check your thermostat’s manual or open the battery compartment to see which type fits. Using the correct battery ensures your thermostat works properly. Avoid mixing old and new batteries to prevent damage.
Additional Tools
Besides batteries, a few simple tools may help. A small screwdriver is useful if your thermostat cover is screwed on. A clean cloth can wipe the battery contacts for better connection. Keep a flashlight nearby if the area is dim. These tools help you work safely and effectively.
Preparing To Replace Batteries
Replacing batteries in your thermostat keeps it running smoothly. Before starting, prepare carefully to avoid mistakes. Proper preparation saves time and prevents damage. Follow these simple steps to get ready.
Turning Off The Thermostat
First, turn off the thermostat to avoid electrical issues. Locate the power button or switch on the device. Press or slide it to the off position. This step ensures safety during battery replacement. Wait a few seconds after turning it off.
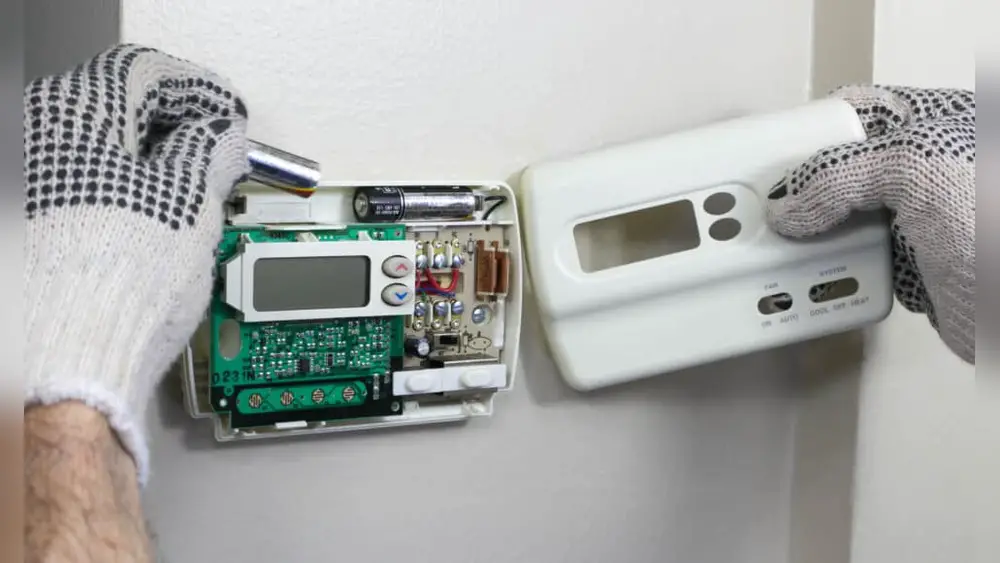
Locating The Battery Compartment
Next, find the battery compartment on your thermostat. It is usually on the back or bottom of the unit. Gently remove the cover by sliding or lifting it. Check for small clips or screws that hold the cover. Keep the cover safe for reassembly.

Credit: willplumb.com
Step-by-step Battery Replacement
Replacing batteries in your thermostat is simple and quick. Follow these clear steps to keep your thermostat working well. This process prevents unexpected shutdowns and helps maintain your home’s comfort.
Removing The Old Batteries
Start by locating the battery compartment on the thermostat. Open the cover gently to avoid damage. Take out the old batteries carefully. Dispose of them properly according to local rules.
Inserting New Batteries
Check the battery type needed for your thermostat. Insert new batteries matching the correct polarity. Ensure they fit securely in the compartment. Do not mix old and new batteries.
Securing The Battery Cover
Close the battery cover firmly but gently. Make sure it snaps into place. This keeps the batteries secure and avoids contact issues. Turn on your thermostat to check it works.
Check Best Thermostat Pricing in Amazon
** As an Amazon Associate, I earn from qualifying purchases.
Testing The Thermostat After Replacement
Testing the thermostat after replacing the batteries is important. It confirms that your device works well. This step ensures your heating or cooling system responds correctly. Follow simple checks to avoid future problems.
Powering On
Start by turning the thermostat back on. Look for the display screen to light up. If the screen stays blank, check the battery placement. Sometimes batteries may not fit properly. Ensure they are inserted with the correct polarity. A powered-on thermostat shows it receives energy from the new batteries.
Checking Functionality
Next, test the thermostat’s basic functions. Adjust the temperature setting up or down. Listen for a click or notice the HVAC system turning on. Watch the screen for changes in temperature display. Confirm that the thermostat responds fast and smoothly. If it does, the battery replacement was successful.
Tips For Extending Battery Life
Extending the battery life in your thermostat saves money and avoids sudden power loss. Small steps can keep your thermostat running longer without trouble. Simple care and smart battery choices make a big difference.
Regular Maintenance
Check your thermostat’s batteries every few months. Clean the battery contacts with a dry cloth to stop corrosion. Remove dust and dirt from the device. Replace old batteries before they fully drain. Keep the thermostat away from extreme heat or cold. These actions help your thermostat work better and last longer.
Optimal Battery Choices
Use high-quality batteries designed for low-drain devices. Alkaline batteries usually last longer than zinc-carbon types. Avoid cheap batteries as they lose power quickly. Consider rechargeable batteries for eco-friendly use. Always insert batteries in the right direction. Good batteries ensure your thermostat stays powered without frequent changes.
When To Call A Professional
Replacing thermostat batteries is usually easy. Many homeowners handle it themselves. But sometimes, problems need a professional’s help. Knowing when to call an expert can save time and stress.
Persistent Issues
Battery replacement should fix basic problems. If the thermostat still acts strange, there might be a deeper issue. Flickering screens, wrong temperature readings, or sudden shutdowns can signal trouble. These problems often need a professional’s tools and knowledge. Trying to fix them alone could cause damage.
Complex Thermostat Models
Some thermostats have advanced features like Wi-Fi or touchscreens. These models need careful handling. Battery replacement in such devices may involve special steps. Professionals understand these systems well. They can avoid mistakes that might break the device or void the warranty.

Credit: www.youtube.com
Frequently Asked Questions
How Do I Know When To Replace Thermostat Batteries?
You should replace batteries when the thermostat displays a low battery alert. Dimming screen or unresponsive controls also indicate replacement time. Regular checks every six months help maintain proper function.
What Type Of Batteries Do Thermostats Use?
Most thermostats use AA or AAA alkaline batteries. Some models require coin-cell batteries like CR2032. Check your thermostat’s manual or existing batteries for the correct type.
Can I Replace Thermostat Batteries Without Turning Off Power?
Yes, you can replace batteries without turning off the power. However, handle the thermostat carefully to avoid resetting settings or causing damage.
How Often Should Thermostat Batteries Be Replaced?
Replace thermostat batteries every 6 to 12 months for optimal performance. Frequent use or extreme temperatures may require more frequent changes.
Conclusion
Replacing batteries in your thermostat keeps it working well. Start by turning off the device to stay safe. Remove the old batteries and check their size. Insert new batteries in the right way. Close the cover and turn the thermostat back on.
Regular battery changes help your heating and cooling run smoothly. Don’t wait for the thermostat to stop working. Small steps like this save time and money. Now, your home stays comfortable all year long. Easy to do and worth it every time.
Check Best Thermostat Pricing in Amazon
** As an Amazon Associate, I earn from qualifying purchases.