
Check Best Thermostat Pricing in Amazon
** As an Amazon Associate, I earn from qualifying purchases.
Removing a Honeywell thermostat cover is simple. You need a few basic tools and a bit of patience.
Many people struggle with this task, but it’s easier than you think. A thermostat cover protects delicate parts, so it’s important to handle it carefully. In this guide, you will learn step-by-step how to remove the cover without damaging the unit.
This skill can help when you need to clean or troubleshoot your thermostat. Whether you are a beginner or have some experience, these steps are clear and easy to follow. Let’s get started and make this task a breeze for you.
Tools You Need
Removing the thermostat cover of your Honeywell device doesn’t have to be a daunting task. With the right tools, you can easily handle this task yourself. In this section, we will cover the essential tools you need to get the job done safely and efficiently. Let’s dive into the details.
Screwdrivers
A good set of screwdrivers is essential. Honeywell thermostats usually have screws that secure the cover in place. You will typically need a Phillips head screwdriver. However, it’s always a good idea to have a flathead screwdriver on hand as well. Having both types ensures you’re prepared for any screw type you encounter.
Consider investing in a screwdriver set with varying sizes. This way, you can easily handle any screw size without stripping them. Stripped screws can be a nightmare to remove, so it’s best to use the correct tool from the start.
Safety Equipment
Your safety should always come first. Before you start, make sure you have the right safety equipment. A pair of safety goggles can protect your eyes from any debris that might fall when you remove the cover. You never know what could be lurking inside, especially if the thermostat hasn’t been opened in a while.
Another essential is a pair of gloves. Gloves protect your hands from sharp edges or any unexpected contaminants inside the thermostat. They also help you get a better grip, making it easier to handle the screws and cover.
Do you remember the last time you tried a DIY project without the proper tools? It probably didn’t go as smoothly as you hoped. The same goes for removing a Honeywell thermostat cover. Having the right tools not only makes the job easier but also ensures you do it safely and correctly. So, gather your screwdrivers and safety equipment, and you’ll be ready to tackle this task with confidence.
Safety Precautions
When removing the cover of your Honeywell thermostat, it’s crucial to prioritize safety. Even though this task seems straightforward, overlooking essential precautions can lead to accidents or damage to your thermostat. By following a few simple steps, you can ensure the job is done safely and efficiently.
Turn Off Power
Before you start, always turn off the power. Working with the thermostat while it’s live can be dangerous. Head to your circuit breaker and switch off the power to your heating and cooling system.
Double-check that the power is off by trying to adjust the temperature on the thermostat. If the display remains unchanged, you’re good to go. This small step can prevent electrical shocks and protect your equipment.
Wear Safety Gear
Make sure to wear safety gear. Simple items like gloves and safety glasses can protect you from unexpected issues. Gloves will keep your hands safe from sharp edges or debris.
Safety glasses can shield your eyes from dust or small particles that might be dislodged during the process. It’s always better to be over-prepared than to risk an injury.
Have you ever overlooked safety gear and regretted it? Share your experience in the comments. It could help someone avoid the same mistake.
By ensuring the power is off and using the right safety gear, you can remove your Honeywell thermostat cover without any trouble. Stay safe and take your time. Your safety is worth those extra few minutes.
Locate The Thermostat
Before removing the thermostat cover, you must locate it. The thermostat is usually found on the wall. It controls the heating and cooling system. Make sure you know where it is placed. This step is crucial for the next tasks.
Identify Model
Different models have different covers. Look at the brand and model number. Honeywell thermostats often have the brand name on the front. Check for any other markings or labels. Knowing the model will help you follow the right steps.
Find Mounting Screws
Once you know the model, find the mounting screws. These screws hold the cover in place. Look around the edges of the thermostat. Some models have screws on the top and bottom. Others might have them on the sides. Use a small screwdriver to remove them.
Credit: www.youtube.com
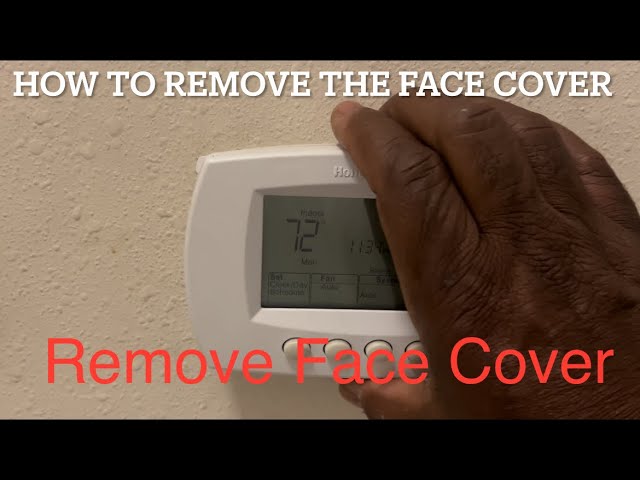
Remove The Thermostat Cover
Removing the thermostat cover is a simple task. It’s the first step to access the inside components of your Honeywell thermostat. Follow these steps to remove the cover safely and without damage.
Unscrew The Cover
Look for screws on the front or sides of the thermostat. These screws hold the cover in place. Use a small screwdriver to remove them. Turn the screws counterclockwise to loosen them. Keep the screws in a safe place.
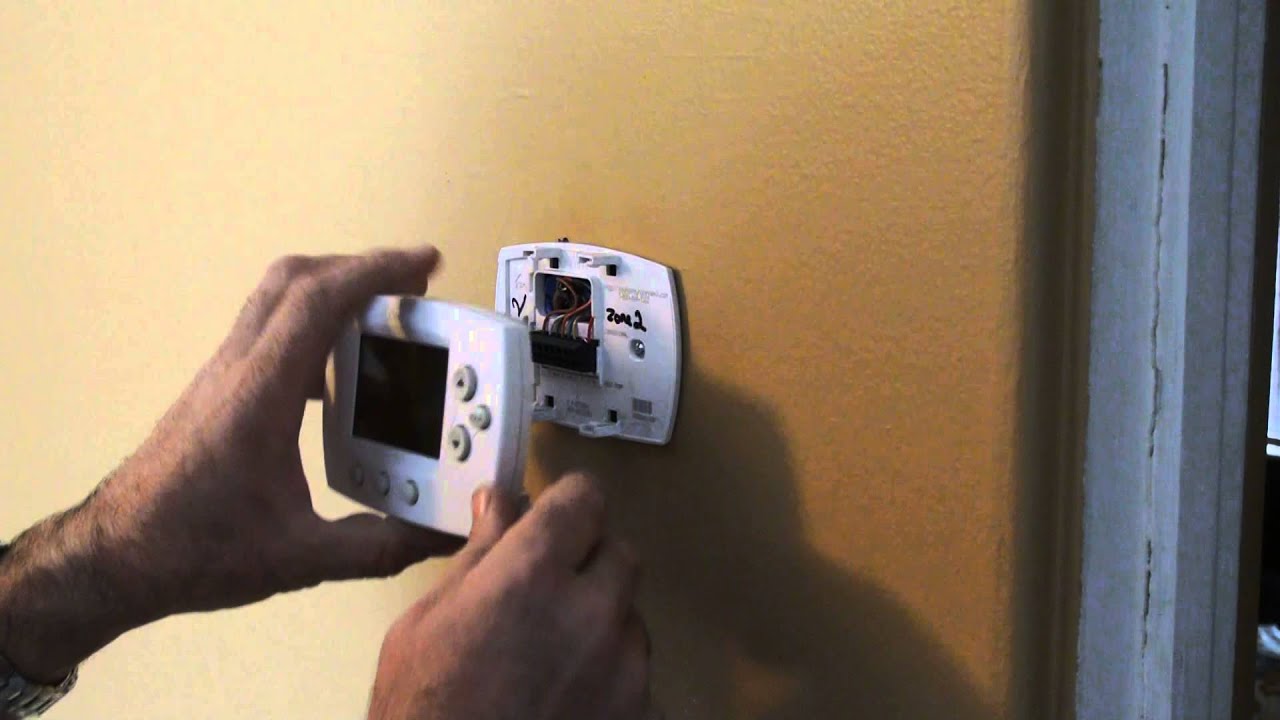
Gently Pry Open
Once the screws are out, the cover is still attached by clips. Use a flat-head screwdriver or a similar tool. Insert it gently into the gap between the cover and the base. Pry it open carefully. Avoid using too much force to prevent damage. The cover should pop off easily.
Check Best Thermostat Pricing in Amazon
** As an Amazon Associate, I earn from qualifying purchases.
Now, you have access to the inside of your Honeywell thermostat. You can proceed with any further steps as needed.
Clean The Thermostat
Maintaining your Honeywell thermostat is crucial for its longevity and efficiency. One important step in this process is cleaning the thermostat. Dust and debris can accumulate inside, affecting its performance. Regular cleaning ensures it works smoothly and accurately. Follow these steps to clean your Honeywell thermostat effectively.
Dust And Debris
Begin by removing any visible dust and debris. Use a soft brush or a can of compressed air. Gently brush or blow away the dust from the surface and inside the cover. Avoid using liquids as they can damage the internal components. Regularly cleaning dust can prevent malfunctions and improve performance.
Check For Damage
While cleaning, check for any damage. Look at the wires and connections. Ensure everything is intact and there are no loose parts. If you notice any damage, it may require professional repair. Keeping an eye on potential issues can help prevent future problems.

Credit: willplumb.com
Reattach The Cover
Secure the Honeywell thermostat cover by aligning it with the base and pressing firmly until it clicks into place. Ensure all edges are flush for proper operation.
Reattaching the cover of your Honeywell thermostat might seem like a simple task, but doing it correctly ensures your device functions optimally. A secure cover not only protects the internal components but also maintains the aesthetic appeal of your thermostat. Below, we’ll guide you through the process, making it easy and hassle-free.Align The Cover
First, make sure you have the cover oriented correctly. Look for any tabs or notches that need to match up with the base. This is crucial for a snug fit. Next, gently position the cover over the base. Align the notches and tabs carefully. Don’t force it; if it doesn’t fit, recheck the alignment. Lastly, ensure that all sides are evenly aligned. A misaligned cover can cause issues with the display or buttons.Secure Screws
Once aligned, locate the screw holes. These are usually at the top and bottom of the thermostat cover. Insert the screws and start turning them clockwise. Use a manual screwdriver for better control. Over-tightening can strip the screws or crack the cover. Finally, give the cover a gentle push to ensure it’s securely in place. If it feels loose, recheck the screws. A secure cover keeps everything protected and functioning correctly. Have you ever struggled with reattaching a thermostat cover? Share your tips or questions below!Test The Thermostat
Easily remove the Honeywell thermostat cover by gently pulling it off from the base. Ensure the unit is off before starting.
After successfully removing the thermostat cover, the next crucial step is to test the thermostat. Testing ensures that the thermostat is working correctly and is set to your desired temperature settings. Let’s dive into the steps to test your Honeywell thermostat effectively.Restore Power
First, you need to restore power to your thermostat. Head back to your circuit breaker and flip the switch back on. You should see the display on your thermostat light up. If the display doesn’t turn on, double-check that the power is correctly restored. It’s essential to ensure that all connections are secure.Check Functionality
Now, it’s time to check the functionality of the thermostat. Set it to a temperature higher or lower than the current room temperature. If you set it to a higher temperature, the heating system should activate. Similarly, setting it to a lower temperature should trigger the cooling system. Listen for any sounds indicating that the HVAC system has started. You should hear a click or the sound of air moving through the vents. If the system doesn’t respond, it might indicate a wiring issue or a problem with the thermostat itself. Consider consulting your Honeywell thermostat manual or seeking professional help. Testing the thermostat is a straightforward process, but it’s crucial to ensure your system runs efficiently. Have you faced any unexpected issues while testing your thermostat? Share your experiences or any tips you found helpful!
Credit: www.reddit.com
Troubleshooting Tips
Are you having trouble removing the thermostat cover from your Honeywell device? Don’t worry, you’re not alone. Let’s dive into some troubleshooting tips that can help you resolve common issues and decide when it’s time to call a professional.
Common Issues
Sometimes, the thermostat cover just doesn’t seem to budge. This can be frustrating, especially when you need to make adjustments quickly. One common issue is the presence of hidden screws. Make sure to check the edges of the cover closely. Another problem could be dirt or debris stuck in the crevices. A quick clean might solve the issue.
Another frequent problem is that the thermostat cover may feel stuck due to age. Plastic can warp over time, making it harder to remove. A gentle wiggle from side to side can sometimes do the trick. Finally, make sure you’re pulling in the right direction. Some Honeywell models require the cover to be slid upwards or downwards rather than pulled directly off.
When To Call A Professional
If you’ve tried these tips and still can’t remove the cover, it might be time to call a professional. You don’t want to risk damaging the thermostat, which could lead to more costly repairs. A professional can quickly identify the issue and safely remove the cover for you.
Another scenario where you should call for help is if you notice any exposed wires or if the thermostat is making unusual noises. These could be signs of deeper electrical issues that need immediate attention. Safety should always be your top priority.
Have you ever had an experience where you tried to fix something and it ended up worse? Sometimes, it’s just better to leave it to the experts. Would you rather spend a few dollars now on a professional, or risk a bigger expense later?
Remember, your thermostat is an essential part of your home’s comfort system. Taking the right steps to troubleshoot and knowing when to seek help can save you both time and stress. So next time you face a stubborn thermostat cover, you’ll know exactly what to do!
Frequently Asked Questions
How To Take Off Honeywell Thermostat Cover?
To take off a Honeywell thermostat cover, gently pull the cover straight off. Ensure the thermostat is turned off first.
How Do I Open My Honeywell Thermostat?
To open your Honeywell thermostat, gently pull the thermostat’s cover from the bottom. Lift off the cover to access the interior.
How To Remove Thermostat Cover To Replace Battery?
To remove the thermostat cover, gently pull it off or unscrew it. Replace the battery by inserting a new one.
How Do I Change The Battery In My Honeywell Thermostat Cover?
Remove the thermostat cover. Locate the battery compartment. Replace old batteries with new AA or AAA batteries. Reattach the cover.
Conclusion
Removing a Honeywell thermostat cover is simple and straightforward. Follow the steps carefully and handle the thermostat gently. Pay attention to any clips or screws. Ensure the thermostat is powered off before starting. Refer to the user manual for specific model instructions.
With these tips, you can easily access the thermostat for cleaning or maintenance. Keep your thermostat in good condition for better performance. Thank you for reading and good luck with your thermostat!
Check Best Thermostat Pricing in Amazon
** As an Amazon Associate, I earn from qualifying purchases.