
Check Best Thermostat Pricing in Amazon
** As an Amazon Associate, I earn from qualifying purchases.
To remove a Honeywell thermostat from the wall, start by turning off the power. Then, carefully detach the thermostat from its base.
Removing a Honeywell thermostat may seem tricky, but it’s not too hard with the right steps. This guide will help you through the process, ensuring you can do it safely and efficiently. Whether you’re upgrading your system, painting the wall, or relocating your thermostat, knowing how to remove it properly is important.
We’ll cover everything you need to know, from the tools required to the step-by-step instructions. By the end of this article, you’ll have the confidence to remove your Honeywell thermostat without any issues. Let’s get started!
Tools Needed
You’ll need a screwdriver, wire labels, and a voltage tester to remove a Honeywell thermostat from the wall. These tools will ensure a safe and efficient removal process.
Removing a Honeywell thermostat from your wall might seem like a daunting task, but with the right tools, it’s a straightforward process. Whether you’re upgrading to a new model or simply relocating the thermostat, ensuring you have the proper tools on hand can make the job easier and safer.Essential Tools
Before you begin, gather these essential tools:- Screwdriver: A Phillips or flathead screwdriver will be necessary to remove the screws securing the thermostat to the wall. Check which type your thermostat uses.
- Drill: If the screws are particularly tight or you’re dealing with an older model, a cordless drill can make the task quicker and less strenuous.
- Wire Labels: These are crucial for labeling the wires as you disconnect them. This will help you reconnect everything correctly later.
- Plier: A small pair of pliers can help you grip and maneuver wires, especially if they’re stubborn or tricky to handle.
- Level: A small level ensures that your new thermostat (or the blank wall plate) is properly aligned.
Optional Tools
Depending on your specific situation, you might also find these optional tools helpful:- Voltage Tester: Safety first! A voltage tester helps ensure no power is running to the thermostat wires before you start working.
- Needle-nose Pliers: These can be useful for handling smaller wires or getting into tight spaces.
- Stud Finder: If you plan to mount your new thermostat in a different location, a stud finder can help you find the best spot.
- Safety Glasses: Protect your eyes from dust and debris, especially if you’re drilling or working in an older home.

Credit: willplumb.com
Power Off
Removing your Honeywell thermostat from the wall might seem like a daunting task, but it’s actually quite straightforward if you follow the right steps. One of the first and most critical steps is to ensure the power is off. This is essential for your safety and the integrity of your home’s electrical system. Here’s how you can do it:
Locate Circuit Breaker
First, you need to find your home’s circuit breaker panel. This is usually located in a basement, garage, or utility room. The panel is a metal box with a door and should have a label indicating “Circuit Breaker”.
Once you locate the panel, open it and look for the breaker that controls the power to your thermostat. This may be labeled as “HVAC”, “Thermostat”, or something similar. If you’re unsure, check your home’s electrical plan or consult a professional.
Turn Off Power
After you’ve found the right breaker, flip the switch to the “Off” position. This will cut off the power to your thermostat, making it safe to remove from the wall.
Double-check that the power is off by attempting to turn on the thermostat. If the display does not light up, you’ve successfully turned off the power. If it does light up, double-check you’ve flipped the correct breaker.
Remember, safety is paramount. Always ensure the power is off before proceeding with any electrical work. Have you ever had an unexpected electrical shock? Not a pleasant experience!
By following these steps, you can safely prepare to remove your Honeywell thermostat. Ready for the next step? Stay tuned for more tips!
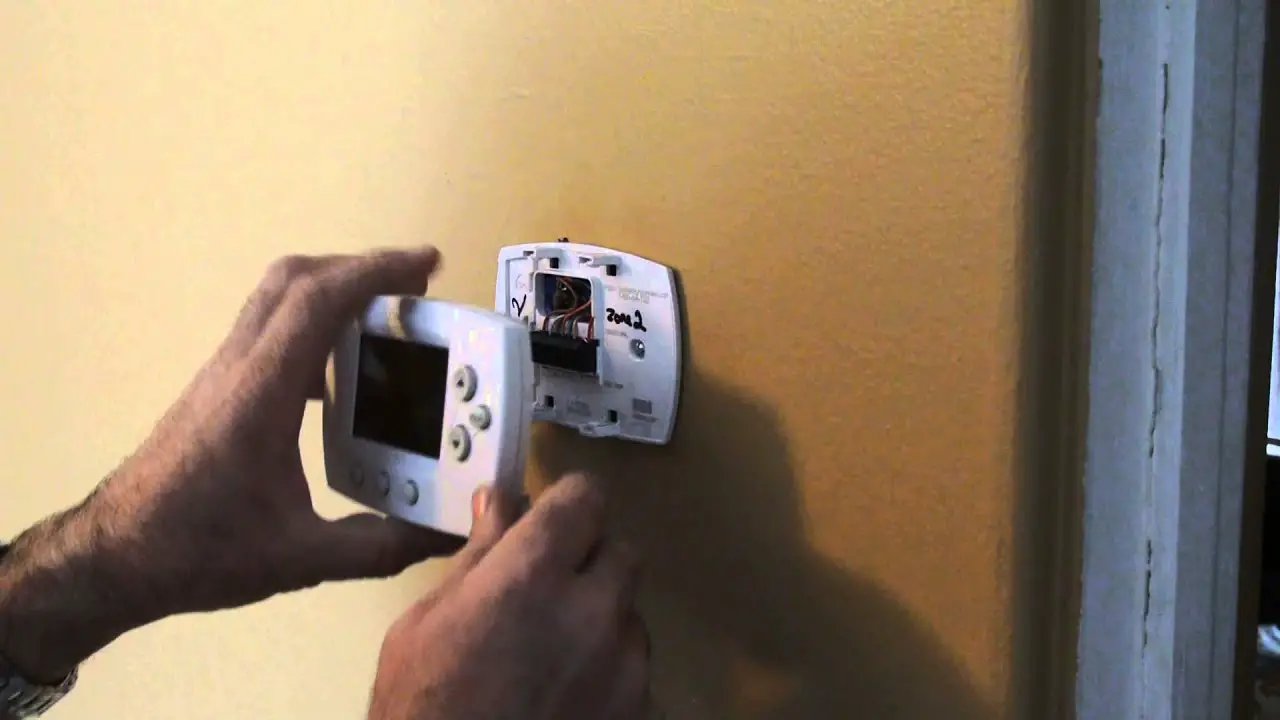
Remove Faceplate
To remove the Honeywell thermostat from the wall, start by taking off the faceplate. Gently pull it away to reveal the screws.
Removing the faceplate of your Honeywell thermostat is a simple task. This step is essential if you want to access the internal components or wires. Follow these instructions to remove the faceplate safely and easily.Detach Faceplate
First, you need to detach the faceplate. Grip the thermostat firmly with both hands. Gently pull the faceplate towards you. Apply even pressure to avoid damaging the device. The faceplate should come off smoothly. If it feels stuck, try wiggling it slightly.Check For Screws
Sometimes, thermostats have screws securing the faceplate. Inspect the edges of the faceplate carefully. Look for any visible screws. Use a screwdriver to remove them if present. Keep the screws in a safe place. This step ensures you can reattach the faceplate later. “`Disconnect Wires
Removing a Honeywell thermostat from the wall might seem like a challenging task, but it’s actually quite straightforward. The key step is to disconnect the wires properly. This ensures that you don’t damage the thermostat or your HVAC system. Here’s how you can do it efficiently.
Label Wires
Before you start disconnecting any wires, it’s crucial to label them first. This will help you keep track of which wire goes where when you install a new thermostat.
Use small pieces of masking tape or wire labels, and write down the terminal letter each wire is connected to. For example, if a wire is connected to terminal “R,” label it as “R.” This simple step saves a lot of confusion later.
Loosen Screws
Once your wires are labeled, the next step is to loosen the screws holding the wires in place. Use a small screwdriver to carefully unscrew each terminal. Be gentle to avoid stripping the screws.
As you loosen each screw, gently pull the corresponding wire out. Keep the wires straight and avoid bending them, which can make reinstallation trickier.
Check Best Thermostat Pricing in Amazon
** As an Amazon Associate, I earn from qualifying purchases.
Have you ever had trouble remembering where each wire goes? Labeling helps prevent that headache. Take a moment to do it right, and future you will thank you.
Are you ready to take on the challenge? With these simple steps, disconnecting the wires from your Honeywell thermostat is a breeze. What other tips would make this process easier for you? Share your thoughts below!
Detach Mounting Plate
Detaching the mounting plate of your Honeywell thermostat is a crucial step. It allows you to fully remove the thermostat from the wall. Follow these steps to do it safely and efficiently.
Unscrew Mounting Plate
First, locate the screws securing the mounting plate. Use a screwdriver to remove these screws. Be careful not to strip the screw heads. This step is simple but requires some attention. Place the screws in a safe spot for reinstallation.
Remove From Wall
Once the screws are removed, gently pull the mounting plate away from the wall. Check for any remaining wires attached to the plate. If there are, disconnect them carefully. Now, the mounting plate should come off easily.
Ensure no debris falls into the exposed wiring. The wall should now be clear of the thermostat and its mounting plate. You have successfully detached the mounting plate!

Credit: support.resideo.com
Inspect Wall
After removing your Honeywell thermostat, it’s important to inspect the wall. This step ensures a smooth transition to your new thermostat. A thorough inspection can help identify any issues that need addressing. This will save time and effort during the new installation.
Check For Damage
Look for any cracks or holes in the wall. Small holes are common where screws were used. Check the paint for peeling or discoloration. These issues can affect the new thermostat’s installation. Address any damage before moving forward.
Prepare For New Installation
Make sure the wall surface is clean and smooth. Remove any debris or dust from the area. This ensures the new thermostat will sit flush against the wall. Mark the new screw holes if needed. This step ensures precise placement of your new thermostat.

Credit: www.youtube.com
Frequently Asked Questions
How Do I Take My Honeywell Thermostat Off The Wall?
To remove your Honeywell thermostat, turn off the power. Carefully detach the front cover, then unscrew the mounting plate.
How To Remove Honeywell Thermostat From Wall To Replace Battery?
Gently pull the thermostat cover off the wall mount. Locate the battery compartment. Replace the batteries and snap the cover back.
How To Pull A Thermostat Off The Wall?
Turn off the power. Remove the thermostat cover. Unscrew the mounting screws. Gently pull the thermostat off the wall.
How Do You Remove The Cover On A Honeywell T6 Thermostat?
To remove the cover on a Honeywell T6 thermostat, gently pull the cover from the bottom. It should snap off easily.
Conclusion
Removing your Honeywell thermostat from the wall is simple. Follow the steps carefully. Start by turning off the power. Next, remove the cover. Unscrew the mounting plate. Disconnect the wires. Finally, gently pull the thermostat off. Make sure to handle it carefully.
Now, you can replace or upgrade your thermostat. This guide ensures you can do it yourself. Save time and avoid hassle. Always remember safety first. Enjoy your new setup!
Check Best Thermostat Pricing in Amazon
** As an Amazon Associate, I earn from qualifying purchases.