
Check Best Thermostat Pricing in Amazon
** As an Amazon Associate, I earn from qualifying purchases.
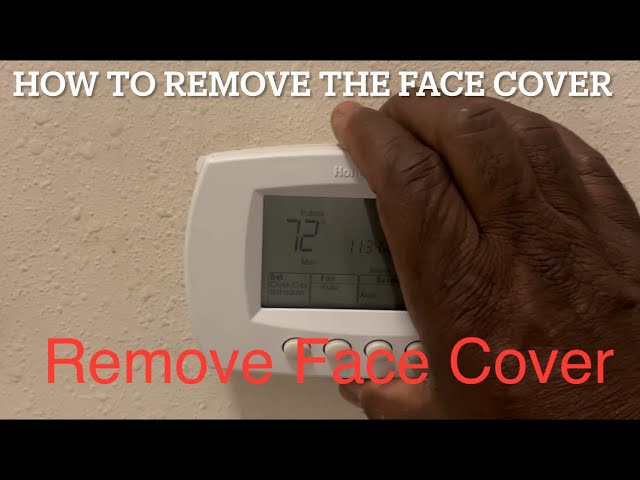
Removing a Honeywell thermostat cover is a simple task. You can do it in minutes with the right steps.
Honeywell thermostats are popular in many homes. They help control heating and cooling systems efficiently. Sometimes, you may need to remove the cover for cleaning or troubleshooting. Knowing how to do this safely is important. In this guide, we will show you how to remove the Honeywell thermostat cover.
We will provide clear instructions to make the process easy. Whether you are fixing an issue or just curious, this guide is for you. Let’s get started on learning how to remove your Honeywell thermostat cover.
Credit: www.youtube.com
Safety Precautions
Removing the cover of a Honeywell thermostat requires careful attention to safety. Following the right precautions can prevent accidents. Here are some key steps to ensure safety.
Turn Off Power
Always switch off the power to the thermostat. Go to the circuit breaker panel. Locate the switch for the HVAC system. Turn it off completely. This step prevents electrical shocks.
Wear Protective Gear
Protect your hands and eyes. Wear gloves and safety glasses. This prevents injury from any sharp edges or debris. Safety gear is essential for any electrical work.
Identifying Your Honeywell Thermostat Model
Identifying your Honeywell thermostat model is essential before removing the cover. Different models have unique features and designs. Knowing your model helps you follow the right steps for safe removal.
Locating Model Number
First, find the model number on your Honeywell thermostat. It is usually located on the back of the thermostat or inside the battery compartment. You may need to gently pull the thermostat from the wall to see it. Look for a label with a combination of letters and numbers.
Take note of this model number. It will help you understand which specific removal steps to follow. Each model has its own method for cover removal.
Understanding Different Models
Honeywell thermostats come in various models. Basic models might have a simple snap-on cover. Advanced models often have more secure covers. Knowing your model helps determine the tools you need and the level of care required.
Some popular models include the Honeywell T Series, RTH Series, and the 8000 Series. Each series has unique features and designs. Familiarize yourself with the specific characteristics of your model. This will make the removal process smoother.
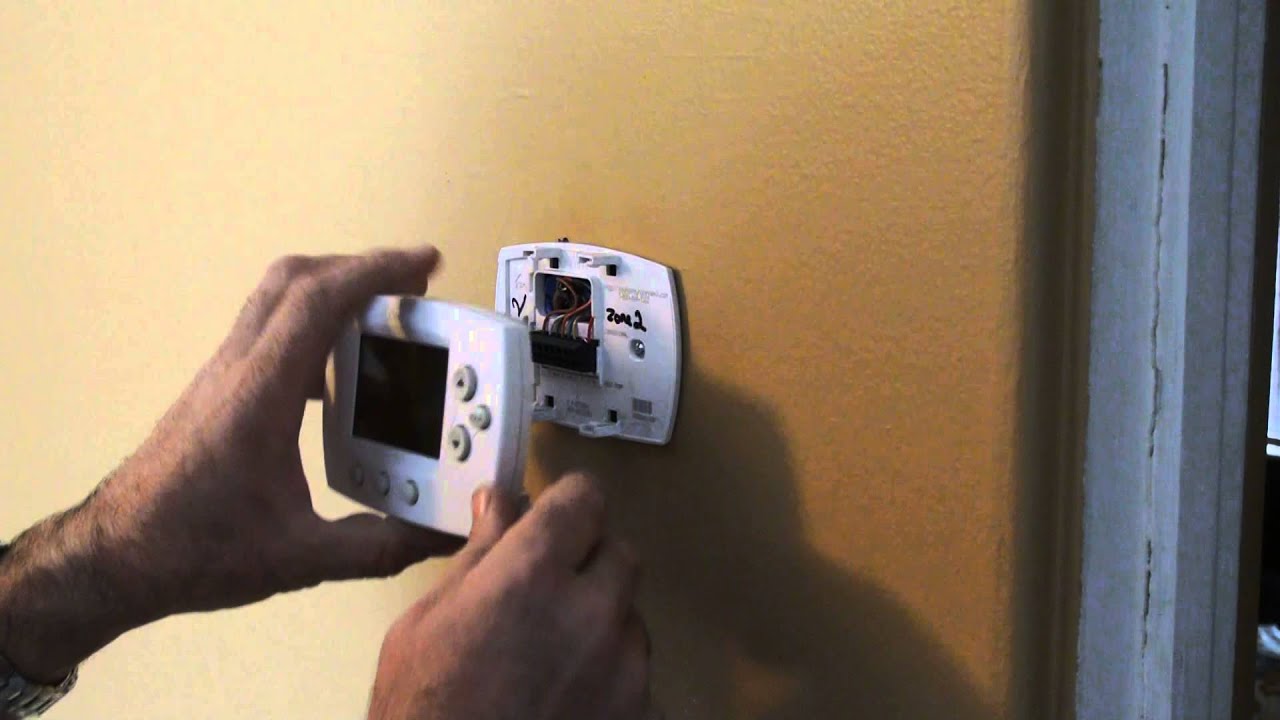
Removing The Thermostat From The Wall
Removing the thermostat from the wall might seem daunting. But with the right steps, it’s manageable. Follow these guidelines to ensure you do it safely and correctly.
Detaching The Unit
First, turn off the power to your thermostat. This prevents any electrical mishaps. Locate the screws securing the thermostat to the wall. Use a screwdriver to loosen them. Once the screws are loose, gently pull the unit away from the wall. Be careful not to yank it. The wires are still connected.
Handling Wires Carefully
Now, look at the wires. They connect the thermostat to your HVAC system. Note their positions and labels. Taking a photo can help. Carefully disconnect each wire. Use gentle pressure to avoid damage. Place the wires away from each other. This prevents short circuits.

Credit: willplumb.com
Removing The Cover
To remove the Honeywell thermostat cover, gently pull on the edges. Ensure you do not force it to avoid damage. Once the cover is loose, carefully lift it off the base.
Removing the cover of your Honeywell thermostat might seem daunting, but it’s actually quite simple. Whether you need to change the batteries, adjust settings, or troubleshoot an issue, knowing how to safely remove the cover is essential. Let’s break it down into manageable steps that anyone can follow.Locating Screws Or Clips
First, determine how your Honeywell thermostat cover is attached. Typically, you will find either screws or clips holding it in place. Check the perimeter of the thermostat for small screws. They may be located on the sides or at the bottom. If there are no visible screws, your thermostat likely uses clips. Remember, not all models are the same. Refer to your thermostat manual if you are unsure.Using Tools To Remove The Cover
If you found screws, you’ll need a small screwdriver. Choose one that fits the screw heads perfectly to avoid stripping them. Gently turn the screws counterclockwise until they come out completely. Keep the screws in a safe place to avoid losing them. For clip-based covers, you may need a flathead screwdriver or a similar tool. Insert the tool gently between the cover and the base of the thermostat. Apply a slight upward or outward pressure to release the clips. Be careful not to use too much force to avoid damaging the clips or the cover. Have you ever tried removing a thermostat cover before? What challenges did you face? Let us know in the comments below! Removing the cover is the first step to maintaining your thermostat. With these instructions, you can easily access the internal components without causing any damage. Now, you’re ready to proceed with your maintenance or troubleshooting tasks!Inspecting The Interior
Inspecting the interior of your Honeywell thermostat is a crucial step. This ensures it functions well and remains reliable. Once you remove the cover, take a moment to look inside.
Check Best Thermostat Pricing in Amazon
** As an Amazon Associate, I earn from qualifying purchases.
Checking For Dust And Debris
Dust and debris can affect your thermostat’s performance. Gently brush away any visible particles. Use a soft, dry cloth or a small brush. Be careful not to damage any internal parts.
Inspecting For Damage
Look closely at the internal components. Check for any signs of wear or damage. Loose wires, burnt areas, or broken parts need immediate attention. If you notice any issues, consider getting professional help.
Reassembling The Thermostat
Reassembling the thermostat is a crucial step after removing the Honeywell thermostat cover. This ensures your thermostat works correctly and is securely mounted. Follow these steps to reassemble your thermostat efficiently.
Replacing The Cover
First, align the cover with the base. Check that all the edges match up. Gently press the cover onto the base until it clicks into place. Make sure the cover is secure and not loose. This will protect the internal components.
Securing The Unit Back On The Wall
Next, hold the thermostat against the wall. Align it with the mounting holes. Insert the screws into the holes and tighten them. Ensure the thermostat is firmly attached to the wall. This prevents it from falling or moving. Once secured, reconnect any wires if needed. Finally, restore power to the thermostat and test it to ensure it functions properly.
Final Checks
After removing the Honeywell thermostat cover, it’s crucial to perform final checks. These checks ensure everything is in order and the thermostat functions correctly. Let’s go through the necessary steps.
Restoring Power
First, restore the power to your thermostat. Locate the circuit breaker panel. Turn the switch labeled “Thermostat” back to the “On” position. This step is vital to ensure the thermostat receives power.
Testing The Thermostat
Next, test the thermostat to confirm it’s working properly. Set the desired temperature on the thermostat. Listen for the click indicating the system is responding. Check if the heating or cooling system activates. Wait a few minutes to see if the system stabilizes at the set temperature.
If the system does not respond, recheck the connections. Ensure all wires are securely attached. Also, verify that the thermostat cover is properly seated. Repeat the power restoration step if necessary.
Credit: www.reddit.com
Frequently Asked Questions
How To Take Off Honeywell Thermostat Cover?
To take off the Honeywell thermostat cover, gently pull it from the bottom. Carefully lift it off the wall plate.
How To Remove Thermostat Cover To Replace Battery?
To remove the thermostat cover, gently pull or unscrew the cover. Locate and replace the battery. Reattach the cover securely.
How Do I Open My Honeywell Thermostat?
To open your Honeywell thermostat, gently pull the cover from the bottom or sides. Follow the user manual for specific instructions.
How Do You Clean The Screen On A Honeywell Thermostat?
Turn off the thermostat. Use a soft, damp cloth to gently wipe the screen. Avoid using harsh chemicals or abrasive materials.
Conclusion
Removing a Honeywell thermostat cover is a simple task. Follow the steps carefully. Gather your tools. Take your time. Gently pry the cover off. Handle with care to avoid damage. Now, you can access the inner components. Regular maintenance ensures efficient operation.
Always refer to the manual if unsure. Keeping your thermostat in good shape is essential. Happy troubleshooting!
Check Best Thermostat Pricing in Amazon
** As an Amazon Associate, I earn from qualifying purchases.