
Check Best Thermostat Pricing in Amazon
** As an Amazon Associate, I earn from qualifying purchases.
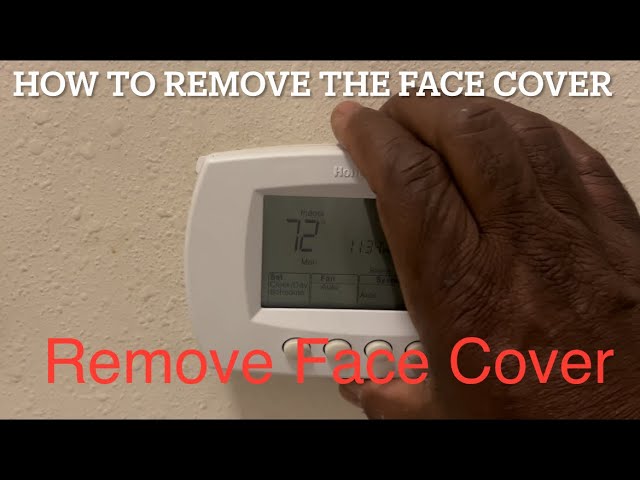
Removing the cover of a Honeywell thermostat is simple. It requires a few steps to ensure safe handling.
In this guide, you’ll learn how to do it correctly. Honeywell thermostats are popular for their reliability and ease of use. Sometimes, you may need to remove the cover for cleaning or troubleshooting. Knowing how to do this can help maintain your thermostat.
It’s important to follow the right steps to avoid damage. This article will walk you through the process with clear instructions. Whether you’re fixing an issue or just cleaning, you will find this guide helpful. Let’s get started on keeping your Honeywell thermostat in top shape.

Credit: willplumb.com
Safety Precautions
Ensure the thermostat is off before removing the cover. Carefully use a screwdriver to avoid damaging the unit. Handle the cover gently to prevent injury.
Removing the cover from your Honeywell thermostat might seem simple, but it’s crucial to follow safety precautions to avoid any mishaps. Not only will this ensure your safety, but it will also protect the thermostat from potential damage. Let’s delve into some essential safety steps you need to follow.Turn Off Power
Before you start, turn off the power to your thermostat at the breaker panel. This step is crucial to prevent electrical shock. Double-check that the power is off by trying to adjust the thermostat—if it’s unresponsive, you’re good to go.Avoid Electrical Hazards
Avoid touching any exposed wires or terminals. These parts can still carry a charge even when the power is off. Consider wearing insulated gloves for added protection. It might seem excessive, but it’s better to be safe than sorry. Have you ever had a close call with an electrical device? Share your story to remind others why these steps are important.Identify Your Honeywell Thermostat Model
Identifying your Honeywell thermostat model is the first step in removing the cover. Different models may have different mechanisms for cover removal. Knowing your model ensures you handle the thermostat correctly. This guide will help you identify your Honeywell thermostat model effortlessly.
Locate Model Number
The model number is often on the front or back of the thermostat. Check the user manual if you have it. The model number is usually a combination of letters and numbers. It may also be inside the cover. If you can’t find it, look for a label or sticker on the device.
Common Models
Honeywell has various thermostat models. The most common ones include the Honeywell T4 Pro, T6 Pro, and RTH9585WF. Each model has unique features and cover removal methods. The T4 Pro is a basic model, while the T6 Pro offers more advanced options. The RTH9585WF has Wi-Fi capabilities.
Knowing your model can save you time. It helps you find the right instructions for removing the cover. Double-check the model number before proceeding. This ensures you do not damage the thermostat.
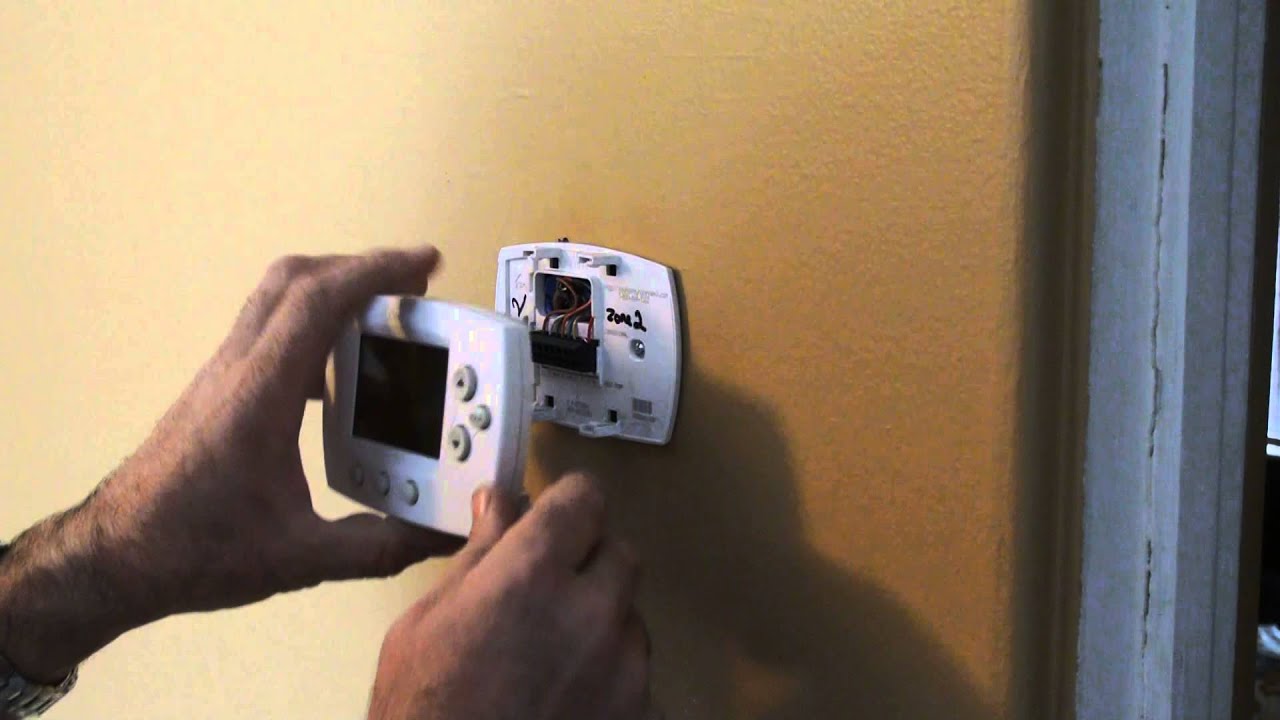
Removing The Cover
Removing the cover of your Honeywell thermostat may seem daunting, but it’s quite simple. Whether you need to change the batteries, clean the unit, or check the wiring, understanding how to remove the cover is essential. Let’s break it down into two main types of covers: standard snap-off covers and screw-on covers.
Standard Snap-off Covers
Many Honeywell thermostats feature standard snap-off covers. You can remove these with minimal effort. Firmly grasp the sides of the cover and gently pull it towards you.
Remember to pull evenly to avoid breaking any clips. If the cover resists, try wiggling it slightly from side to side. This can help loosen any stuck clips.
I once struggled with a particularly stubborn cover. A gentle wiggle did the trick. Have you had any similar experiences?
Screw-on Covers
Screw-on covers are another common design. These covers are held in place by screws, making them more secure. Locate the screws, which are usually at the top or bottom of the thermostat.
Use a screwdriver to remove the screws. Keep them in a safe place to avoid losing them. Once the screws are out, gently pull the cover off.
It’s straightforward, but be cautious not to strip the screws. Have you ever lost a tiny screw? It’s a pain to find them again.
By understanding these two types of covers, you can easily access your Honeywell thermostat. This knowledge will help you maintain your thermostat efficiently.
Dealing With Stubborn Covers
Struggling to remove the cover on your Honeywell thermostat can be frustrating. Sometimes, the cover just doesn’t want to budge. Let’s talk about how to handle those stubborn covers without causing damage.
Using Gentle Force
Sometimes, a little bit of gentle force is all you need. Try wiggling the cover back and forth while applying slight pressure. This can help loosen any stuck edges.
If that doesn’t work, use a flathead screwdriver. Gently insert it into the seam and twist slightly to pry the cover open. Make sure to apply just enough pressure to lift the cover without cracking it.
Check Best Thermostat Pricing in Amazon
** As an Amazon Associate, I earn from qualifying purchases.
Avoiding Damage
Be cautious to avoid damaging your thermostat. Excessive force can break the cover or the internal components.
Always start with the least amount of force. If you feel resistance, check for any screws or latches that you might have missed.
Using tools like a plastic card can be helpful. Slide it around the edges to loosen the cover without scratching the surface. This is especially useful if you’re concerned about aesthetics.
Have you ever removed a stubborn cover and damaged it? Share your experiences below. Your tips might help someone else!
Cleaning The Thermostat
Keeping your Honeywell thermostat clean is essential. Dust and grime can affect its performance. Regular cleaning ensures it works efficiently. Start by removing the cover carefully. Once removed, focus on cleaning the internal parts.
Dust Removal
First, use a soft brush to remove dust. Gently brush the dust off the thermostat components. Avoid using water or any liquid cleaners. Liquids can damage the electronic parts. Use a can of compressed air for hard-to-reach areas. This helps in blowing away dust particles without touching the components.
Checking For Damage
After dust removal, check the thermostat for any visible damage. Look for loose wires or broken parts. Damaged components can affect the thermostat’s functionality. If you find any issues, consider consulting a professional. They can repair or replace the damaged parts. Regular checks ensure your thermostat remains in good working condition.
Credit: www.youtube.com
Reattaching The Cover
Slide the cover back onto the Honeywell thermostat. Ensure it clicks into place securely. Check the display to confirm proper attachment.
Reattaching the cover on your Honeywell thermostat is a simple process. Correctly aligning and securing the cover is essential. This ensures your thermostat operates properly. Follow these steps to reattach the cover with ease.Aligning The Cover
First, hold the cover with both hands. Make sure the edges line up with the base. Position the cover directly over the thermostat. Align the clips or tabs on the cover with the slots on the base. This will help you place the cover correctly.Securing The Cover
Gently press the cover against the thermostat base. You should hear a click, which indicates the cover is secure. Double-check all sides to ensure the cover is flush with the base. If the cover feels loose, press it again until it clicks into place. Once the cover is secure, your Honeywell thermostat is ready to use. Ensure the display and buttons work correctly. If everything functions well, you have successfully reattached the cover. “`Troubleshooting Common Issues
Encountering problems while removing the cover on your Honeywell thermostat can be frustrating. Understanding common issues helps you handle them efficiently. Here, we explore frequent problems and their solutions.
Cover Not Fitting
If the cover does not fit, check for obstructions. Debris or dust may block the cover. Clean the area around the thermostat. Ensure no wires are in the way. Align the cover properly before placing it back. Do not force it. Gentle pressure should secure it.
Thermostat Not Working
If your thermostat stops working after removing the cover, check the wiring. Loose wires may cause the issue. Ensure all connections are secure. Reset the thermostat by turning off the power. Wait a few minutes, then turn it back on. If the problem persists, consult the user manual. It may provide specific troubleshooting steps for your model.
Credit: www.reddit.com
Frequently Asked Questions
How Do I Take The Cover Off My Honeywell Thermostat To Change The Battery?
To remove the cover of your Honeywell thermostat, gently pull it off from the bottom. Replace the battery and snap the cover back on.
How To Open Up A Honeywell Thermostat?
To open a Honeywell thermostat, gently pull the front cover off from the base. Remove the screws if present.
How Do You Take The Top Off A Honeywell Thermostat?
Gently pull the thermostat’s faceplate or cover towards you. It should snap off easily without tools.
How To Remove Cover On Honeywell Pro Series Thermostat?
To remove the cover on a Honeywell Pro series thermostat, gently pull the cover straight off. Avoid twisting.
Conclusion
Removing the cover on a Honeywell thermostat is straightforward. Follow steps carefully for safety. Always turn off power before starting. Use gentle pressure to avoid damage. Clean the inside if necessary. Check for any loose wires or debris. Replace the cover securely after finishing.
Regular maintenance helps your thermostat function well. Feel confident in handling your Honeywell thermostat. It’s a simple task with these tips. Enjoy a well-maintained and efficient thermostat!
Check Best Thermostat Pricing in Amazon
** As an Amazon Associate, I earn from qualifying purchases.