

Check Best Thermostat Pricing in Amazon
** As an Amazon Associate, I earn from qualifying purchases.
Removing the cover from a Honeywell thermostat is straightforward. Most models have simple mechanisms for this.
Understanding how to remove the cover is essential for maintenance or troubleshooting. Whether you’re adjusting settings or checking for issues, knowing how to access the internal components can save time and effort. Honeywell thermostats are designed with user-friendly features, making this task relatively simple.
In this guide, you’ll learn the steps to safely remove the cover without damaging the unit. This knowledge ensures you can confidently manage your thermostat, whether it’s for cleaning, replacing batteries, or inspecting connections. Let’s dive into the details to make your thermostat maintenance as easy as possible.
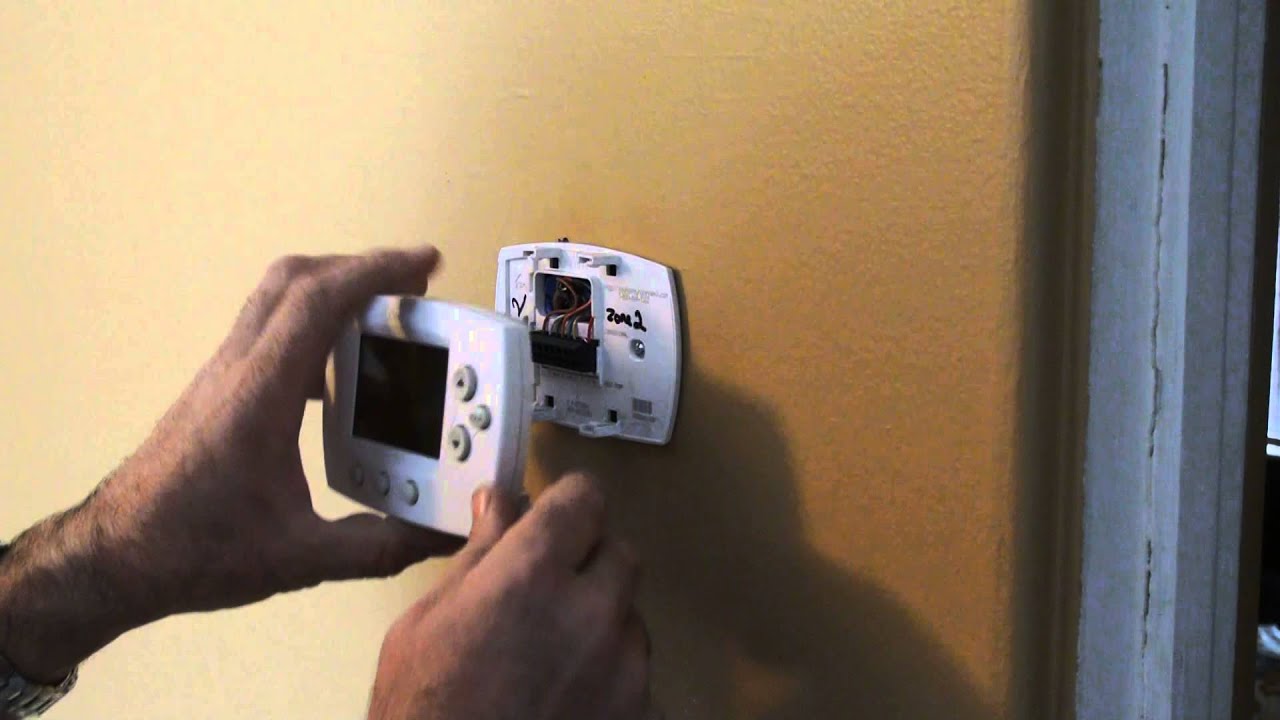
Credit: www.youtube.com
Safety First
Ensuring safety is crucial before removing the cover from your Honeywell thermostat. Following proper safety measures can prevent accidents and protect your device. Let’s dive into the essential steps to ensure a safe removal process.
Turn Off Power
Always start by turning off the power to your thermostat. Locate the circuit breaker panel in your home. Switch off the breaker that controls your HVAC system. This step ensures there’s no electricity running to the thermostat. It protects you from electric shocks.
Gather Necessary Tools
Before you begin, gather the necessary tools. You will need a small flat-head screwdriver. You might also need a Phillips-head screwdriver. Having these tools ready will make the process smoother. This simple preparation helps you avoid interruptions.
Identify Your Honeywell Thermostat Model
Removing the cover from your Honeywell thermostat may seem tricky. First, identify your thermostat model. This step is crucial. Different models have different ways to remove the cover. Knowing your model ensures you follow the correct process.
Locate Model Number
Find the model number on your thermostat. It is usually on the front or back. Sometimes, it is inside the cover. Check all sides carefully. The model number consists of letters and numbers. Write it down for reference.
Check User Manual
Refer to the user manual for your thermostat. The manual provides specific instructions. It will show you how to remove the cover safely. Manuals often include diagrams. These visuals help you understand the process better.
Removing The Thermostat Cover
Removing the thermostat cover might seem like a daunting task, but it is crucial for maintaining your Honeywell thermostat. Whether you are replacing batteries, cleaning the unit, or troubleshooting an issue, knowing how to safely remove the cover is essential. Let’s break down the steps to make it easy for you.
Gently Pry Open
Begin by ensuring your thermostat is switched off. This is crucial to avoid any accidental damage or electrical shock. Use a flathead screwdriver or a similar tool to gently pry open the cover. Insert the tool into the small gap between the cover and the base of the thermostat.
Apply gentle pressure and work your way around the edges. You should feel the cover start to loosen. Be patient and avoid using excessive force, as this can damage the unit. A little persistence goes a long way here.
Handle With Care
Once the cover is loose, use your hands to gently lift it away from the base. Hold the cover with both hands to keep it steady. Avoid pulling it off too quickly, as there may be wires connected to the cover.
If you notice any resistance, stop and check for any clips or latches that may still be holding the cover in place. Carefully unclip these before proceeding. Taking your time will help prevent any accidental damage to the thermostat or its components.
Check Best Thermostat Pricing in Amazon
** As an Amazon Associate, I earn from qualifying purchases.
Have you ever had a mishap while handling delicate equipment? Share your experience in the comments, and let’s learn from each other!
Credit: www.reddit.com
Troubleshooting Stuck Covers
Having trouble removing the cover from your Honeywell thermostat? A stuck cover can be frustrating. You might think it’s broken or jammed. But don’t worry. There are simple solutions to this common problem.
Check For Hidden Screws
First, check if there are hidden screws holding the cover. These screws can be small and easy to miss. Look at the sides and bottom of the thermostat. Use a flashlight if needed. Removing these screws can often solve the issue.
Use Proper Tools
Using the right tools makes a big difference. A small flathead screwdriver works well. Gently insert it into the gap between the cover and the base. Twist it slightly to loosen the cover. Be careful not to use too much force. You don’t want to damage the thermostat.
Cleaning And Maintenance
Gently pull the thermostat cover from the base. Use a firm, steady grip. Avoid using sharp tools to prevent damage.
Cleaning and maintaining your Honeywell thermostat is crucial for optimal performance. Regular maintenance ensures that your thermostat functions efficiently and extends its life. You’ll be surprised how a little effort can make a big difference in how well your thermostat works.Dust And Dirt Removal
Dust and dirt can accumulate inside your Honeywell thermostat, affecting its performance. Use a soft, dry cloth to gently wipe the exterior. For the interior, carefully use a small brush or a can of compressed air. Focus on areas around the buttons and display. Keep an eye on the thermostat sensors and make sure they are clean. Clean sensors can improve the accuracy of temperature readings.Inspect For Damage
Regularly inspect your thermostat for any signs of damage. Look for cracks, loose wires, or corrosion. If you notice any damage, it might affect the thermostat’s performance. In such cases, it’s best to consult the user manual or contact Honeywell support. Have you ever checked the battery compartment? Ensure there are no leaks or corrosion. Replace batteries if needed to keep your thermostat running smoothly. Taking these simple steps can help you avoid bigger issues down the road. Plus, you’ll have peace of mind knowing your home’s temperature is accurately controlled.
Credit: willplumb.com
Reattaching The Thermostat Cover
Removing the cover from a Honeywell thermostat is simple. Gently pull the cover towards you while holding the base. Reattach by aligning the cover and pressing it back into place.
Reattaching the thermostat cover is a crucial step. It ensures your Honeywell thermostat functions properly. Follow these simple steps to do it right.Align Properly
First, ensure the thermostat and cover align properly. Check the tabs and slots. They should match perfectly. Misalignment can cause malfunction. Carefully position the cover over the thermostat. Take your time to get it right.Secure Firmly
Next, press the cover gently but firmly. You should hear a click. This means the cover is secured. Make sure it doesn’t move. A loose cover can affect the thermostat’s performance. Double-check the edges for any gaps. This ensures a snug fit. Following these steps helps maintain your thermostat. A properly attached cover protects internal components. It also ensures accurate temperature readings. Always handle the thermostat with care. This prolongs its lifespan and keeps it working efficiently. “`Frequently Asked Questions
How To Remove The Faceplate Of A Honeywell Thermostat?
To remove the faceplate of a Honeywell thermostat, gently pull the cover from the bottom. It should snap off easily.
How Do You Open A Honeywell Thermostat?
To open a Honeywell thermostat, gently pull the thermostat cover straight off the wall plate. Ensure power is off for safety.
How Do You Take The Top Off A Honeywell Thermostat?
To take the top off a Honeywell thermostat, gently pull the cover straight off. Avoid using excessive force.
How To Remove Thermostat Cover To Replace Battery?
To remove the thermostat cover, gently pull or unscrew it. Check for clips or screws securing the cover. Replace the battery and reattach the cover.
Conclusion
Removing the cover from a Honeywell thermostat is simple. Follow the steps outlined. Always start by turning off the power. Use gentle force to avoid damage. Clean the inside if needed. Regular maintenance can extend its life. Now you can access your thermostat easily.
This helps with troubleshooting or battery replacement. Keep your thermostat working efficiently. Enjoy a comfortable home environment. Thank you for reading!
Check Best Thermostat Pricing in Amazon
** As an Amazon Associate, I earn from qualifying purchases.