
Check Best Thermostat Pricing in Amazon
** As an Amazon Associate, I earn from qualifying purchases.
To remove a Honeywell thermostat from the wall, start by cutting the power. Disconnect the wires, then gently detach the unit from the wall plate.
Honeywell thermostats are popular for their reliability and ease of use. But when it’s time to upgrade or relocate, you’ll need to know how to remove it properly. Removing a thermostat might seem tricky, but with the right steps, it’s simple and safe.
This guide will walk you through the entire process, ensuring you avoid any damage to your system or wall. By following these steps, you can confidently handle the task and get your home ready for the next update. Ready to get started? Let’s dive in and make this job easy.
Gathering Tools
Removing a Honeywell thermostat from the wall can seem tricky. With the right tools and knowledge, it becomes easier. In this section, you will learn about the tools needed for the task.
Necessary Equipment
You need a few basic tools to remove the thermostat. A flat-head screwdriver is essential. This helps in prying the device off the wall. A Phillips-head screwdriver is also needed. It helps in removing screws. You might also need a small level. This ensures the new thermostat is correctly placed.
Safety Precautions
Safety is vital when dealing with electrical devices. Always turn off the power supply before starting. This prevents any electrical shock. Use insulated tools if possible. They offer extra protection. Make sure your hands are dry. Wet hands can cause electrical accidents. Keep children and pets away from the work area. This ensures everyone’s safety.

Credit: www.youtube.com
Turning Off Power
Before removing a Honeywell thermostat from the wall, you must turn off the power. This step ensures your safety and prevents electrical shock. Follow these simple steps to safely turn off the power to your thermostat.
Locate Circuit Breaker
First, find your home’s circuit breaker panel. It is often located in a garage, basement, or utility room. The panel contains switches that control power to various parts of your home.
Confirm Power Off
After locating the circuit breaker, identify the switch controlling the thermostat. Flip this switch to the “off” position. Ensure the power is off by checking the thermostat display. It should be blank or off.
Removing Thermostat Cover
Removing the thermostat cover is the first step in uninstalling a Honeywell thermostat. This process is straightforward and does not require special tools. Follow these steps to safely and efficiently remove the cover.
Accessing Screws
First, locate the screws on the thermostat cover. They are usually at the bottom. Use a small screwdriver to loosen them. Make sure not to lose the screws. Place them in a safe spot.
Detach Cover
Once the screws are loose, gently pull the cover away from the wall. Apply steady pressure to avoid breaking any clips. If the cover is stuck, wiggle it gently. This should help release it. Now, you can see the wiring and internal components.
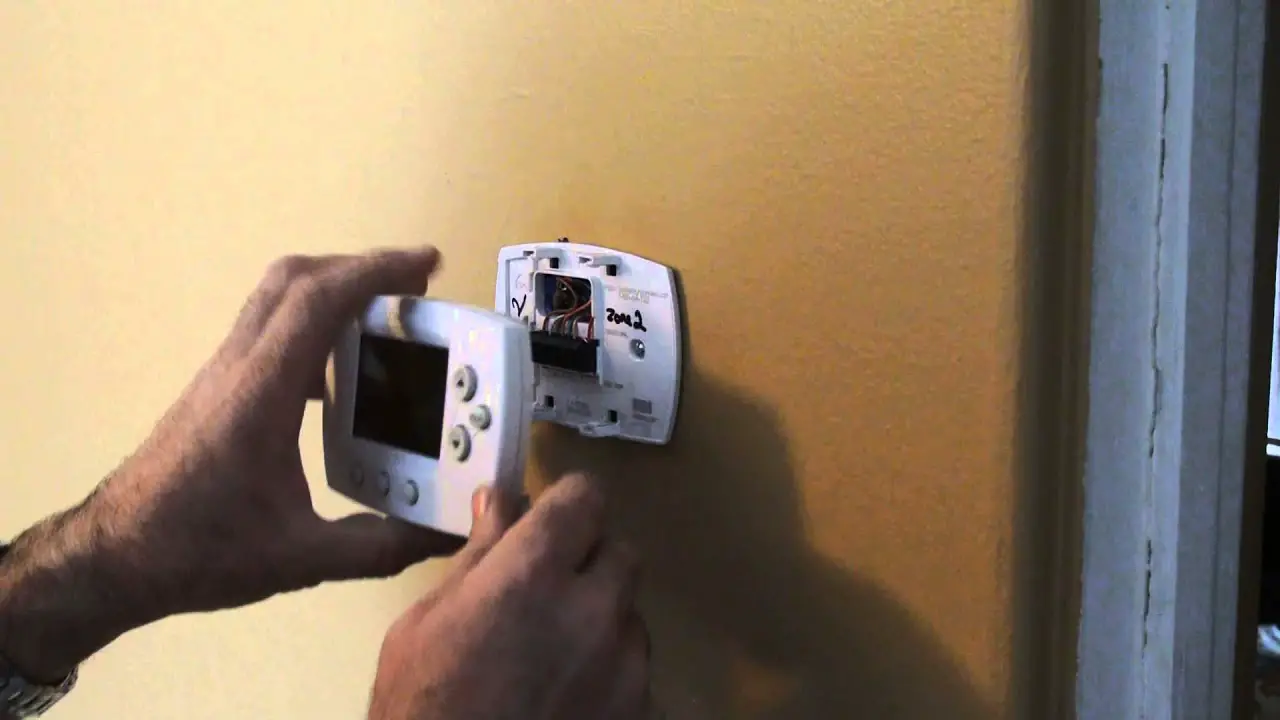
Disconnecting Wires
Disconnecting the wires from your Honeywell thermostat can seem intimidating, but it’s a crucial step in safely removing the thermostat from the wall. Whether you’re upgrading to a newer model or just need to paint the wall behind it, knowing how to properly disconnect the wires is essential. Let’s break it down into manageable steps: labeling the wires and removing the connections.
Label Wires
Before you begin disconnecting any wires, it’s important to label them. This will save you a lot of time and frustration when you’re ready to install the new thermostat. Use small pieces of masking tape and a pen to mark each wire according to the terminal it connects to.
For instance, if a wire is connected to the ‘R’ terminal, write ‘R’ on the tape and wrap it around the wire. Do the same for each wire. This simple step will prevent you from mixing up the wires later.
Have you ever found yourself staring at a mess of wires, wondering which goes where? Labeling them now avoids that confusion. Trust me, I learned this the hard way!
Remove Connections
Once all the wires are labeled, you can start disconnecting them. Use a screwdriver to loosen the screws on each terminal. Gently pull the wire out, taking care not to damage it.
Be mindful of how much force you use. Wires can be delicate, and you don’t want to break any. If a wire seems stuck, wiggle it gently rather than pulling hard.
If you’re unsure about which tool to use, a small flat-head screwdriver usually does the trick. Keep a little container nearby to hold the screws you remove; they’re easy to lose!
Check Best Thermostat Pricing in Amazon
** As an Amazon Associate, I earn from qualifying purchases.
Remember, safety first. Ensure the power to the thermostat is off before you begin. Have you ever been shocked by an electrical wire? It’s not a pleasant experience, and it’s easily avoidable by taking this precaution.
By following these steps, you’ll find that disconnecting the wires from your Honeywell thermostat is straightforward and stress-free. What other DIY projects have you tackled that seemed daunting at first but turned out to be simple? Share your experiences in the comments!
Unscrewing Mounting Plate
Removing a Honeywell thermostat from the wall involves a few steps. One crucial step is unscrewing the mounting plate. This is essential for safely detaching the device. Follow these steps to do it right.
Locate Screws
First, find the screws holding the mounting plate. They are usually at the top and bottom. Use a flashlight if you have trouble seeing them. Ensure you have the right screwdriver.
Remove Mounting Plate
Next, unscrew the screws carefully. Keep them in a safe place. Once the screws are out, gently pull the mounting plate. Be cautious not to damage the wires behind it. This step completes the removal of the mounting plate.
Cleaning Wall Area
Removing a Honeywell thermostat from the wall requires careful handling. Turn off the power, then gently detach the cover and unscrew the mounting plate.
Cleaning Wall Area Once you’ve successfully removed your Honeywell thermostat from the wall, you might notice some dust and residue left behind. Cleaning the wall area not only helps in maintaining the overall aesthetics but also ensures a clean surface for your next installation. Let’s get started with some practical steps.Remove Dust
First, use a soft cloth or a microfiber duster to gently wipe away any dust or debris. Dust can accumulate behind the thermostat over time. Be thorough but gentle to avoid scratching the wall surface. For stubborn dust or residue, lightly dampen the cloth with water. Avoid using harsh chemicals as they might damage the paint or wall texture. If you find any small nails or screws left behind, carefully remove them using a screwdriver or pliers. This will give you a smoother surface to work with.Prepare For New Installation
Before installing a new thermostat, ensure the wall area is completely clean and dry. This step is crucial for a secure and stable installation. Check for any uneven patches or holes. Use wall putty to fill in small holes and cracks. Let it dry completely before sanding it down to a smooth finish. Lastly, consider giving the wall a fresh coat of paint if needed. This will not only enhance the look but also provide a clean slate for the new thermostat. Have you noticed any unexpected wall damage while removing your thermostat? Share your experiences in the comments below and let’s discuss how to tackle those challenges!Handling Old Thermostat
Handling an old thermostat may seem daunting. Yet, it’s crucial for a smooth replacement process. Carefully removing your Honeywell thermostat ensures you avoid damaging the wiring or wall.
Dispose Properly
Old thermostats contain electronic parts. These should not go in regular trash. Take your old thermostat to an electronic recycling center. Many home improvement stores also accept them. They ensure safe disposal.
Environmental Considerations
Some thermostats contain mercury. Mercury is harmful to the environment. Check if your old thermostat has mercury. If it does, handle it with care. Use proper disposal methods. This prevents harmful substances from polluting nature.

Credit: support.resideo.com
Installing New Thermostat
Removing a Honeywell thermostat from the wall is straightforward. First, switch off the power. Then, gently detach the faceplate and unscrew the mounting plate.
Installing a new thermostat can seem like a daunting task, especially after removing your old Honeywell model. However, with the right steps and a bit of patience, you can get it done quickly and efficiently. Let’s dive into the preparation steps and the installation process to make sure you get it right.Preparation Steps
Before you start, ensure you have all the necessary tools. Typically, you’ll need a screwdriver, a drill, and possibly a level. Turn off the power to your heating and cooling system to avoid any electrical mishaps. This is crucial for your safety. Carefully read the instructions that come with your new thermostat. Different models may have specific requirements or steps.Installation Process
First, mount the new thermostat’s baseplate onto the wall. Use the screws provided and make sure it’s level. A crooked thermostat can affect its functionality. Next, connect the wires to the new thermostat. Most new models come with labeled wire terminals, which makes this step straightforward. Just match the wires to the corresponding terminals. Attach the thermostat to the baseplate. Gently snap it into place, making sure it’s secure. Finally, turn the power back on and test your new thermostat. Set a desired temperature and see if your heating or cooling system responds correctly. Installing a new thermostat doesn’t have to be complicated. By following these steps, you can ensure a smooth installation process. Have you ever installed a new thermostat? What challenges did you face, and how did you overcome them? Share your experiences in the comments below!
Credit: willplumb.com
Frequently Asked Questions
How Do I Take My Honeywell Thermostat Off The Wall?
Turn off the power. Remove the faceplate by gently pulling it off. Unscrew the mounting screws and lift the thermostat off the wall.
How To Take Honeywell Thermostat Off Wall To Change Battery?
Remove the thermostat cover by gently pulling it off the wall. Replace the batteries and reattach the cover.
How To Detach A Thermostat From A Wall?
To detach a thermostat from a wall, turn off the power. Remove the cover and unscrew the mounting plate. Disconnect the wires, noting their positions.
How Do I Remove A Honeywell Thermostat From Temporary?
Press “Cancel” or “Run Schedule” on the Honeywell thermostat. This will remove the temporary setting.
Conclusion
Removing a Honeywell thermostat from the wall is simple. Follow the steps carefully. First, turn off the power. Next, remove the cover. Unscrew the mounting screws. Finally, disconnect the wires. Remember to take your time. This process ensures safety. Now, you can replace or upgrade your thermostat.
Enjoy your new device without any hassle. Proper installation makes a big difference. Always consult the user manual for details. If problems arise, seek professional help. Happy DIY!
Check Best Thermostat Pricing in Amazon
** As an Amazon Associate, I earn from qualifying purchases.