
Check Best Thermostat Pricing in Amazon
** As an Amazon Associate, I earn from qualifying purchases.
Reading a Nest Thermostat is straightforward. Understand its display for effective use.
The Nest Thermostat is a smart device that helps manage your home’s temperature. Its sleek design and user-friendly interface make it a popular choice. But, to get the most out of it, you need to know how to read its display.
This guide will help you understand the essential features and information shown on your Nest Thermostat. By knowing what each symbol and number means, you can optimize your home’s climate control. Let’s dive into the basics of reading your Nest Thermostat to ensure your home stays comfortable and energy-efficient.
Setting Up Nest Thermostat
Setting up your Nest Thermostat is an exciting first step towards making your home smarter and more energy-efficient. This process is straightforward and user-friendly, even if you’re new to smart home devices. Let’s dive into the setup process, starting from unboxing to connecting to Wi-Fi.
Unboxing And Installation
When you first unbox your Nest Thermostat, you’ll find the device itself, a base plate, a screwdriver, screws, and a trim kit for covering any holes from your old thermostat. The packaging is sleek and well-organized, making it easy to locate all the components.
Begin by turning off the power to your HVAC system. This is important for your safety. Remove your old thermostat and label the wires as you disconnect them. The Nest Thermostat comes with labels to make this easier.
Next, install the base plate on the wall. Use the built-in level to ensure it’s straight. Attach the wires to the corresponding terminals on the base plate. Once the wires are connected, snap the Nest Thermostat onto the base plate.
Connecting To Wi-fi
Once installed, turn the power back on. Your Nest Thermostat should light up. The display will guide you through the initial setup process. You will select your language and connect to your home’s Wi-Fi network.
Use the thermostat’s rotating ring to navigate through the menu. Select your Wi-Fi network and enter the password. This step is crucial as it allows your thermostat to connect to the Nest app and other smart home devices.
If you encounter any issues, the display offers troubleshooting tips. You can also refer to the user manual or the Nest support website for additional help. Connecting to Wi-Fi ensures you get the most out of your Nest Thermostat, including remote control via the app and software updates.
Have you ever thought about how much easier life could be with a smart thermostat? By setting up your Nest Thermostat, you’re taking a big step towards a more convenient and efficient home. What part of the setup process are you most excited about?
Navigating The Interface
Reading a Nest Thermostat can be straightforward once you understand the interface. The device features a user-friendly design, making it easy to control your home’s temperature. Let’s explore how to navigate the Nest Thermostat interface effectively.
Home Screen Overview
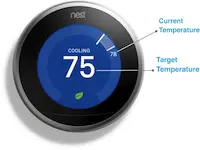
The home screen of the Nest Thermostat displays essential information. You’ll see the current temperature, the target temperature, and whether the heating or cooling system is active. The screen also shows the time and other icons that provide quick access to various functions.
The dial in the center is your main control. Turn it to adjust the temperature. Press it to select options. The home screen is designed for quick and easy adjustments.
Settings Menu
Access the settings menu by pressing the dial and selecting the gear icon. This menu allows you to customize your thermostat’s settings. You can adjust the display brightness, set up the Wi-Fi, and configure your preferred temperature ranges.
Within the settings, you can also enable energy-saving features. Explore the options to find what works best for your home. The menu is simple, ensuring you can make changes with ease.
Reading Temperature
Reading the temperature on your Nest Thermostat is simple. This smart device displays the current temperature and lets you adjust it easily. In this section, we will cover how to read the temperature on your Nest Thermostat. We will discuss how to view the current temperature and how to adjust it.
Viewing Current Temperature
To view the current temperature, look at the main screen. The large number in the center is the current temperature in your home. You can also see the target temperature, usually shown in a smaller font. The Nest Thermostat displays temperature in both Celsius and Fahrenheit. You can change this in the settings if needed.
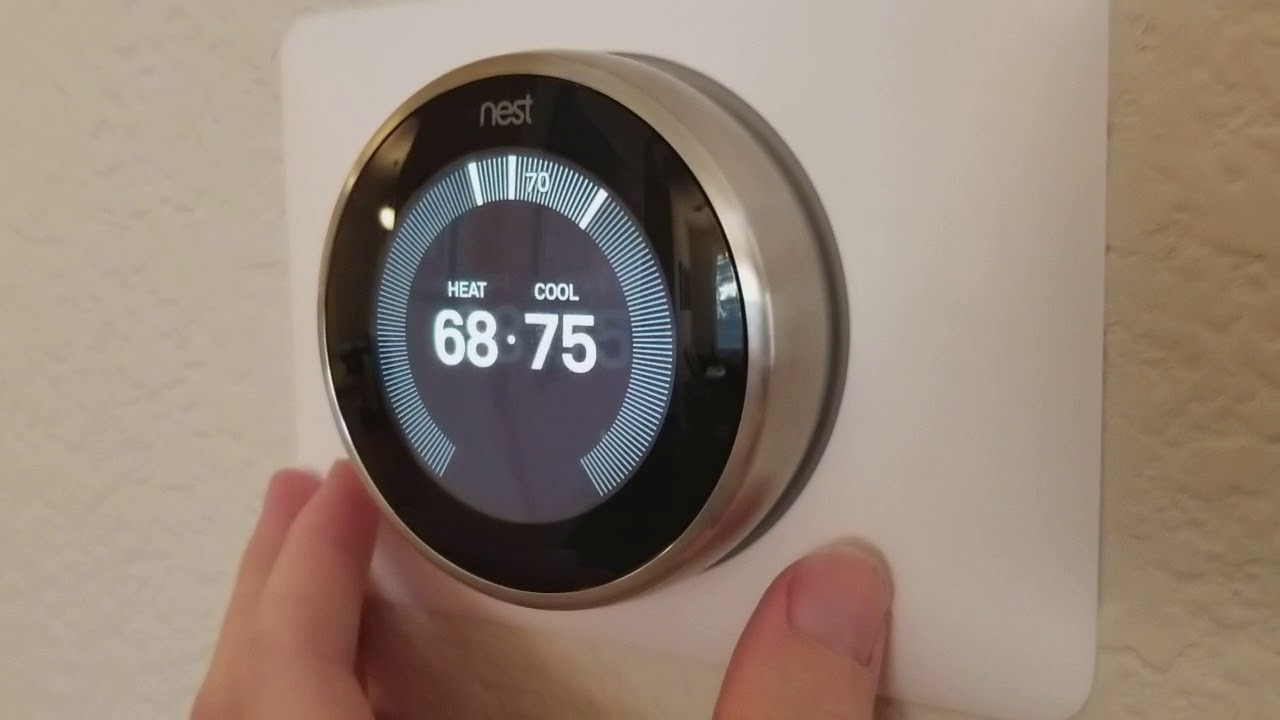
Adjusting Temperature
Adjusting the temperature on your Nest Thermostat is easy. Turn the outer ring to the left to lower the temperature. Turn it to the right to raise the temperature. The new target temperature will appear on the screen. You can also use the Nest app to adjust the temperature remotely. Open the app, select your thermostat, and use the slider to set your desired temperature.

Credit: www.reddit.com
Energy Saving Features
The Nest Thermostat is not just a device to control your home’s temperature; it’s a powerful tool for saving energy and reducing your utility bills. Understanding its energy-saving features can help you make the most out of this smart technology. Let’s dive into two key features: Eco Mode and Energy History.
Eco Mode
Eco Mode is a game-changer for anyone looking to cut down on energy consumption. When you’re away from home, the Nest Thermostat automatically switches to Eco Mode to save energy. This means your heating and cooling systems won’t run unnecessarily, which can lead to significant savings.
Imagine leaving for work and not having to worry about adjusting the thermostat. Eco Mode takes care of it for you. It’s smart enough to know when you’re away and adapts accordingly. Think about how much you could save just by letting your Nest Thermostat handle this task.
Energy History
Energy History is like having a personal energy consultant. This feature allows you to review your energy usage over time. You can see when your heating or cooling system was on, and how much energy was used during those periods.
By examining your Energy History, you can identify patterns and make informed decisions. For example, if you notice a spike in energy usage at certain times, you can adjust your schedule or settings to save more. It’s like having a detailed report card that helps you understand your habits and improve them.
Have you ever wondered how much energy you waste without realizing it? Energy History gives you the insights you need to take control. You can easily track your progress and see how small changes can lead to big savings.
Making the most of these features can lead to a more energy-efficient home and lower bills. Why not take a few minutes to explore them today? Your wallet will thank you!
Check Best Thermostat Pricing in Amazon
** As an Amazon Associate, I earn from qualifying purchases.
Using Nest App
The Nest Thermostat is not just a device; it’s an integral part of making your home smarter and more efficient. One of the best features is the ability to control it remotely using the Nest App. Whether you’re lounging in bed or halfway across the world, the Nest App brings convenience right to your fingertips. Let’s dive into how you can make the most of this app.
App Installation
First things first, you need to install the Nest App. Go to your smartphone’s app store and search for “Nest.” It’s available on both iOS and Android platforms. Download and install the app. Once installed, open the app and create a Nest account if you don’t have one already. If you already have a Google account, you can use that for easy sign-in.
Remote Control
One of the standout features of the Nest App is remote control. Imagine you’re coming home earlier than expected on a chilly day. Simply open the app and adjust the thermostat to your desired temperature. By the time you get home, it’s warm and cozy.
You can also use the app to monitor your energy usage. The app provides detailed reports on how much energy you are consuming. This can be really helpful in understanding your patterns and making adjustments to save on bills.
Another great feature is the ability to set schedules. You can create a daily or weekly schedule for your thermostat. This ensures that your home is always at the perfect temperature when you need it, without having to manually adjust it all the time.
Have you ever forgotten to turn off your heating or cooling when leaving for a vacation? With the Nest App, you can easily check and adjust your settings remotely. This not only gives you peace of mind but also saves energy.
The Nest App also works with other smart home devices. You can integrate it with Google Assistant or Amazon Alexa for voice control. Imagine telling Alexa to turn up the heat without even lifting a finger!
So, have you installed the Nest App yet? What features do you find most useful? Share your thoughts in the comments!

Credit: support.google.com
Troubleshooting Common Issues
Experiencing issues with your Nest Thermostat can be frustrating. But don’t worry. Many common problems have simple solutions. In this section, we will guide you through troubleshooting some of these common issues.
Connectivity Problems
One frequent issue is connectivity problems. First, check your Wi-Fi connection. Ensure your router is working and the Nest Thermostat is within range. Restarting your router can often fix connectivity issues. Sometimes, you might need to restart the thermostat too. To do this, press the thermostat ring and go to Settings. Select Restart and follow the instructions.
If the problem persists, check for any software updates. Go to Settings, then Software, and check for updates. Keeping your Nest Thermostat updated can resolve many connectivity issues. Still having trouble? Check if other devices are interfering with the Wi-Fi signal. Devices like microwaves or baby monitors can cause disruptions.
Temperature Reading Errors
Another common issue is temperature reading errors. Your Nest Thermostat might show incorrect temperatures. First, make sure it’s installed in the right place. Avoid placing it near windows, doors, or vents. These areas can affect its temperature readings.
If the thermostat is in a good spot, try recalibrating it. Go to Settings, then Technical Info, and select Power. Check the battery level. Low battery can cause incorrect readings. Replace the batteries if needed. Still not accurate? Reset the thermostat. Go to Settings, then Reset, and choose Schedule. This will reset the temperature schedule but keep your other settings.
Lastly, ensure there is no dust or debris on the thermostat. A dirty thermostat can cause reading errors. Clean it gently with a soft cloth.
Advanced Features
The Nest Thermostat offers advanced features that enhance your home’s comfort. These features make it more than just a thermostat. Let’s explore some of these advanced features.
Scheduling Temperature Changes
The Nest Thermostat allows you to schedule temperature changes. Set specific times for the thermostat to adjust. For example, you can set it to cool down at night. Or, you can warm up your home before you wake up. This helps save energy and keeps you comfortable.
Integration With Other Smart Devices
The Nest Thermostat integrates with other smart devices in your home. It can connect with Google Home or Amazon Alexa. This lets you control the thermostat with voice commands. You can also link it with smart lights or security systems. This creates a seamless smart home experience.
Credit: www.youtube.com
Frequently Asked Questions
How Do I Read My Nest Thermostat Screen?
To read your Nest thermostat screen, press the display. The main screen shows temperature, mode, and settings. Use the dial to navigate.
How Does A Nest Thermostat Read Temperature?
A Nest thermostat reads temperature using built-in sensors. These sensors detect ambient room temperature accurately.
What Temperature Should My Nest Thermostat Be Set At?
Set your Nest thermostat to 68°F (20°C) in winter and 78°F (26°C) in summer for optimal comfort and energy savings.
How To Read Nest Thermostat History?
To read Nest thermostat history, open the Nest app. Tap the thermostat icon, then select “History” to view data.
Conclusion
Mastering your Nest Thermostat is easier than it seems. Follow the steps. Start with understanding the screen and modes. Adjust the temperature to your liking. Use the app for remote control. Monitor energy usage for savings. Regular checks ensure efficiency.
Enjoy a comfortable home with minimal effort. Reading a Nest Thermostat can be simple and rewarding. Happy managing!
Check Best Thermostat Pricing in Amazon
** As an Amazon Associate, I earn from qualifying purchases.