
Check Best Thermostat Pricing in Amazon
** As an Amazon Associate, I earn from qualifying purchases.
Programming your Nest Thermostat is straightforward. You can easily set it up in minutes.
The Nest Thermostat is designed to make your home more energy-efficient. By learning how to program it, you can save money on your energy bills and keep your home comfortable. Whether you’re new to smart home technology or already have experience, this guide will walk you through the steps.
From setting your preferred temperature to creating a schedule that matches your daily routine, programming your Nest Thermostat is a simple process. Get ready to take control of your home’s heating and cooling needs effortlessly. Let’s dive into the details and ensure you get the most out of your smart thermostat.

Credit: support-assets.nest.com
Introduction To Nest Thermostat
Learn how to program the Nest Thermostat for better energy management. Discover easy steps to set schedules and control temperatures. Save on energy bills while maintaining home comfort.
The Nest Thermostat has changed the way we think about home temperature control. Designed by Google, this smart device offers convenience and energy efficiency. Many people are turning to smart thermostats for better home management. Let’s explore what makes the Nest Thermostat special.What Is Nest Thermostat?
The Nest Thermostat is a smart thermostat that learns your schedule. It adjusts the temperature based on your habits. This means you stay comfortable while saving energy. You can control it from your smartphone. This makes it easy to manage your home’s temperature even when you are away.Benefits Of Using Nest Thermostat
First, the Nest Thermostat helps save energy. It learns when you are home or away and adjusts the temperature. This reduces energy waste. Second, it provides convenience. You can control it from anywhere using your phone. Third, it offers insights into your energy usage. This helps you make informed decisions. Lastly, it integrates with other smart home devices. This creates a seamless smart home experience. “`
Credit: www.loft-o.com
Unboxing And Setup
Setting up your Nest Thermostat is an exciting step towards a smarter home. The process begins with unboxing and setup. This ensures you have everything you need and know how to get started. Follow these steps to make the process simple and stress-free.
What’s In The Box?
The Nest Thermostat package comes with several key items. First, you’ll find the thermostat itself. This is the main device that will control your home’s temperature. Next, there is a base plate. This helps to attach the thermostat to the wall.
The box also includes screws and a screwdriver. These are used for mounting the base plate. A trim plate is provided to cover any holes or marks from your previous thermostat. Lastly, there is a quick start guide. This guide gives an overview of the setup process.
Tools You’ll Need
For a smooth installation, gather a few basic tools. You’ll need a Phillips screwdriver. This tool is for mounting the base plate to the wall. A level can help ensure your thermostat is straight. This makes it look neat and professional.
Having a power drill can save time. It helps when creating pilot holes for the screws. A pencil is useful for marking the wall. Lastly, keep a smartphone or tablet handy. You’ll need this to connect your thermostat to your home Wi-Fi.
Installing The Nest Thermostat
Installing the Nest Thermostat is a straightforward process that can save you money and make your home more comfortable. It’s designed for the everyday homeowner, so you don’t need to be a tech expert to get it up and running. Let’s walk through the steps to get your new Nest Thermostat installed and ready to go.
Removing The Old Thermostat
First, make sure to turn off the power to your HVAC system at the breaker. This is crucial for your safety.
Next, remove the old thermostat cover. You might need a screwdriver to help with this. Once the cover is off, take a photo of the wiring. This photo will be your reference for connecting the wires to the new Nest Thermostat.
Label each wire using the provided labels in the Nest Thermostat package. This will make it easier to connect them to the correct terminals later. Carefully disconnect the wires and remove the base plate of the old thermostat from the wall.
Mounting The Nest Thermostat
Start by attaching the Nest base plate to the wall. If the holes from your old thermostat don’t line up, you may need to drill new ones. Use the built-in level to make sure the base plate is straight.
Once the base plate is secure, connect the labeled wires to the matching terminals on the Nest base. This is where your photo and labels come in handy. Ensure each wire is firmly connected and there are no loose ends.
Snap the Nest display onto the base plate. It should click into place easily. Turn the power back on at the breaker and watch the Nest Thermostat light up.
The Nest will guide you through the initial setup. Follow the on-screen instructions to configure your settings. You’ll be asked to connect to your Wi-Fi network and set your temperature preferences.
Isn’t it amazing how technology can make our lives easier? Have you installed a smart device before? Share your experiences and tips in the comments below!

Credit: www.youtube.com
Connecting To Wi-fi
Easily connect your Nest Thermostat to Wi-Fi for remote control via the app. Access settings and schedule changes effortlessly.
Connecting your Nest Thermostat to Wi-Fi is a crucial step to unlocking its full potential. It allows you to control the temperature from your smartphone, receive notifications, and even integrate with other smart devices. Let’s walk through how to set up Wi-Fi on your Nest Thermostat, troubleshoot common issues, and ensure you have a seamless connection.Setting Up Wi-fi
First, ensure your Wi-Fi router is working correctly. Position your router centrally and avoid physical obstructions. Go to your Nest Thermostat. Press the display to bring up the menu. Navigate to ‘Settings’ and select ‘Network’. Your thermostat will scan for available Wi-Fi networks. Choose your home network from the list. Enter the Wi-Fi password. Wait for the connection to establish. Your Nest will notify you once it’s connected. If the password is correct and the signal is strong, you should be good to go!Troubleshooting Wi-fi Issues
Sometimes, things don’t go as planned. If your Nest Thermostat isn’t connecting to Wi-Fi, start by checking the Wi-Fi signal strength. You can do this by placing your phone near the thermostat and testing the connection. Restart your Wi-Fi router. A simple reboot can solve many connectivity issues. Ensure your Wi-Fi network is using the 2.4GHz band. Nest Thermostats are often more compatible with this band than the 5GHz band. Lastly, check if there are any firmware updates for your Nest Thermostat. Updates can resolve connectivity bugs and improve performance. Do you have any tips or personal experiences with setting up Wi-Fi on your Nest Thermostat? Sharing your insights can help others troubleshoot their issues more effectively.Creating A Nest Account
Creating a Nest account is the first step to getting the most from your Nest Thermostat. This account allows you to control your thermostat from your smartphone. It also lets you access advanced features and settings. Follow these steps to get started.
Check Best Thermostat Pricing in Amazon
** As an Amazon Associate, I earn from qualifying purchases.
Downloading The Nest App
First, download the Nest app from your app store. It is available on both iOS and Android. Open the app store on your phone. Type “Nest” in the search bar. Look for the app with the blue house icon. Tap the “Install” or “Get” button. Wait for the app to download and install.
Registering Your Device
Next, open the Nest app. Tap “Sign up” to create a new account. Enter your email address and choose a password. Follow the prompts to complete the registration. You will then be asked to add your Nest Thermostat. Tap “Add product” and select “Nest Thermostat” from the list. Follow the on-screen instructions to complete the setup. Your thermostat will now be linked to your Nest account.
Programming The Thermostat
Programming the Nest Thermostat can help you save energy and stay comfortable. It’s a smart way to manage your home’s temperature. Here’s how to set it up for efficient use.
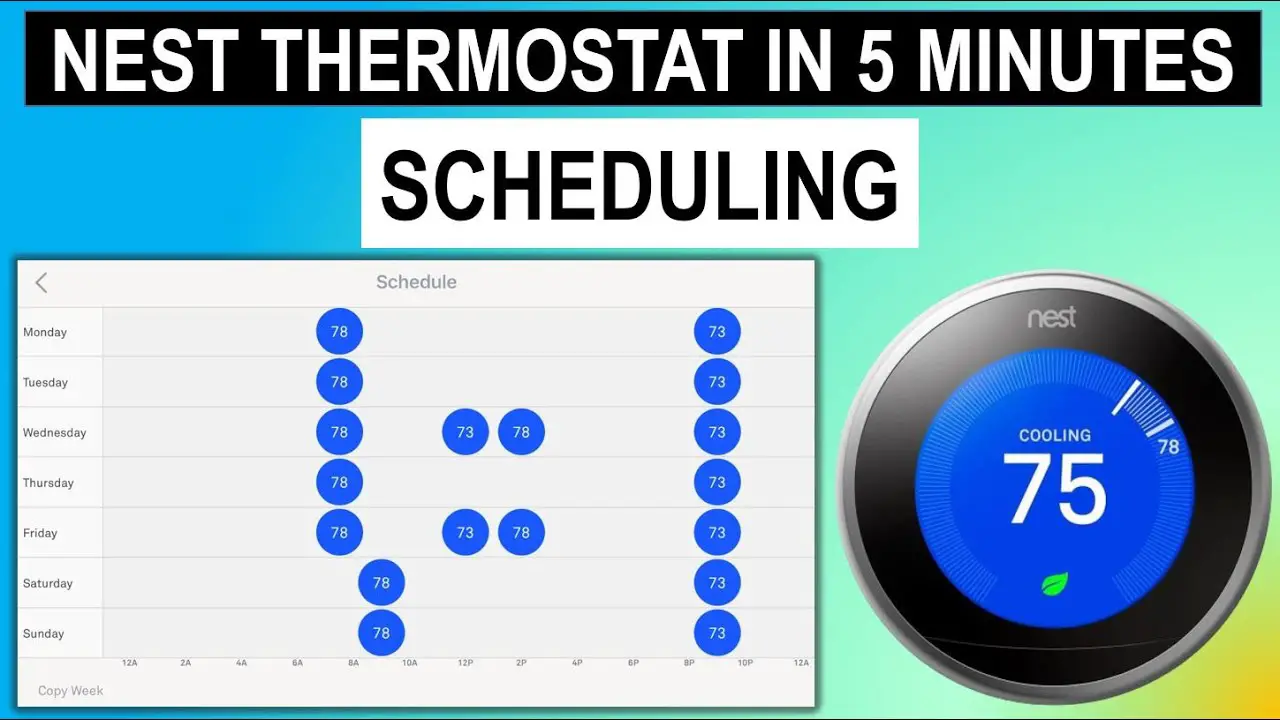
Setting Up Temperature Schedule
The first step is to set up a temperature schedule. Open the Nest app on your phone. Select your thermostat. Tap on the “Schedule” option. Here, you can set different temperatures for different times of the day. For example, set a lower temperature while you’re at work. Increase it before you get home. This way, you save energy and stay comfortable.
Use the “+” button to add a new time and temperature. You can create as many settings as needed. Make sure to cover all parts of your day. Don’t forget to set different schedules for weekends if your routine changes.
Using Learning Mode
Learning mode is a unique feature of Nest Thermostat. It learns your habits and adjusts the temperature automatically. To enable learning mode, go to “Settings” in the Nest app. Select “Nest Sense” and turn on “Auto-Schedule”.
For the first few days, adjust the temperature manually. The thermostat will learn your preferences. After a week, it will start making adjustments on its own. This way, you don’t need to worry about changing the settings constantly.
Using learning mode can make your home more energy-efficient. It also keeps you comfortable without much effort. Let the thermostat do the work for you.
Integrating With Smart Home
Integrating your Nest Thermostat with your smart home system offers convenience and efficiency. This guide will show how to connect your Nest Thermostat to Google Home and use voice commands to control it. Enjoy a seamless smart home experience with these simple steps.
Connecting To Google Home
To start, ensure your Nest Thermostat and Google Home are set up and connected to Wi-Fi. Open the Google Home app on your smartphone or tablet. Tap the “+” button in the top left corner. Select “Set up device” and then choose “Works with Google”.
Search for “Nest” and select it. Sign in to your Nest account and follow the on-screen instructions. Once connected, you can control your thermostat using the Google Home app. Adjust settings, change temperatures, and monitor energy usage all in one place.
Using Voice Commands
After connecting your Nest Thermostat to Google Home, you can use voice commands. Say “Hey Google, set the thermostat to 72 degrees” to adjust the temperature. You can also ask about current settings by saying “Hey Google, what’s the thermostat set to?”
Voice commands offer hands-free control and make managing your home’s temperature easier. You can even create routines to automate settings based on your daily schedule. For example, say “Hey Google, good morning” to set your preferred morning temperature.
Integrating your Nest Thermostat with your smart home system enhances comfort and efficiency. Enjoy the convenience of voice control and seamless integration with Google Home.
Maintenance And Troubleshooting
Learn how to program a Nest Thermostat for efficient home temperature control. Follow simple steps for easy maintenance and troubleshooting. Enjoy a comfortable home environment with minimal effort.
Programming your Nest Thermostat can be a breeze, but like any tech gadget, it requires regular maintenance and occasional troubleshooting. Keeping your device in top shape ensures that it operates efficiently and prolongs its lifespan. Let’s dive into some practical tips for maintaining your Nest Thermostat and addressing common issues.Regular Maintenance Tips
Regular maintenance is crucial to keep your Nest Thermostat functioning smoothly. Dust can accumulate over time and affect its sensors. Use a soft, dry cloth to gently clean the thermostat’s display and external sensors. Ensure that the thermostat is firmly attached to the wall and that there are no loose wires. This helps in preventing connectivity issues.Common Issues And Fixes
Even the best devices can encounter problems. Here are some common issues you might face with your Nest Thermostat and how to fix them: Issue: Thermostat Not Turning On Check if the thermostat is properly connected to the power source. Sometimes, a simple reset can solve the problem. Hold down the thermostat’s ring until it restarts. Issue: Inaccurate Temperature Readings Calibrate the thermostat to ensure it reads the temperature correctly. Look for drafts or heat sources nearby that might be affecting the readings. Issue: Wi-Fi Connectivity Problems Restart your router and ensure your Wi-Fi network is working. Reconnect the thermostat to the network through the settings menu. Addressing these issues promptly can save you from bigger headaches down the road. Have you ever had to troubleshoot your Nest Thermostat? What was the most surprising fix you discovered?Energy-saving Tips
Program your Nest Thermostat to save energy with ease. Set schedules to match your daily routine and adjust the temperature remotely. Simple adjustments can lead to significant savings.
Energy-Saving Tips Programming your Nest Thermostat can save you money and energy. With a few adjustments, you can make your home more efficient. Let’s dive into some practical tips.Optimizing Thermostat Settings
Setting your thermostat correctly can significantly reduce energy consumption. Start by setting the temperature lower when you are asleep or away from home. A difference of just a few degrees can lead to substantial savings. Consider using the Nest Thermostat’s auto-schedule feature. This learns your routine over time and adjusts the temperature automatically. It’s like having a personal assistant for your home’s climate control. Another great feature is the Eco mode. This sets the temperature to a range that saves energy. It’s perfect for those times when you’re not home but don’t want to turn off the heating or cooling completely.Monitoring Energy Usage
Keeping an eye on your energy usage can help you spot ways to save even more. The Nest app provides detailed energy reports. These show how much energy you’ve used and when. Look for patterns in your energy usage. Are there times when your usage spikes? This can help you identify habits to change. The app also sends you energy-saving tips based on your usage. Implementing these tips can lead to noticeable savings. — Have you tried any of these tips with your Nest Thermostat? What changes have you noticed in your energy bills? Share your experiences in the comments!Frequently Asked Questions
How Do I Manually Program My Nest Thermostat?
To manually program your Nest thermostat, press the thermostat ring to access the menu. Select “Schedule,” then create or adjust temperature settings.
How Do I Keep My Nest Thermostat From Changing Temperature?
To stop your Nest thermostat from changing temperature, disable the “Auto-Schedule” feature in the settings. Set a fixed temperature manually.
How Do I Set My Nest Thermostat To Settings?
To set your Nest thermostat, press the thermostat ring to open the menu. Select “Settings” and adjust preferences as needed.
How To Make Nest Thermostat Stay At One Temperature?
Set the Nest thermostat to “Hold” mode to maintain a constant temperature. Adjust settings via the Nest app or thermostat.
Conclusion
Programming your Nest Thermostat is simple and efficient. Follow the steps provided to set up temperature schedules. Enjoy a comfortable home environment. Remember to adjust settings for different seasons. Save energy and reduce your bills. Keep your home cozy with minimal effort.
Happy programming!
Check Best Thermostat Pricing in Amazon
** As an Amazon Associate, I earn from qualifying purchases.