
Check Best Thermostat Pricing in Amazon
** As an Amazon Associate, I earn from qualifying purchases.
Are you tired of inconsistent hot water or your water heater not working properly? The thermostat plays a key role in controlling the water temperature, and knowing how to install a water heater thermostat can save you time and money.
In this guide, you’ll discover simple steps that anyone can follow, even if you’re not a DIY expert. By the end, you’ll have the confidence to fix your water heater thermostat yourself and enjoy reliable hot water whenever you need it.
Keep reading to unlock easy solutions that make a big difference in your daily comfort.

Credit: www.youtube.com
Tools And Materials Needed
Preparing the right tools and materials makes installing a water heater thermostat easier. Having everything ready saves time and avoids frustration. It also helps keep the work safe and neat.
Below is a list of essential tools and materials for this job. Each item plays a specific role during installation.
Basic Hand Tools
You will need a screwdriver set, including flathead and Phillips types. A wrench or adjustable pliers help loosen and tighten bolts. Wire strippers make it easy to handle electrical wires safely.
Replacement Thermostat
Choose the correct thermostat model for your water heater brand and size. Check the temperature rating to match your hot water needs.
Electrical Supplies
Use electrical tape to secure wire connections. Wire nuts help join wires without loose ends. A voltage tester ensures no power runs through the wires before you start.
Safety Gear
Wear insulated gloves to protect your hands from shocks. Safety goggles shield your eyes from debris. Use a mask if dust or particles are present.
Safety Precautions
Safety is the top priority when installing a water heater thermostat. Careless actions can lead to electric shock or damage. Following proper safety steps protects you and your home.
Before starting, make sure you understand the risks. Take time to prepare your workspace and tools. Work slowly and carefully to avoid mistakes.
Switch off the main power to the water heater at the breaker box. Double-check with a tester to confirm no electricity flows. This step prevents electric shock during installation.
Wear Protective Gear
Use insulated gloves to protect your hands from electric currents. Safety glasses shield your eyes from sparks or debris. Dress in non-conductive clothing to reduce risks.
Use Proper Tools
Choose tools with insulated handles made for electrical work. Avoid using damaged or worn-out equipment. Correct tools reduce the chance of slipping or accidents.
Work In A Dry Area
Keep the installation site dry and free from water. Moisture increases the risk of electric shock. Use a dry cloth to wipe surfaces if needed.
Follow Manufacturer Instructions
Read the thermostat manual carefully before starting. Follow all steps exactly as described. Improper installation can cause malfunction or hazards.
Turn Off Power Supply
Turning off the power supply is the first and most important step before installing a water heater thermostat. It keeps you safe from electric shocks. Water heaters use high voltage electricity, which can be very dangerous.
Always make sure the power is completely off. This prevents accidents and damage to the thermostat or water heater. Never skip this step.
Locate The Circuit Breaker
Find the main circuit breaker panel in your home. This panel controls all electrical power in your house. Look for the breaker labeled for the water heater.
Switch Off The Correct Breaker
Flip the breaker switch to the OFF position. This stops electricity from reaching the water heater. Double-check that the breaker stays off during your work.
Confirm Power Is Off
Use a voltage tester or a multimeter to check the wires. Make sure no electricity flows to the thermostat wires. This step ensures your safety before starting installation.
Access The Water Heater Thermostat
Accessing the water heater thermostat is the first step in adjusting or replacing it. It involves safely opening the heater’s outer casing. This section guides you through this process clearly and simply.
Before starting, always turn off the power supply to the water heater. This prevents any risk of electric shock. Safety first.
Remove Access Panels
Most water heaters have metal access panels on their side. These panels cover the thermostat and heating elements. Use a screwdriver to remove the screws holding the panels. Keep the screws safe for reassembly.
Carefully lift off the panels and set them aside. Some heaters may have insulation behind these panels. Gently move it to see the thermostat clearly. Avoid damaging the insulation.
Locate The Thermostat
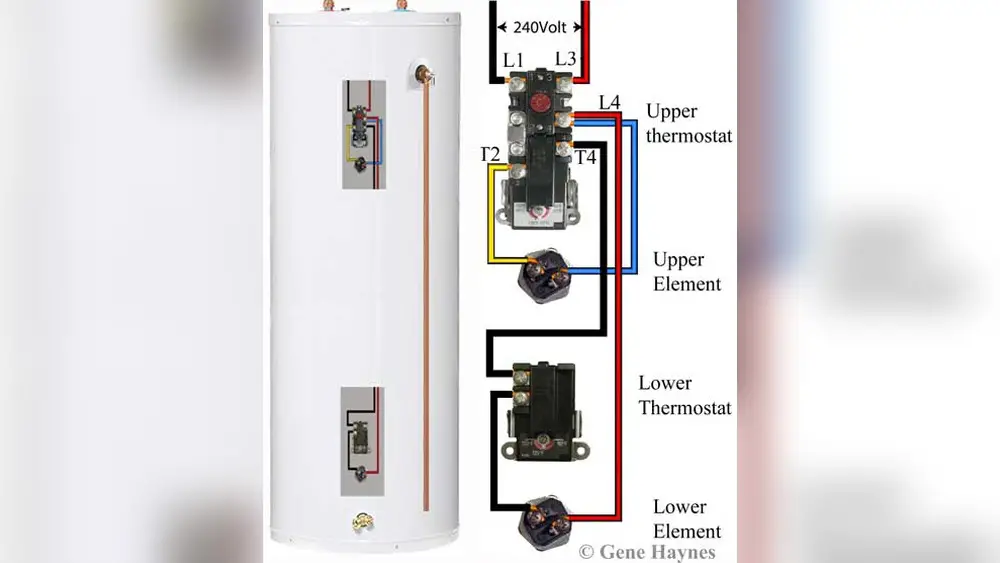
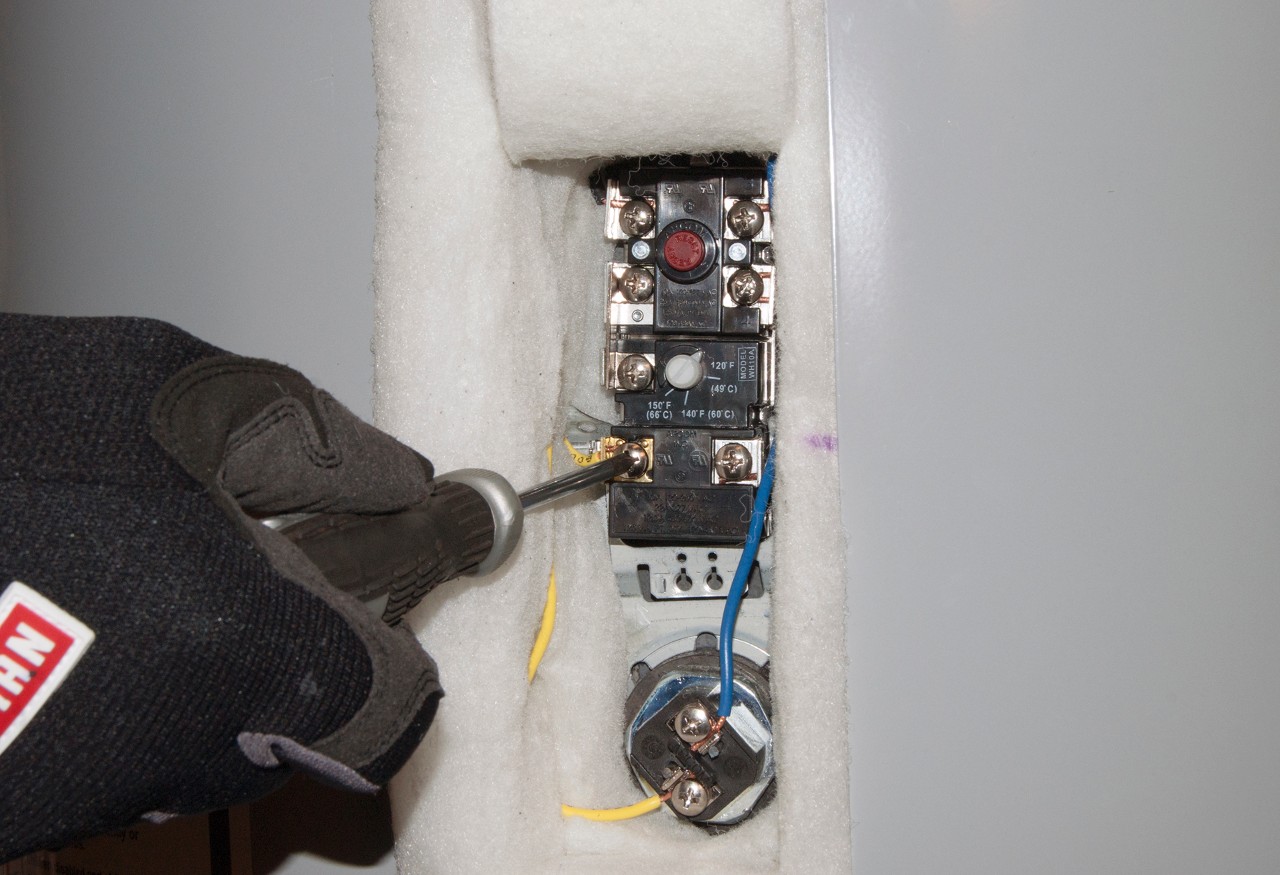
The thermostat usually sits near the heating elements inside the heater. It looks like a small rectangular box with wires attached. You may find one or two thermostats depending on the heater model.
Check for a dial or adjustment knob on the thermostat. This controls the water temperature. Identifying the thermostat correctly helps in the next steps of installation or repair.
Disconnect Old Thermostat
Disconnecting the old thermostat is an important step before installing a new one. It makes sure the wiring is safe and ready for the new device. Taking time to carefully remove the old thermostat helps avoid mistakes and keeps the process smooth.
Follow these steps to safely disconnect the old thermostat from your water heater.
Label Wires
Start by turning off the power to the water heater. Use a marker or tape to label each wire. This keeps track of where each wire connects. Labeling wires prevents confusion when connecting the new thermostat.
Remove Wiring
After labeling, gently pull the wires out from the old thermostat. Hold the wire near the connection point to avoid damage. Make sure no wires touch each other to prevent short circuits.
Check Best Thermostat Pricing in Amazon
** As an Amazon Associate, I earn from qualifying purchases.
Unscrew Thermostat
Use a screwdriver to remove the screws holding the thermostat. Keep the screws safe for later use. Carefully take the thermostat off the wall or water heater surface.
Install New Thermostat
Installing a new thermostat on your water heater is a key step. It controls the water temperature and keeps it consistent. A properly installed thermostat improves safety and energy efficiency. Follow these simple steps to place, wire, and secure the new thermostat correctly.
Position Thermostat
Place the new thermostat in the original location. Align it with the mounting holes on the heater. Make sure the sensor touches the tank’s surface for accurate readings. Avoid bending or damaging the sensor during positioning.
Reconnect Wiring
Match each wire to the correct terminal on the thermostat. Use the wiring diagram or label the wires before removal. Tighten the screws firmly to hold wires in place. Check for loose connections to prevent faults or shorts.
Secure Thermostat
Fasten the thermostat with screws or clips supplied. Ensure it sits flat and stable against the heater. Double-check all connections and mounting for safety. Close the access panel and restore power to test the new thermostat.
Adjust Thermostat Settings
Adjusting the thermostat settings on your water heater is key to getting the right water temperature. Set it too low, and the water might not be warm enough. Set it too high, and it could waste energy or cause burns. Proper adjustment helps save money and keeps your water safe.
Follow these steps to adjust the thermostat correctly. Small changes can make a big difference in comfort and efficiency.
Locate The Thermostat Dial
Turn off the power to the water heater first. Find the thermostat dial, usually behind a small panel. Remove the cover carefully with a screwdriver. You will see a dial marked with temperature levels.
Set The Temperature
Use a flat-head screwdriver to turn the dial. Adjust it to the recommended setting, usually 120 degrees Fahrenheit. This temperature is safe and energy-efficient. Avoid setting it higher to prevent scalding.
Check The Water Temperature
Wait about 30 minutes for the water to heat up. Open a hot water tap and test the water temperature. Use a thermometer for accuracy. Adjust the dial again if the water is too hot or too cold.

Credit: www.whirlpoolwaterheaters.com
Reassemble Water Heater
After replacing the thermostat, the next step is to reassemble the water heater. This step is important to ensure everything works safely and correctly. Take your time to put all parts back in place carefully. Missing or loose components can cause problems later.
Check that all wires are connected properly before closing the heater. Double-check the thermostat and heating element connections. Safety first. Make sure the power is still off while you work.
Replace Access Panels
Start by putting the access panels back on the water heater. These panels protect the internal parts from dust and damage. Align the panel with its original position. Use screws to secure it tightly. Loose panels can cause heat loss or allow debris inside.
Do not force the panel if it does not fit easily. Check for any wiring or parts blocking it. Fix any issues before tightening the screws. Proper panel replacement helps the water heater run efficiently and safely.
Restore Power And Test
After installing the water heater thermostat, restoring power and testing the system is crucial. This step ensures the thermostat works correctly and heats water safely. Careful testing helps avoid future problems and keeps the water heater running smoothly.
Turn On Power
Locate the circuit breaker that controls the water heater. Switch the breaker back to the ON position. Listen for any unusual sounds from the heater. If the heater does not start, turn off the power immediately. Check all connections and the thermostat installation again.
Check Water Temperature
Wait about 30 minutes for the water to heat up. Use a thermometer to check the water temperature at a faucet. The ideal temperature is between 120°F and 140°F (49°C and 60°C). If the water is too hot or too cold, adjust the thermostat. Repeat the test after each adjustment until the temperature is right.
Troubleshooting Tips
Troubleshooting a water heater thermostat can save time and money. Problems with the thermostat often cause water to be too hot or cold. Understanding common issues helps fix the thermostat quickly. Here are simple tips to solve common thermostat problems.
Check The Power Supply
First, ensure the water heater is getting power. A tripped circuit breaker or blown fuse may stop the thermostat from working. Reset the breaker or replace the fuse if needed. Use a voltage tester to confirm power reaches the thermostat.
Inspect The Thermostat Wiring
Loose or damaged wires can cause thermostat failure. Turn off power before checking wires. Tighten any loose connections. Replace frayed or broken wires to restore proper function. Proper wiring ensures the thermostat reads temperature correctly.
Test The Thermostat Settings
Set the thermostat to the correct temperature, usually between 120 and 140 degrees Fahrenheit. If water is still too hot or cold, adjust the setting slightly. Some thermostats may need calibration or replacement if adjustments don’t work.
Examine The Heating Elements
Faulty heating elements can make the thermostat seem broken. Use a multimeter to test element resistance. Replace any damaged heating elements. A working heating element helps the thermostat maintain the right temperature.
Reset The Thermostat
Many thermostats have a reset button. Press it to clear errors or faults. If the reset does not fix the problem, consider replacing the thermostat. Resetting can restore normal function without full replacement.
Credit: lamarpro.com.tr
Frequently Asked Questions
How Do I Install A Water Heater Thermostat Safely?
Turn off the power supply before starting. Remove the access panel and insulation. Disconnect the old thermostat wires carefully. Attach the new thermostat wires, match the terminals. Replace insulation and panel. Restore power and test the thermostat for proper heating.
What Tools Are Needed To Install A Water Heater Thermostat?
You’ll need a screwdriver, multimeter, wire stripper, and voltage tester. These tools help safely remove and attach thermostat wires. A voltage tester ensures the power is off before installation. A multimeter checks thermostat functionality after installation.
How To Set The Right Temperature On A Water Heater Thermostat?
Set the thermostat to 120°F (49°C) for energy efficiency and safety. This temperature prevents scalding and reduces energy use. Adjust the dial gently and test water temperature after a few hours. Fine-tune if necessary for comfort.
Can I Replace A Water Heater Thermostat Myself?
Yes, if you follow safety guidelines and have basic electrical knowledge. Always turn off power before working. Use proper tools and carefully follow installation steps. If unsure, consult a professional to avoid risks.
Conclusion
Installing a water heater thermostat can save energy and money. Follow each step carefully to ensure safety. Double-check all connections before turning the power back on. Adjust the temperature to a comfortable level for your home. Regularly test the thermostat to keep your water heater working well.
Taking time to do it right avoids problems later. Now, you can enjoy warm water with better control and efficiency. Simple changes make a big difference in your daily comfort.
Check Best Thermostat Pricing in Amazon
** As an Amazon Associate, I earn from qualifying purchases.